Why Clearing History is Important
Modern tablets, like the Samsung models, have become an integral part of our lives, connecting us to the digital world and storing a wealth of personal information. As we browse the internet, use various apps, and communicate with others, our tablets accumulate a history of our activities.
While this history can be convenient for quick access to previous searches or visited websites, it can also pose potential risks and privacy concerns. Here are several reasons why clearing your history on a tablet, such as a Samsung, is important:
- Privacy: Clearing your history helps safeguard your privacy by preventing others from accessing your browsing, search, and communication history. This is especially crucial if you share your tablet with others or when selling or disposing of your device.
- Security: Deleting your history can help protect sensitive information, such as usernames, passwords, and banking details, from falling into the wrong hands. This is particularly relevant if your tablet gets lost, stolen, or hacked.
- Optimizing Performance: Over time, the accumulation of browsing history, temporary files, and cached data can slow down your tablet. Clearing your history regularly can help optimize your tablet’s performance and ensure it runs smoothly.
- Removing Clutter: Clearing your history eliminates unnecessary clutter and frees up storage space on your tablet. This can be especially beneficial if you have limited internal storage or if your tablet starts to run out of space.
- Personalizing Recommendations: Deleting your browsing and search history can help prevent targeted ads and personalized recommendations from being based on your past activities. This provides a chance for a fresh start and a more unbiased browsing experience.
By understanding the importance of clearing history on your tablet, you can take proactive measures to protect your privacy, enhance security, optimize performance, and declutter your device. Now let’s explore how you can clear different types of history on your Tablet Samsung.
Step-by-Step Guide to Clear History on Tablet Samsung
Clearing your history on a Samsung tablet is a straightforward process that involves accessing various settings and apps. Follow this step-by-step guide to easily clear different types of history on your Tablet Samsung:
- Clearing Browsing History in Samsung Internet: Open the Samsung Internet app, tap on the three-dot menu at the bottom right corner, go to “Settings,” select “Privacy,” and then tap on “Delete browsing data.” Choose the desired time range and the types of data you want to clear, and then tap on “Delete.”
- Deleting Search History in Google App: Open the Google app, tap on the “More” menu at the bottom right corner, go to “Settings,” select “Privacy,” and then tap on “Clear browsing data.” Choose the desired time range and the types of data you want to clear, and then tap on “Clear.”
- Removing Call History from Phone App: Open the Phone app, tap on the “Recents” tab, and then tap on the “History” button. This will display the call history. Tap on the three-dot menu at the top right corner, and select “Delete.” Choose the specific calls or select “Select all” to delete the entire call history.
- Clearing Maps History in Google Maps: Open the Google Maps app, tap on your profile picture at the top right corner, go to “Settings,” select “Maps history,” and then tap on “Manage Map History.” Choose the specific locations or tap on “Select all” to delete the entire map history. Finally, tap on “Delete” to remove the selected locations.
- Erasing App Usage History: Open the Settings app, go to “Apps,” select the desired app, and then tap on “Storage.” Tap on “Clear data” or “Clear cache” to erase the respective app’s usage history and temporary files.
- Deleting Message History in Messaging App: Open the Messaging app, tap on the conversation you want to delete, and then tap on the three-dot menu at the top right corner. Select “Delete” and confirm your decision to remove the messages and clear the message history.
- Clearing Download History: Open the Downloads app, tap on the three-dot menu at the top right corner, and select “Clear download history.” Confirm your decision by tapping on “Clear” to delete the entire download history.
- Removing Autofill Data in Samsung Internet: Open the Samsung Internet app, tap on the three-dot menu at the bottom right corner, go to “Settings,” select “Privacy,” and then tap on “Autofill forms and passwords.” Tap on “Manage autofill data” and then tap on “Delete” next to the respective form or password entry you want to remove.
- Clearing Clipboard Data on Samsung Tablet: Unfortunately, there is no built-in feature to clear the clipboard history on a Samsung tablet. However, restarting your tablet will automatically clear the clipboard contents.
- Deleting Location History in Google Maps: Open the Google Maps app, tap on your profile picture at the top right corner, go to “Settings,” select “Maps history,” and then tap on “Manage Map History.” Tap on “Delete all” to remove the entire location history from Google Maps.
By following these step-by-step instructions, you can easily clear a variety of history types on your Tablet Samsung, enhancing your privacy, security, and device performance.
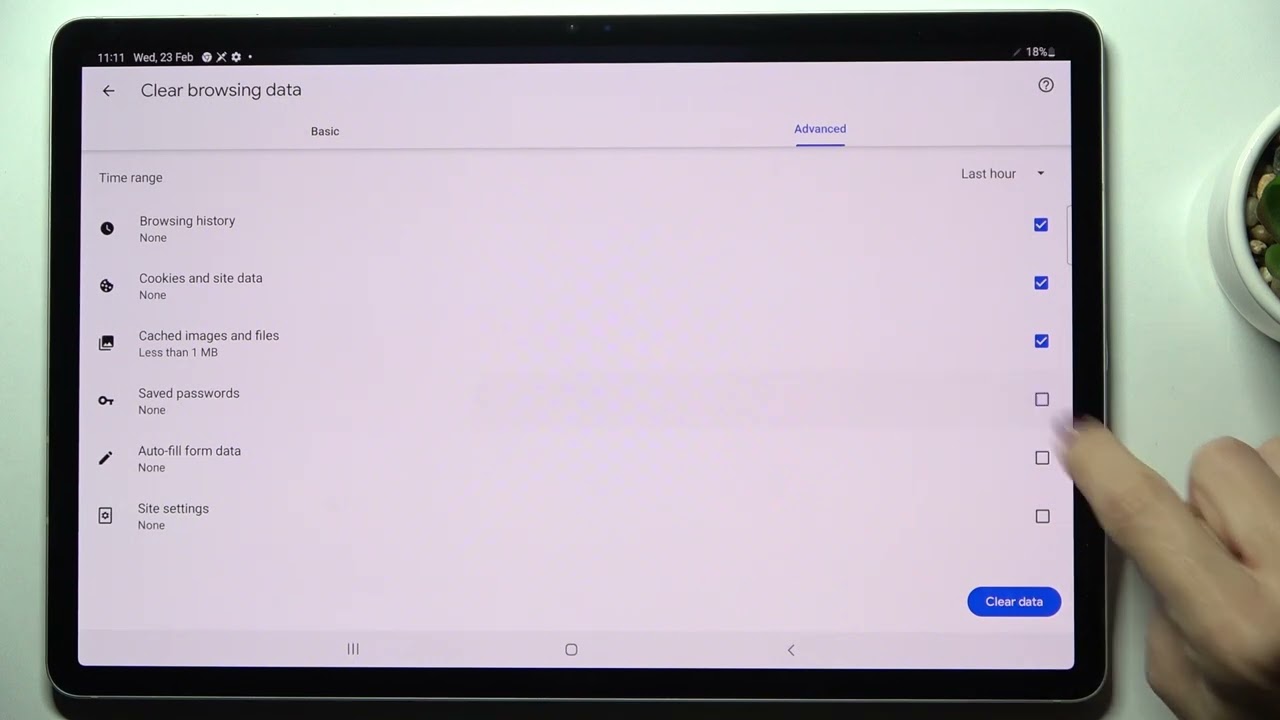
Clearing Browsing History in Samsung Internet
Clearing your browsing history is essential for maintaining privacy and optimizing the performance of your Tablet Samsung. Here is a step-by-step guide on how to clear your browsing history in the Samsung Internet app:
- Open the Samsung Internet app on your tablet. You can usually find it on your home screen or in the app drawer.
- Tap on the three-dot menu located at the bottom right corner of the screen. This will open a menu with various options.
- Select “Settings” from the menu. It is represented by a gear icon.
- In the Settings menu, scroll down and tap on “Privacy.”
- Within the Privacy settings, you will find the option to “Delete browsing data.” Tap on it.
- A new window will appear, allowing you to customize the deletion process. Choose the desired time range of the data you want to clear. You can select options like “Last hour,” “Last 24 hours,” “Last 7 days,” or “All time.”
- Tick the checkboxes next to the types of data you want to clear. These may include “Browsing history,” “Cache,” “Cookies and site data,” and “Saved passwords.”
- Once you have selected the desired time range and data types, tap on the “Delete” button. This will initiate the clearing process.
- The Samsung Internet app will now proceed to clear your browsing history and selected data. The time required for the process may vary depending on the amount of data to be deleted.
- Once the clearing process is complete, your browsing history and selected data will be removed from the Samsung Internet app.
By regularly clearing your browsing history in the Samsung Internet app, you can protect your privacy, improve device performance, and ensure a clutter-free browsing experience. Remember to customize your deletion preferences and select the appropriate time range and data types to meet your specific needs. Following these steps will help you maintain control over your browsing data on your Tablet Samsung.
Deleting Search History in Google App
When you use the Google app on your Tablet Samsung to perform searches, your search history is stored to provide faster and more personalized search results. However, if you value your privacy or simply want to clear out your search history, follow these steps to delete your search history in the Google app:
- Open the Google app on your Tablet Samsung. You can typically find it on your home screen or in the app drawer.
- Tap on the “More” menu icon located at the bottom right corner of the screen. It is represented by three horizontal lines.
- In the menu that appears, scroll down and select “Settings.”
- Within the Settings menu, tap on “Privacy.”
- Look for the option called “Clear browsing data” and tap on it.
- You will now see various options for clearing your search history. Select the time range for which you want to delete your search history. You can choose from options like “Last hour,” “Last 24 hours,” “Last 7 days,” or “All time.”
- Beneath the time range, you will find a list of data types related to your search history. Make sure the checkbox next to “Browsing history” is selected to delete your search history.
- You can also choose to clear other types of data such as “Cookies and site data” and “Cached images and files” if desired, by ticking the respective checkboxes.
- Once you have selected the desired time range and data types, tap on the “Clear” button to initiate the deletion process.
- The Google app will now proceed to delete your search history and other selected data types. The time required for this process may vary depending on the amount of data to be cleared.
- After the deletion process is complete, your search history within the Google app will be successfully cleared.
Regularly clearing your search history in the Google app on your Tablet Samsung can safeguard your privacy, prevent targeted advertising, and create a more personalized and unbiased search experience. By following these simple steps, you can easily delete your search history and take control over your browsing data within the Google app.
Removing Call History from Phone App
Your Tablet Samsung keeps a record of your call history, including incoming, outgoing, and missed calls. If you want to remove this call history for privacy reasons or simply to declutter your device, follow these steps to delete your call history from the Phone app:
- Open the Phone app on your Tablet Samsung. You can typically find it on your home screen or in the app drawer.
- Tap on the “Recents” tab at the bottom of the screen. This will display a list of your recent calls.
- Within the “Recents” tab, you will see a “History” button. Tap on it to access your call history.
- The call history will now be visible, sorted by date and time of the calls.
- To delete a specific call entry, tap and hold on it until a menu pops up.
- From the menu, select “Delete” to remove the selected entry from your call history.
- If you want to delete multiple entries, tap on the checkbox next to each call you wish to remove. Once you have chosen all the entries, tap on the trash bin icon or the “Delete” button at the top or bottom of the screen.
- If you want to delete your entire call history, tap on the three-dot menu icon at the top right corner of the screen, then select “Delete” or “Clear call history.”
- Confirm your decision to delete the call history by tapping on “OK” or a similar confirmation button.
- The Phone app will now proceed to delete the selected call entries or the entire call history, depending on your choice. The process may take a few moments depending on the number of entries.
- Once the deletion process is complete, your call history in the Phone app on your Tablet Samsung will be cleared.
Regularly removing your call history from the Phone app can help protect your privacy and maintain a clean and organized device. By following these steps, you can easily delete specific call entries or clear your entire call history on your Tablet Samsung.
Clearing Maps History in Google Maps
Google Maps on your Tablet Samsung keeps track of your location history to provide personalized recommendations and improve your navigation experience. However, if you value your privacy or want to remove your location history from Google Maps, follow these steps to clear your maps history:
- Open the Google Maps app on your Tablet Samsung. You can usually find it on your home screen or in the app drawer.
- Tap on your profile picture or initial located at the top right corner of the screen. This will open a menu with various options.
- In the menu, scroll down and select “Settings.” You may need to scroll further to find it.
- Within the Settings menu, look for the option called “Maps history” or “Your timeline.” Tap on it to access your location history.
- Here, you will see a timeline of your recent locations and activities. Tap on the three-dot menu icon or the “More” button usually located at the top right corner of the screen.
- From the options that appear, select “Manage Map History” or “Manage location history.”
- A list of your recent locations will now be displayed. To delete a specific location entry, tap and hold on it until a menu pops up.
- From the menu, select “Delete” to remove the selected location entry from your maps history.
- If you want to delete multiple entries, tap on the checkbox next to each location you wish to remove. Once you have selected all the entries, tap on the trash bin icon or the “Delete” button at the top or bottom of the screen.
- If you want to delete your entire maps history, look for an option like “Delete all” or “Clear all history.” Tap on it to remove all your location entries.
- Confirm your decision to delete the maps history by tapping on “OK” or a similar confirmation button.
- The Google Maps app will now proceed to delete the selected location entries or the entire maps history, depending on your choice. The process may take a few moments depending on the number of entries.
- Once the deletion process is complete, your maps history in the Google Maps app on your Tablet Samsung will be cleared.
Clearing your maps history in Google Maps allows you to maintain privacy and control over your location data. By following these steps, you can easily delete specific location entries or clear your entire maps history on your Tablet Samsung.
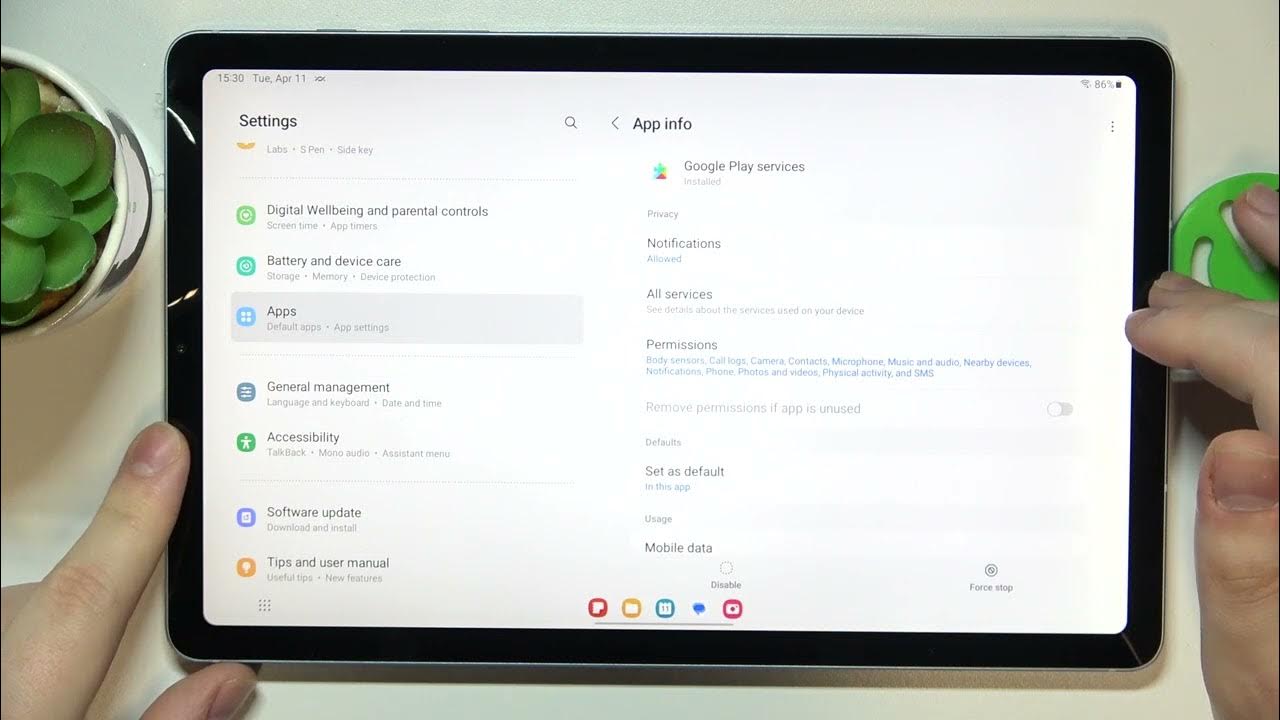
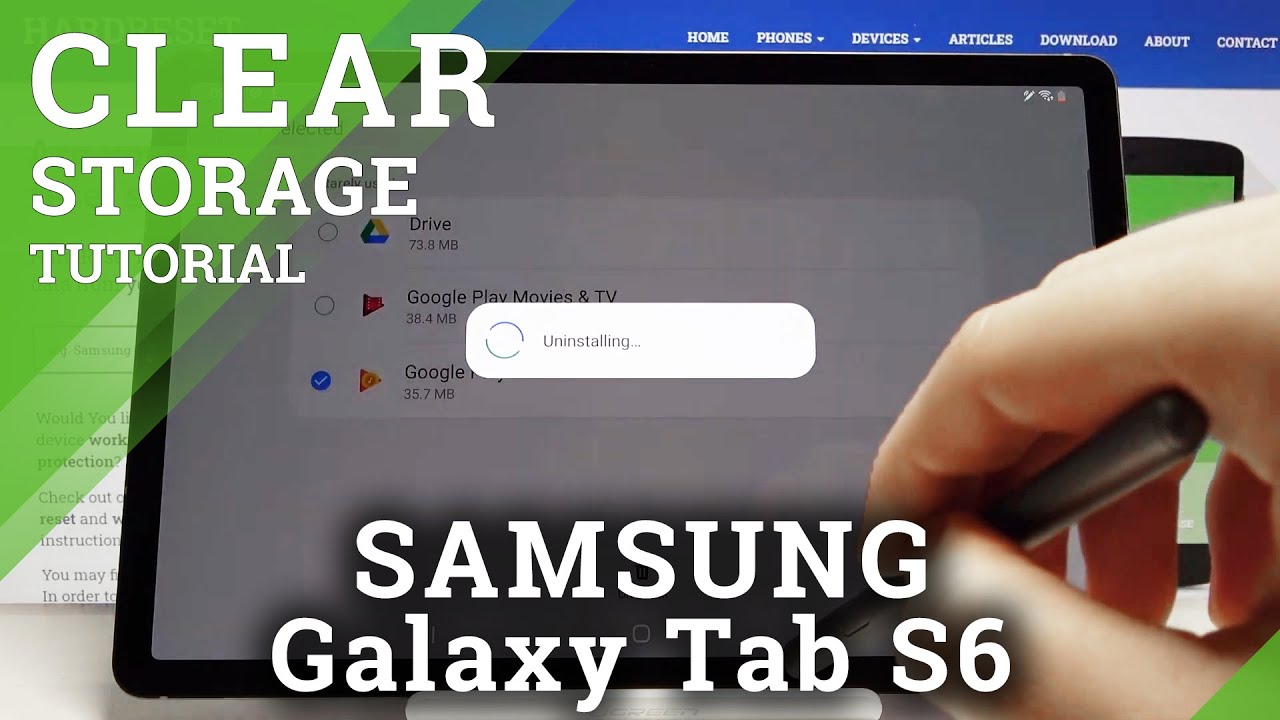
Erasing App Usage History
As you use various apps on your Tablet Samsung, a record of your app usage history is created. This history can include information such as recently used apps, app preferences, and app activity. If you want to erase this app usage history to maintain privacy or declutter your device, follow these steps:
- Open the Settings app on your Tablet Samsung. You can usually find it on your home screen or in the app drawer.
- Scroll down and select “Apps” or “Applications,” depending on your device model.
- A list of installed apps on your tablet will appear. Choose the app for which you want to erase the usage history.
- In the app settings, look for the “Storage” or “Storage & cache” option.
- Tapping on the “Storage” option will open a new screen showing the app’s storage usage and other related data.
- On this screen, you will find options to “Clear data” or “Clear cache.” Clearing data will erase the app usage history along with any stored data, preferences, or settings for that particular app.
- If you only want to remove temporary files and cached data associated with the app, you can choose to clear the cache instead.
- Tap on the appropriate option to clear either the app’s data or cache. You may be prompted to confirm your action.
- The app usage history will now be erased, and any associated data or temporary files will be removed from the app.
- Repeat these steps for other apps on your Tablet Samsung that you wish to erase the usage history for.
By erasing the app usage history, you can maintain privacy, clear unnecessary data, and potentially improve the performance of your Tablet Samsung. Follow these simple steps to easily erase the usage history for individual apps and enjoy a cleaner and more private app experience on your device.
Deleting Message History in Messaging App
Your Tablet Samsung’s messaging app stores a history of your text messages and conversations. If you want to clear this message history for privacy reasons or to free up storage space, follow these steps to delete your message history in the messaging app:
- Open the Messaging app on your Tablet Samsung. You can usually find it on your home screen or in the app drawer.
- Navigate to the conversation or specific message thread that you want to delete.
- Once inside the conversation, tap and hold on a specific message until a menu appears.
- From the menu, select the “Delete” option to remove the chosen message. Alternatively, some messaging apps may have a dedicated trash bin or delete icon within the conversation interface.
- If you want to delete multiple messages, tap on each message to select them. The selected messages typically highlight or display a checkbox next to them.
- Once you have selected all the messages you want to delete, tap on the trash bin icon or the “Delete” button, usually located at the top or bottom of the screen.
- If you want to delete the entire conversation and all associated messages, navigate back to the list of conversations or message threads. Tap and hold on the desired conversation until a menu appears, and select the “Delete” option.
- You may be prompted with a confirmation message asking if you want to delete the conversation and its messages. Confirm your decision to proceed.
- The messaging app will now delete the selected messages or the entire conversation. The time required for this process may vary depending on the number of messages.
- Once the deletion process is complete, the selected messages or conversation will be removed from the messaging app. The messages will no longer be visible in your message history.
By regularly deleting your message history in the messaging app on your Tablet Samsung, you can maintain privacy, free up storage space, and keep your conversations organized. Follow these steps to easily delete individual messages, selected messages, or entire conversations within the messaging app.
Clearing Download History
When you download files, images, or documents on your Tablet Samsung, a history of your downloads is created. Over time, this download history can accumulate and take up precious storage space. If you want to clear your download history to declutter your device and maintain privacy, follow these steps:
- Open the Downloads app on your Tablet Samsung. You can typically find it on your home screen or in the app drawer.
- Inside the Downloads app, you will see a list of all the files you have downloaded on your device.
- Tap on the three-dot menu icon, typically located at the top right corner of the screen. This will open a menu with various options.
- From the menu, select “Clear download history” or a similar option. The wording may vary slightly depending on the device model and software version.
- You may be prompted with a confirmation message asking if you want to clear your download history. Confirm your decision to proceed.
- The Downloads app will now proceed to clear your download history, removing all the listed files in the process.
- Depending on the number and size of the downloaded files, it may take a few moments for the app to complete the clearing process.
- Once the clearing process is complete, all the files in your download history will be removed from the Downloads app.
By regularly clearing your download history on your Tablet Samsung, you can free up storage space, organize your files, and maintain privacy by removing traces of your downloaded content. Follow these simple steps to easily clear your download history and keep your device clutter-free.
Removing Autofill Data in Samsung Internet
The Autofill feature in the Samsung Internet app on your Tablet Samsung allows you to quickly fill in forms and passwords with previously saved information. However, if you want to remove this autofill data for privacy reasons or to reset your autofill preferences, follow these steps:
- Open the Samsung Internet app on your Tablet Samsung.
- Tap on the three-dot menu located at the bottom right corner of the screen. This will open a menu with various options.
- Select “Settings” from the menu. It is represented by a gear icon.
- In the Settings menu, scroll down and tap on “Privacy.”
- Within the Privacy settings, look for the option called “Autofill forms and passwords.”
- Tap on “Manage autofill data” or a similar option to access your autofill data.
- You will now see a list of saved autofill entries, including forms and passwords.
- To remove a specific autofill entry, tap on the “Delete” button next to it. This will effectively delete the particular form or password from the autofill data.
- If you want to remove all the saved autofill data, look for an option like “Clear all autofill data” or “Delete all.” Tap on it to remove all the autofill entries in one go.
- You may be prompted to confirm your action. Review the prompt and tap on “OK” or a similar confirmation button to proceed with the deletion.
- The Samsung Internet app will now remove the selected autofill entries or clear all the autofill data.
- Once the removal or clearing process is complete, the targeted autofill data will no longer be available in the Samsung Internet app.
By actively managing and removing your autofill data in the Samsung Internet app on your Tablet Samsung, you can maintain privacy and control over your form and password information. Follow these steps to easily remove individual autofill entries or clear all the autofill data, as per your preferences.
Clearing Clipboard Data on Samsung Tablet
The clipboard on your Samsung Tablet stores temporary data that you have copied or cut, such as text, images, or links. Clearing the clipboard can be useful for maintaining privacy, especially if you have copied sensitive information. While there is no direct option to clear the clipboard on a Samsung Tablet, you can indirectly clear it by following these steps:
- Open any app that allows you to type or enter text, such as the Notes app or a messaging app.
- Tap on a blank space within the app to bring up the keyboard.
- Tap and hold on the text input area until a menu appears.
- From the menu, select “Clipboard” or a similar option. This will open the clipboard interface that shows your recent copied or cut items.
- Swipe left or right on each item to reveal a delete button or trash bin icon.
- Tap on the delete button or trash bin icon next to each item you want to remove from the clipboard. Alternatively, some devices may have a “Clear clipboard” option.
- If the clipboard interface does not have a delete or clear option, you can remove the items by tapping and holding on them, and then dragging them outside the app area to delete them.
- Repeat the process for each item you want to remove from the clipboard.
- Once you have deleted all the items you want to remove, exit the app or close the keyboard.
By following these steps, you can effectively clear the stored data on the clipboard of your Samsung Tablet. Note that the clipboard is a temporary storage and any data that remains on it will be overwritten as you copy or cut new items.
Note: If you want to clear clipboard contents from an application outside of the Notes app or a messaging app, the steps may vary slightly. Consider checking the specific app’s settings or user guide for instructions on clearing clipboard data.
By manually clearing the clipboard contents on your Samsung Tablet, you can ensure that any sensitive or unnecessary information is removed, thus maintaining your privacy and preventing accidental exposure of copied or cut data.
Deleting Location History in Google Maps
Google Maps keeps a record of your location history to provide personalized recommendations and improve your navigation experience. If you value your privacy or want to delete your location history from Google Maps, follow these steps:
- Open the Google Maps app on your Tablet Samsung. You can typically find it on your home screen or in the app drawer.
- Tap on your profile picture or initial located at the top right corner of the screen. This will open a menu with various options.
- In the menu, scroll down and select “Settings.” You may need to scroll further to find it.
- Within the Settings menu, look for the option called “Maps history” or “Your timeline.” Tap on it to access your location history.
- You will see a timeline with your recent locations and activities. Tap on the three-dot menu icon or the “More” button usually located at the top right corner of the screen.
- From the options that appear, select “Manage Map History” or “Manage location history.”
- You will now see a list of your recent locations on the screen. Tap on “Delete all” or a similar option to remove the entire location history from Google Maps.
- A confirmation message will appear asking if you want to delete your location history. Review the prompt and tap on “OK” or a similar confirmation button to proceed with the deletion.
- The Google Maps app will now delete your entire location history, including all the recorded locations and activities.
- Keep in mind that deleting your location history from Google Maps may affect the personalized recommendations and features that rely on this data.
By deleting your location history in Google Maps on your Tablet Samsung, you can maintain privacy and have more control over your location data. Follow these steps to remove your entire location history and enjoy a cleaner and more private mapping experience.
Clearing Form Data in Samsung Internet
When you use the Samsung Internet app on your Tablet Samsung to fill out forms, such as online registrations or login pages, the app may save your form data for convenience. If you want to clear this form data for privacy reasons or to start fresh, follow these steps:
- Open the Samsung Internet app on your Tablet Samsung.
- Tap on the three-dot menu located at the bottom right corner of the screen. This will open a menu with various options.
- Select “Settings” from the menu. It is represented by a gear icon.
- In the Settings menu, scroll down and tap on “Privacy.”
- Within the Privacy settings, look for the option called “Autofill forms and passwords.”
- Tap on “Clear data” or a similar option to access your form data.
- You will see a list of saved form entries, including previously filled out information in various fields.
- To remove a specific form entry, tap on the “Delete” button next to it. This will effectively delete the stored form data for that particular entry.
- If you want to remove all the saved form data, look for an option like “Clear all data” or “Delete all.” Tap on it to remove all the form entries in one go.
- You may be prompted to confirm your action. Review the prompt and tap on “OK” or a similar confirmation button to proceed with the deletion.
- The Samsung Internet app will now remove the selected form entries or clear all the form data.
- Once the removal or clearing process is complete, the targeted form data will no longer be available in the Samsung Internet app.
By regularly clearing your form data in the Samsung Internet app on your Tablet Samsung, you can maintain privacy and have control over the information you provide in online forms. Follow these steps to easily remove individual form entries or clear all the form data based on your privacy preferences.
Removing Cookies and Site Data in Samsung Internet
When you browse the internet using the Samsung Internet app on your Tablet Samsung, websites may store cookies and other site data on your device. These data files are used to enhance user experience and provide personalized content. However, if you want to clear these cookies and site data for privacy reasons or to free up storage space, follow these steps:
- Open the Samsung Internet app on your Tablet Samsung.
- Tap on the three-dot menu located at the bottom right corner of the screen. This will open a menu with various options.
- Select “Settings” from the menu. It is represented by a gear icon.
- In the Settings menu, scroll down and tap on “Privacy.”
- Within the Privacy settings, look for the option called “Clear browsing data.”
- Tap on “Clear browsing data” or a similar option to access the data clearance options.
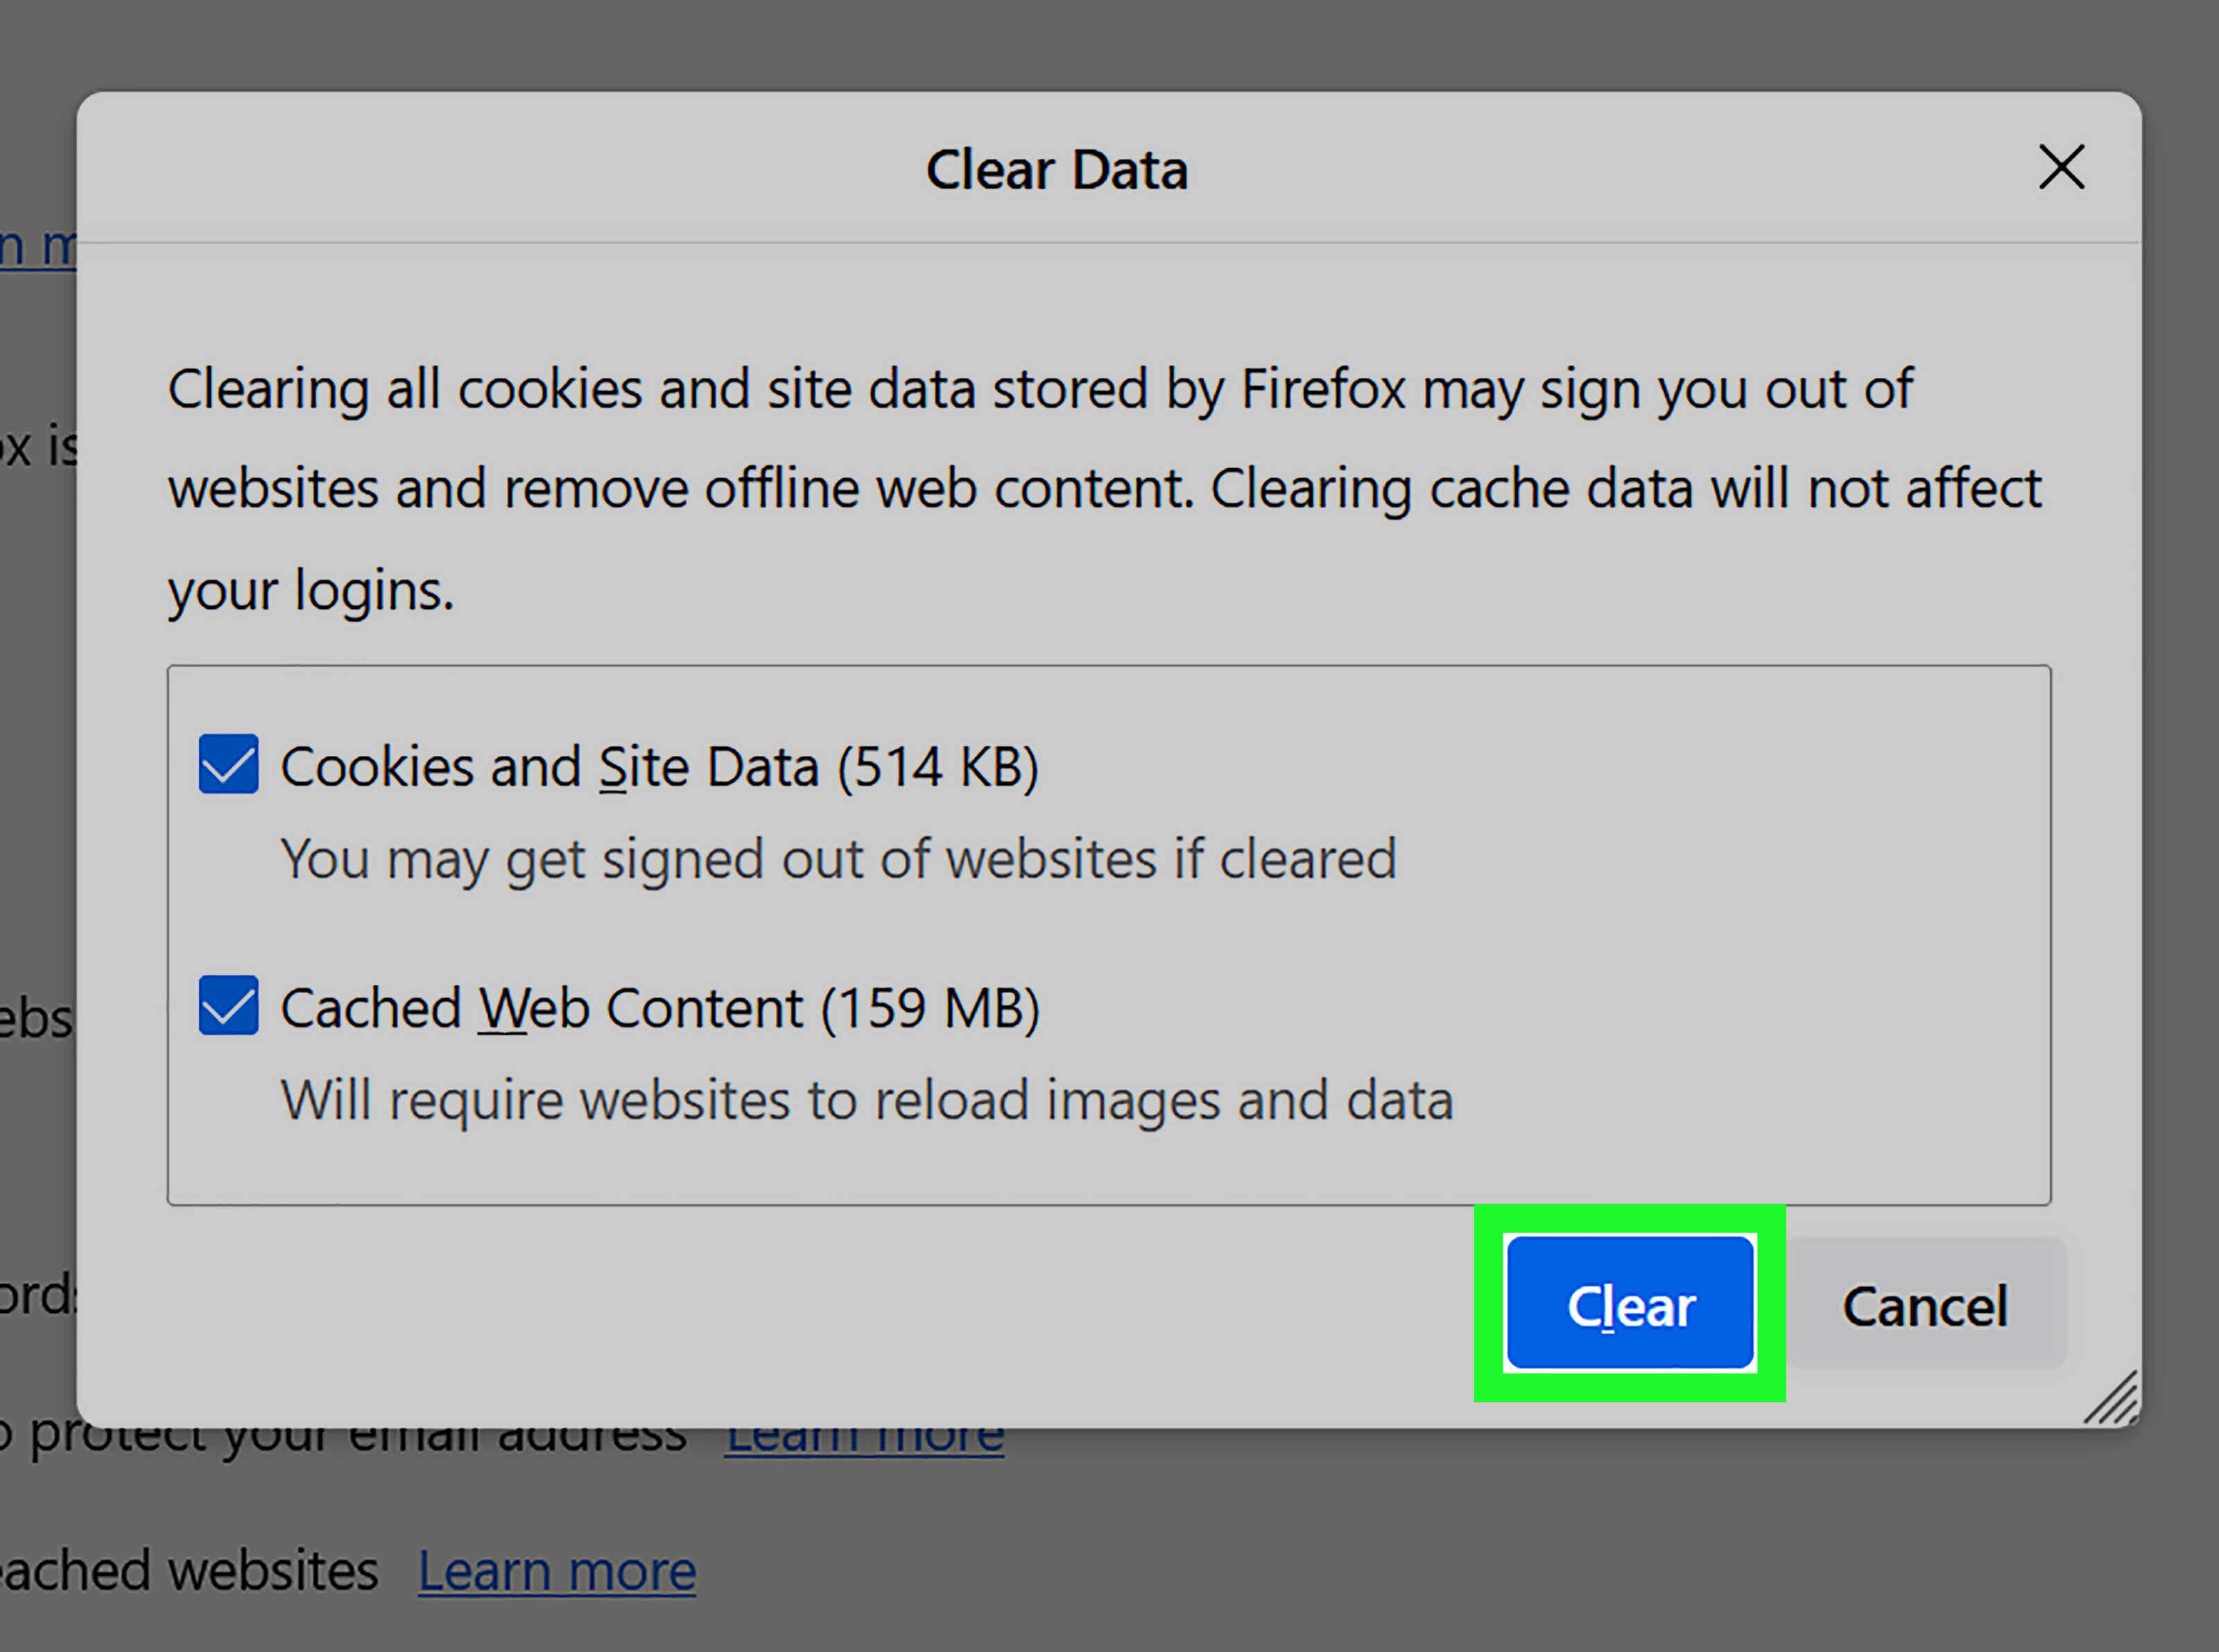
- A new window will appear, presenting you with various types of data to clear. Make sure the checkbox next to “Cookies and site data” is selected.
- You can also choose to clear other types of data such as “Browsing history,” “Cached images and files,” and “Saved passwords” if desired, by ticking the respective checkboxes.
- Once you have selected the desired data to clear, tap on the “Clear” button to initiate the clearance process.
- The Samsung Internet app will now proceed to clear the selected data, including cookies and site data.
- The time required for this process may vary depending on the amount of data to be cleared. Once completed, a confirmation message will usually appear.
By regularly removing cookies and site data in the Samsung Internet app on your Tablet Samsung, you can maintain privacy, free up storage space, and ensure a cleaner browsing experience. Follow these steps to easily clear cookies and site data based on your preferences and enjoy a more privacy-conscious browsing experience.
Clearing Cache in Samsung Internet
The cache in the Samsung Internet app on your Tablet Samsung stores temporary data from websites you visit, making subsequent visits faster by loading certain elements from memory. However, over time, this cache can accumulate and take up storage space. If you want to clear the cache to free up space or resolve any website loading issues, follow these steps:
- Open the Samsung Internet app on your Tablet Samsung.
- Tap on the three-dot menu located at the bottom right corner of the screen. This will open a menu with various options.
- Select “Settings” from the menu. It is represented by a gear icon.
- In the Settings menu, scroll down and tap on “Privacy.”
- Within the Privacy settings, look for the option called “Clear browsing data.”
- Tap on “Clear browsing data” or a similar option to access the data clearance options.
- A new window will appear, presenting you with various types of data to clear. Make sure the checkbox next to “Cached images and files” is selected.
- You can also choose to clear other types of data such as “Browsing history,” “Cookies and site data,” and “Saved passwords” if desired, by ticking the respective checkboxes.
- Once you have selected the desired data to clear, tap on the “Clear” button to initiate the clearance process.
- The Samsung Internet app will now proceed to clear the selected data, including the cache.
- The time required for this process may vary depending on the amount of data to be cleared. Once completed, a confirmation message will usually appear.
By regularly clearing the cache in the Samsung Internet app on your Tablet Samsung, you can free up storage space and possibly resolve website loading issues, ensuring a smoother browsing experience. Follow these steps to easily clear the cache and enjoy faster and more efficient browsing on your device.
Deleting Social Media App History
Social media apps on your Tablet Samsung, such as Facebook, Instagram, or Twitter, store a history of your activities within the app. This includes your posts, comments, likes, and search history. If you want to delete your social media app history for privacy reasons or to start with a clean slate, follow these steps:
- Open the social media app for which you want to delete the history on your Tablet Samsung.
- Look for the app’s settings or options menu, usually represented by an icon with three horizontal lines or three dots.
- Tap on the settings or options icon to open the menu.
- Within the menu, locate and tap on the “Settings” or “Privacy” option. The wording may vary depending on the app.
- Look for options related to “Account” or “Privacy and Security.”
- Within the account or privacy settings, you may find options like “Clear search history” or “Clear browsing history.” Tap on these options to delete your search or browsing history within the app.
- You may be prompted to confirm your action. Review the prompt and tap on “OK” or a similar confirmation button to proceed with the deletion.
- If the social media app allows, you can also individually delete specific posts, comments, or likes by finding them in your activity history. Swipe on the item or tap on the three-dot menu next to it to reveal options for deletion.
- Follow any additional on-screen instructions that may appear to complete the deletion process for your social media app history.
- Repeat these steps for each social media app you want to delete the history from on your Tablet Samsung.
By regularly deleting your social media app history on your Tablet Samsung, you can maintain privacy and have control over the information and activities associated with your social media accounts. Follow these steps for different social media apps to easily delete your history and enjoy a more private and personalized social media experience.
Removing Voice Command History
Voice command history on your Tablet Samsung is created when you use voice assistants like Google Assistant or Samsung’s Bixby. These voice commands are recorded and stored to improve the accuracy and responsiveness of the voice assistant. If you want to remove your voice command history for privacy reasons or to clear any sensitive or inaccurate recordings, follow these steps:
- Open the voice assistant app on your Tablet Samsung. This can be Google Assistant or Samsung’s Bixby, depending on your device.
- Tap on the profile icon or the three-line menu located at the top right corner of the screen. This will open a menu with various options.
- In the menu, look for and tap on “Settings” or “Preferences” to access the voice assistant settings.
- Scroll through the settings to find options related to “Voice and Speech,” “Voice History,” or “Voice recognition.”
- Tapping on these options will give you access to your voice command history, usually presented as a list of recorded commands or interactions.
- Look for options like “Delete voice history,” “Clear commands,” or similar phrases specific to your voice assistant app.
- Tap on these options to delete your voice command history. You may be prompted to confirm your action.
- Review the confirmation prompt and tap on “OK” or a similar button to proceed with the deletion process.
- The voice assistant app will now remove your voice command history, ensuring that your previous voice interactions are no longer stored.
- Repeat these steps for each voice assistant app you have installed on your Tablet Samsung.
By regularly removing your voice command history on your Tablet Samsung, you can maintain privacy and have control over the recordings and interactions stored by the voice assistant. Follow these steps for respective voice assistant apps to easily delete your voice command history and enjoy a more personalized and private voice interaction experience.
Clearing Keyboard History on Samsung Tablet
The keyboard on your Samsung Tablet stores a history of words and phrases that you have typed, making it easier to predict and suggest text as you type. If you want to clear this keyboard history for privacy reasons or to start fresh, follow these steps:
- Open the Settings app on your Samsung Tablet. You can usually find it on your home screen or in the app drawer.
- Scroll down and select “General Management” or a similar option, depending on your device model and software version.
- Look for and tap on “Language and input” or “On-screen keyboard” within the settings menu.
- Depending on your device and Android version, you may see different options for keyboard settings. Look for an option related to “Keyboard settings,” “Virtual keyboard,” or the name of the specific keyboard you are using.
- Within the keyboard settings, look for the option called “Dictionary” or “Text input.” Tap on it to access the keyboard’s dictionary settings.
- In the dictionary settings, you should find an option to “Clear personal data” or “Reset keyboard settings.”
- Tap on this option to clear the keyboard history, including learned words and phrases.
- You may be prompted to confirm your action. Review the prompt and tap on “OK” or a similar confirmation button to proceed with the deletion.
- The keyboard on your Samsung Tablet will now clear its history and reset its settings. You will start with a fresh, blank dictionary.
By regularly clearing the keyboard history on your Samsung Tablet, you can maintain privacy and ensure that any previously typed words or phrases are no longer suggested or stored by the keyboard. Follow these steps to easily clear the keyboard history and enjoy a more personalized and private typing experience on your Tablet Samsung.
Deleting App Store Search History
When you search for apps on the App Store on your Tablet Samsung, a history of your searches is stored. This can be convenient for quick access to previously searched apps, but if you want to delete your search history for privacy reasons or to clear out unnecessary suggestions, follow these steps:
- Open the App Store on your Tablet Samsung.
- Tap on the “Search” tab located at the bottom right corner of the screen. This will open the search interface.
- In the search bar at the top of the screen, you will see a list of your recent searches.
- Tap on the “×” button next to each search entry to remove it from your search history.
- If you want to clear the entire search history, look for an option like “Clear” or “Clear All” usually located at the bottom of the search interface.
- Tap on this option to delete your entire search history.
- You may be prompted to confirm your action. Review the prompt and tap on “OK” or a similar confirmation button to proceed with the deletion.
- The App Store will now remove all the search entries from your search history.
- As you perform new searches on the App Store, your search history will start populating again, but it will be from that point onward.
By periodically deleting your App Store search history on your Tablet Samsung, you can maintain privacy and have a cleaner search interface. Follow these steps to easily remove individual search entries or clear your entire search history and enjoy a more personalized and private app discovery experience on your device.
Removing Recent Files History
Your Tablet Samsung keeps a record of the recently accessed files, making it convenient to revisit them quickly. However, if you want to clear your recent files history for privacy reasons or to declutter your device, follow these steps:
- Open the “Files” or “My Files” app on your Tablet Samsung. You can usually find it on your home screen or in the app drawer.
- Once in the Files app, look for a tab or option called “Recents” or “Recent files.” Tap on it to access your recent files history.
- Here, you will see a list of files that you have recently accessed or modified.
- To remove a specific file from the recent files list, tap and hold on it until a menu appears.
- From the menu, select “Remove” or “Delete” to remove the file from your recent files history.
- If you want to clear your entire recent files history, look for an option like “Clear” or “Clear history.” Tap on it to remove all the recent files entries.
- You may be prompted to confirm your action. Review the prompt and tap on “OK” or a similar confirmation button to proceed with the deletion.
- The Files app will now remove the selected file or clear your entire recent files history.
- Keep in mind that clearing your recent files history will not delete the files themselves from your device. It only clears the record of files that have been recently accessed.
By regularly removing your recent files history on your Tablet Samsung, you can maintain privacy and keep your file management interface tidy. Follow these steps to easily delete individual recent files or clear your entire recent files history, providing a fresh start and a more organized file browsing experience.
Clearing Email App History
The email app on your Tablet Samsung stores a history of your email activity, including sent and received emails, search queries, and other related data. If you want to clear this email app history for privacy reasons or to declutter your device, follow these steps:
- Open the email app on your Tablet Samsung. The specific email app may vary depending on the email service you use (e.g., Gmail, Outlook, Yahoo Mail).
- Tap on the menu icon, typically represented by three horizontal lines or three dots, located at the top left or right corner.
- From the menu that appears, look for and tap on “Settings” or a similar option.
- Within the settings menu, scroll down and find the option named “Privacy” or “Account Privacy.”
- Tap on this option to access the privacy settings for the email app.
- Look for an option called “Clear data” or “Clear history.” It may also be listed as “Clear cache” or “Clear storage.”
- Tap on this option to initiate the process of clearing your email app history.
- You may be prompted to confirm your action. Review the prompt and tap on “OK” or a similar confirmation button to proceed with the deletion.
- The email app will now clear your email app history, including sent and received emails, search queries, and other associated data.
- Keep in mind that clearing your email app history may affect certain features, such as saved drafts or email suggestions based on previous activity.
By regularly clearing your email app history on your Tablet Samsung, you can maintain privacy and ensure a clutter-free email experience. Follow these steps to easily clear your email app history and enjoy a more private and organized communication experience on your device.
Deleting Bluetooth Device History
Your Tablet Samsung keeps a record of the Bluetooth devices it has connected to in the past. This history can include devices such as headphones, speakers, smartwatches, or other Bluetooth-enabled peripherals. If you want to delete the Bluetooth device history to maintain privacy or remove unnecessary entries, follow these steps:
- Open the Settings app on your Tablet Samsung. You can usually find it on your home screen or in the app drawer.
- Scroll down and select “Connections” or “Bluetooth & device connection” depending on your device model and software version.
- Look for an option called “Bluetooth” or a similar term and tap on it to access the Bluetooth settings.
- Within the Bluetooth settings, you will see a list of previously paired devices.
- Tap on the gear icon, settings icon, or the information icon next to the device whose history you want to delete.
- On the device-specific settings page, look for an option to “Forget,” “Remove,” or “Unpair” the device.
- Tap on this option to delete the Bluetooth device’s history and remove it from the list of paired devices.
- You may be prompted to confirm your action. Review the prompt and tap on “OK” or a similar confirmation button to proceed with the deletion.
- The Tablet Samsung will now remove the history of the selected Bluetooth device, and it will no longer appear in the list of paired devices.
- Repeat these steps for each Bluetooth device entry whose history you want to delete.
By deleting the Bluetooth device history on your Tablet Samsung, you can maintain privacy, remove unnecessary entries, and ensure a streamlined Bluetooth connection experience. Follow these steps to easily delete the history of previously paired Bluetooth devices and enjoy a more organized and private Bluetooth connection on your device.