Clearing Cache and Cookies
Clearing the cache and cookies in the Samsung Internet browser can help resolve various issues and improve the browsing experience on your Samsung tablet. Cache is a temporary storage that stores web page elements for faster loading, while cookies are small files that store website preferences and login information.
To clear the cache and cookies on your Samsung tablet:
- Open the Samsung Internet browser on your tablet.
- Tap on the menu icon (three vertical dots) located at the top right corner of the screen.
- Select Settings from the dropdown menu.
- Scroll down and tap on Privacy & security.
- Under the Advanced section, tap on Delete browsing data.
- Choose the desired time range. To clear all data, select All time.
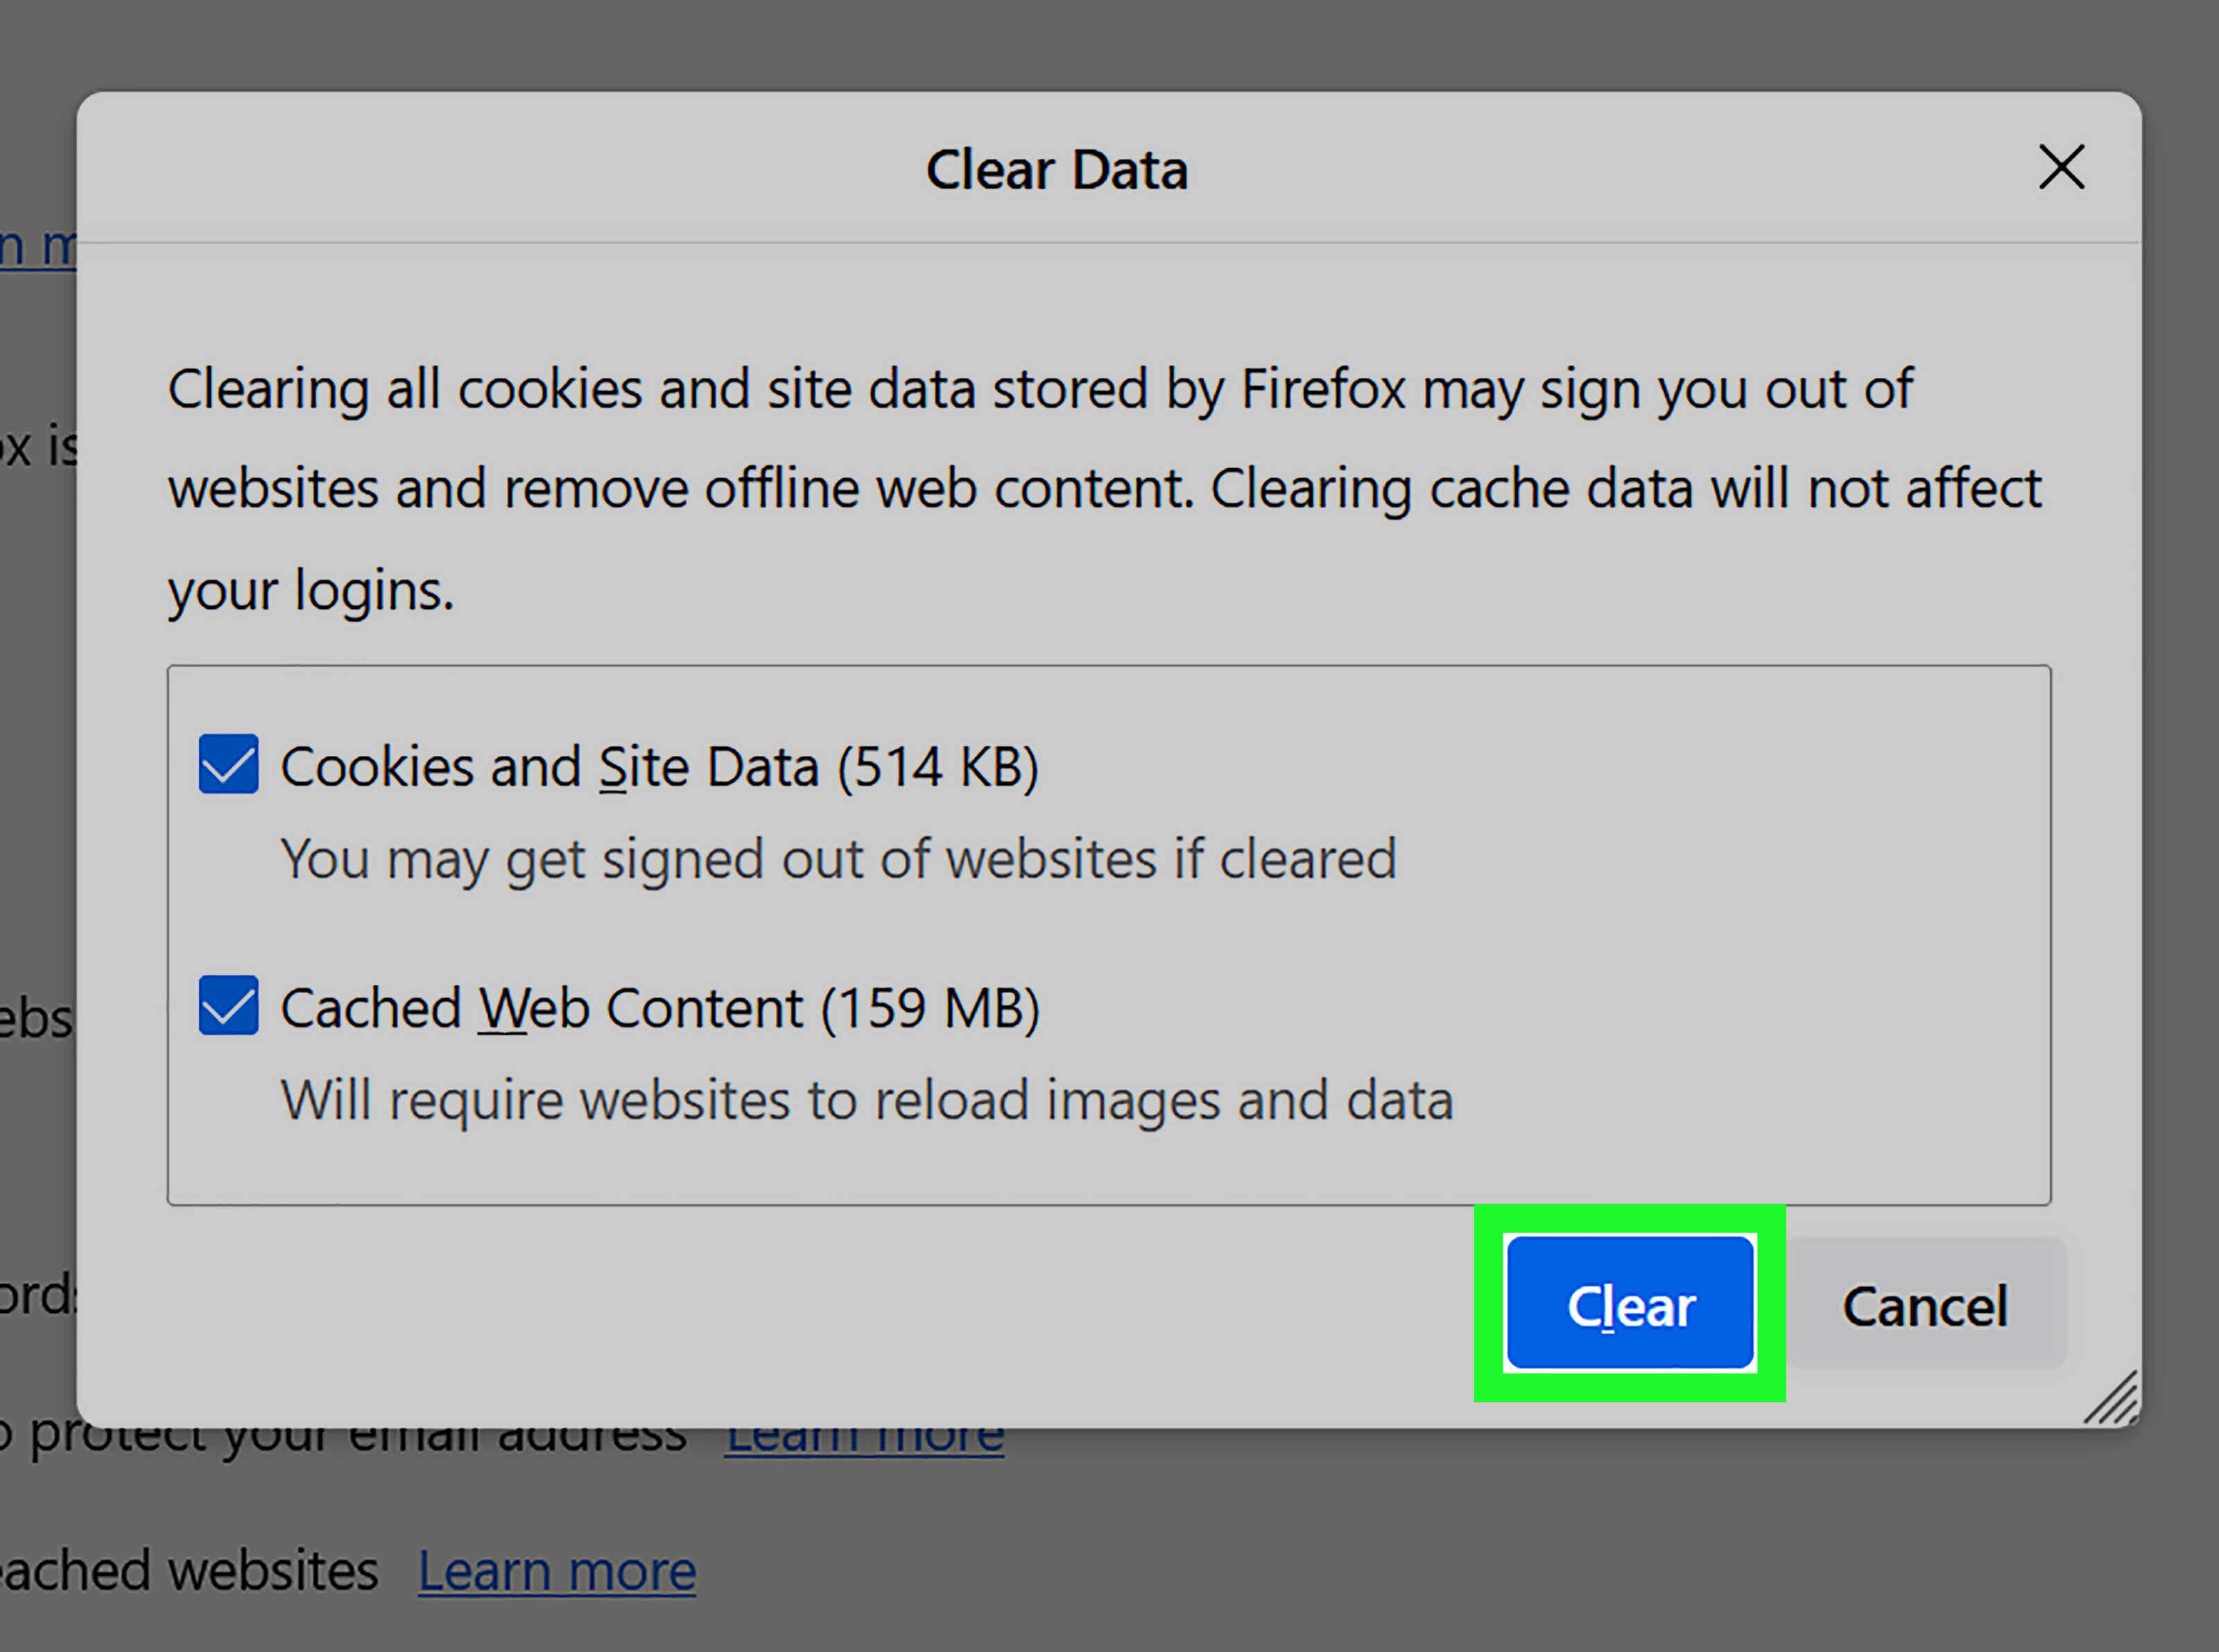
- Select the checkboxes next to Cached images and files and Cookies and site data.
- Tap on the Delete button to clear the cache and cookies.
Keep in mind that clearing the cache and cookies will sign you out of websites and remove any saved preferences. However, it can help fix issues like slow loading websites, incorrect display of web elements, and login problems.
Regularly clearing the cache and cookies also helps protect your privacy by removing any stored login information on public or shared devices.
By performing these steps, you can ensure that your Samsung tablet’s browser is running smoothly and efficiently, without any unnecessary clutter from cached files and stored cookies.
Updating the Samsung Internet Browser
Keeping your Samsung Internet browser up to date is essential to ensure that you have the latest features, security patches, and bug fixes. Updating the browser on your Samsung tablet is a straightforward process and can be done using either automatic or manual methods.
Enabling Automatic Updates
By default, the Samsung Internet browser is set to automatically update to the latest version whenever a new release becomes available. However, it’s always a good idea to double-check and ensure that automatic updates are enabled on your device. To do this:
- Open the Google Play Store app on your Samsung tablet.
- Tap on the menu icon (three horizontal lines) located at the top left corner.
- Select My apps & games from the menu.
- Under the Installed tab, find the Samsung Internet browser.
- If updates are available, tap on the Update button next to the browser.
- If automatic updates are not enabled, tap on the three dots located at the top right corner and enable the Auto-update option.
Checking for Updates Manually
If you prefer to have more control over the updating process, you can manually check for updates in the Google Play Store. Here’s how:
- Open the Google Play Store app on your Samsung tablet.
- Tap on the menu icon (three horizontal lines) located at the top left corner.
- Select My apps & games from the menu.
- Under the Installed tab, find the Samsung Internet browser.
- If updates are available, you’ll see an Update button next to the browser. Tap on it to install the latest version.
Regularly updating your Samsung Internet browser ensures that you have access to the newest features, improved performance, and security enhancements. It is recommended to check for updates periodically or enable automatic updates to stay up-to-date with the latest advancements in browsing technology.
Enabling Automatic Updates
Enabling automatic updates for the Samsung Internet browser on your Samsung tablet ensures that you always have the latest version installed without any manual intervention. This is crucial for enjoying the best browsing experience and staying protected from potential security vulnerabilities.
To enable automatic updates for the Samsung Internet browser, follow these steps:
- Open the Google Play Store app on your Samsung tablet.
- Tap on the menu icon (three horizontal lines) located at the top left corner of the screen.
- Select Settings from the menu.
- Scroll down and locate the Auto-update apps section.
- Tap on Auto-update apps and select Enable auto-update.
Once you’ve enabled auto-updates, the Samsung Internet browser will automatically update whenever a new version is released by the developer. This way, you can ensure that you have access to the latest features, security patches, bug fixes, and performance improvements without manually checking for updates.
Enabling automatic updates not only saves you time and effort but also helps in maintaining a browser that is optimized for speed, security, and compatibility. It ensures that your browsing experience remains smooth, and you benefit from the latest enhancements provided by the developers.
Remember to keep an eye on your device’s available storage space to ensure that you have enough room for downloading and installing the updates. In case you have limited storage, consider deleting unnecessary files or apps to free up space.
By enabling automatic updates for the Samsung Internet browser, you can stay ahead of the curve and enjoy the best browsing experience on your Samsung tablet, hassle-free.
Checking for Updates Manually
In addition to enabling automatic updates, you may also want to manually check for updates for the Samsung Internet browser on your Samsung tablet. This gives you more control over the updating process and ensures that you’re always running the latest version.
To manually check for updates for the Samsung Internet browser, follow these steps:
- Open the Google Play Store app on your Samsung tablet.
- Tap on the menu icon (three horizontal lines) located at the top left corner of the screen.
- Select My apps & games from the menu.
- Under the Installed tab, scroll down to find the Samsung Internet browser.
- If updates are available, you will see an Update button next to the browser. Tap on it to initiate the update process.
By manually checking for updates, you have the opportunity to review the changelog provided by the developer. This allows you to understand the new features, bug fixes, security enhancements, and performance improvements that come with the latest version.
Manual updates are particularly useful when you want to ensure that any new features or updates are in line with your browsing preferences. You can review and test the new version before allowing the automatic update to take place.
Regularly checking for updates is also essential for staying on top of security patches, as developers often release updates to address any known vulnerabilities and protect your browsing experience.
Remember, it’s recommended to connect your Samsung tablet to a stable Wi-Fi network before checking for updates manually. This ensures faster download speeds and minimizes any potential data charges, especially if the updates are large in size.
By manually checking for updates for the Samsung Internet browser, you can have peace of mind knowing that you’re running the latest version, benefiting from new features, improved security, and an enhanced browsing experience.
Managing Permissions for the Browser
Managing permissions for the Samsung Internet browser on your Samsung tablet is important to ensure your privacy and security while browsing the web. By controlling which permissions the browser has access to, you can customize your browsing experience and protect your personal information.
Here’s how you can manage permissions for the Samsung Internet browser:
- Open the Samsung Internet browser on your tablet.
- Tap on the menu icon (three vertical dots) located at the top right corner of the screen.
- Select Settings from the dropdown menu.
- Scroll down and tap on Permissions.
- You’ll see a list of different permissions that the browser can access.
- Tap on any permission to adjust its settings according to your preferences.
- You can choose to allow or deny individual permissions like location access, camera access, microphone access, etc.
- Depending on your security and privacy preferences, you can selectively enable or disable permissions for websites you visit.
Managing permissions allows you to have more control over your personal information and can help protect against malicious websites or apps trying to access sensitive data without your knowledge.
For example, if you’re concerned about your privacy, you might choose to deny the browser access to your location or disable the camera and microphone permissions. However, keep in mind that denying certain permissions might affect the functionality of some websites or web applications that rely on those permissions.
Regularly reviewing and adjusting the permissions for the Samsung Internet browser ensures that you are in control of the data shared by the browser and can help safeguard your privacy.
It’s important to note that permissions can vary depending on the version of the Samsung Internet browser and the Android operating system on your tablet. Therefore, it’s recommended to keep the browser updated to leverage the latest security features and improvements.
By managing permissions for the Samsung Internet browser, you can customize your browsing experience, protect your personal information, and enhance your overall privacy and security while using your Samsung tablet.
Resetting the Browser to Default Settings
If you’re experiencing persistent issues with the Samsung Internet browser on your Samsung tablet, resetting it to its default settings can often resolve the problems. This process will revert the browser to its original state, clearing any customizations or settings that may be causing conflicts or errors.
Here’s how you can reset the Samsung Internet browser to its default settings:
- Open the Samsung Internet browser on your tablet.
- Tap on the menu icon (three vertical dots) located at the top right corner of the screen.
- Select Settings from the dropdown menu.
- Scroll down and tap on Privacy & security.
- Under the Advanced section, tap on Reset settings.
- You’ll see a confirmation message informing you that all settings, including your homepage and search engine, will be reset to the default values.
- If you’re sure you want to proceed, tap on the Reset button.
- The browser will then reset to its default settings, and you can start afresh.
Resetting the browser can help resolve issues such as crashing, slow performance, frequent errors, or unexpected browser behavior. It can also be beneficial if you made changes to settings that you can’t recall or want to start with a clean slate.
However, note that resetting the browser will remove your browsing history, bookmarks, saved passwords, and other personalized settings. Therefore, it’s recommended to backup any important data before initiating the reset process.
Additionally, remember to update the Samsung Internet browser to the latest version after resetting it. This ensures that you have the most up-to-date features, security patches, and bug fixes that the developers have released since the original default settings.
By resetting the Samsung Internet browser to its default settings, you can effectively troubleshoot and resolve persistent issues, improve performance, and enjoy a fresh browsing experience on your Samsung tablet.
Clearing Browsing History
Clearing your browsing history is a useful practice to maintain privacy and free up storage space on your Samsung tablet. The browsing history contains a record of the websites you’ve visited, and clearing it removes this data from the Samsung Internet browser.
To clear your browsing history in Samsung Internet:
- Open the Samsung Internet browser on your tablet.
- Tap on the menu icon (three vertical dots) located at the top right corner of the screen.
- Select Settings from the dropdown menu.
- Scroll down and tap on Privacy & security.
- Under the Basic section, tap on Delete browsing data.
- Choose the desired time range for deleting history. To clear all history, select All time.
- Tick the checkbox for Browsing history.
- Tapping on Clear data will delete the selected browsing history from your Samsung tablet.
Clearing your browsing history helps maintain your privacy, especially if you share your tablet with others. It prevents others from seeing the websites you’ve visited and any personal or sensitive information that may be associated with your browsing activity.
In addition, clearing your browsing history can free up storage space on your tablet. Browsing history can accumulate over time, taking up valuable storage that may impact the performance of your device. By clearing the history, you can regain storage space and ensure your tablet operates smoothly.
Keep in mind that clearing your browsing history will only remove the history from your Samsung Internet browser. It will not affect any saved data or settings related to other apps or browsers on your tablet.
Regularly clearing your browsing history is a good habit to maintain the privacy of your online activities and keep your Samsung tablet running efficiently.
Managing Bookmarks in the Browser
Bookmarks are a handy tool in the Samsung Internet browser on your Samsung tablet, allowing you to save and organize your favorite websites for quick and easy access. Managing and organizing your bookmarks efficiently can greatly enhance your browsing experience and help you stay organized.
To manage bookmarks in the Samsung Internet browser:
- Open the Samsung Internet browser on your tablet.
- Tap on the menu icon (three vertical dots) located at the top right corner of the screen.
- Select Bookmarks from the dropdown menu.
- You’ll see a list of your saved bookmarks.
- To access a bookmarked website, tap on its entry in the list.
- To organize your bookmarks, tap on the menu icon (three vertical dots) located at the top right corner and select Sort. You can choose to sort by name, address, or date.
- You can also edit a bookmark’s name or URL by tapping and holding on the bookmark entry.
- To delete a bookmark, swipe left on the bookmark entry and tap on the Delete button.
Managing bookmarks helps you keep important websites easily accessible and organized. With bookmarks, you can quickly navigate to your favorite websites without having to remember or search for their URLs again.
Regularly reviewing and organizing bookmarks is essential to keep them relevant and ensure that you can find the websites you need at a glance. It’s a good practice to delete outdated or unused bookmarks and categorize them into folders based on topics or preferences.
Syncing your bookmarks across devices is another useful feature provided by the Samsung Internet browser. By signing in with your Samsung account, you can easily access and manage your bookmarks on other connected devices, such as your Samsung smartphone or computer.
By effectively managing your bookmarks in the Samsung Internet browser, you can save time, stay organized, and have your favorite websites just a tap away on your Samsung tablet.
Using Incognito Mode
Incognito mode, also known as private browsing, is a feature in the Samsung Internet browser on your Samsung tablet that allows you to browse the web without leaving a trace of your online activity. When you use incognito mode, the browser does not save your browsing history, cookies, or any other temporary data. This can be particularly useful when you want to maintain privacy, prevent others from seeing your browsing activity, or when you’re using a shared device.
To use incognito mode in the Samsung Internet browser:
- Open the Samsung Internet browser on your tablet.
- Tap on the menu icon (three vertical dots) located at the top right corner of the screen.
- Select New incognito tab from the dropdown menu.
- A new tab will open, indicating that you’re now in incognito mode.
- You can browse the web as usual, knowing that your activity is not being recorded or saved.
- To switch back to regular browsing mode, simply close the incognito tab.
Using incognito mode can be beneficial in various scenarios:
- Private browsing: When you use incognito mode, your browsing history, cookies, and other temporary data are not stored. This is useful when you’re accessing sensitive information or browsing websites that you prefer not to leave a trace of on your device.
- Shared devices: If you’re using a shared device, such as a tablet in a public setting or a device that you share with others, using incognito mode ensures that your browsing activity is not visible to other users.
- Avoiding targeted ads: Incognito mode can help reduce targeted ads based on your browsing history. Since your browsing activity is not saved, advertisers have limited access to your preferences and browsing patterns.
- Testing and debugging: Incognito mode is often used by developers to test websites or troubleshoot issues without the interference of previously stored data or cookies.
While incognito mode provides additional privacy, it’s important to note that it does not make you completely anonymous online. Your internet service provider, the websites you visit, and other parties may still be able to track your activity. If you require a higher level of anonymity or security, using a virtual private network (VPN) in conjunction with incognito mode is recommended.
By utilizing incognito mode in the Samsung Internet browser, you can browse the web with added privacy, peace of mind, and control over your online presence on your Samsung tablet.
Customizing Browser Settings
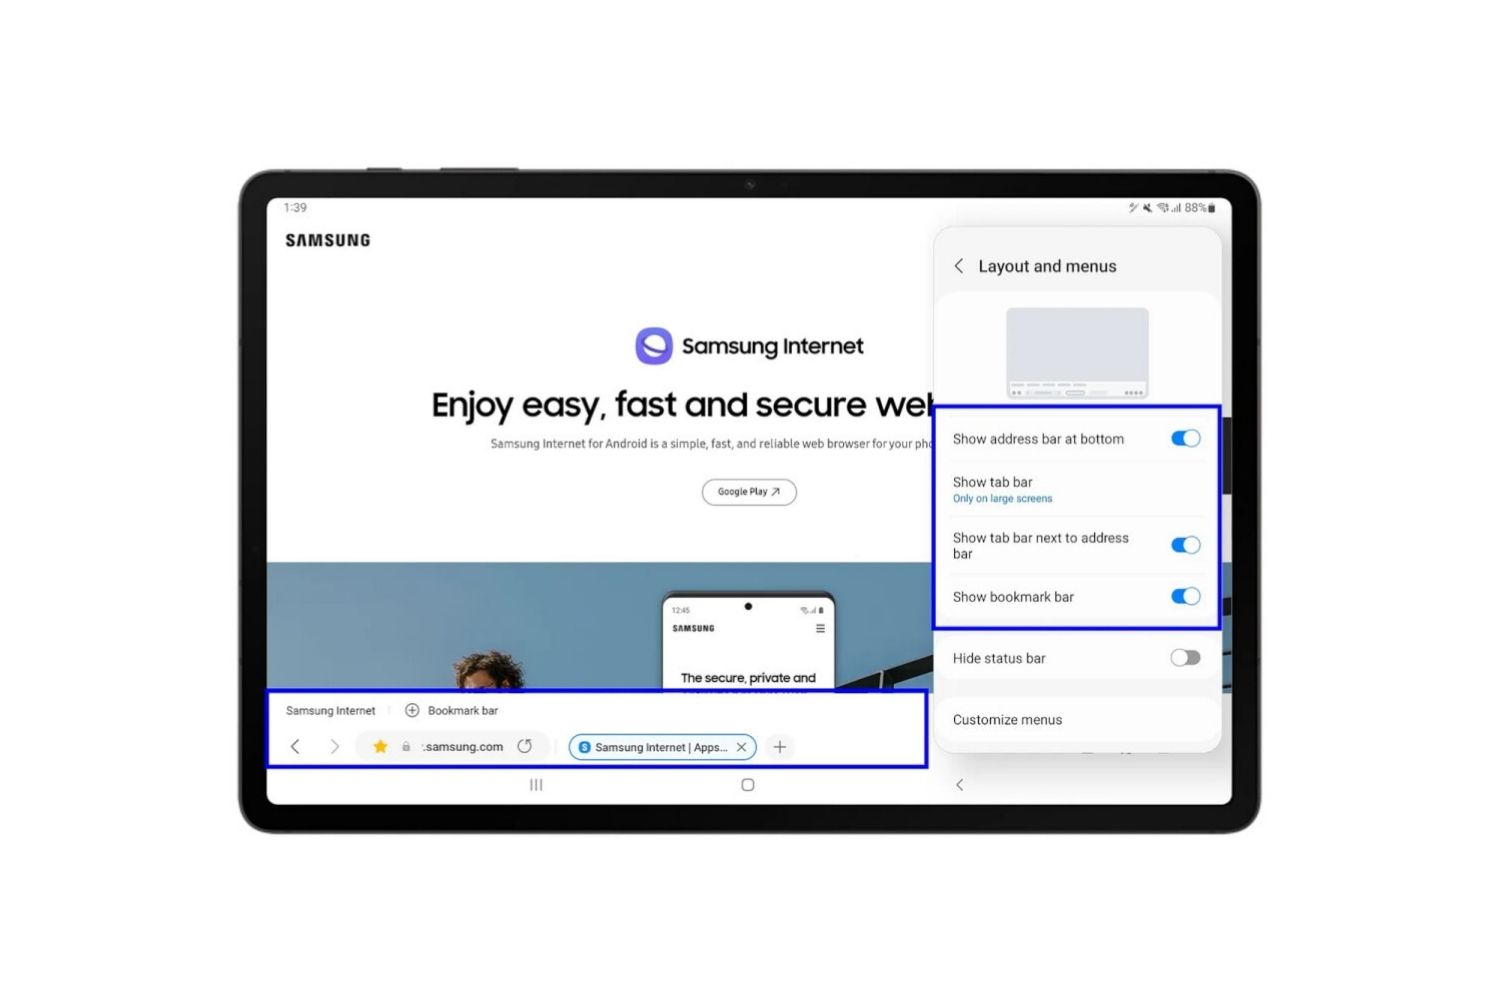
Customizing the settings in the Samsung Internet browser on your Samsung tablet allows you to personalize your browsing experience and optimize it according to your preferences. With a variety of customizable options available, you can tailor the browser to meet your specific needs and enhance your overall browsing satisfaction.
To access and customize the settings in the Samsung Internet browser:
- Open the Samsung Internet browser on your tablet.
- Tap on the menu icon (three vertical dots) located at the top right corner of the screen.
- Select Settings from the dropdown menu.
- You’ll find a list of settings options that you can customize to your liking.
- Examples of customizable settings include homepage selection, search engine preference, font size adjustment, enabling or disabling ad blockers, and enabling night mode for less strain on the eyes.
- Navigate through the various setting categories and make adjustments according to your preferences.
Customizing browser settings can greatly enhance your browsing experience in several ways:
- Personalization: Customizing the homepage, search engine, and other settings allows you to tailor the browser to your liking. You can set your preferred search engine, choose a homepage that opens every time you launch the browser, and modify other visual aspects to make it feel more personalized.
- Accessibility: Adjusting the font size and enabling features like a high contrast mode or reader mode can make it easier to read content and navigate websites, especially for users with visual impairments or those who prefer a different visual style.
- Privacy and security: In the settings, you can enable features like ad blockers, anti-tracking, and Do Not Track requests to enhance your privacy and security while browsing.
- Performance: Customizable settings, such as enabling data savings mode or blocking autoplaying videos, can help improve browser performance, reduce data usage, and enhance your overall browsing speed.
It’s recommended to explore the various settings and experiment with different options to find the configuration that suits your preferences and needs the best. Additionally, remember to check for updates regularly, as the developers may introduce new features and settings in newer versions of the browser.
By customizing the settings in the Samsung Internet browser on your Samsung tablet, you can create a browsing experience that is tailored to your preferences, improving usability, privacy, and overall satisfaction.