Introduction
Minecraft is a popular sandbox game that allows players to build and explore virtual worlds. As a visually immersive game, Minecraft heavily relies on your computer’s graphics card to render the game’s graphics smoothly and with high-quality visuals. If you’re experiencing lag, low frame rates, or pixelated graphics, upgrading your graphics card can greatly enhance your Minecraft gaming experience.
A graphics card, also known as a GPU (Graphics Processing Unit), is a vital component of your computer that is responsible for rendering images, videos, and animations. It plays a crucial role in determining the quality, speed, and performance of your gaming experience. While Minecraft doesn’t require a high-end graphics card like some AAA games, having a capable graphics card can significantly improve the game’s visuals and overall gameplay.
Before rushing to change your graphics card, it’s essential to understand your current setup and determine if an upgrade is necessary. In this guide, we will walk you through the process of changing the graphics card that Minecraft uses, from checking your current graphics card to installing a new one and configuring it for optimal performance in Minecraft.
So, if you’re ready to take your Minecraft gaming experience to the next level, let’s delve into the steps involved in changing the graphics card that Minecraft utilizes.
What is a graphics card and why is it important for Minecraft?
A graphics card, also known as a GPU (Graphics Processing Unit), is a specialized hardware component that is responsible for rendering images, videos, and animations on your computer screen. It works in conjunction with your computer’s CPU (Central Processing Unit) to process and generate visuals in real-time. When it comes to Minecraft, a graphics card plays a crucial role in delivering smooth gameplay and enhancing the overall visual experience.
Minecraft’s unique block-based graphics, intricate textures, and dynamic lighting effects require a capable graphics card to render them accurately. Without a proper graphics card, you may encounter performance issues such as stuttering frame rates, lagging gameplay, pixelation, or even crashes. Here are a few reasons why a graphics card is important for Minecraft:
1. Visual Quality: A powerful graphics card allows you to enjoy Minecraft with higher resolution textures, improved lighting effects, and smoother animations. It enhances the overall visual quality, making the game look more vibrant and immersive.
2. Performance: Minecraft can be a resource-intensive game, particularly when you’re exploring vast landscapes or engaging in multiplayer gameplay. A dedicated graphics card helps offload the graphical processing from the CPU, resulting in smoother performance and higher frame rates, even during intense gameplay.
3. Modding and Shaders: Minecraft’s modding community offers an extensive range of mods and shaders that can significantly enhance the game’s visuals. Many of these mods and shaders rely on the capabilities of a powerful graphics card to deliver their full potential, allowing you to customize your Minecraft experience further.
4. Multiplayer Experience: Minecraft’s multiplayer environment, whether it’s playing with friends or engaging in massive online servers, can put a strain on your computer’s hardware resources. A graphics card that can handle the demands of multiplayer gameplay ensures smooth interactions, reduced latency, and an overall improved multiplayer experience.
To sum it up, a graphics card is essential for Minecraft as it directly impacts the visual quality, performance, and overall enjoyment of the game. By upgrading your graphics card, you can unlock the full potential of Minecraft, immersing yourself in its virtual world with enhanced graphics and seamless gameplay.
Checking your current graphics card
Before you proceed with changing your graphics card for Minecraft, it’s essential to determine the specifications of your current graphics card. This information will help you ensure compatibility with the new graphics card you plan to install. Follow these steps to check your current graphics card:
- Open the Start menu on your computer and search for “Device Manager.”
- Click on “Device Manager” to open it.
- In the Device Manager window, locate and expand the “Display adapters” category.
- Your graphics card will be listed under the “Display adapters” category. Note down the name and model of your current graphics card.
- You can right-click on your graphics card and select “Properties” to view more detailed information about it, such as the manufacturer, driver version, and video memory capacity.
Alternatively, you can also use third-party software such as GPU-Z or Speccy to gather information about your graphics card. These tools provide comprehensive details about your system’s hardware components, including the graphics card.
Once you have identified your current graphics card, it’s important to compare its specifications with the requirements of the new graphics card you plan to install. Look for compatibility in terms of connector type, power requirements, and supported APIs such as DirectX or OpenGL. If the new graphics card requires additional power connections or exceeds the power supply capacity of your computer, you may also need to consider upgrading your power supply unit.
By checking your current graphics card’s specifications, you can ensure that the new graphics card you choose is compatible and will seamlessly integrate with your computer, providing optimal performance for Minecraft and other graphically intensive applications.
Researching and choosing a compatible graphics card for Minecraft
When it comes to selecting a new graphics card for Minecraft, it’s important to consider several factors to ensure compatibility and optimal performance. Here are the steps you can follow to research and choose a compatible graphics card:
- Determine your budget: Start by determining how much you are willing to spend on a new graphics card. Graphics cards come in a wide range of prices, so having a budget in mind will help narrow down your options.
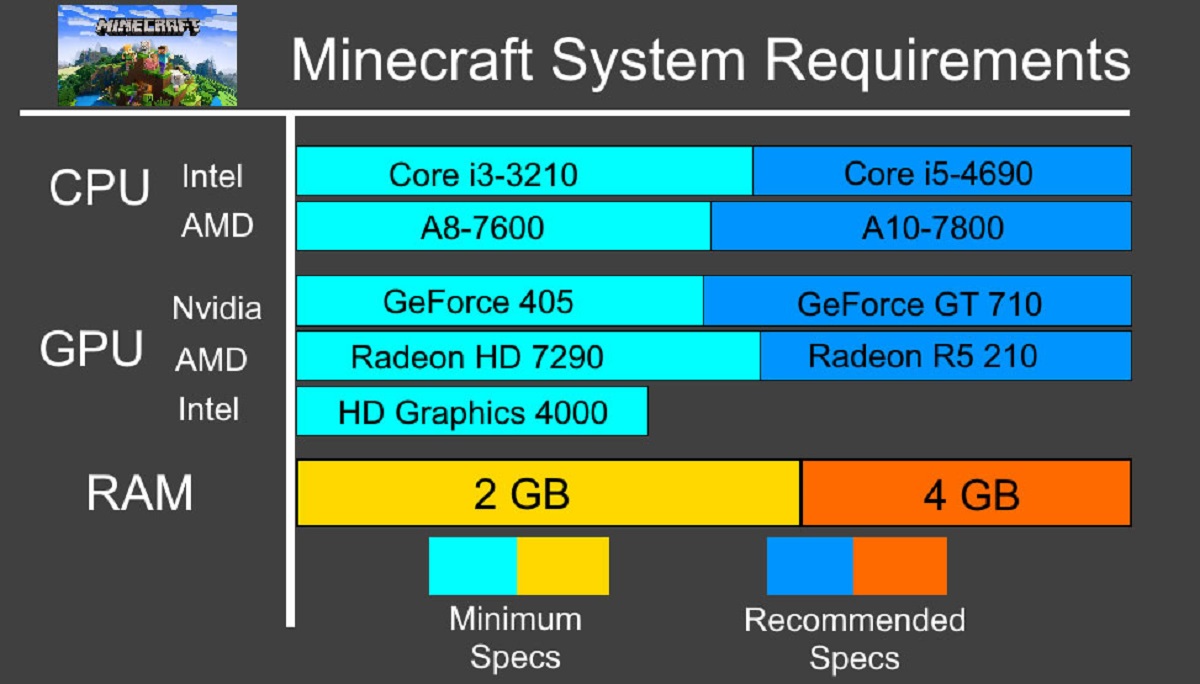
- Check the system requirements: Take note of Minecraft’s system requirements and recommended specifications. This will give you a baseline of the minimum graphics card specifications you should look for. Keep in mind that it’s often beneficial to opt for a graphics card that exceeds the minimum requirements to future-proof your system.
- Consider your gaming preferences: Think about the level of graphical fidelity you desire in Minecraft. If you’re content with the game’s default visuals, a mid-range graphics card will suffice. However, if you want to use resource packs, mods, or shaders that significantly enhance the graphics, you may need a more powerful graphics card.
- Research graphics card models: Look up reviews and comparisons of different graphics card models. Pay attention to factors such as performance benchmarks, cooling solutions, and reliability. Websites and forums dedicated to gaming hardware can be valuable resources for gathering information and user experiences.
- Consider brand and manufacturer: Choosing a reputable brand and manufacturer can ensure high-quality components and reliable customer support. Popular graphics card manufacturers include NVIDIA, AMD, and ASUS, among others.
- Check compatibility and power requirements: Ensure that the graphics card you choose is compatible with your computer’s motherboard and has the necessary power connectors. Check the power supply unit’s capacity to determine if it can handle the power demands of the new graphics card.
- Settle on a graphics card that meets your needs: Based on your budget, requirements, and research, select a graphics card that offers a good balance between price and performance for your Minecraft gaming needs.
Remember, the graphics card you choose should not only meet the requirements for Minecraft but also be suitable for any other games or applications you plan to use. Taking the time to research and select a compatible graphics card will ensure a seamless and enjoyable Minecraft gaming experience with improved visuals and performance.
Preparing your computer for a graphics card upgrade
Before installing a new graphics card for Minecraft, it’s important to prepare your computer to ensure a smooth upgrade process. Follow these steps to get your computer ready:
- Power off your computer: Shut down your computer and unplug it from the power source to avoid any potential electrical hazards.
- Open the computer case: Depending on your computer model, you may need to remove screws or slide off a side panel to access the internal components. Refer to your computer’s user manual or manufacturer’s website for specific instructions on opening the case.
- Gather necessary tools: Make sure you have the necessary tools, such as a screwdriver, to remove or secure components inside your computer case.
- Ground yourself: Before touching any components inside your computer, ground yourself by touching a metal surface or wearing an anti-static wristband. This helps prevent static electricity from damaging sensitive components.
- Remove the current graphics card (if applicable): If you’re replacing an existing graphics card, you’ll need to remove it from the motherboard. Unplug any power connectors and gently release the retention mechanism (usually a latch or screw) securing the card. Carefully lift the card out of its slot.
- Check for available PCIe slots: Examine your motherboard to identify available PCIe (Peripheral Component Interconnect Express) slots. The new graphics card should fit into an available PCIe slot that matches its specifications (e.g., PCIe x16).
- Ensure proper power supply connections: If your new graphics card requires additional power, ensure that your power supply unit has the necessary connectors. If not, you may need to consider upgrading your power supply unit to accommodate the new card’s power requirements.
- Clear space and ensure proper ventilation: Check inside your computer case for any obstructions that may impede the installation of the new graphics card. Ensure that the chosen PCIe slot has enough space for the card and that there is proper ventilation to prevent overheating.
- Refer to the graphics card manufacturer’s instructions: Consult the manufacturer’s instructions or online documentation for any specific guidelines or recommendations for preparing your computer for the installation of their graphics card.
By following these steps and properly preparing your computer, you will be ready to install the new graphics card for Minecraft. Ensuring a clean and well-prepared computer environment will not only make the installation process easier but also contribute to the overall stability and performance of your system.
Installing the new graphics card
Once you have prepared your computer for the installation of a new graphics card, you are ready to proceed with the installation process. Follow these steps to install the new graphics card for Minecraft:
- Locate the PCIe slot: Identify the appropriate PCIe slot on your motherboard for the installation of the new graphics card. This is usually a PCIe x16 slot, but refer to your motherboard manual for specific details.
- Remove slot covers: If the chosen slot is covered by a metal bracket, gently remove it by unscrewing the retaining screw and sliding it out of the way.
- Align the graphics card: Hold the new graphics card by its edges, and align the gold contacts on the card with the PCIe slot. Ensure that the card is inserted straight and does not force it into the slot, as this may damage the card or the motherboard.
- Secure the card: Once the graphics card is aligned with the PCIe slot, gently press it down until it is fully seated in the slot. You may hear a clicking sound or feel a slight resistance when the card is properly inserted. Secure the card by screwing in the retaining bracket or latch if applicable.
- Connect power cables: If your new graphics card requires additional power, connect the necessary power cables from your power supply unit to the appropriate connectors on the graphics card. Make sure these connections are secure.
- Replace the computer case: Carefully close the computer case, ensuring that all edges align properly. Secure the case with the screws or latches according to your computer’s design.
- Connect monitor and peripherals: Reconnect your monitor to the graphics card’s video output. If applicable, connect any other peripherals such as a keyboard or mouse that were disconnected during the installation process.
- Power on the computer: Plug your computer back into the power source and press the power button to turn it on. Your computer should now detect the new graphics card.
- Install graphics drivers: To ensure proper functionality and performance of the new graphics card, install the latest drivers provided by the graphics card manufacturer. Visit their website or use their software utility to download and install the appropriate drivers.
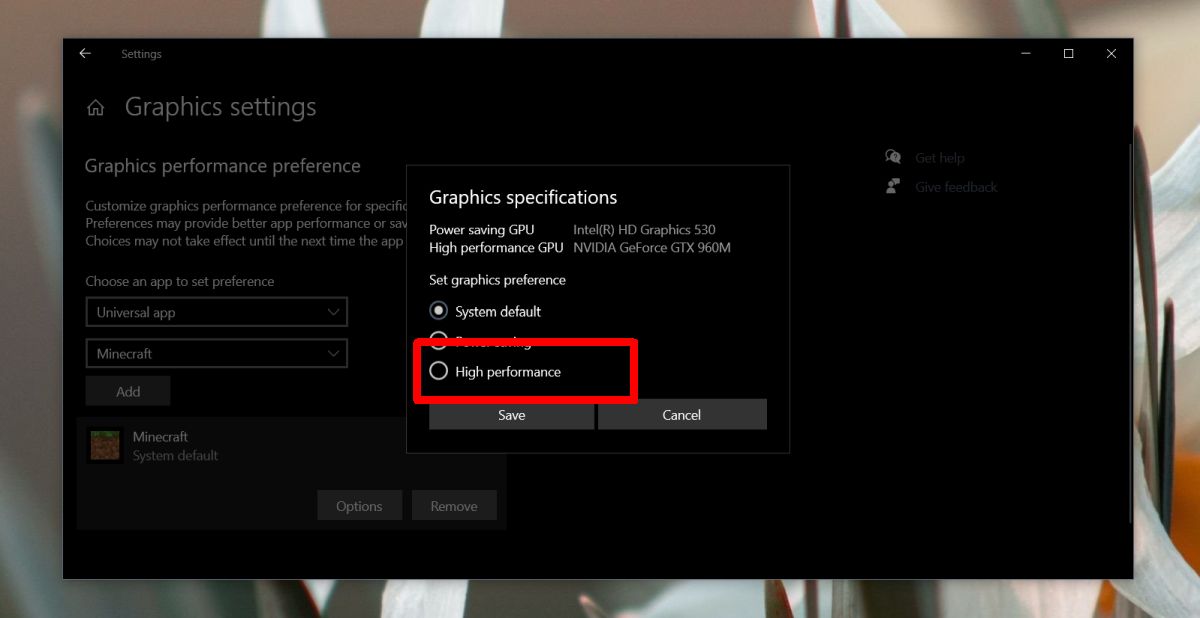
- Test the graphics card: Launch Minecraft and observe the performance and visuals. Ensure that the game is using the new graphics card by checking the graphics settings or using third-party software that displays system information. Make any necessary adjustments to the game settings for optimal performance.
By following these steps, you will successfully install the new graphics card for Minecraft. Remember to handle the hardware components delicately and refer to the manufacturer’s instructions or online resources for any specific guidelines related to their graphics card model.
Configuring Minecraft to use the new graphics card
After installing a new graphics card for Minecraft, it’s important to configure the game to make use of the upgraded hardware. Here are the steps to configure Minecraft to use the new graphics card:
- Launch Minecraft: Open the Minecraft launcher and log in to your Minecraft account.
- Open Minecraft settings: In the launcher, click on “Settings” or “Options” to access the Minecraft settings.
- Select “Video Settings”: Look for the “Video Settings” or “Graphics Settings” option in the settings menu and click on it.
- Adjust graphics settings: In the video settings menu, you can customize various graphics options such as render distance, smooth lighting, particle settings, and more. These settings allow you to optimize the game’s visuals based on your preferences and the capabilities of your new graphics card.
- Ensure hardware acceleration is enabled: Check if the “Use VBOs” (Vertex Buffer Objects) and “Use VSync” options are enabled. These options utilize your graphics card’s hardware acceleration capabilities to improve performance and reduce screen tearing. Enable them if they are not already.
- Apply and test the settings: Once you have adjusted the graphics settings, click on “Done” or “Apply” to save the changes. Launch a Minecraft world to test the new graphics card’s performance and verify if the settings are to your satisfaction.
- Observe and adjust as needed: While playing Minecraft, monitor the game’s performance, visual quality, and overall stability. If you encounter any issues such as lag, frame rate drops, or artifacts, you may need to tweak the graphics settings further.
- Experiment with resource packs and shaders: If your new graphics card is capable of handling enhanced visuals, consider trying out resource packs and shaders to further improve Minecraft’s graphics. Install them and enable them through the Minecraft settings, making sure to adjust the settings accordingly for the best experience.
- Stay updated: As Minecraft continues to evolve, new updates, patches, and drivers may become available. Regularly check for updates from Mojang, the Minecraft community, and your graphics card manufacturer to ensure you have the latest software enhancements and bug fixes.
By configuring Minecraft to use the new graphics card and fine-tuning the graphics settings, you can fully leverage the improved capabilities of your upgraded hardware. Keep experimenting and adjusting the settings based on your preferences and the performance of your new graphics card to achieve the best possible Minecraft gaming experience.
Testing and optimizing your Minecraft graphics settings
Once you have configured Minecraft to use your new graphics card, it’s important to test and optimize the graphics settings to ensure the optimal performance and visual experience. Follow these steps to test and optimize your Minecraft graphics settings:
- Run Minecraft with default settings: Launch Minecraft and play the game with the default graphics settings. Pay attention to the frame rate, visual quality, and overall smoothness of the gameplay.
- Monitor performance statistics: Use in-game performance monitoring tools or third-party software to monitor key performance statistics such as FPS (frames per second), RAM usage, and GPU temperature. This will help you assess the impact of different graphics settings on your system.
- Adjust render distance: Experiment with different render distance settings to find a balance between performance and visual range. Lowering the render distance can improve FPS, while higher render distances offer a more immersive experience.
- Disable unnecessary graphics options: Review the graphics settings and disable any options that are not essential or have a significant impact on performance. For example, turning off fancy graphics, smooth lighting, or particles can provide a performance boost.
- Experiment with texture packs: Install different texture packs and observe their impact on performance and visuals. Higher resolution texture packs may provide more detailed visuals but can also demand more resources from your graphics card.
- Tweak advanced settings: Explore the advanced graphics settings, such as Anisotropic Filtering, Antialiasing, and Mipmap Levels. Adjust these settings to strike a balance between visual quality and performance.
- Optimize Java settings: Minecraft runs on Java, and optimizing the Java settings can improve performance. Allocate more RAM to Minecraft in the launcher settings and consider enabling JVM (Java Virtual Machine) arguments for better Java performance.
- Test with shaders and mods: If your new graphics card is capable, experiment with shaders and mods that enhance Minecraft’s visuals. Take note of their impact on performance and adjust the graphics settings accordingly for the best experience.
- Regularly update drivers: Keep your graphics card drivers up to date by visiting the manufacturer’s website and downloading the latest drivers. Updated drivers often come with optimizations and fixes that can improve the performance and stability of Minecraft.
- Benchmark and fine-tune: Utilize benchmarking tools to assess the performance of Minecraft under different settings. This can help you identify the optimal graphics settings that provide a balance between visual quality and smooth gameplay.
By testing and optimizing your Minecraft graphics settings, you can achieve the best possible performance and visual experience based on your new graphics card’s capabilities. Remember to strike a balance between visual enhancements and the smoothness of gameplay to ensure an immersive and enjoyable Minecraft gaming experience.
Troubleshooting common issues with graphics card changes in Minecraft
Changing your graphics card for Minecraft can sometimes lead to certain issues or complications. However, with proper troubleshooting, you can address these issues effectively. Here are some common problems that may arise and how to troubleshoot them:
- Driver conflicts: Ensure that you have completely removed the previous graphics card’s drivers before installing the new graphics card. Use specialized driver uninstallation tools or follow the manufacturer’s instructions to ensure a clean driver installation.
- Incorrect graphics card detection: If Minecraft is not recognizing your new graphics card, update your graphics card drivers to the latest version. Additionally, check your computer’s BIOS settings to ensure that the PCIe slot is enabled.
- Low frame rates or stuttering: If you experience low frame rates or stuttering in Minecraft, check your graphics settings and reduce the render distance or adjust other graphics options to lighten the load on your graphics card. Additionally, ensure that your computer has sufficient cooling to prevent overheating, as high temperatures can reduce performance.
- Screen tearing: Screen tearing occurs when the graphics card and monitor are out of sync. Enable VSync in the graphics settings to resolve screen tearing issues, or consider using third-party software that synchronizes the frame rate between your graphics card and monitor.
- Compatibility issues with mods or shaders: Certain mods or shaders may not be compatible with your new graphics card. Check for updated versions of the mods or shaders that are compatible with your graphics card, and ensure that you have the correct dependencies and settings configured.
- Artifacts or visual glitches: If you notice artifacts, visual glitches, or pixelation in Minecraft, it may indicate an issue with your graphics card or its drivers. Update your graphics card drivers to the latest version and, if the problem persists, contact the graphics card manufacturer for further assistance.
- Power supply limitations: If your new graphics card requires additional power connectors, ensure that your power supply unit can provide enough power to support the card’s requirements. If not, consider upgrading your power supply unit to a higher wattage capacity.
- Memory issues: Insufficient system RAM or video memory can lead to performance issues in Minecraft. Monitor your system’s resource usage and consider upgrading your RAM or allocating more memory to Minecraft in the launcher settings if needed.
- Conflicts with other software: Certain background processes or software on your computer may conflict with Minecraft or your graphics card. Close unnecessary applications or background processes that may be utilizing system resources and conflicting with Minecraft’s performance.
- Consulting expert help: If you have tried troubleshooting steps and are still facing issues with your graphics card in Minecraft, consider seeking assistance from technical support forums, the Minecraft community, or contacting the graphics card manufacturer directly for further guidance.
By troubleshooting common issues related to graphics card changes in Minecraft, you can overcome challenges and enjoy a smooth and immersive gaming experience with your new graphics card.
Conclusion
Upgrading your graphics card for Minecraft can greatly enhance your gaming experience by improving visual quality, performance, and overall immersion. By carefully researching, selecting, and installing a compatible graphics card, you can unlock the full potential of Minecraft’s graphics capabilities.
Ensure that you thoroughly check your current graphics card, research different models, and consider your budget and gaming preferences before making a final decision. Preparing your computer for the graphics card upgrade is essential to ensure a smooth installation process, including checking compatibility, removing the old graphics card, and making any necessary power supply adjustments.
After installing the new graphics card, configuring Minecraft to utilize the upgraded hardware is crucial. Adjusting graphics settings, testing different options, and optimizing performance will allow you to strike a balance between visual quality and smooth gameplay.
In the event of any issues or complications, the troubleshooting steps provided should help you address common problems such as driver conflicts, low frame rates, or compatibility issues with mods and shaders.
Remember to stay up to date with the latest drivers and software updates for your graphics card to ensure optimal performance and stability. Regularly monitor your system’s performance and make adjustments as needed to achieve the best possible Minecraft experience.
By following these steps and guidelines, you can effectively change the graphics card that Minecraft uses and enjoy an enhanced gaming experience with improved visuals and smooth gameplay.