Before Cancelling Your Asana Account
Considering cancelling your Asana account? Before taking such a step, it’s important to understand a few key things. Cancelling an account can have repercussions, so it’s crucial to thoroughly evaluate your decision. Here are some important factors to consider before proceeding with the cancellation:
- Reason for cancellation: Take a moment to reflect on why you want to cancel your Asana account. Are you dissatisfied with the features or functionality? Are you no longer using the platform? Understanding your reasons can help you make an informed decision.
- Communication and collaboration: Asana is a powerful tool for team communication and collaboration. If you’re part of a team or organization using Asana, ensure you have discussed your intentions with other members. It’s important to have a plan in place for transitioning tasks and responsibilities to other team members or finding an alternative solution.
- Data backup: Before cancelling your account, make sure to backup any important data or information stored on Asana. This includes tasks, documents, attachments, and project history. Asana provides options for exporting your data, ensuring that you can access it even after your account is cancelled.
- Affected integrations: Consider any integrations you have set up with Asana. Cancelling your account may impact the functionality of these integrated apps or services. Take note of any integrations you will need to disconnect or find alternatives for before proceeding with the cancellation.
- Downgrading instead of cancelling: If you’re considering cancelling due to cost or specific features, explore the option of downgrading your plan instead. Asana offers various subscription plans, and switching to a lower tier might meet your needs while still allowing you to retain access to the platform.
By taking the time to assess these considerations, you can make a well-informed decision regarding the cancellation of your Asana account. Remember, cancelling an account is a significant step, so it’s important to evaluate all aspects and alternatives to ensure it’s the right choice for you and your team.
Steps to Cancel Your Asana Account
If you have considered all the factors and have decided to proceed with cancelling your Asana account, here are the steps to guide you through the process:
- Log in to your Asana account: Visit the Asana website and log in using your account credentials. Ensure that you have administrative access to cancel the account.
- Access account settings: Once logged in, navigate to the account settings section. You can typically find this by clicking on your profile picture or the account dropdown menu.
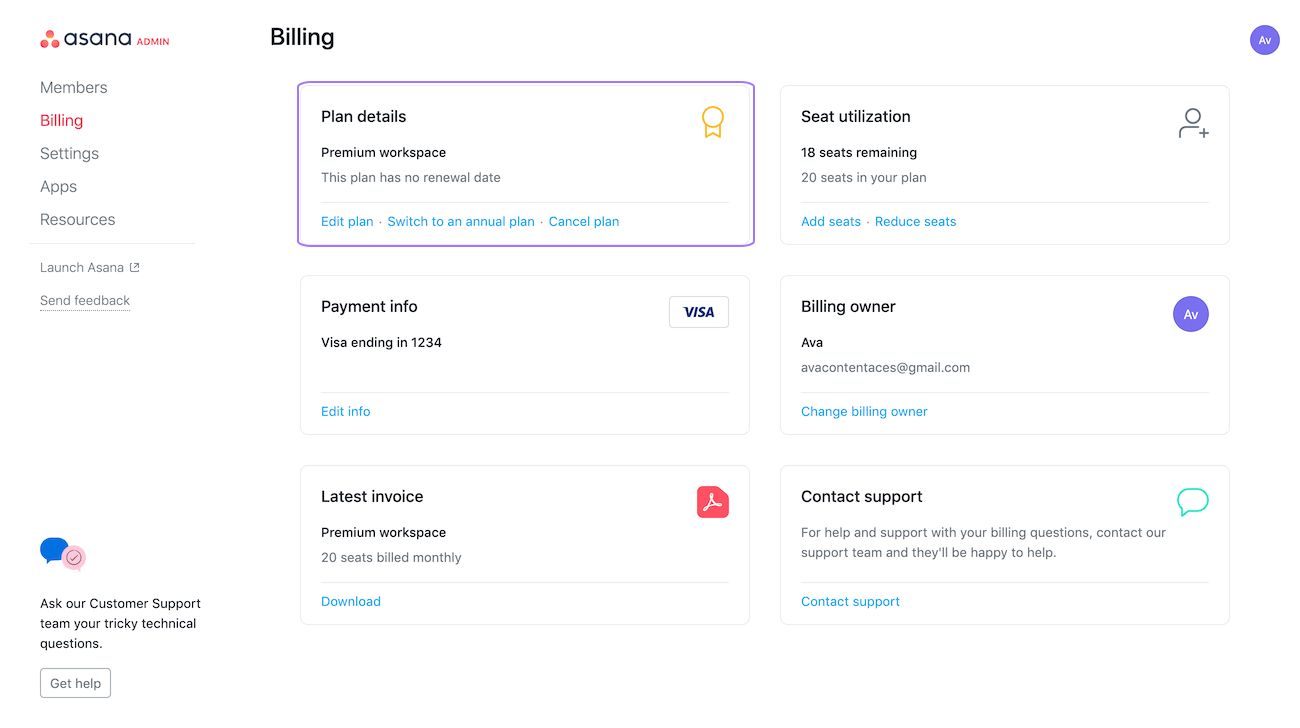
- Choose “Account Management” or “Billing”: Depending on your account settings layout, you will either find an “Account Management” or “Billing” option. Select this to access your account management options.
- Cancel your subscription: Look for the option to cancel your subscription. Asana offers different plans, so the wording may vary, but you should be able to locate the appropriate option. Follow the prompts to initiate the cancellation process.
- Confirm cancellation: After selecting the cancellation option, a confirmation window will typically appear. Verify that you want to cancel your account. Read any additional information or terms related to the cancellation before proceeding.
- Provide feedback (optional): As part of the cancellation process, Asana may offer an opportunity to provide feedback on your experience or reasons for cancelling. This step is optional, but providing feedback can help Asana improve their services in the future.
- Review confirmation: Once you have confirmed the cancellation, review the confirmation message that appears on your screen. Take note of any additional instructions or steps provided.
Following these steps will allow you to cancel your Asana account successfully. It’s essential to go through each step carefully, ensuring you understand the implications of cancelling your account and any potential impact on your tasks, projects, and team collaboration.
Cancel Your Subscription or Downgrade Your Plan
If you’re considering cancelling your Asana account due to cost or specific features, it’s worth exploring alternative options before completely terminating your subscription. Asana provides the flexibility to downgrade your plan, which may better suit your needs. Here’s how you can cancel your subscription or downgrade your plan:
- Log in to your Asana account: Access your Asana account by visiting the website and entering your login credentials.
- Go to Account Management or Billing: Once logged in, navigate to the account settings section. Look for the options labeled “Account Management” or “Billing” to continue.
- Select “Change Plan” or “Upgrade/Downgrade”: Within the account management or billing settings, you should find the option to change your plan. Click on this to proceed further.
- Review plan options: Asana offers different subscription plans with varying features and pricing. Take the time to review the available plans and compare them to your current plan.
- Select a new plan or downgrade: If you decide to change your plan, select a different one that best meets your needs. If you want to downgrade your plan, choose the lower tier that aligns with your requirements.
- Review changes and pricing: As you make changes to your plan, review the modifications being made, including any adjustments to pricing or features. Ensure you understand the implications of the new plan.
- Confirm changes: Once you are satisfied with your selection, confirm the changes to your subscription plan. Be aware that any changes may take effect immediately or at the end of your current billing cycle.
By exploring the option to cancel your subscription or downgrade your plan, you can potentially find a more suitable arrangement without completely terminating your Asana account. This allows you to continue benefiting from Asana’s features and collaboration tools while aligning with your budget and specific needs. Take the time to assess plan options and make an informed decision that best suits your requirements.
Export Your Asana Data Before Cancelling
Before you proceed with cancelling your Asana account, it is important to ensure that you have a copy of your data. Asana offers an option to export your data, allowing you to save your tasks, projects, and other valuable information. Here’s how you can export your Asana data:
- Log in to your Asana account: Visit the Asana website and log in to your account using your credentials. Ensure that you have administrative access to export the data.
- Access the account settings: Once logged in, navigate to the account settings section. Look for options such as “Account Management” or “Settings” where you can access your account-related features.
- Find the data export option: Look for the option to export your data. Asana typically offers a data export feature that allows you to create a copy of your tasks, projects, and associated information.
- Select the export format: Choose the desired format for your exported data. Asana offers options such as CSV or JSON, depending on your preferences and needs.
- Choose the data range: Specify the date range for which you want to export data. You can export data for a specific project, workspace, or select a custom range to export a particular timeframe.
- Initiate the export: Once you have configured the export settings, initiate the export process. This may take some time, depending on the amount of data being exported.
- Download the exported data: Once the export process is complete, Asana will provide you with a link or notification to download your exported data. Click on the link or follow the provided instructions to retrieve your data.
By exporting your Asana data, you can preserve your tasks, projects, and other valuable information even after cancelling your account. It ensures that you have a backup of your data for future reference or in case you decide to switch back to Asana. Remember to store the exported data in a secure location to maintain its integrity and accessibility.
Delete Your Asana Workspace or Organization
If you have made the decision to cancel your Asana account, it’s essential to delete any workspaces or organizations associated with your account. Deleting a workspace or organization ensures that all data, tasks, and projects within them are permanently removed. Follow these steps to delete your Asana workspace or organization:
- Log in to your Asana account: Visit the Asana website and log in to your account using your credentials. Ensure that you have administrative access to delete the workspace or organization.
- Access the workspace settings: Once logged in, locate the workspace or organization you wish to delete. Click on the settings icon (usually represented by a gear or three dots) next to the workspace name.
- Select “Settings” or “Workspace settings”: From the dropdown menu, choose the option labeled “Settings” or “Workspace settings” to access the configuration options.
- Navigate to “Remove from Asana”: Within the settings menu, look for the option to “Remove from Asana” or “Delete workspace/organization”. This should be located in a prominent position as it’s a critical action.
- Confirm deletion: Asana will display a confirmation message or prompt to confirm the deletion. Read any additional information or warnings before proceeding.
- Review deletion details: After confirming, Asana will provide information about what will happen to the workspace or organization. It will outline the data and projects that will be permanently deleted. Ensure that you understand the implications of this action.
- Verify your intention: As a final step, you may be required to type in a verification phrase or check a box to confirm that you understand the consequences of deleting the workspace or organization. Follow the instructions provided.
By deleting your Asana workspace or organization, you can ensure that all data associated with them is permanently removed from the platform. Take the time to carefully evaluate and back up any important information or tasks before initiating the deletion. Once deleted, it may be challenging or impossible to recover the data, so proceed with caution and ensure that this action aligns with your intentions.
Removing Integrations and Connections Before Cancellation
Before you cancel your Asana account, it is important to review and remove any integrations or connections you may have established with other apps or services. Disconnecting these integrations ensures that your data remains secure and that there are no interruptions or issues after cancelling your account. Here’s how you can remove integrations and connections in Asana:
- Log in to your Asana account: Visit the Asana website and log in to your account using your credentials.
- Access the integrations settings: Once logged in, navigate to the account settings section. Look for options such as “Integrations” or “Connected Apps” to manage your integrations.
- Review the connected integrations: In the integrations settings, you will find a list of all the apps and services that are connected to your Asana account. Take the time to review each integration and consider its importance and relevance to your workflow.
- Remove integrations: For each integration you wish to remove, look for an option to disconnect or remove the connection. Click on this option to initiate the disconnection process.
- Confirm disconnection: Asana may ask for confirmation before disconnecting an integration. Read any messages or warnings presented, and proceed with the disconnection if you are sure.
- Review remaining integrations: After removing selected integrations, review the remaining integrations to ensure they are necessary and will not be affected by cancelling your Asana account.
By removing integrations and connections before cancelling your Asana account, you can ensure a smooth transition and avoid any potential issues with data syncing or compatibility after account termination. Take the time to assess and disconnect integrations that are no longer needed or that could pose a security risk. By doing so, you can maintain control over your data and ensure a seamless experience with other connected apps or services.
Frequently Asked Questions (FAQs)
Here are some frequently asked questions about cancelling an Asana account:
Q: Can I reactivate my Asana account after cancellation?
A: Yes, you can reactivate your Asana account after cancellation. However, keep in mind that your data may not be recoverable, so it’s important to back it up before cancelling.
Q: Will cancelling my Asana account delete all my data?
A: Yes, cancelling your Asana account will result in the permanent deletion of all your data, including tasks, projects, attachments, and other associated information. Be sure to export any important data before cancelling.
Q: What happens to my team members if I cancel my Asana account?
A: When you cancel your Asana account, your team members will no longer have access to the tasks, projects, and other data within your workspace. It is important to communicate with your team and make arrangements to transfer responsibilities or find alternative solutions.
Q: Can I transfer ownership of an Asana workspace or organization?
A: Yes, you can transfer ownership of an Asana workspace or organization to another member of that workspace or organization. This ensures that someone else assumes administrative responsibilities if you decide to cancel your account.
Q: Will cancelling my Asana account stop any recurring payments or subscription charges?
A: Yes, cancelling your Asana account will stop any recurring payments or subscription charges associated with your account. However, it’s important to review the cancellation terms and any notice periods to ensure a smooth transition.
Q: Can I cancel my Asana account at any time?
A: Yes, you can cancel your Asana account at any time. There are no restrictions or time limits for cancelling your account. Simply follow the steps outlined in the account settings to initiate the cancellation process.
Q: Will cancelling my Asana account affect my integrations with other apps?
A: Yes, cancelling your Asana account may impact the functionality of any integrations you have set up with other apps or services. It is important to review and remove these integrations before cancelling your account.
These are some of the most commonly asked questions about cancelling an Asana account. It’s recommended to reach out to Asana’s support or refer to their documentation for more specific or detailed inquiries related to your account.