Introduction
Asana is a powerful project management tool that offers a wide range of features and capabilities. However, there may come a time when you no longer require the full functionality of your Asana account and would like to downgrade it. Whether you are looking to decrease costs, simplify workflow, or streamline your project management processes, downgrading your Asana account can offer several benefits. In this guide, we will walk you through the steps on how to effectively downgrade your Asana account.
By downgrading your Asana account, you can ensure that you are only paying for the features that you truly need, without any unnecessary expenses. Additionally, a downgraded account can help you focus on the core functionalities required for your specific projects, avoiding any distractions or complications that might arise from having access to additional features.
Before proceeding with the account downgrade, it is essential to understand the limitations and changes that come with it. Downgrading may restrict certain functionalities and reduce access to advanced features, so it’s crucial to evaluate if those limitations will align with your project management needs.
In the following steps, we will guide you through the process of downgrading your Asana account, ensuring that you have all the information needed to make an informed decision and smoothly transition to your downgraded account.
Step 1: Accessing the Asana Account Settings
Before you can begin downgrading your Asana account, you need to access the account settings. Here’s how you can do it:
- Start by logging in to your Asana account using your credentials.
- Once you’re logged in, look for the profile picture or initials in the top-right corner of the screen. Click on it to open the dropdown menu.
- In the dropdown menu, you will find the option “My Profile Settings.” Click on it to proceed.
- On the left side of the screen, you will see a vertical menu. Scroll down and find the “Admin Console” option.
- Click on “Admin Console” to open the administration settings for your Asana account.
By following these steps, you will successfully access the account settings and be ready to proceed to the next steps of downgrading your Asana account.
It’s worth noting that only certain users with administrative privileges can access the account settings and make changes to the account. If you don’t have the necessary permissions, you may need to reach out to your Asana account administrator to request access or assistance with the downgrading process.
Step 2: Navigating to the Account page
Once you’ve accessed the Asana account settings, the next step is to navigate to the Account page. Here’s how you can do it:
- In the Admin Console, look for the “Settings” tab. Click on it to proceed.
- After clicking on the “Settings” tab, a sub-menu will appear. Look for the option “Account Settings” and click on it.
- This will take you to the Account page, where you can make various changes to your Asana account settings and configurations.
By following these steps, you will successfully navigate to the Account page, which is where you can initiate the process of downgrading your Asana account. On this page, you will find different sections and options related to managing your account, including the ability to modify your subscription plan.
Before proceeding to the next step, take a moment to familiarize yourself with the different sections and options available on the Account page. This will ensure that you can make informed choices when downgrading your account and understand any potential limitations or changes that may occur.
Now that you’ve successfully navigated to the Account page, let’s move on to the next step, which is the actual process of downgrading your Asana account.
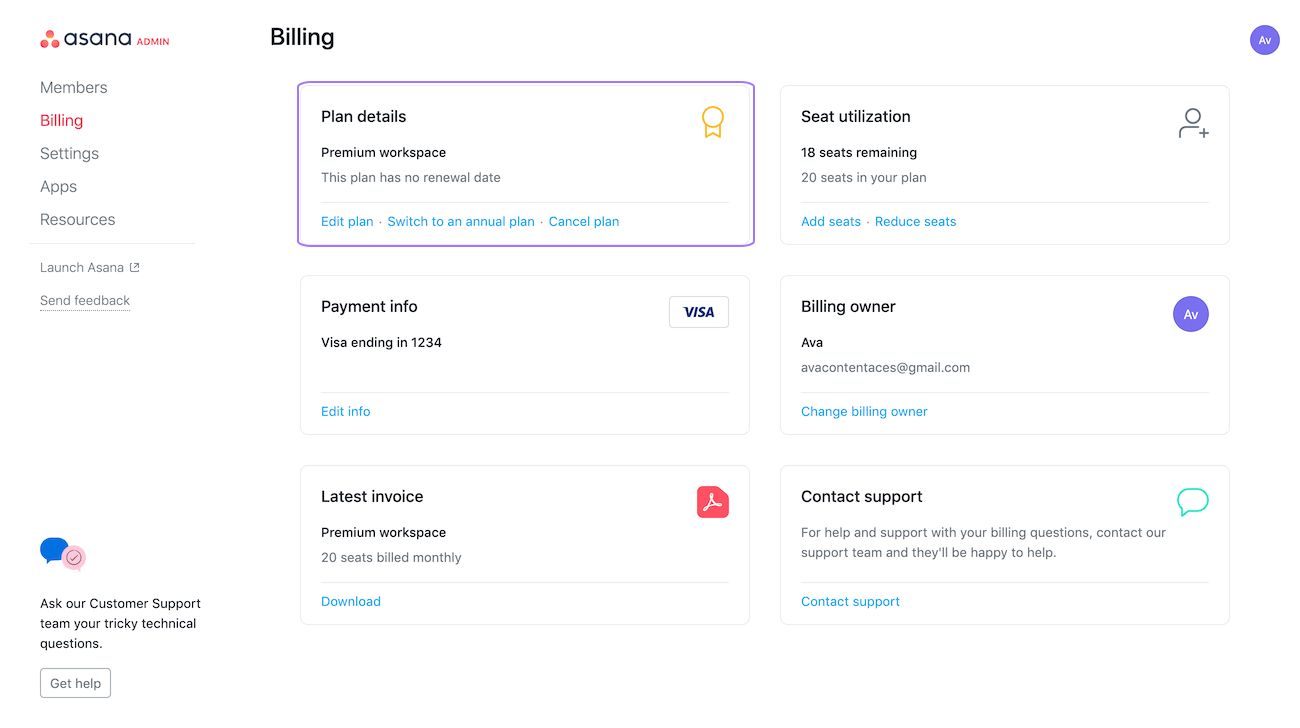
Step 3: Downgrading the Asana Account
Once you are on the Account page, you can proceed with the process of downgrading your Asana account. Here’s how:
- Scroll down on the Account page until you find the “Plan” section. This is where you can modify your subscription plan.
- Within the “Plan” section, you will see your current subscription plan details, such as the plan name, features, and pricing. Look for the option to downgrade your account, which may be labeled as “Downgrade Plan” or a similar variation.
- Click on the “Downgrade Plan” option to initiate the account downgrade process.
- Depending on your current subscription plan and the available options for downgrade, you may be presented with a list of different plan tiers or a single downgrade choice. Select the option that best fits your project management needs.
- After selecting the desired downgrade option, review the changes in your plan details that will take effect upon downgrading. Pay attention to any features or functionalities that may be limited or removed in the downgraded plan.
- Once you are comfortable with the changes, click on the “Confirm Downgrade” or similar button to finalize the downgrade process.
By following these steps, you will successfully downgrade your Asana account to the selected plan. Take note that the changes may take effect immediately or at the end of your current billing cycle, depending on the specific terms outlined by Asana.
It’s important to carefully review the changes and limitations associated with the downgraded plan to ensure that it aligns with your project management requirements. If you have any concerns or questions about the downgrade, consider reaching out to Asana’s customer support for assistance.
Now that you have successfully downgraded your Asana account, let’s move on to the next step to understand the changes and limitations that come with the downgraded plan.
Step 4: Confirming the downgrade
After initiating the downgrade process for your Asana account in the previous step, it’s important to confirm the downgrade to ensure that the changes are applied correctly. Follow these steps to confirm the downgrade:
- Once you click on the “Confirm Downgrade” or similar button, Asana will prompt you to review the details of the downgrade.
- Carefully review the new plan details, including any limitations or changes that will be implemented with the downgrade. Take note of any functionalities or features that may be restricted in the downgraded plan.
- If you are satisfied with the changes, proceed to confirm the downgrade by clicking on the “Confirm” or “Accept” button.
- Asana may require you to re-enter your account password or provide additional authentication to complete the downgrade process. Follow the prompts and provide the necessary information to confirm the downgrade.
- Once you have successfully confirmed the downgrade, Asana will apply the changes to your account accordingly.
It’s crucial to double-check the downgrade details and ensure that you are comfortable with the limitations and changes that come with the downgraded plan. This will help prevent any surprises or disruptions to your project management workflow.
If you have any concerns or questions during the confirmation process, do not hesitate to reach out to Asana’s customer support for assistance. They will be able to provide guidance and address any queries you may have regarding the downgrade.
Now that you have successfully confirmed the downgrade, let’s proceed to the next step where we will review the changes and limitations associated with the downgraded account.
Step 5: Reviewing the changes and limitations
Once you have confirmed the downgrade of your Asana account, it’s crucial to take some time to review the changes and limitations that come with the downgraded plan. Understanding these limitations will help you adjust your project management workflow accordingly. Follow these steps to review the changes:
- Access the account settings or profile page on Asana. You can do this by following the steps mentioned earlier in this guide.
- Navigate to the “Plan” section or similar area, where you initiated the downgrade process.
- Within the “Plan” section, you will find the details of your downgraded plan. Take note of any functionalities or features that may be limited or removed.
- Review the available features and compare them to your previous subscription plan. Pay attention to any changes in task limits, integration availability, advanced reporting, or other premium features that may have been restricted.
- Consider the impact of these changes on your project management processes and workflow. Determine any adjustments or alternative strategies you may need to implement to accommodate the limitations of the downgraded plan.
By careful review, you can ensure that you are fully aware of the changes and limitations introduced with the downgraded plan. This will prevent any unexpected hurdles or difficulties in managing your projects using Asana.
If you have any questions or concerns regarding the changes and limitations, don’t hesitate to contact Asana’s customer support. They will be able to provide further clarification and guidance to help you navigate the downgraded plan effectively.
Now that you have reviewed the changes and limitations, let’s proceed to the next step where we will explore how to adjust your usage to fit the downgraded account.
Step 6: Adjusting usage to fit the downgraded account
With your Asana account successfully downgraded, it’s essential to make the necessary adjustments to align your usage with the limitations and changes introduced by the downgraded plan. Follow these steps to effectively adjust your usage:
- Review your current projects and tasks to identify any features or functionalities that may be restricted in the downgraded plan. Take note of any integrations, advanced reporting, or other premium features that may need to be modified.
- Consider alternative methods or tools for tasks that are no longer available due to the downgraded plan. Explore different ways to achieve the same results without relying on the restricted features.
- Communicate with your team members or stakeholders about the changes and limitations of the downgraded plan. Ensure everyone is aware of the adjustments and any impact it may have on their project-related activities.
- Revisit and update your project management processes and workflows to accommodate the limitations of the downgraded plan. Identify any areas where you need to streamline or simplify your approach to work within the constraints of the new plan.
- Take advantage of the features and functionalities that are still available in the downgraded plan. Familiarize yourself with the tools and capabilities that can still support your project management activities effectively.
By adjusting your usage and workflows, you can maximize the value of your downgraded Asana account. While there may be some limitations, with proper planning and adaptation, you can continue to manage your projects efficiently and effectively.
If you encounter any challenges or need guidance on making the necessary adjustments, don’t hesitate to reach out to Asana’s customer support or consult their documentation and resources. They can provide valuable assistance in navigating the downgraded plan and optimizing your project management practices.
Now that you have learned how to adjust your usage for the downgraded account, you are ready to effectively utilize your Asana account within the limitations of the new plan.
Conclusion
Downgrading your Asana account can be a strategic move to optimize costs, simplify workflow, and focus on essential project management functionalities. By following the steps outlined in this guide, you can successfully navigate the process of downgrading your Asana account.
We began by accessing the Asana account settings and navigating to the Account page. From there, we proceeded to downgrade the account, confirming the changes and reviewing the limitations that come with the downgraded plan. Finally, we discussed the importance of adjusting your usage to fit the downgraded account.
Throughout this process, it is important to carefully review the changes and limitations to understand how they might impact your project management workflow. Communicating these changes with your team members and stakeholders will help ensure a smooth transition to the downgraded account.
As you adjust your usage to fit the downgraded plan, take advantage of the features that are still available to maximize the effectiveness of your project management activities. Remember to reach out to Asana’s customer support if you have any questions or concerns during the downgrade process.
By downgrading your Asana account, you can optimize your project management approach and tailor it to your specific needs. Asana remains a valuable tool for efficient collaboration, even with the restrictions of the downgraded plan.
Now that you have a clear understanding of the steps involved in downgrading your Asana account, you are ready to take action and make the necessary adjustments to streamline your project management efforts.