Introduction
Are you a digital artist or graphic designer who relies on a Wacom tablet to bring your creative visions to life? If so, then you already know that having a well-calibrated tablet is crucial for achieving optimal accuracy and precision in your work. Calibrating your Wacom tablet ensures that it accurately translates your pen movements to the corresponding positions on the screen, resulting in a more natural and immersive drawing or design experience.
Calibration is the process of aligning the coordinates of your tablet with the display on your computer monitor. By doing so, you can eliminate any inconsistencies or discrepancies that may occur due to factors like individual pen pressure or tablet angle. The calibration process helps to ensure that your cursor or brush strokes are accurately placed on the screen, allowing you to have full control and confidence in your digital artwork.
In this guide, we will walk you through the step-by-step process of calibrating your Wacom tablet, regardless of the specific model or software you are using. Whether you are a beginner just getting started with your tablet or an experienced user looking to improve your workflow, following these calibration steps will help you achieve the best possible results.
Before we dive into the calibration process, it’s worth noting that calibrating your tablet should be a regular maintenance task. Over time, factors such as wear and tear, changes in environmental conditions, or accidental adjustments can impact the accuracy of your tablet. By periodically calibrating your device, you can ensure that it consistently performs at its best.
So, if you’re ready to take your Wacom tablet to the next level and optimize its performance, let’s get started with the calibration process. Follow the upcoming steps, and you’ll be well on your way to a more accurate and immersive digital art experience.
Why Calibrating Your Wacom Tablet is Important
Calibrating your Wacom tablet is essential for several reasons. Firstly, it ensures precision and accuracy in your digital artwork. When your tablet is properly calibrated, the movements you make with the pen will be accurately reflected on your computer screen. This level of accuracy is crucial, especially for tasks that require fine details or intricate designs. Whether you’re creating digital paintings, graphic designs, or illustrations, having a properly calibrated tablet will enhance your ability to produce high-quality work.
Another reason why calibration is important is that it improves your workflow and overall productivity. When your tablet is correctly calibrated, you won’t have to spend extra time correcting or adjusting your brush strokes or pen movements. This saves you time and allows you to focus more on your creative process. When you can trust that your tablet is accurately capturing your artistic expressions, you can work more efficiently and effectively.
In addition, a calibrated tablet helps to eliminate frustration and inconsistency in your work. When your tablet is not calibrated, you may experience issues like cursor drift, where the perceived position of your pen on the tablet does not align with the cursor on the screen. This can lead to imprecise strokes and an overall frustrating experience. By calibrating your tablet, you can eliminate these inconsistencies and ensure a smooth and reliable artistic workflow.
Furthermore, calibrating your Wacom tablet allows you to adjust the tablet’s sensitivity to suit your drawing style and preferences. Different artists have different pen pressure and tilt preferences, and calibration gives you the flexibility to customize these settings according to your needs. By fine-tuning the sensitivity of your tablet, you can achieve greater control over your brush strokes and create artwork that truly reflects your unique style.
Lastly, calibrating your tablet on a regular basis helps prevent potential issues that may arise due to factors like dirt or dust buildup. Over time, particles can accumulate on the tablet surface or beneath its protective cover, which can affect the accuracy of the pen tracking. By calibrating your tablet periodically, you can detect and address any inconsistencies caused by debris, ensuring a consistently smooth and precise drawing experience.
Now that you understand the importance of calibrating your Wacom tablet, let’s proceed to the steps involved in the calibration process.
Before You Start
Before diving into the calibration process, there are a few important things you should do to ensure a successful calibration:
- Update your drivers: Make sure that you have the latest drivers installed for your Wacom tablet. Drivers are software programs that enable your tablet to communicate with your computer effectively. Updating your drivers ensures that you have access to the latest features and bug fixes, which can enhance the overall performance and stability of your tablet.
- Close unnecessary programs: To avoid potential conflicts or disruptions during the calibration process, close any unnecessary programs or applications running in the background. This helps to allocate more system resources to the calibration utility, ensuring a smooth and uninterrupted experience.
- Remove any distractions: Find a quiet and well-lit space where you can focus on calibrating your tablet without distractions. Minimize any potential interruptions, such as phone notifications or loud noises, that could disrupt your concentration during the calibration process.
- Prepare a clean tablet surface: Ensure that the surface of your tablet is clean and free from any debris or obstructions. Use a soft, lint-free cloth to gently wipe the tablet surface and remove any dust, fingerprints, or smudges that could interfere with the accuracy of the pen tracking.
- Have your pen and tablet ready: Make sure that you have your Wacom pen and tablet readily available. Position your tablet in a comfortable and ergonomic position, and ensure that your pen is charged and in good working condition.
By following these preparatory steps, you can set yourself up for a smooth and effective calibration process. Taking the time to properly prepare will help ensure that you can fully optimize the performance of your Wacom tablet and achieve accurate and precise results in your digital artwork.
How to Calibrate Your Wacom Tablet
The process of calibrating your Wacom tablet may vary slightly depending on the specific model and software you are using. However, the following steps provide a general guideline that can be applied to most Wacom tablets:
- Step 1: Access the Wacom Tablet Properties: Start by accessing the Wacom Tablet Properties, which is the control panel for your tablet settings. The location of this control panel may differ depending on your operating system, but you can usually find it in the system tray or the Control Panel section.
- Step 2: Choose Your Tablet: Once you have accessed the Wacom Tablet Properties, select your specific tablet model from the list of connected devices. This ensures that you are calibrating the correct tablet.
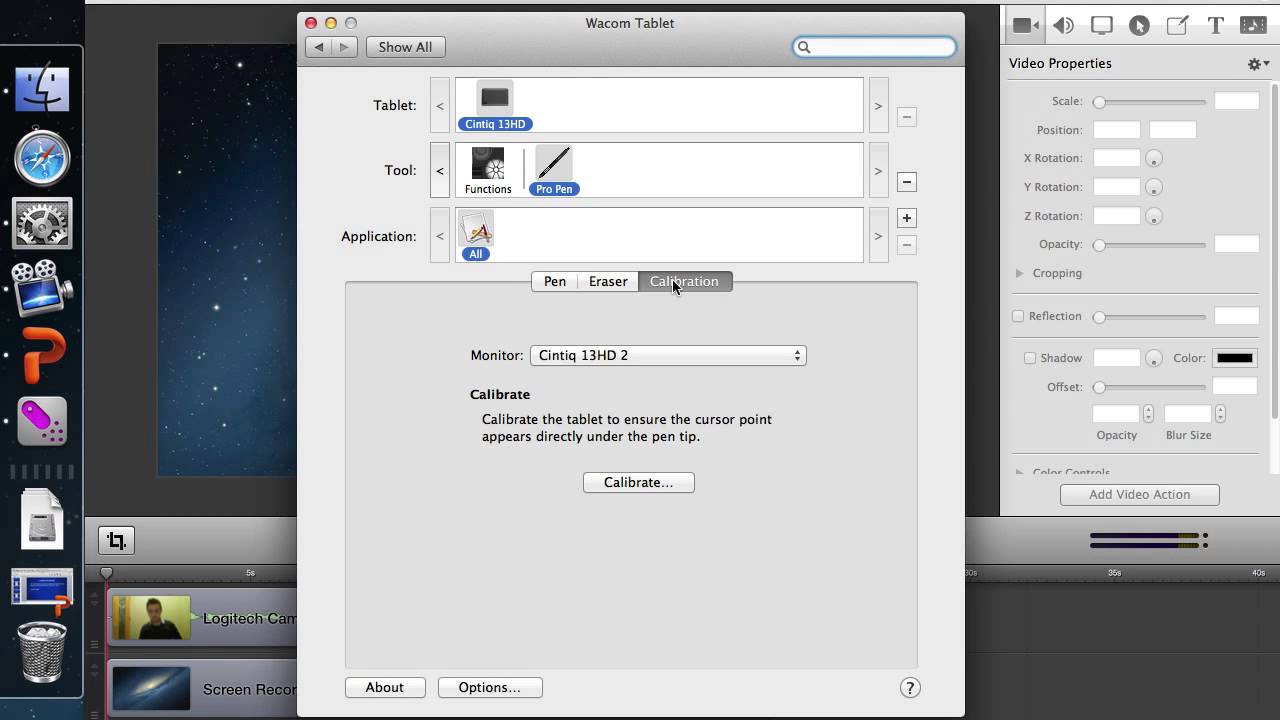
- Step 3: Run the Calibration Utility: Look for a button or tab labeled “Calibration” or “Pen Settings” within the Wacom Tablet Properties. Click on it to launch the calibration utility.
- Step 4: Follow the On-Screen Instructions: The calibration utility will guide you through a series of on-screen instructions. Typically, you will be asked to tap specific points on your tablet screen with your pen. Follow the instructions carefully, making sure to tap each point accurately. This process allows the tablet to determine the correct mapping between your pen’s position and the corresponding areas on the screen.
- Step 5: Test and Adjust as Needed: After completing the calibration process, it’s important to test the accuracy of your tablet. Open a drawing or design software and create some test strokes or lines. Check if the cursor or brush strokes accurately follow the movements of your pen. If you notice any inconsistencies or inaccuracies, you may need to recalibrate or adjust the sensitivity settings within the Wacom Tablet Properties.
It’s worth noting that some advanced Wacom models may offer additional customization options during the calibration process. These options allow you to fine-tune settings such as pen pressure sensitivity, tilt recognition, or touch gestures. Explore the available settings within the calibration utility to customize your tablet’s behavior according to your preferences.
Remember, calibration is not a one-time process. It is recommended to periodically recalibrate your tablet to ensure optimal performance. Factors such as environmental conditions, changes in the tablet’s position, or wear and tear can affect its accuracy over time. By regularly calibrating your tablet, you can maintain a consistent and accurate drawing experience.
Now that you know how to calibrate your Wacom tablet, it’s time to implement these steps and enjoy a more precise and immersive digital art experience.
Step 1: Access the Wacom Tablet Properties
Before you can start calibrating your Wacom tablet, you need to access the Wacom Tablet Properties. This control panel allows you to configure various settings for your tablet, including calibration.
The exact method of accessing the Wacom Tablet Properties may vary depending on your operating system. Here are the general steps to access the properties:
- Windows:
- Look for the Wacom tablet icon in the system tray, usually located in the bottom-right corner of the screen. It may be a small tablet-shaped icon or a series of horizontal lines.
- Right-click on the Wacom tablet icon to open a context menu.
- Select “Open Wacom Tablet Properties” or a similar option from the menu. This will launch the Wacom Tablet Properties control panel.
- If you can’t find the icon in the system tray, you can also access the properties by going to the Control Panel, searching for “Wacom Tablet Properties,” and opening it from there.
- Mac:
- Click on the Apple menu in the top-left corner of the screen.
- Select “System Preferences” from the dropdown menu.
- In the System Preferences window, look for the “Wacom Tablet” or “Wacom Tablet Preferences” icon and click on it.
- This will open the Wacom Tablet Properties, allowing you to access the controls and settings for your tablet.
- Linux:
- The method of accessing the Wacom Tablet Properties may vary depending on the specific Linux distribution you are using.
- In most cases, you can find the Wacom Tablet Properties either in the system settings or by searching for “Wacom” in your application menu.
- Click on the Wacom Tablet Properties to launch the control panel and access the settings for your tablet.
Once you have successfully accessed the Wacom Tablet Properties, you are ready to proceed with the calibration process. The control panel provides a range of settings and options that allow you to customize your tablet’s behavior and performance according to your preferences.
Now that you have accessed the Wacom Tablet Properties, let’s move on to the next step of the calibration process and choose your tablet model.
Step 2: Choose Your Tablet
After accessing the Wacom Tablet Properties, the next step in calibrating your Wacom tablet is to select your specific tablet model. This ensures that the calibration settings apply to your particular device.
Here’s how you can choose your tablet within the Wacom Tablet Properties:
- Windows:
- In the Wacom Tablet Properties window, you will typically see a list of connected devices or tablets on the left-hand side.
- Scroll through the list and locate your specific tablet model.
- Click on your tablet model to select it.
- Mac:
- In the Wacom Tablet Properties window, you will find a list of connected devices or tablets on the left-hand side of the screen.
- Identify your tablet model from the list and click on it to select it.
- Linux:
- The process of selecting your tablet may vary depending on the Linux distribution and the Wacom driver you are using.
- In most cases, you will find a list of connected tablets or devices in the Wacom Tablet Properties window.
- Locate your tablet model from the list and click on it to select it.
Selecting your specific tablet model ensures that the calibration settings are applied correctly and accurately. It also allows you to access any additional customization options or features specific to your tablet model.
If you are using multiple Wacom tablets simultaneously, make sure to select the correct tablet that you wish to calibrate. Each tablet may have different calibration settings based on its individual characteristics and specifications.
After choosing your tablet, you are ready to move on to the next step in the calibration process, which is running the calibration utility.
Now that you have chosen your tablet within the Wacom Tablet Properties, let’s proceed to the next step and run the calibration utility.
Step 3: Run the Calibration Utility
Once you have accessed the Wacom Tablet Properties and selected your specific tablet model, the next step in calibrating your Wacom tablet is to run the calibration utility. This utility will guide you through the process of aligning the coordinates of your tablet with the display on your computer screen.
Here’s how you can run the calibration utility:
- Windows:
- In the Wacom Tablet Properties window, look for a tab or button labeled “Calibration” or “Pen Settings.”
- Click on the “Calibration” or “Pen Settings” tab to open the calibration utility.
- If you can’t find a specific tab or button for calibration, check the options within the Wacom Tablet Properties for a calibration option or similar function.
- Mac:
- In the Wacom Tablet Properties window, look for a tab or button labeled “Calibration” or “Pen Settings.”
- Click on the “Calibration” or “Pen Settings” tab to access the calibration utility.
- If you can’t find a dedicated calibration tab or button, search for a related option within the Wacom Tablet Properties to access the calibration utility.
- Linux:
- The location of the calibration utility may differ depending on the Linux distribution and Wacom driver you are using.
- In most cases, you will find a calibration tab or button within the Wacom Tablet Properties.
- Click on the calibration tab or button to launch the calibration utility.
Once you have opened the calibration utility, you are now ready to proceed with the next steps in the calibration process. The utility will guide you through the necessary actions and provide instructions for calibrating your tablet accurately.
If you encounter any issues or difficulties accessing the calibration utility, refer to the Wacom tablet’s documentation or support resources for specific instructions related to your tablet model.
Now that you have run the calibration utility, let’s move on to the next step and follow the on-screen instructions to calibrate your Wacom tablet.
Step 4: Follow the On-Screen Instructions
After launching the calibration utility in the Wacom Tablet Properties, the next step in calibrating your Wacom tablet is to follow the on-screen instructions. The calibration utility will provide you with a series of prompts and actions to perform in order to properly align the coordinates of your tablet with the display on your computer screen.
Here’s what you can expect and how to proceed:
- Tap on Calibration Points: The calibration utility will ask you to tap on specific points on your tablet screen using your pen. These points are usually marked with crosshairs or dots.
- Follow the Order: Follow the order indicated by the calibration utility when tapping on the calibration points. Usually, you will need to start from a corner or edge of the tablet and work your way across the screen in a predetermined pattern.
- Accuracy is Key: Make sure to tap each calibration point as accurately as possible. Aim to be precise without applying excessive pressure. Your goal is to help the tablet establish an accurate mapping between the tablet’s surface and the corresponding areas on the screen.
- Complete the Calibration: Once you have successfully tapped on all the calibration points, the utility will finalize the calibration process and save the new settings for your tablet.
During the calibration process, it is important to follow the on-screen instructions carefully. Pay attention to any additional prompts or actions that may be required, such as lifting and re-tapping the pen in certain areas. The utility’s instructions are designed to ensure the most accurate calibration possible.
Remember, the calibration process may slightly differ depending on your Wacom tablet model and the software you are using. Always refer to the specific instructions provided by Wacom or consult their documentation if you encounter any difficulties.
Now that you have followed the on-screen instructions for calibrating your Wacom tablet, let’s proceed to the next step and test and adjust the calibration as needed.
Step 5: Test and Adjust as Needed
After completing the calibration process by following the on-screen instructions, the next step in calibrating your Wacom tablet is to test the accuracy of the calibration and make any necessary adjustments.
Here’s what you can do to test and adjust the calibration as needed:
- Open a Drawing/Design Software: Launch a drawing or design software, such as Adobe Photoshop, Illustrator, or Corel Painter. This will allow you to test the accuracy of your tablet’s calibration in a practical setting.
- Create Test Strokes/Lines: Use your pen to create various strokes or lines on the digital canvas. Pay attention to how the cursor or brush strokes correspond to the movements of your pen. Evaluate whether the strokes align accurately with your intended positions.
- Identify Inaccuracies or Inconsistencies: If you notice any inaccuracies or inconsistencies in the placement or tracking of your pen strokes, it may indicate that further adjustments are needed.
- Recalibrate or Adjust Sensitivity: Depending on the calibration results and the specific software you are using, you may have the option to recalibrate your tablet or adjust its sensitivity settings. Refer to the Wacom Tablet Properties and explore any available options or tabs related to sensitivity or recalibration. Make the necessary adjustments based on your preferences and requirements.
- Repeat Test Strokes/Lines: After recalibrating or adjusting the sensitivity, repeat the test strokes or lines to assess the impact of the changes. Evaluate whether the adjustments have improved the accuracy and responsiveness of your pen strokes.
- Continue Testing and Adjusting: If the initial adjustments do not yield satisfactory results, repeat the process of testing, recalibrating, and adjusting until you achieve the desired accuracy and responsiveness.
It’s important to note that the sensitivity and customization options may vary depending on your tablet model and the software you are using. Take the time to explore the available settings within the Wacom Tablet Properties to find the options that best suit your needs.
By regularly testing and adjusting your tablet’s calibration, you can ensure that it performs optimally and meets your specific artistic requirements. Calibration is not a one-time process, and it’s recommended to periodically check and fine-tune the settings as needed.
Now that you have tested and made any necessary adjustments to your Wacom tablet’s calibration, you are ready to create your digital artwork with improved accuracy and precision.
Conclusion
Calibrating your Wacom tablet is a crucial step in ensuring optimal accuracy and precision in your digital artwork. By aligning the coordinates of your tablet with the display on your computer screen, you can achieve a more natural and immersive drawing or design experience.
In this guide, we have covered the step-by-step process of calibrating your Wacom tablet, from accessing the Wacom Tablet Properties to running the calibration utility and testing the results. Remember to periodically recalibrate your tablet to maintain its performance over time.
By calibrating your tablet, you will benefit from enhanced precision and control in your artwork. Calibrated tablets improve your workflow, save time, and eliminate frustrations caused by inconsistencies or inaccuracies in your pen strokes. You can customize your tablet’s sensitivity settings to match your drawing style and preferences, further enhancing your creative process.
Additionally, proper calibration helps to prevent potential issues caused by dirt or dust buildup on the tablet’s surface, ensuring a consistently smooth and precise drawing experience.
So, take the time to calibrate your Wacom tablet and enjoy the improved drawing experience that comes with it. Access the Wacom Tablet Properties, follow the on-screen instructions, and test and adjust as needed to achieve the best results.
Now, armed with the knowledge of how to calibrate your Wacom tablet, you can dive into your digital artwork with confidence, knowing that your tablet is optimized to deliver accurate and precise results. Unleash your creativity and create stunning digital masterpieces!