Introduction
Google Calendar is a powerful tool that helps us manage our time and organize our schedules. One of its convenient features is the ability to add rooms to your calendar events. Whether you want to book a conference room for a meeting or reserve a study room for a group project, adding rooms to your Google Calendar can ensure that you have the space you need when you need it.
In this article, we will guide you through the step-by-step process of adding rooms to your Google Calendar. We will explore how to access your Google Calendar settings, add a new resource, configure the room details, and save the room configuration. Additionally, we will provide some helpful tips for managing rooms effectively in Google Calendar.
By the end of this article, you will have a clear understanding of how to add and manage rooms in Google Calendar, allowing you to streamline your scheduling process and make the most of this useful tool.
Understanding Rooms in Google Calendar
Before we dive into the step-by-step guide, let’s take a moment to understand what rooms are in Google Calendar. In the context of Google Calendar, rooms refer to physical spaces that can be reserved for various purposes. These spaces can include conference rooms, meeting rooms, classrooms, or any other area that you may need for a specific event or activity.
When you add a room to your Google Calendar event, it not only reserves the space, but it also provides additional information about the room, such as the capacity, location, and availability. This allows you to easily view and manage your scheduled events and ensure that you have the necessary resources for your planned activities.
Rooms in Google Calendar can be shared resources within an organization, making it easier for team members to find and book the appropriate space for their meetings or events. It also helps to avoid conflicts and double bookings by providing real-time availability information.
In addition to booking rooms for your own events, Google Calendar also allows you to invite others to your events and include the room as a participant. This ensures that all participants are aware of the location and availability of the room, making it a seamless process for everyone involved.
Now that we have a clear understanding of what rooms are in Google Calendar, let’s move on to the step-by-step guide on how to add rooms to your calendar events.
Step-by-Step Guide to Adding Rooms in Google Calendar
Adding rooms to your Google Calendar events is a straightforward process. Follow these simple steps to ensure that you have the necessary space reserved for your meetings or activities:
- Accessing your Google Calendar: Open your preferred web browser and navigate to the Google Calendar website (calendar.google.com). Sign in with your Google account if you haven’t already.
- Navigating to Settings: Click on the gear icon located in the top-right corner of the screen, then select “Settings” from the dropdown menu. This will take you to the Settings page.
- Adding a New Resource: In the Settings page, click on the “Resources” tab located on the left-hand side. Then, click on the “Add a resource” button to create a new room.
- Configuring the Room Details: Fill in the necessary information for the room, such as the name, location, capacity, and any additional details that may be helpful. You can also specify the working hours and define the room’s availability preferences.
- Saving the Room Configuration: Once you have filled in all the necessary details, click on the “Save” or “Create” button to save the room configuration. The newly created room will now be available for you to add to your calendar events.
+
Congratulations! You have successfully added a room to your Google Calendar. Now, when you create or edit an event, you can select the room as a location and ensure that you have the appropriate space reserved.
It is important to note that the process may vary slightly based on the type of calendar view you are using. However, the general steps outlined above should apply to most instances of Google Calendar.
Now that you know how to add rooms to your Google Calendar, let’s explore some additional tips for managing rooms effectively.
Accessing your Google Calendar
To begin the process of adding rooms to your Google Calendar, you’ll first need to access the calendar itself. Here’s how you can do it:
- Open your web browser and go to the Google Calendar website (calendar.google.com).
- If you’re not already signed in to your Google account, enter your login credentials and sign in.
- Once you’re signed in, you’ll be redirected to the main Google Calendar interface. Here, you’ll see your calendar with any existing events, if you have any.
Alternatively, you can also access Google Calendar from other Google apps, such as Gmail or Google Drive. Look for the “Calendar” option in the navigation menu of these apps to quickly jump into your calendar.
It’s worth noting that Google Calendar is accessible not only on web browsers but also on mobile devices through the Google Calendar app. You can download the app from the App Store for iOS devices or the Google Play Store for Android devices. Once installed, sign in with your Google account, and you’ll have access to your calendar on the go.
Now that you know how to access your Google Calendar, you’re ready to proceed with adding rooms to your events. In the next steps, we’ll guide you through the process of navigating to the settings and configuring the room details.
Navigating to Settings
Once you have accessed your Google Calendar, the next step is to navigate to the settings where you can make changes and add rooms. Here’s how you can do it:
- In the top-right corner of the Google Calendar interface, you’ll find a gear icon. Click on this icon to access the settings menu.
- A dropdown menu will appear. From the options presented, select “Settings.” This will open the settings page.
- On the settings page, you’ll see various tabs on the left-hand side. Look for the “Resources” tab and click on it.
By selecting the “Resources” tab, you’re accessing the section specifically dedicated to managing resources, including rooms, in your Google Calendar.
Alternatively, if you’re using the new Google Calendar interface, you can find the settings by clicking the three horizontal lines (also known as the “hamburger” menu) in the top-left corner of the screen. From there, select “Settings” and follow the same steps mentioned above to access the “Resources” tab.
Once you’ve successfully navigated to the settings and accessed the “Resources” tab, you’re ready to proceed to the next step of adding a new resource, which in this case will be a room to your Google Calendar.
Note that the settings page may look different depending on the version and layout of Google Calendar you are using. However, the overall process of navigating to the settings and accessing the resources tab remains relatively consistent.
Now that you know how to navigate to the settings, let’s move on to the next section to learn how to add a new resource, which will be the room for your calendar events.
Adding a New Resource
Once you’ve accessed the settings and the “Resources” tab in Google Calendar, you can proceed to add a new resource, which in this case will be the room you want to add to your events. Here’s how you can do it:
- On the “Resources” tab, you’ll find an option to add a new resource. Look for a button that says something like “Add a resource” or “Create a new resource,” and click on it.
- A form will appear where you can enter the details of the new resource, such as the room name, location, capacity, and any additional information that may be relevant.
- Fill in the necessary information. Provide a descriptive name for the room so that it’s easily identifiable in your calendar. Specify the location of the room, whether it’s a specific building, floor, or room number. Include the capacity of the room so that others can know its size limitations.
- Depending on the calendar version you’re using, you may find additional options to configure, such as working hours or availability preferences. Adjust these settings according to your needs.
Once you’ve filled in all the necessary details and adjusted the settings, review the information you entered to ensure its accuracy. This will help prevent any confusion or conflicts when scheduling events with this room.
Finally, when you’re satisfied with the room details, look for a button to save or create the resource. Click on it to add the room to your Google Calendar.
Congratulations! You’ve successfully added a new resource, which is the room you want to use for your calendar events. The room will now be available for you to select and include as a location when creating or editing events.
In the next section, we’ll explore how to configure the room details, such as its availability and working hours, to ensure an efficient scheduling process.
Configuring the Room Details
After successfully adding a new resource (room) to your Google Calendar, the next step is to configure its details. This includes specifying its availability, working hours, and any additional settings that align with your scheduling needs. Follow these steps to configure the room details:
- In the resource settings page, locate the newly added room and click on it to access the configuration options.
- You’ll see various sections that allow you to customize the room’s details. Start by reviewing the basic information, such as the room name, location, and capacity, and make any necessary changes if required.
- Look for the “Availability” or “Working Hours” section. Here, you can specify the days and times when the room is typically available for scheduling. For instance, you can set it to be available from Monday to Friday, between 9 am to 5 pm.
- Additionally, you may find options to configure the room’s preferences, such as setting a maximum meeting duration or defining a buffer time between appointments. Adjust these settings according to your preferences and scheduling requirements.
- Take note of any advanced settings that are available, such as automatically declining overlapping events or allowing additional comments or booking requirements. Choose the options that best align with your needs.
- As you make changes to the room’s configuration, ensure to save or update the settings to apply the changes. Look for a button that says “Save” or “Update” and click on it.
By configuring the room’s details, you ensure that it aligns with your specific scheduling preferences. This allows you and others to easily identify its availability, working hours, and any specific requirements or limitations associated with the room.
It’s important to periodically review and update the room settings as needed. Changes in organizational policies, availability, or other factors may require adjustments to the room’s configuration to maintain accurate scheduling information.
Now that you have configured the room details, you’re ready to move forward and save the room configuration. In the next section, we’ll cover the final step of the process.
Saving the Room Configuration
Once you have finished configuring the details of the room in Google Calendar, it’s time to save the room configuration. This step ensures that the changes you’ve made are applied and that the room is ready to be used for scheduling events. Follow these steps to save the room configuration:
- Review the room details and settings to ensure that everything is accurate and aligned with your requirements. Double-check the room name, location, capacity, availability, and other preferences you have set.
- If you need to make any additional changes, navigate through the various sections and adjust the settings accordingly.
- Once you are satisfied with the configuration, locate the “Save” or “Update” button. This button might be in a different location depending on the Google Calendar interface you are using (classic or new).
- Click on the “Save” or “Update” button to save the room configuration. Google Calendar will process your request and save the changes you have made.
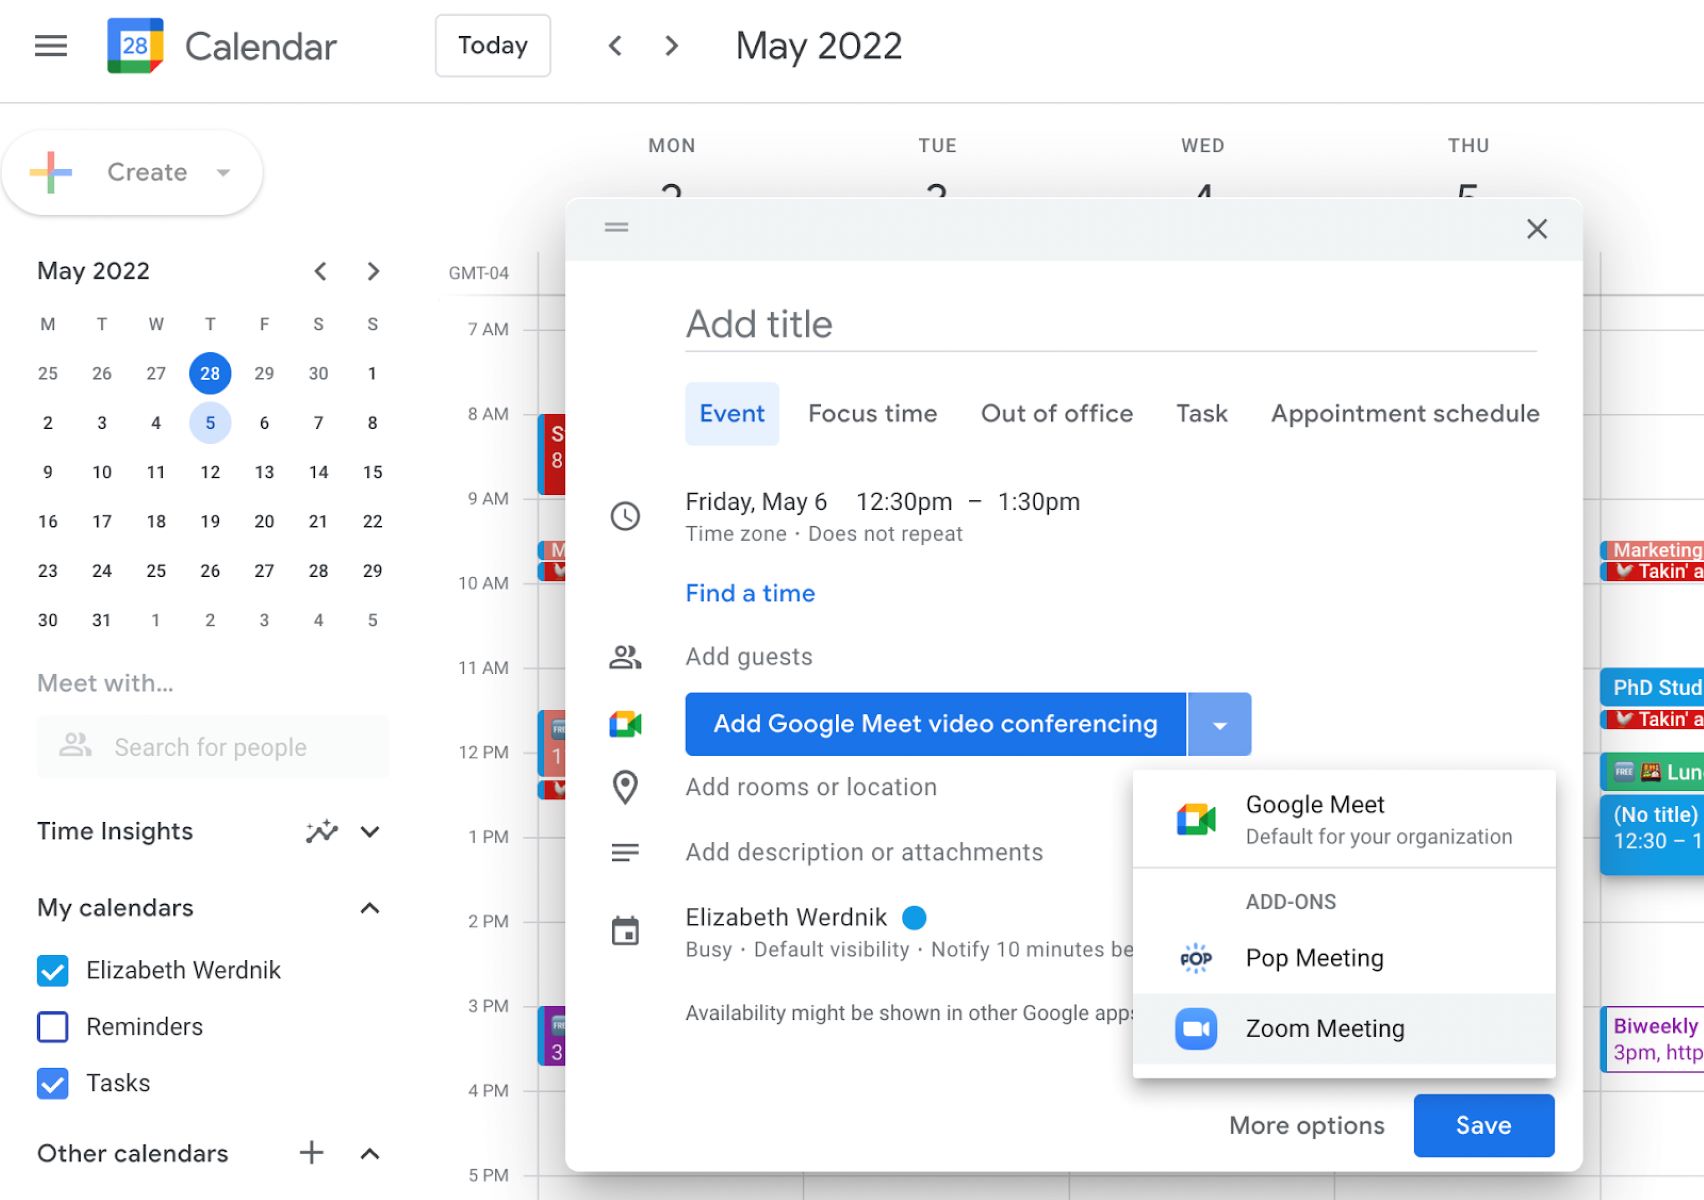
After saving the room configuration, you can start utilizing the room for your calendar events. When creating or editing an event, you can search for the room by its name or location and select it as the event’s location. This ensures that the room is reserved during the specified time slot and prevents conflicts with other events.
Remember that you can always revisit the room configuration settings to make further adjustments or updates as needed. If there are changes in the availability or capacity of the room, it’s important to reflect those modifications in the configuration to maintain accurate scheduling information.
By successfully saving the room configuration, you have completed the process of adding and setting up a room in Google Calendar. Now, you can effectively manage your events and ensure that you have the necessary space reserved at the right time.
Additional Tips for Managing Rooms in Google Calendar
Now that you have learned how to add and configure rooms in Google Calendar, here are some additional tips to help you effectively manage your rooms and maximize the benefits of this feature:
- Regularly review and update room availability: As schedules and availability change, it’s important to periodically review and update the availability of your rooms in Google Calendar. This ensures that the information is accurate and prevents any scheduling conflicts.
- Use descriptive and clear room names: When adding new rooms, make sure to use descriptive names that are easily understandable by everyone. Clear and intuitive names reduce confusion and make it easier to select the correct room for your events.
- Utilize room resources efficiently: Make the most of your room resources by encouraging team members to book the necessary space in advance. By utilizing rooms effectively, you can avoid conflicts, optimize productivity, and ensure that everyone has access to the resources they need.
- Consider integrating with other apps: Depending on your workflow, you may consider integrating Google Calendar with other apps such as productivity tools or communication platforms. This can help streamline your scheduling process and enhance collaboration.
- Collaborate with team members: If you work in a team environment, communicate and collaborate with your team members to ensure smooth scheduling and minimize room conflicts. Share calendars and use features like calendar invitations to keep everyone informed about room bookings.
- Make use of notifications and reminders: Enable notifications and reminders for your scheduled events. This way, you and the participants will receive alerts and stay informed about upcoming meetings or activities in the designated rooms.
By following these additional tips, you can effectively manage your rooms in Google Calendar and optimize the scheduling process within your organization. Remember to customize the settings and workflows to best suit your specific needs and preferences.
With these strategies in mind, you can make the most out of the room management features in Google Calendar and ensure that your events and meetings run smoothly, with all necessary resources readily available.
Conclusion
Adding and managing rooms in Google Calendar can greatly simplify the process of scheduling events and ensure that you have the necessary space reserved when you need it. By following the step-by-step guide outlined in this article, you can seamlessly add rooms to your calendar events and configure the details to fit your specific requirements.
Understanding the concept of rooms in Google Calendar allows you to efficiently utilize shared resources within your organization. Whether you need to book a conference room for meetings or reserve a study room for group projects, Google Calendar provides a user-friendly interface to manage these spaces effectively.
By navigating to the settings, adding new resources, configuring room details, and saving the configuration, you can streamline your scheduling process and ensure that your events are organized and hassle-free. Remember to periodically review and update the room settings to keep the information accurate and up to date.
Additionally, by implementing the additional tips provided, such as regular review of room availability, using descriptive room names, and collaborating with team members, you can further optimize the management of rooms in Google Calendar and improve overall productivity.
Google Calendar offers a powerful and efficient way to manage your time, events, and resources. By taking advantage of the room management feature, you can enhance your scheduling process and ensure that your events run smoothly. So, go ahead and start using rooms in Google Calendar to make the most of this valuable tool.