Introduction
Welcome to the world of Google Workspace, an all-in-one suite of productivity tools designed to streamline communication and collaboration in your business or organization. Formerly known as G Suite, Google Workspace offers a wide range of applications including Gmail, Google Drive, Google Calendar, Google Meet, and much more.
With Google Workspace, you can not only create professional email addresses for your team members but also leverage the power of cloud storage, online document editing, and video conferencing to enhance productivity and efficiency in your work environment.
In this comprehensive guide, we will walk you through the step-by-step process of setting up your Google Workspace account, configuring essential services, and managing user accounts effectively. Whether you are a small business owner, an entrepreneur, or an IT administrator, this guide will provide you with the necessary knowledge and instructions to get started with Google Workspace.
By the end of this guide, you will have a clear understanding of how to set up Gmail for your custom domain, configure Google Calendar to schedule and manage events, set up Google Drive to store and share files, and use Google Meet for seamless video conferencing. Additionally, we will cover advanced topics such as managing security and permissions, adding and managing users, and configuring additional Google Workspace services according to your business needs.
So, let’s dive in and discover how to harness the full potential of Google Workspace to revolutionize the way you collaborate, communicate, and work together towards your business goals!
Step 1: Creating a Google Workspace Account
Creating a Google Workspace account is the first step to accessing the suite of powerful productivity tools offered by Google. Follow these simple instructions to get started:
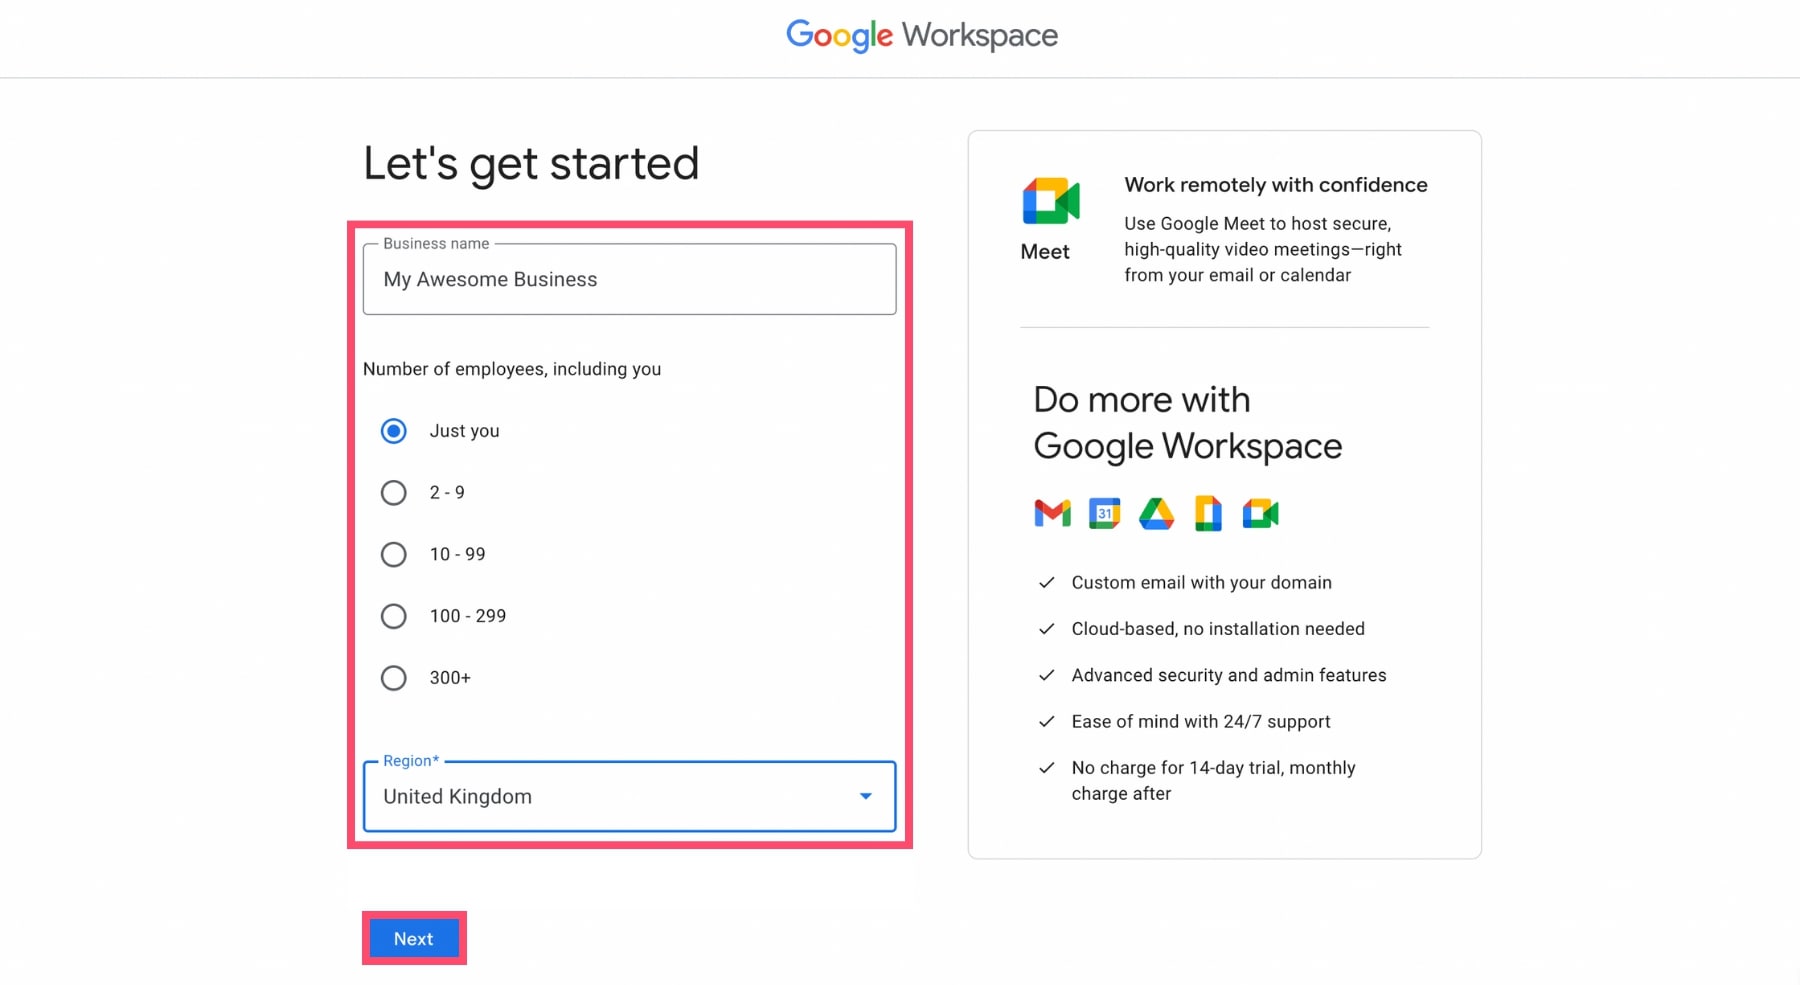
- Go to the Google Workspace website and click on the “Get Started” button.
- Enter your business or organization’s name and click “Next”.
- Choose the number of employees or users who will be using the Google Workspace account.
- Select a domain name for your business. You can either use an existing domain or purchase a new one through Google.
- Provide your personal or business contact information, including your name, email address, and phone number.
- Review and accept the terms of service and click on “Next”.
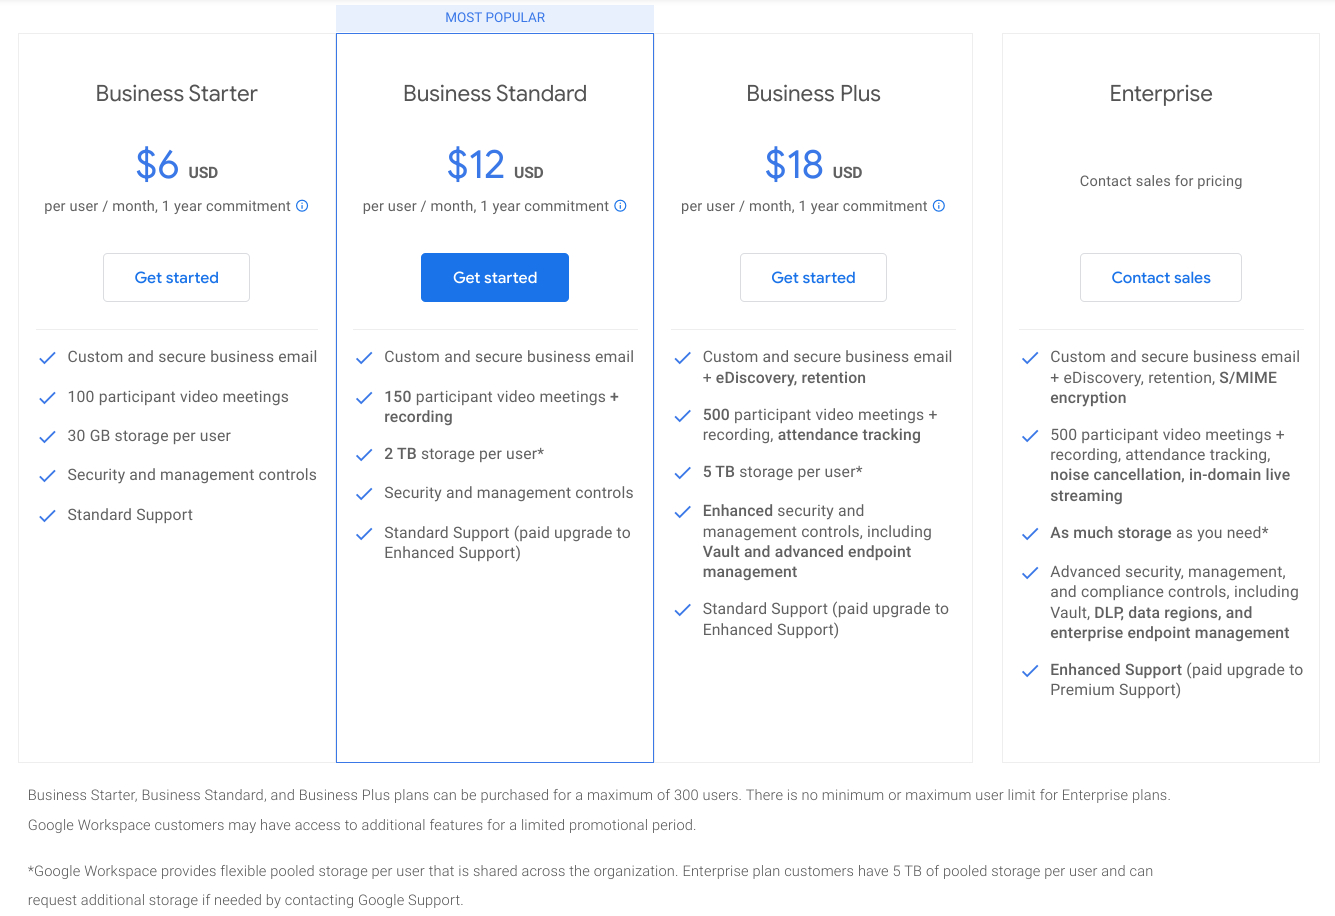
- Choose a payment plan that suits your needs. Google offers a variety of plans depending on the size and requirements of your organization.
- Enter your payment information and proceed to complete the payment process.
- Once the payment is confirmed, you will be directed to the Google Workspace admin console, where you can start setting up and configuring your account.
It’s important to note that during the account creation process, you will have the option to either use an existing domain or purchase a new one through Google. If you choose to purchase a new domain, you can easily search for available domain names and select the one that best represents your business.
The creation process may vary slightly depending on the country you are in and the specific requirements for domain verification. However, Google provides clear instructions and guidance throughout the process to ensure a smooth account setup.
Now that you have successfully created your Google Workspace account, you are ready to move on to the next step: verifying your domain. This verification process confirms that you are the owner of the domain and allows you to link it to your Google Workspace account for full functionality.
Step 2: Verifying Your Domain
Verifying your domain is a crucial step in setting up your Google Workspace account. It confirms that you are the owner of the domain and enables you to fully utilize the features and services provided by Google. Follow these steps to verify your domain:
- Access the Google Workspace admin console by logging in with your account credentials.
- Click on “Domains” in the main dashboard menu.
- Choose the option to “Add a Domain” and enter your domain name.
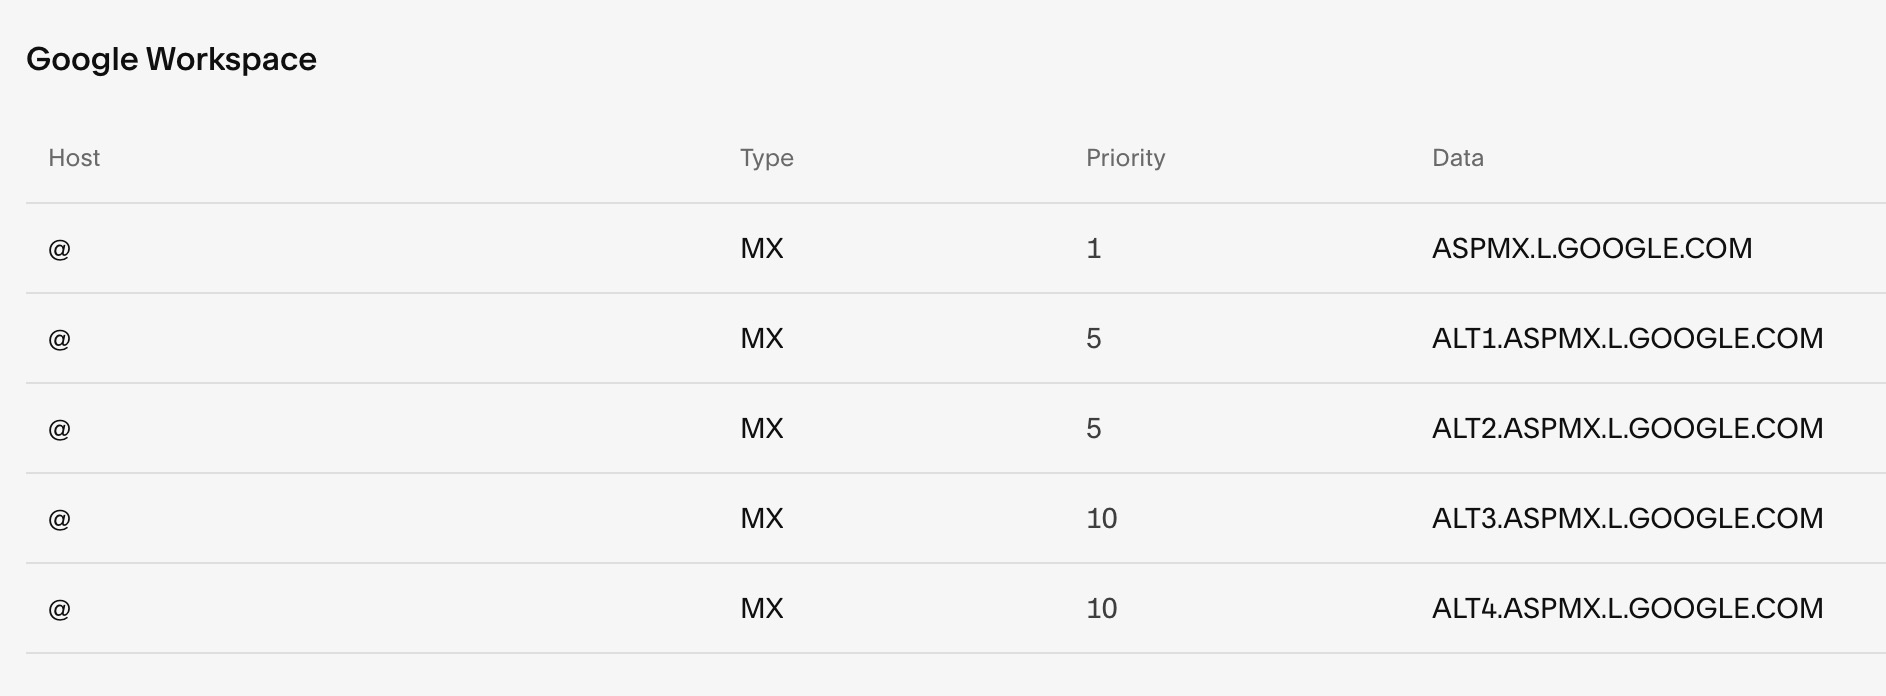
- Click “Continue” and select the method you prefer for domain verification. Google provides different methods, including adding a meta tag to your website’s HTML, uploading an HTML file to your website, or adding a DNS record.
- Choose the verification method that aligns with your technical capabilities and follow the provided instructions.
- Once you have completed the verification steps, click on “Verify” to confirm the ownership of your domain.
Note that the verification process may take some time, depending on the method you choose and the DNS propagation time. Google typically provides guidelines on how long the verification process may take for each method.
After successfully verifying your domain, you will be able to access all the benefits of Google Workspace using your custom domain. This includes setting up professional email addresses using your domain, accessing Google Drive and other services, and managing user accounts for your organization.
If you encounter any issues during the domain verification process, Google provides comprehensive support documentation and a dedicated support team to assist you. Don’t hesitate to reach out for assistance if needed.
Now that your domain is verified, you can proceed to the next step: setting up Gmail to start sending and receiving emails using your custom domain. This will give your organization a professional and branded presence in your email communications.
Step 3: Setting up Gmail
Gmail is a powerful email service provided by Google Workspace, offering a range of features and customization options to enhance your email experience. Follow these steps to set up Gmail for your custom domain:
- Access the Google Workspace admin console and navigate to the “Apps” section.
- Click on “G Suite” and select “Gmail” from the list of available apps.
- Click on “User settings” to configure the Gmail settings for your organization.
- Customize the email routing for your domain by choosing between the options to route directly to Google Workspace or through an external mail server. This choice depends on your specific email infrastructure and preferences.
- Configure the email delivery settings, including the Spam and Quarantine settings, to ensure optimal email security and filtering.
- Enable additional features such as Smart Compose, Smart Reply, and email delegation to enhance productivity and collaboration within your organization.
- Set up email signatures and customize the appearance and layout of your Gmail interface.
- Configure settings related to email retention and archiving, if required by your organization’s policies or regulatory requirements.
- Once you have reviewed and customized the Gmail settings to your preferences, click on “Save” to apply the changes.
It’s important to note that configuring Gmail for your Google Workspace account provides you with the flexibility to create professional email addresses using your custom domain. This enhances your organization’s branding and credibility when communicating with clients, partners, and team members.
Additionally, Gmail’s robust spam filtering capabilities provide a secure and efficient way to manage your email communications, ensuring that important messages reach your inbox while blocking unwanted or malicious emails.
Furthermore, the advanced features offered by Gmail, such as email delegation and collaboration tools, allow for seamless teamwork and efficient communication within your organization. Whether you need to manage multiple email accounts or collaborate on emails with your team, Gmail has you covered.
With Gmail fully configured for your custom domain, you are now ready to start sending and receiving emails under your professional email addresses. Next, we will cover the steps to set up Google Calendar, enabling you and your team to schedule, manage, and organize events more effectively.
Step 4: Configuring Google Calendar
Google Calendar is a powerful tool that helps you and your team stay organized and manage your schedules efficiently. Follow these steps to configure Google Calendar for your Google Workspace account:
- Access the Google Workspace admin console and navigate to the “Apps” section.
- Click on “G Suite” and select “Calendar” from the list of available apps.
- Click on “User settings” to access the configuration options for Google Calendar.
- Customize the general settings of Google Calendar such as the default time zone for your organization and the working hours.
- Enable features such as automatic event declined notifications and working hour intrusion alerts to enhance productivity and time management.
- Configure sharing settings to control access and visibility of calendars within your organization or with external stakeholders.
- Set up calendar delegation to allow authorized individuals to manage and schedule events on behalf of others.
- Enable meeting room booking and resource management to ensure efficient utilization of shared spaces.
- Customize notifications and reminders to receive timely alerts for upcoming events or changes.
- Once you have reviewed and customized the Google Calendar settings according to your organization’s needs, click on “Save” to apply the changes.
Google Calendar offers a wide range of features and functionalities to streamline your scheduling and time management. By utilizing the capabilities of Google Calendar, you can easily create and share events, schedule meetings, send invitations, manage RSVPs, and get reminders, helping you and your team stay organized and on track.
With the ability to create multiple calendars for different purposes, you can segment and manage your schedule effectively. Whether it’s personal appointments, team meetings, project deadlines, or shared events, Google Calendar provides a centralized platform for seamless scheduling and collaboration.
Furthermore, the integration of Google Calendar with other Google Workspace apps, such as Gmail and Google Meet, allows for seamless communication and scheduling. You can easily create events directly from emails or join meetings with a single click.
Now that you have successfully configured Google Calendar for your Google Workspace account, you and your team can enjoy the benefits of efficient schedule management and improved coordination. In the next step, we will explore how to set up and utilize Google Drive for secure file storage and collaboration.
Step 5: Setting up Google Drive
Google Drive is a cloud-based storage solution offered by Google Workspace. It allows you to store, organize, and share files securely with your team members and collaborators. Follow these steps to set up Google Drive for your Google Workspace account:
- Access the Google Workspace admin console and navigate to the “Apps” section.
- Click on “G Suite” and select “Drive and Docs” from the list of available apps.
- Review the settings related to file sharing, permissions, and external access to ensure they align with your organization’s security policies.
- Enable features such as offline access and Drive folder shortcuts to enhance accessibility and productivity.
- Customize storage quotas and limits for users within your organization based on their needs and roles.
- Configure advanced settings such as document conversions, file uploads, and sync options.
- Set up file retention policies and version history to keep track of file changes and revisions.
- Enable shared drives to create collaborative spaces where teams can work together on projects and share files.
- Once you have reviewed and customized the Google Drive settings according to your organization’s requirements, click on “Save” to apply the changes.
Google Drive offers a user-friendly interface that allows you to create, upload, organize, and share files across devices and with team members. By utilizing the storage capabilities of Google Drive, you can ensure that your important documents, presentations, spreadsheets, and other files are securely stored and easily accessible whenever and wherever needed.
With Google Drive’s powerful collaboration features, multiple team members can work on the same document simultaneously, making real-time edits and updates. This fosters seamless teamwork, reduces version control issues, and enhances productivity.
Furthermore, Google Drive integrates seamlessly with other Google Workspace apps such as Gmail and Google Docs. This means that you can easily attach files from Google Drive to your emails or collaborate on documents stored in Drive without the need for manual file downloads and uploads.
Now that you have successfully set up Google Drive for your Google Workspace account, you can start uploading, organizing, and sharing files with your team members. In the next step, we will cover how to configure Google Meet, Google’s video conferencing tool, to facilitate virtual meetings and collaboration.
Step 6: Configuring Google Meet
Google Meet is a powerful video conferencing tool within the Google Workspace suite. It allows you to host virtual meetings, team collaborations, and remote video calls seamlessly. Follow these steps to configure Google Meet for your Google Workspace account:
- Access the Google Workspace admin console and navigate to the “Apps” section.
- Click on “Google Meet” and select “Settings” from the list of available options.
- Review and customize the settings related to meeting options, such as enabling external participants or allowing screen sharing.
- Configure the audio and video settings to ensure optimal quality and compatibility.
- Enable additional features such as live captions, breakout rooms, and recording, based on your organization’s needs.
- Set up default access and security settings to control who can join meetings and how meetings are conducted.
- Customize the dial-in options, virtual backgrounds, and other settings to personalize your Google Meet experience.
- Once you have reviewed and customized the Google Meet settings to your preferences, click on “Save” to apply the changes.
With Google Meet, you can conduct virtual meetings, webinars, training sessions, and more, with team members, clients, or external stakeholders, regardless of their location. The flexibility and ease-of-use provided by Google Meet make it an ideal solution for remote collaboration and communication.
Google Meet also integrates seamlessly with other Google Workspace apps, such as Google Calendar and Gmail, allowing you to easily schedule, join, and access meetings with a few clicks. The ability to share screens, collaborate on documents, and record meetings enhances productivity and improves collaboration within your organization.
Furthermore, features like live captions and breakout rooms enhance engagement and facilitate effective communication during virtual meetings. These features help participants stay focused, collaborate efficiently, and ensure that everyone’s voice is heard.
Now that you have successfully configured Google Meet for your Google Workspace account, you can start scheduling and hosting virtual meetings with ease. In the next step, we will cover how to add and manage users within your Google Workspace account.
Step 7: Adding and Managing Users
Adding and managing users within your Google Workspace account is essential for granting access and assigning roles to individuals in your organization. Follow these steps to add and manage users effectively:
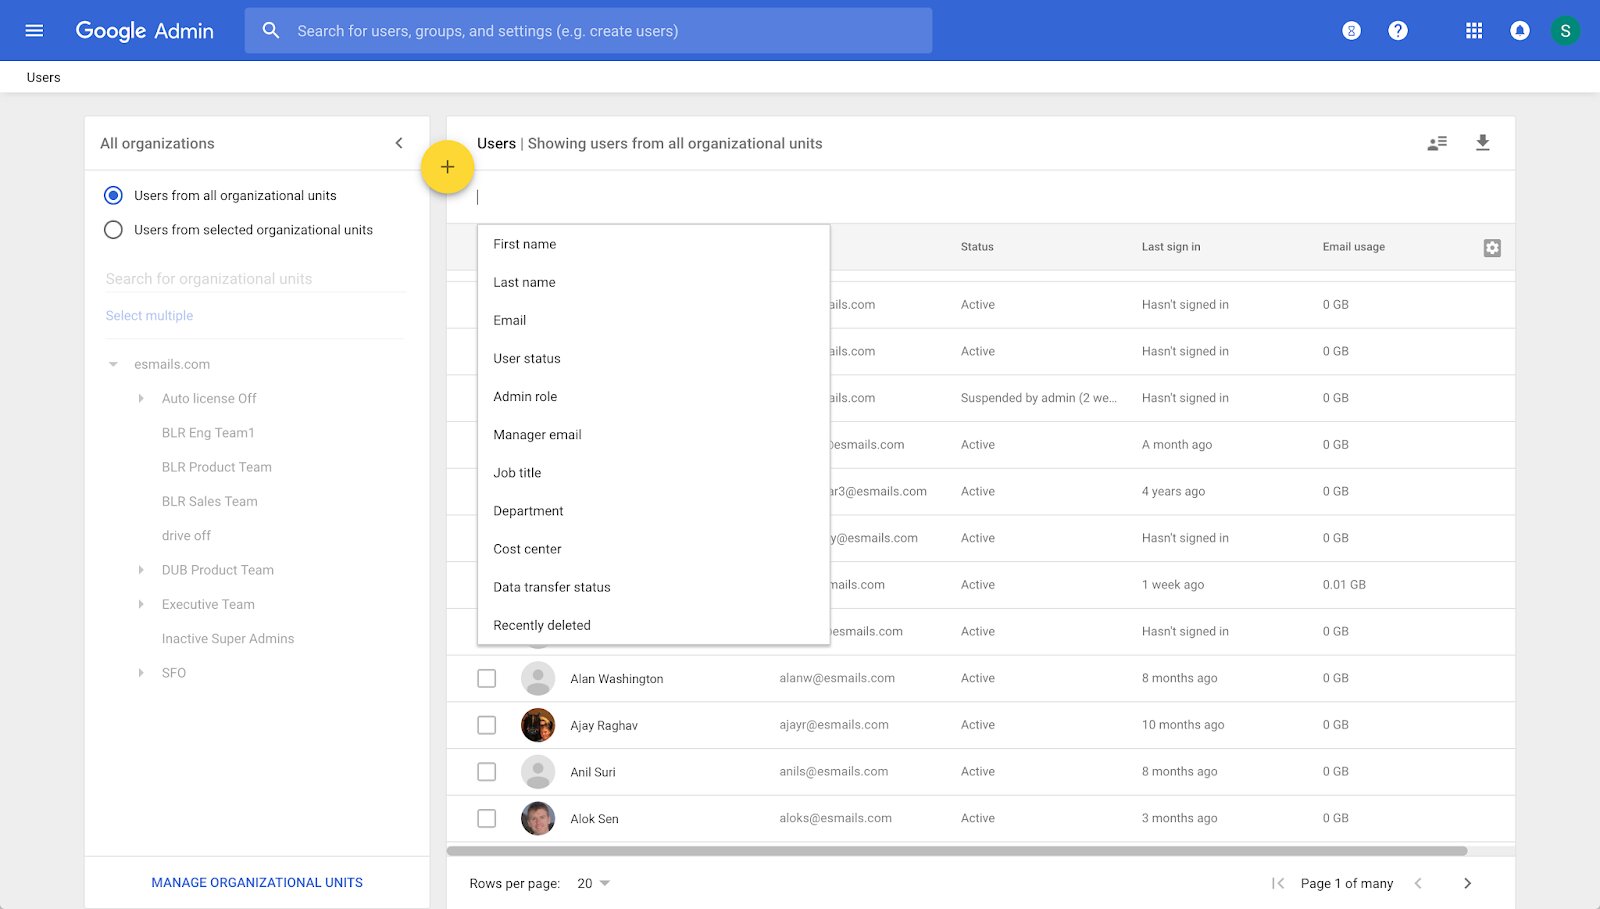
- Access the Google Workspace admin console and navigate to the “Users” section.
- Click on “Add” to create new user accounts for individuals in your organization.
- Enter the required information for each user, including their name, email address, and password.
- Assign user roles and permissions based on their responsibilities and access needs.
- Customize individual user settings such as email routing, calendar preferences, and storage quotas if required.
- For existing users, you can edit their information and settings by selecting the user from the list and clicking on “Edit”.
- Ensure that each user has the necessary licenses and access to the Google Workspace apps they require for their work.
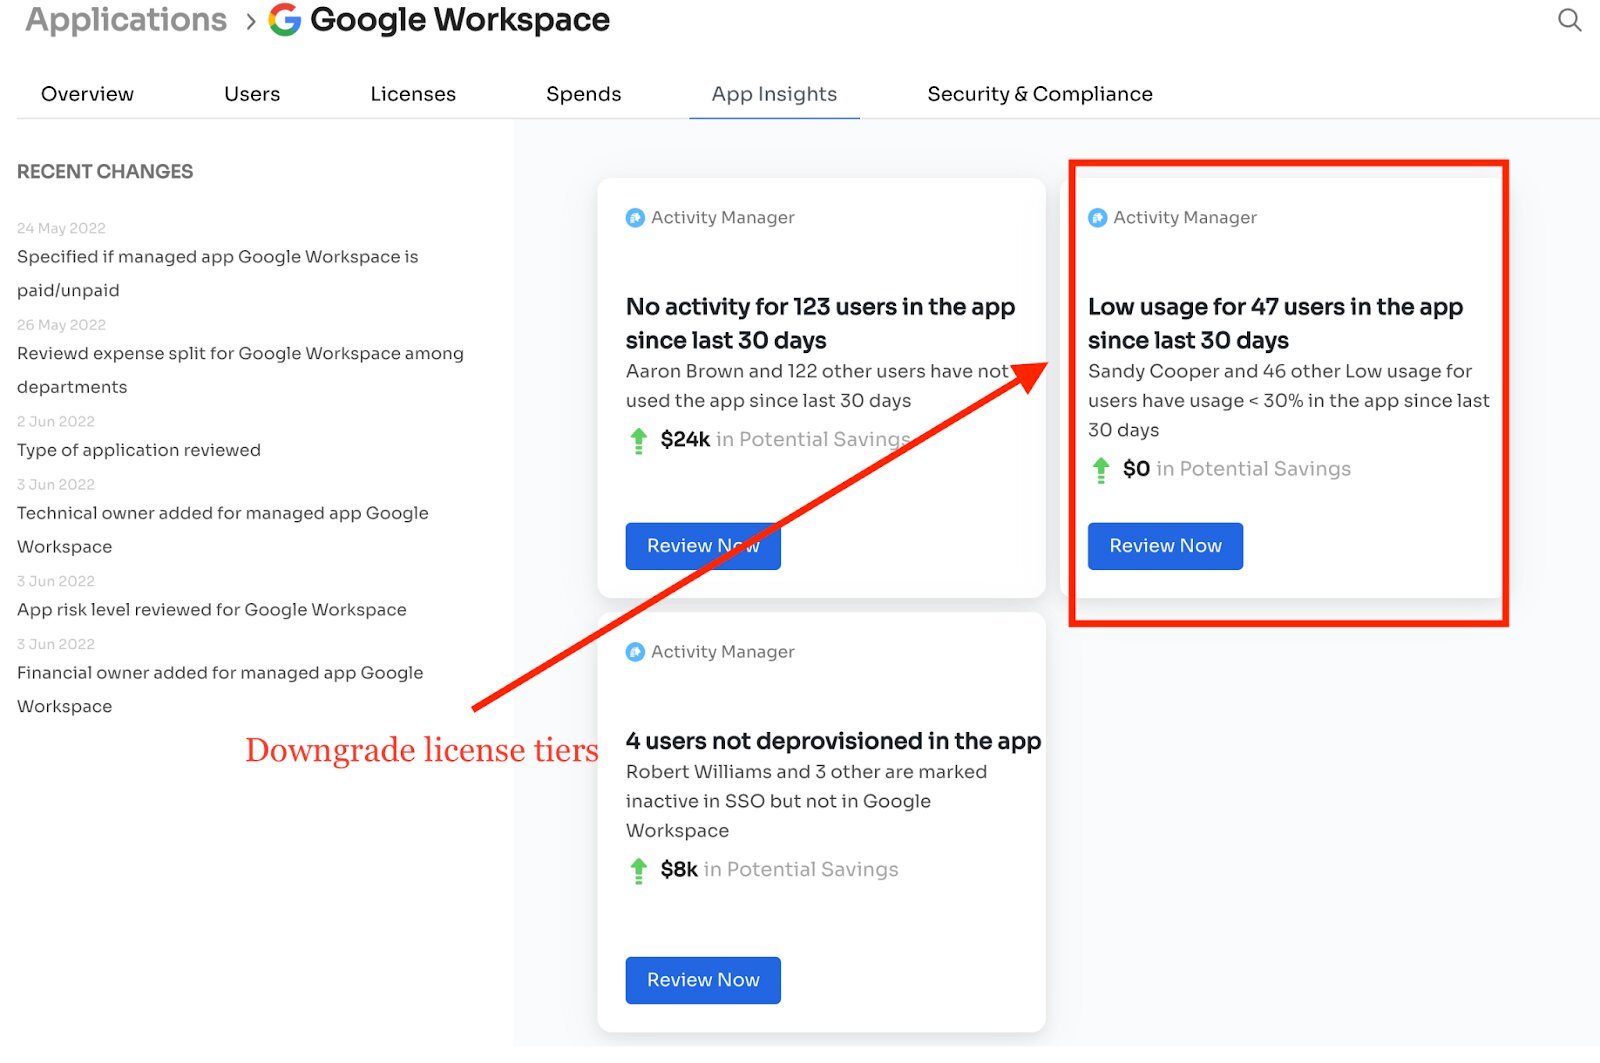
- Monitor and manage user accounts by reviewing the user list regularly and making updates as needed, such as disabling inactive accounts or granting additional permissions.
- Utilize organizational units to group users based on departments or teams for easier management and administration.
- Take advantage of the available user management tools and features offered by Google Workspace to streamline administrative tasks and enhance user management efficiency.
Adding and managing users within your Google Workspace account allows you to control access to the suite of tools and services provided. This ensures that users have appropriate permissions and access levels based on their roles and responsibilities within your organization.
By assigning specific user roles, you can define the level of access each user has, whether it’s an administrator, an IT manager, or a regular user. This helps maintain security, data privacy, and efficient management of your Google Workspace account.
Regularly reviewing and managing user accounts is important for maintaining the integrity of your organization’s Google Workspace environment. This includes disabling or removing accounts for users who have left your organization or no longer require access to the platform.
Organizational units are useful for structuring your user management, allowing you to apply specific settings, policies, and access controls to different groups within your organization. This helps streamline administration and ensures that each user receives the appropriate level of access and functionality.
By effectively adding and managing users within your Google Workspace account, you can ensure that your organization’s collaboration and communication are streamlined and secure. In the next step, we will discuss managing security and permissions within your Google Workspace account.
Step 8: Managing Security and Permissions
Managing security and permissions within your Google Workspace account is crucial for protecting sensitive data and ensuring that users have appropriate access levels. Follow these steps to effectively manage security and permissions:
- Access the Google Workspace admin console and navigate to the “Security” section.
- Review and configure security settings to enhance account protection, such as enabling two-factor authentication (2FA) for all users.
- Utilize security tools like Security Key Enforcement and Password Alert to prevent unauthorized access and detect potential security threats.
- Customize user password requirements, such as complexity rules and password expiration policies, to enforce strong password practices.
- Enable mobile device management (MDM) to manage and secure mobile devices accessing your Google Workspace account.
- Manage and configure data sharing settings to control the external sharing of files and documents within your organization.
- Set up and manage security groups to control access to specific resources and collaborate securely with external partners or clients.
- Regularly review and update user permissions to ensure that users have appropriate levels of access to the Google Workspace apps and services they require.
- Monitor user activity and security logs to identify and address any suspicious or unauthorized behavior.
- Stay informed about the latest security updates and best practices provided by Google to further strengthen your organization’s security posture.
Managing security and permissions within your Google Workspace account is essential for protecting your organization’s sensitive data and mitigating potential security risks. By implementing strong security measures, you can safeguard your organization’s information and ensure that only authorized users have access to it.
Enabling two-factor authentication (2FA) adds an additional layer of security to user accounts by requiring users to provide a second form of authentication, such as a verification code sent to their mobile device, in addition to their password.
By utilizing security tools like Security Key Enforcement and Password Alert, you can proactively detect and prevent unauthorized access attempts, reducing the risk of compromised accounts and data breaches.
Managing data sharing settings and utilizing security groups help you maintain control over how data is shared both internally and externally, ensuring that sensitive information remains protected.
Regularly reviewing and updating user permissions helps ensure that users have the appropriate level of access to the Google Workspace apps and services required for their roles, preventing unauthorized access to sensitive data.
By monitoring user activity and security logs, you can quickly identify any anomalous behavior and take immediate action to address and investigate potential security incidents.
By staying informed about the latest security updates and best practices provided by Google, you can stay ahead of emerging threats and continuously enhance the security of your Google Workspace account.
Now that you have effectively managed security and permissions within your Google Workspace account, you can proceed to the next step: configuring additional Google Workspace services to further enhance productivity and collaboration within your organization.
Step 9: Configuring Additional Google Workspace Services
Google Workspace offers a variety of additional services beyond the core applications like Gmail, Google Drive, and Google Calendar. These additional services can further enhance productivity and collaboration within your organization. Follow these steps to configure and utilize additional Google Workspace services:
- Access the Google Workspace admin console and navigate to the “Apps” section.
- Explore the available additional Google Workspace services such as Google Docs, Google Sheets, Google Slides, Google Sites, and more.
- Click on the desired service and review the settings and options available.
- Customize the settings for each service according to your organization’s collaboration and communication requirements.
- Enable and configure integrations between different Google Workspace services to streamline workflows and enhance productivity.
- Ensure that users have the necessary licenses and access to the additional services based on their roles and responsibilities.
- Train your team members on how to effectively utilize these additional services to maximize their potential and improve collaboration within your organization.
- Regularly review and update the configurations and settings of additional Google Workspace services based on evolving needs and feedback from users.
- Stay informed about new features and updates for these services, and explore how they can benefit your organization.
- Monitor usage and adoption of these additional services to gauge their impact on productivity and collaboration within your organization.
Configuring and utilizing additional Google Workspace services allows you to leverage the full range of tools and features available for collaboration, productivity, and communication.
Google Docs, Google Sheets, and Google Slides provide a collaborative environment for creating and editing documents, spreadsheets, and presentations in real-time, enabling team members to work together seamlessly.
Google Sites allows you to create visually appealing and functional websites to showcase information, resources, and projects within your organization.
Integrating these additional services with other Google Workspace applications, such as Gmail and Google Drive, further enhances productivity and streamlines workflows by enabling easy sharing, collaboration, and access to files and documents.
By training your team members on how to effectively utilize these additional services and encouraging their adoption, you can foster a culture of collaboration and improve efficiency within your organization.
Regularly reviewing and updating the configurations and settings of additional Google Workspace services helps ensure that they align with your organization’s evolving needs and that you are utilizing the latest features and enhancements.
Monitoring usage and adoption of these additional services allows you to assess their impact on productivity and collaboration within your organization, enabling you to make informed decisions and adjustments as needed.
With additional Google Workspace services configured and utilized effectively, you have empowered your organization with a comprehensive suite of tools to streamline work processes and promote efficient collaboration.
Congratulations! You have successfully completed the process of setting up and configuring your Google Workspace account, enabling you and your team to work more effectively and collaboratively. Embrace the power of Google Workspace and continue to explore and leverage its features to achieve your organization’s goals.
Conclusion
Congratulations on completing the step-by-step process of setting up and configuring your Google Workspace account! You have taken the first crucial steps towards enhancing productivity, collaboration, and communication within your organization.
Throughout this guide, you have learned how to create a Google Workspace account, verify your domain, and set up essential services such as Gmail, Google Calendar, Google Drive, and Google Meet. By effectively managing security, permissions, and additional Google Workspace services, you have created a robust and tailored environment to meet your organization’s needs.
With Google Workspace, you have the power to create professional email addresses using your custom domain, store and share files securely in the cloud, schedule and manage events seamlessly, conduct virtual meetings, and collaborate with team members from anywhere, at any time.
Remember to regularly review and update your Google Workspace configurations and settings to ensure they align with your evolving needs and take advantage of new features and enhancements. Stay informed about the latest security updates and best practices provided by Google to maintain a secure environment for your organization’s data and communication.
Continue to explore the features and capabilities of Google Workspace to unlock its full potential. Encourage your team members to utilize and adopt the tools and services available to enhance collaboration, productivity, and efficiency in your work processes.
As technology evolves, Google Workspace remains at the forefront, consistently delivering new features and innovations to support businesses and organizations worldwide. Embrace the power of Google Workspace as a valuable asset for your organization’s growth and success.
Thank you for choosing Google Workspace as your productivity solution. Wishing you and your team many successful and productive endeavors ahead.