Introduction
Migrating from Microsoft 365 to Google Workspace can be a significant undertaking, but with the right planning and execution, it can be a smooth and successful transition. Google Workspace offers a suite of productivity tools, including Gmail, Google Drive, Google Calendar, and more, that can provide a seamless collaboration experience for your team.
Whether you’re looking to take advantage of the cost savings, enhanced features, or simply want a change, this guide will walk you through the key steps to migrate from Microsoft 365 to Google Workspace.
Before starting the migration process, it’s important to note that proper planning and preparation are crucial to ensure a successful transition. This includes understanding your organization’s needs, setting up Google Workspace, configuring user accounts, migrating data, and training your users on the new platform.
In this guide, we will break down the migration process into ten easy-to-follow steps, providing you with the knowledge and tools necessary to migrate from Microsoft 365 to Google Workspace seamlessly. Let’s dive in!
Step 1: Plan Your Migration
Before you begin the migration process, it’s crucial to plan out your approach to ensure a smooth transition. Taking the time to develop a solid migration plan will help you avoid potential pitfalls and minimize downtime for your users. Here are the key steps to consider when planning your migration:
- Assess your needs: Evaluate your organization’s requirements and goals for migrating to Google Workspace. Consider factors such as the number of users, storage needs, and specific features you rely on in Microsoft 365.
- Identify key stakeholders: Determine who will be involved in the migration process, including IT administrators, project managers, and end-users. Assign responsibilities and create a communication plan to keep everyone informed.
- Develop a timeline: Create a timeline that outlines the different phases of the migration process. Identify any dependencies, such as data backups, and allocate sufficient time for testing and training.
- Communicate with users: Inform your team about the upcoming migration and communicate the benefits of transitioning to Google Workspace. Address any concerns or questions they may have and provide training resources to help them prepare.
- Inventory your data: Take stock of the data stored in Microsoft 365, including emails, contacts, calendars, and files. Identify any data that needs to be migrated and develop a strategy for transferring it to Google Workspace.
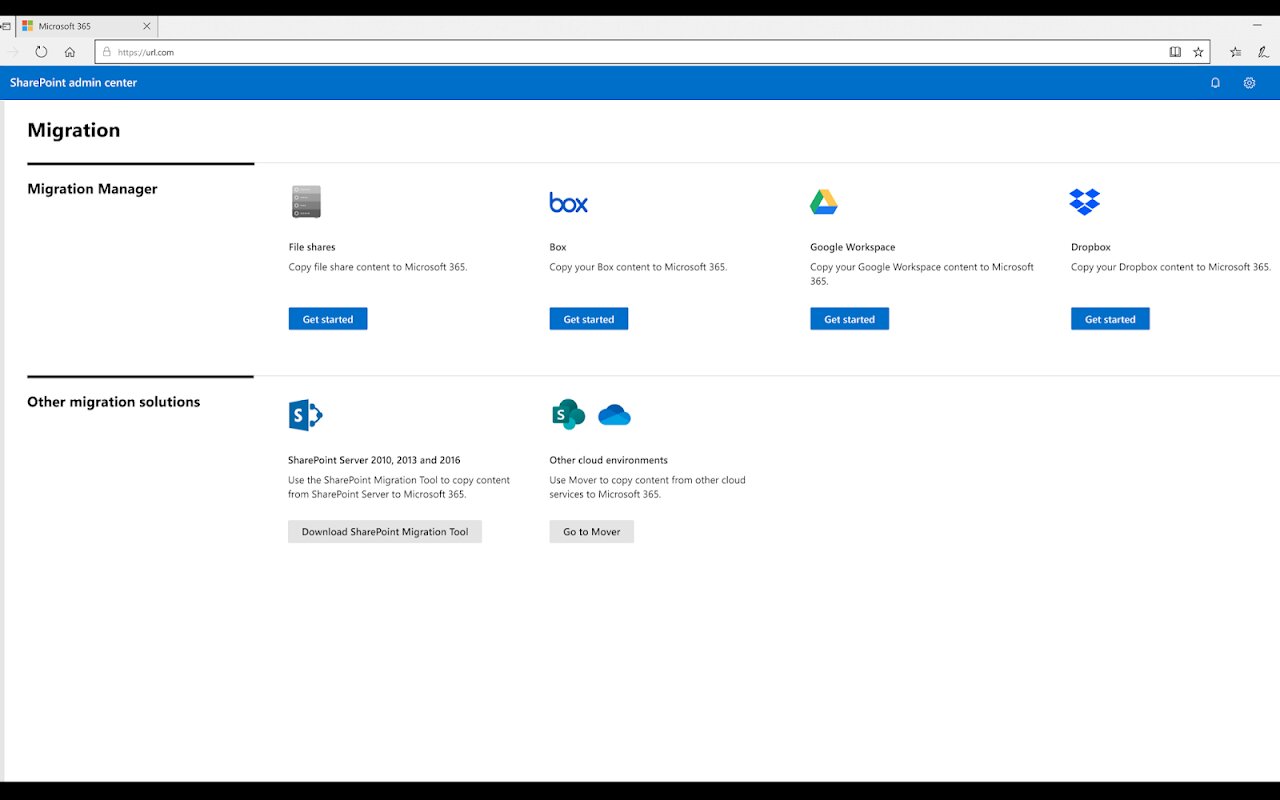
- Consider third-party tools: Evaluate if third-party migration tools can simplify the process and ensure data integrity. Research different options and select a tool that aligns with your specific requirements.
- Test the migration: Set up a test environment to simulate the migration process and validate its feasibility. This will help identify any potential issues and allow you to fine-tune your migration plan.
By thoroughly planning your migration, you can ensure a smooth transition to Google Workspace. By assessing your needs, involving key stakeholders, developing a timeline, communicating with users, inventorying your data, considering third-party tools, and testing the migration, you’ll be well-prepared for the next steps in the migration process.
Step 2: Prepare Your Data
Before proceeding with the migration, it’s essential to properly prepare your data to ensure a seamless transfer from Microsoft 365 to Google Workspace. Here are the key considerations when preparing your data:
- Data Cleanup: Take the opportunity to clean up your data before migrating. Delete any outdated or unnecessary files, folders, and emails to reduce the amount of data that needs to be transferred. This process will help optimize storage space and improve efficiency.
- Backup: Before initiating the migration process, it’s critical to back up your data. This backup will act as a safety net in case of any unforeseen issues during the migration process.
- Data Mapping: Map out the structure of your data in Microsoft 365 and determine the corresponding locations and settings in Google Workspace. This mapping will help ensure that data is transferred correctly to the appropriate folders and accounts.
- Email Migration: Configure your email migration strategy. Decide whether to perform a full cutover migration, where all emails are moved at once, or a staged migration, where emails are migrated in batches. Consult the Google Workspace documentation or consider using third-party migration tools for the smooth transfer of email data.
- Contact and Calendar Migration: Plan the migration of contacts and calendars from Microsoft 365. Export these data items from Microsoft 365 and import them into the corresponding Google Workspace applications. Ensure that the data is accurately mapped to the correct fields to maintain data integrity.
- File Migration: Develop a strategy for migrating files and documents from Microsoft 365 to Google Drive. Determine which files need to be transferred, organize them into appropriate folders, and consider any sharing settings or permissions that should be replicated in Google Drive.
- Shared Drives: If your organization extensively uses shared drives in Microsoft 365, plan how you will migrate these shared drives and ensure that permissions and access are preserved in Google Workspace.
- Data Validation: It’s crucial to thoroughly validate the migrated data to ensure its accuracy and completeness. Conduct a series of tests to confirm that emails, contacts, calendars, and files have been successfully transferred and are accessible to users in Google Workspace.
By adequately preparing your data, you can minimize the risk of data loss or errors during the migration process. Undertake data cleanup, perform backups, map out data structures, plan email, contact, and calendar migration, strategize file migration, address shared drives, and validate the data to ensure a successful transition to Google Workspace.
Step 3: Set Up Google Workspace
Once you have planned and prepared your data, the next step in migrating from Microsoft 365 to Google Workspace is to set up your Google Workspace environment. Here’s a guide on how to get started with the setup:
- Create a Google Workspace Account: If you don’t have one already, sign up for a Google Workspace account. Choose a plan that suits your organization’s needs and follow the setup process provided by Google.
- Domain Verification: Verify your domain ownership with Google to ensure that you have control over the domain associated with your organization. This step is crucial for setting up your organization’s email and other Google Workspace services.
- Set Up Organization Settings: Configure the global settings for your organization in Google Workspace. This includes setting up your organization’s name, logo, default language, and other preferences that align with your branding and communication requirements.
- Add Users: Create user accounts for your team members in Google Workspace. This step involves adding their names, email addresses, and assigning specific roles and permissions based on their responsibilities within the organization.
- Set Up Groups: Create groups within Google Workspace to facilitate better collaboration and communication within your organization. Groups allow you to easily manage permissions and send messages to specific departments, teams, or project groups.
- Configure Security Settings: Enhance the security of your Google Workspace environment by setting up two-factor authentication (2FA) for all users. Consider enabling advanced security features such as mobile device management (MDM) and data loss prevention (DLP).
- Enable Service Integration: Explore and enable the various Google Workspace services that align with your organization’s needs. This includes Gmail, Google Calendar, Google Drive, Google Meet, and more. Customize and configure these services to optimize your team’s productivity and collaboration.
- Set Up Data Retention Policies: Define data retention policies that align with your organization’s compliance and regulatory requirements. This step ensures that data is retained for the appropriate duration and is accessible when needed.
- Train Administrators: Provide training to the Google Workspace administrators within your organization. They should be familiar with the administration console, user management, security settings, and other key aspects of managing Google Workspace.
By following these steps, you can effectively set up your Google Workspace environment and lay the foundation for a successful migration. Take the time to create a Google Workspace account, verify your domain, configure organization settings, add users and groups, enhance security, enable service integration, set up data retention policies, and train administrators to ensure a smooth transition to Google Workspace.
Step 4: Configure User Accounts
Configuring user accounts is a crucial step in the migration process from Microsoft 365 to Google Workspace. Properly setting up user accounts ensures a smooth transition and seamless access to Google Workspace services for your team members. Follow these steps to configure user accounts:
- Transfer User Data: Migrate user data from Microsoft 365 to Google Workspace for each individual user. This includes emails, contacts, calendars, and files specific to each user. Ensure that the data is mapped correctly and efficiently transferred to their respective Google Workspace accounts.
- Set Up Email Forwarding: Configure email forwarding from Microsoft 365 to the corresponding Google Workspace email addresses for each user. This ensures that any emails sent to their Microsoft 365 email addresses are forwarded to their new Google Workspace accounts during the transition period.
- Configure Labels and Filters: Set up email labels and filters in Google Workspace to replicate any organizational or personal email organization systems that users had in Microsoft 365. This ensures that users can easily manage and find their emails in the new environment.
- Enable User Collaboration: Set up shared folders and shared calendars in Google Workspace to facilitate collaboration among team members. Share relevant files and calendars with the appropriate users to ensure a smooth transition to the new platform.
- Configure Signature and Preferences: Set up email signatures and customize user preferences within Google Workspace. Users can personalize their email accounts by adding professional email signatures and adjusting email settings according to their preferences.
- Enable Google Drive Sync: Set up Google Drive syncing for each user, allowing them to access and sync their files seamlessly across different devices. Ensure that the necessary settings are enabled to provide a smooth file sharing and collaboration experience.
- Train Users on Google Workspace: Conduct training sessions or provide resources to train your users on how to use Google Workspace effectively. Familiarize them with the new interface, features, and any changes in workflows to ensure a smooth transition and help them get up to speed quickly.
- Communicate Support Channels: Inform users about the support channels available for them to seek assistance during and after the migration. Provide contact information for IT support or refer them to available resources, such as FAQs or documentation.
By following these steps, you can successfully configure user accounts in Google Workspace and ensure a seamless transition for your team members. Properly transfer user data, set up email forwarding, configure labels and filters, enable user collaboration, customize signatures and preferences, enable Google Drive sync, train users on Google Workspace, and communicate support channels to achieve a smooth and efficient migration experience.
Step 5: Migrate Email and Contacts
Migrating email and contacts from Microsoft 365 to Google Workspace is a critical step in the migration process. Ensuring a smooth transition of these essential communication elements is vital for uninterrupted collaboration. Follow these steps to migrate email and contacts:
- Email Migration: Migrate user emails from Microsoft 365 to Google Workspace. Depending on the size of your organization and the volume of emails, you can choose to perform a full cutover migration or a staged migration in batches. Consult the Google Workspace documentation or consider using third-party migration tools for efficient and accurate email migration.
- Verify Email Delivery: After the email migration, conduct thorough testing to ensure that all emails have been successfully transferred to the respective Google Workspace accounts. Test both incoming and outgoing emails to verify that the delivery is working as expected.
- Contact Migration: Export contacts from Microsoft 365 and import them into Google Workspace. Ensure that mapping of fields is accurate and contacts are properly categorized. Consider cleaning up and removing any duplicate or outdated contacts during this migration process.
- Contacts Synchronization: Set up contact synchronization between Google Workspace and user devices or other applications if needed. Ensure that any changes made to contacts in Google Workspace are synced across different platforms or devices seamlessly.
- Test Email and Contact Accessibility: Test the accessibility of migrated emails and contacts for individual users and across different devices. Verify that users can easily search, view, and manage their emails and contacts within the new Google Workspace environment.
- Communicate Changes: Notify your users about the successful migration of their emails and contacts. Provide them with any necessary instructions or training resources to help them adapt to the new email and contact management tools in Google Workspace.
- Address Email Redirects: If necessary, set up email redirects from Microsoft 365 to Google Workspace for a specific period. This allows users to seamlessly receive any emails sent to their old Microsoft 365 email addresses into their new Google Workspace accounts.
- Configure Email Signatures: Advise users to update their email signatures in Google Workspace. Guide them on how to create professional and informative signatures that align with the organization’s branding guidelines.
By following these steps, you can successfully migrate email and contacts from Microsoft 365 to Google Workspace. Ensure a smooth transition by migrating emails, verifying email delivery, importing contacts, synchronizing contacts, testing accessibility, communicating changes, addressing email redirects, and configuring email signatures. This ensures that your team members can seamlessly continue their communication and collaboration using the new Google Workspace platform.
Step 6: Migrate Calendars, Drive, and Documents
Migrating calendars, drive, and documents from Microsoft 365 to Google Workspace is an important step in the migration process. It allows your team to continue accessing and collaborating on their essential files and schedules seamlessly. Here’s how to migrate calendars, drive, and documents:
- Calendar Migration: Export calendars from Microsoft 365 and import them into Google Workspace. Ensure that calendar events are mapped accurately and that any event details, including attendee lists and reminders, are preserved. Verify that calendars are accessible and functioning as expected in Google Workspace.
- Drive Migration: Migrate files and documents from Microsoft 365 to Google Drive. Organize the files into appropriate folders and ensure that permissions and access settings are replicated in Google Drive. Consider using migration tools or APIs to simplify and automate the transfer process.
- Document Conversion: Convert any Microsoft Office files to their Google Workspace equivalents, such as converting Word documents to Google Docs, Excel files to Google Sheets, and PowerPoint presentations to Google Slides. Ensure the formatting, functionality, and collaboration features are maintained after the conversion process.
- Shared Drive Migration: If your organization utilizes shared drives in Microsoft 365, migrate them to Google Workspace’s shared drive feature. Ensure that the appropriate permissions and access controls are set up to maintain collaboration and file management within shared drives.
- Test Accessibility and Collaboration: Test the accessibility and collaboration features of migrated calendars, drive, and documents. Ensure that users can view, edit, share, and collaborate on their files and calendars within the Google Workspace environment with ease and without any hindrances.
- Communicate Changes and Training: Announce the successful migration of calendars, drive, and documents to your team members. Provide any necessary training and guidance on how to navigate and use the new Google Workspace tools effectively for calendar management, file sharing, and collaborative document editing.
- Address File Redirection: If needed, set up file redirection or sharing permissions from Microsoft 365 to Google Workspace for a specific period. This ensures that users can access any files that may still be stored in their Microsoft 365 accounts during the transition phase.
- Configure Offline Access: Enable offline access to Google Drive and the Google Workspace applications as needed. Guide users on how to set up and utilize offline access to ensure productivity even in situations where an internet connection is not available.
By following these steps, you can successfully migrate calendars, drive, and documents from Microsoft 365 to Google Workspace. This allows your team to seamlessly continue collaborating, managing schedules, and working on their important files within the new Google Workspace environment.
Step 7: Test and Verify the Migration
Once you have completed the migration of email, contacts, calendars, drive, and documents to Google Workspace, it’s crucial to thoroughly test and verify the migration to ensure its success. Testing and verification help identify any potential issues and ensure that your team can seamlessly transition to the new platform. Follow these steps to test and verify the migration:
- Test User Access: Ensure that all users can access their respective Google Workspace accounts, including email, calendar, drive, and documents. Verify that each user can successfully log in, view their data, send and receive emails, and access shared resources.
- Test Calendar Syncing: Schedule test events in various user calendars and verify that they sync properly across devices and platforms. Confirm that invitations, reminders, and notifications are functioning as intended.
- Test Drive and Document Collaboration: Conduct tests to ensure smooth collaboration on shared drives and documents within Google Workspace. Check that users can edit, comment, and share files with the appropriate permissions and that changes are reflected in real-time for all collaborators.
- Test Data Integrity: Verify the accuracy and integrity of migrated data across different Google Workspace applications. Check for any missing or corrupt data, ensuring that all emails, contacts, calendars, and documents have been successfully migrated without any loss or data corruption.
- Test Email Delivery: Send test emails from both internal and external sources and verify that they are correctly delivered to the intended recipients’ Google Workspace email addresses. Test different scenarios, including attachments, formatting, and advanced features.
- Validate Data Permissions: Review and verify the permissions and access control settings for shared drives, documents, calendars, and folders. Confirm that all users have the appropriate level of access to the data they require and that any sensitive or confidential information is adequately protected.
- Seek User Feedback: Encourage users to provide feedback on their experience with Google Workspace. Conduct surveys or feedback sessions to gather insights on any challenges they may have faced during the migration process or any issues they encounter in using the new platform.
- Address Issues: Address any issues or errors that arise during the testing and verification process promptly. Work with your IT team or third-party support to resolve these issues and ensure that users can fully utilize the features and capabilities of Google Workspace.
By thoroughly testing and verifying the migration, you can ensure a smooth transition and resolve any issues before fully adopting Google Workspace. By testing user access, calendar syncing, drive and document collaboration, data integrity, email delivery, data permissions, seeking user feedback, and addressing issues, you can ensure that the migration has been successful and that your team can fully utilize the capabilities of Google Workspace.
Step 8: Update DNS and MX Records
Updating DNS (Domain Name System) and MX (Mail Exchanger) records is a crucial step in the migration process, as it ensures that email delivery is directed to the correct destination – Google Workspace. Here are the key steps to update your DNS and MX records:
- Identify your DNS Provider: Determine which DNS provider manages your domain’s DNS records. This could be your domain registrar or a separate DNS service provider.
- Access DNS Management: Log in to your DNS provider’s website or platform to access the DNS management console. This is where you will make changes to your DNS and MX records.
- Locate MX Records: Locate the MX records in your DNS management console. These records determine the email routing for your domain.
- Delete Existing MX Records: Delete any existing MX records associated with your Microsoft 365 account. This will ensure that email delivery is no longer directed to Microsoft 365 but to Google Workspace.
- Add Google Workspace MX Records: Add the Google Workspace MX records to your DNS management console. These records define the mail servers responsible for handling the email delivery for your domain. Google provides specific instructions and MX record values to be added.
- Set Priority: Set the proper priority order for the MX records. The MX record with the lowest priority (highest preference number) will be the primary mail server for your domain.
- Save Changes: Save the changes to the DNS records in your DNS management console. It may take some time for the changes to propagate across the internet.
- Verify MX Records: Use online DNS lookup tools to verify that the MX records have been updated successfully and are pointing to the Google Workspace mail servers.
- Test Email Delivery: Send test emails to confirm that email delivery is now routing correctly to Google Workspace. Test both internally within your organization and externally to ensure that emails are being received without any issues.
- Monitor and Troubleshoot: Monitor email delivery and troubleshoot any issues that may arise. Keep an eye on bounce backs or delivery failures and take appropriate action to resolve them.
By updating your DNS and MX records, you ensure that email delivery is properly routed to Google Workspace. By identifying your DNS provider, accessing DNS management, locating and deleting existing MX records, adding Google Workspace MX records, setting the priority, saving changes, verifying the MX records, testing email delivery, monitoring, and troubleshooting, you can ensure a seamless transition in email routing to make the most of Google Workspace’s email capabilities.
Step 9: Train Users on Google Workspace
Training your users on Google Workspace is essential to ensure a smooth transition and maximize the productivity and collaboration features of the platform. Proper training will help your team become proficient in using the tools and functionalities of Google Workspace. Here are the key steps to train your users:
- Create Training Materials: Develop training materials, such as user guides, video tutorials, or interactive presentations, that cover the essential features and workflows of Google Workspace. Make the materials easily accessible to users for reference.
- Conduct Training Sessions: Schedule training sessions to familiarize users with Google Workspace. These sessions can be conducted in person, virtually through webinars, or through recorded videos. Cover topics such as email management, calendar scheduling, document collaboration, and other relevant features.
- Provide Hands-on Experience: Encourage users to explore and experiment with Google Workspace tools on their own. Give them time to navigate the interface, try out different features, and discover the various capabilities of the platform.
- Offer One-on-One Assistance: Provide one-on-one assistance to users who may require additional support or have specific questions or concerns. Offer personalized training sessions or allow them to schedule dedicated time to address their individual needs.
- Promote Self-Learning Resources: Share self-learning resources, such as online tutorials, help articles, or user forums, where users can find answers to common questions or learn advanced usage techniques at their own pace.
- Address Frequently Asked Questions: Compile a list of frequently asked questions about Google Workspace and distribute it to users. This document can address common concerns or challenges that arise during the transition and provide quick solutions.
- Encourage Collaboration and Sharing: Emphasize the collaborative nature of Google Workspace. Guide users on how to share files, collaborate on documents, and schedule meetings using Google Workspace’s integrated features. Promote the benefits of real-time collaboration and encourage teams to embrace these functionalities.
- Highlight Time-Saving Features: Showcase time-saving features and shortcuts available in Google Workspace. Demonstrate how users can streamline their workflows, automate tasks, and improve productivity by utilizing these tools effectively.
- Provide Ongoing Support: Continue to provide support and assistance to users even after the initial training sessions. Establish channels, such as a dedicated help desk or a designated point of contact, where users can seek assistance with any ongoing questions or issues they encounter.
- Solicit Feedback: Encourage users to provide feedback on their experience with Google Workspace. Collect their input on what works well and what can be improved. This feedback will help you identify areas where additional training or support may be necessary.
By following these steps, you can ensure that your users are well-prepared to utilize Google Workspace effectively. By creating training materials, conducting training sessions, providing hands-on experience, offering personalized assistance, promoting self-learning resources, addressing frequently asked questions, encouraging collaboration, highlighting time-saving features, providing ongoing support, and soliciting feedback, you can empower your team to make the most of the capabilities and benefits of Google Workspace.
Step 10: Decommission Microsoft 365
Once your migration to Google Workspace is complete and your users are successfully using the new platform, it’s time to decommission Microsoft 365 to streamline your workflows and fully transition to Google Workspace. Here are the key steps to decommission Microsoft 365:
- Confirm Data Migration: Double-check that all necessary data, including emails, contacts, calendars, drive files, and documents, has been successfully migrated from Microsoft 365 to Google Workspace. Verify the integrity and accessibility of the migrated data.
- Backup Microsoft 365 Data: Create a final backup of any remaining data in Microsoft 365 that was not migrated to Google Workspace. This backup will act as an additional safeguard in case any data is needed in the future.
- Inform Users: Notify your users that the migration to Google Workspace is complete and Microsoft 365 will no longer be accessible. Provide clear instructions on how to access their data and perform tasks using Google Workspace.
- Disable Microsoft 365 Accounts: Disable the user accounts in Microsoft 365 to prevent accidental or unauthorized access. This ensures that users solely rely on their Google Workspace accounts for all communication and collaboration purposes.
- Reconfigure DNS Settings: Review your DNS settings and remove any references to Microsoft 365, such as MX records or autodiscovery settings. Update the DNS records to reflect that email and other services are now hosted on Google Workspace.
- Cancel Microsoft 365 Subscriptions: Cancel any remaining subscriptions or licenses for Microsoft 365. Ensure that you have migrated all necessary data and are no longer dependent on the services provided by Microsoft 365.
- Communicate Decommissioning: Inform your team and stakeholders about the decommissioning of Microsoft 365. Explain the reasons behind transitioning to Google Workspace and highlight the benefits and features of the new platform.
- Provide Post-Migration Support: Offer continued support for any questions or concerns that may arise after the decommissioning of Microsoft 365. Ensure that your team is well-versed in using Google Workspace and can assist users with any issues they may encounter.
- Evaluate Success and Gather Feedback: Assess the success of the migration by monitoring user feedback, adoption rates, and productivity metrics. Gather feedback from your team to identify areas for improvement and refine your Google Workspace workflows accordingly.
- Remove Microsoft 365 Environment: Finally, once you are confident in the successful migration and adoption of Google Workspace, decommission the Microsoft 365 environment completely. This typically includes deleting user accounts, removing data backups, and disabling any remaining services associated with Microsoft 365.
By following these steps, you can effectively decommission Microsoft 365 and fully transition to Google Workspace. Confirm the data migration, backup remaining Microsoft 365 data, inform users, disable Microsoft 365 accounts, reconfigure DNS settings, cancel subscriptions, communicate the decommissioning, provide post-migration support, evaluate success, and remove the Microsoft 365 environment. This ensures a seamless and efficient transition to Google Workspace as your primary productivity and collaboration suite.
Conclusion
Migrating from Microsoft 365 to Google Workspace can be a complex process, but with careful planning, preparation, and execution, you can successfully make the transition and unlock the full potential of Google’s powerful suite of productivity tools.
Throughout this migration guide, we have covered the ten essential steps to migrate from Microsoft 365 to Google Workspace:
- Plan Your Migration
- Prepare Your Data
- Set Up Google Workspace
- Configure User Accounts
- Migrate Email and Contacts
- Migrate Calendars, Drive, and Documents
- Test and Verify the Migration
- Update DNS and MX Records
- Train Users on Google Workspace
- Decommission Microsoft 365
By following these steps, you can ensure a seamless and successful migration. Each step plays a crucial role in transferring data, configuring accounts, training users, and ultimately transitioning to Google Workspace.
Remember to involve key stakeholders throughout the process, communicate changes to your team, and provide ongoing support to maximize the adoption and utilization of Google Workspace.
As you embark on this migration journey, keep in mind that change can sometimes be challenging. However, embracing the enhanced features, collaboration capabilities, and cost savings offered by Google Workspace will not only streamline your workflows but also empower your team to work more efficiently and effectively.
With proper planning, thorough preparation, and comprehensive training, you can successfully migrate from Microsoft 365 to Google Workspace and unlock a new level of productivity and collaboration for your organization.