Introduction
Google Workspace is a powerful suite of cloud-based collaboration and productivity tools, offering features like email, cloud storage, document editing, and more. When setting up email services with Google Workspace, understanding MX records is crucial. MX records, short for Mail Exchange records, are essential DNS (Domain Name System) entries that direct email communication for a domain to the correct email servers.
MX records play a vital role in ensuring that emails sent to your domain are delivered reliably to your Google Workspace email addresses. By correctly configuring the MX records, you can ensure that your emails reach their intended recipients promptly and efficiently.
However, for beginners and even experienced users, locating MX records in Google Workspace can be a bit confusing. Admins often wonder where exactly to find the MX records within the Google Workspace Admin Console.
In this guide, we will provide a step-by-step walkthrough of how to locate the MX records within the Google Workspace Admin Console. Additionally, we will discuss how to verify the MX records and troubleshoot common issues that might arise during the process.
So, whether you are setting up Google Workspace for the first time or need to modify your MX records, this guide will help you navigate through the Admin Console and ensure that your email services are configured correctly.
Let’s dive in and explore how to find MX records in the Google Workspace Admin Console.
Overview of MX records
MX records, or Mail Exchange records, are an essential part of the Domain Name System (DNS) that helps in managing email delivery for a domain. These records specify the mail servers responsible for receiving incoming emails.
When someone sends an email to a specific domain, the email server looks up the MX records to determine where to deliver the messages. The MX records provide information about the priority and address of the mail servers that handle the email traffic for that domain.
Each MX record has two main components: the priority and the server address. The priority indicates the order in which the mail servers should be attempted for email delivery. A lower number indicates a higher priority, with the email server with the lowest priority being tried first. If the first server is unavailable or unreachable, the email server will try the next one with a higher priority.
MX records are crucial when setting up email services with Google Workspace. By correctly configuring the MX records in your DNS settings, you can ensure that emails sent to your domain are directed to the appropriate Google Workspace email servers.
It’s important to note that MX records are not visible or editable within the Google Workspace Admin Console. They are managed through the DNS settings provided by your domain registrar or hosting provider. This means that you need to access your DNS settings outside of Google Workspace to modify or update the MX records.
In the next section, we will guide you through the process of accessing the Google Workspace Admin Console, where you can find the necessary information to configure MX records correctly.
Let’s move on to understanding how to access the Google Workspace Admin Console and locate the MX records.
Accessing Google Workspace Admin Console
To access the Google Workspace Admin Console, you must have administrative privileges for your Google Workspace account. The Admin Console is where you can manage various aspects of your Google Workspace settings, including user accounts, security settings, and domain configuration.
Here’s how you can access the Google Workspace Admin Console:
1. Open your web browser and go to the Google Workspace Admin Console website.
2. Enter your Google Workspace administrator email address and password.
3. Click “Next” and follow any additional authentication steps, such as entering a verification code if prompted.
4. Once successfully signed in, you will be redirected to the Admin Console dashboard, where you can manage various settings for your Google Workspace account.
It’s worth noting that the process of accessing the Admin Console can vary slightly depending on your Google Workspace subscription and if you have implemented Single Sign-On (SSO) for your account. If you encounter any issues during the login process, you can refer to the Google Workspace support documentation or contact your IT administrator for assistance.
Now that you have gained access to the Google Workspace Admin Console, let’s proceed to the next section, where we will explain how to locate the MX records within the Admin Console’s settings.
Finding MX records in Google Workspace Admin Console
While MX records are crucial for configuring email services, it’s important to note that you won’t find MX records directly within the Google Workspace Admin Console. Instead, you need to access the DNS settings of your domain through your domain registrar or hosting provider to modify or update the MX records.
To locate the necessary information for your MX records within the Google Workspace Admin Console, follow these steps:
1. Log in to the Google Workspace Admin Console using your administrator credentials.
2. From the Admin Console dashboard, navigate to the “Domains” section. This can usually be found under the “Domains & Addresses” or “Domain Settings” menu.
3. Select the domain for which you want to locate the MX records. If you have multiple domains associated with your Google Workspace account, ensure you choose the appropriate domain.
4. In the Domain Settings page, look for the section called “DNS Records” or “DNS Zone File.” This section contains important DNS records, including the MX records, associated with your domain.
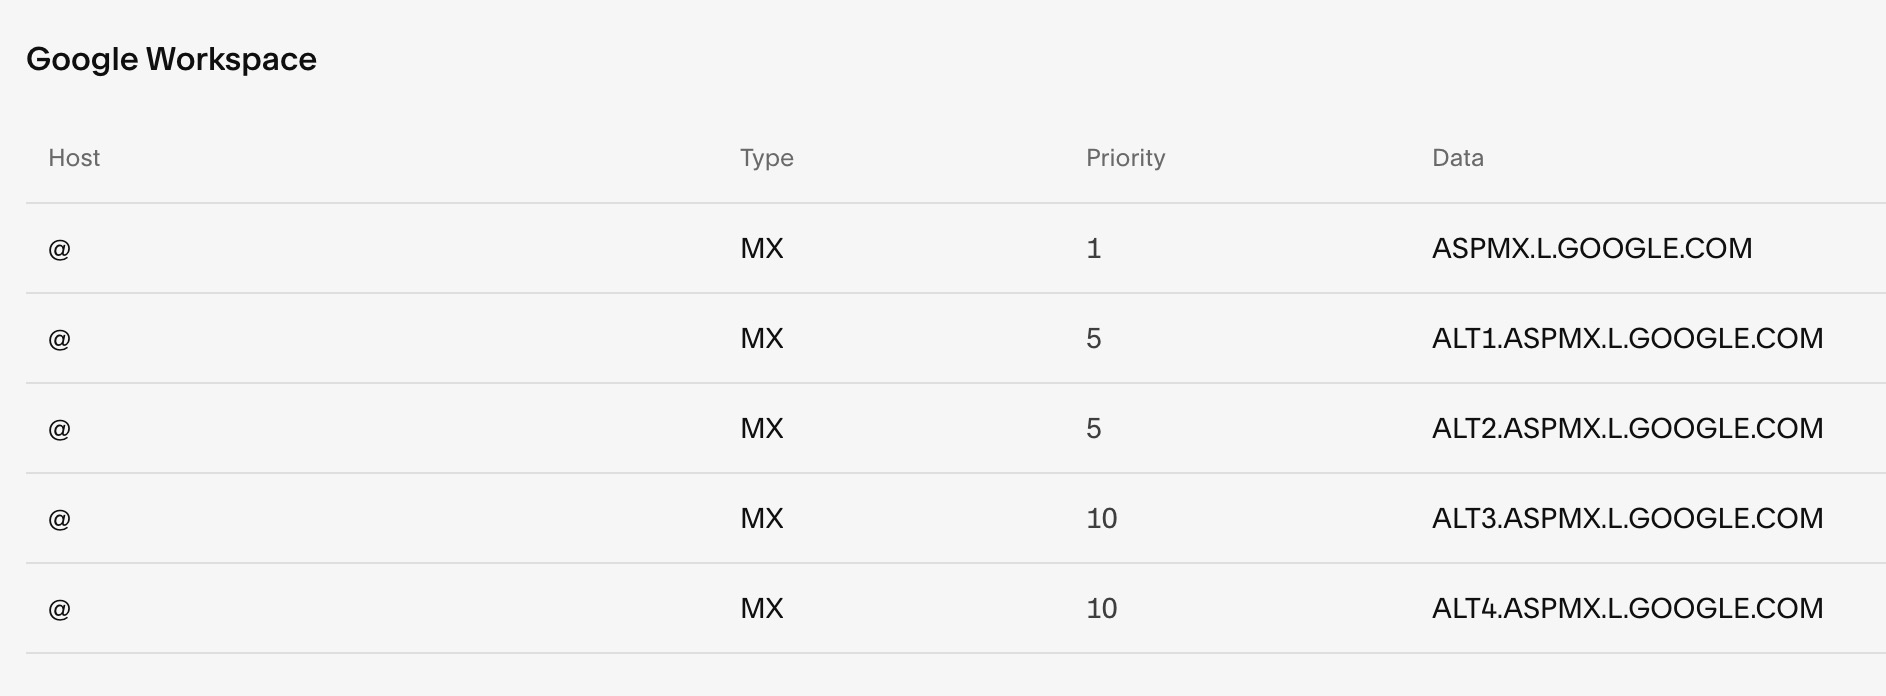
5. Within the DNS Records section, locate the MX records. They are typically listed alongside other DNS records like A, CNAME, and TXT records.
6. Take note of the MX record values, including the server addresses and their corresponding priorities. You may need these details when accessing your domain registrar or hosting provider’s DNS settings to modify the MX records.
Remember, the Google Workspace Admin Console provides you with the necessary information to configure your MX records, but making changes to those records is done outside the Admin Console in your domain’s DNS settings.
In the next section, we will guide you through a step-by-step process to locate and modify MX records using popular domain registrars or hosting providers.
Step-by-step guide to locating MX records
Configuring MX records requires accessing the DNS settings provided by your domain registrar or hosting provider. The specific steps may vary depending on your provider, but we will outline a general step-by-step guide below to help you locate MX records for common domain registrars or hosting providers.
Here’s a general process to find MX records for your domain:
1. Log in to the website of your domain registrar or hosting provider. This is where you manage your domain settings.
2. Locate the section for managing your DNS settings. It may be called “DNS Management,” “DNS Zone Editor,” “DNS Configuration,” or something similar.
3. Access the DNS settings for the domain you want to modify. Some providers may display a list of your domains, while others may require you to select or search for the specific domain.
4. Look for the MX records section within the DNS settings. Depending on the provider’s interface, you may find it under a dedicated tab or as a separate section.
5. Within the MX records section, you should see a list of existing MX records, if any. Each record will typically include the server address and priority.
6. Take note of the server addresses and priorities for the MX records. You may need this information to modify or update the records.
7. If you need to modify the MX records, look for options like “Edit,” “Modify,” or “Change.” Click on the appropriate button or link to make changes.
8. Enter the new server addresses and priorities as required. You may also have the option to delete or add new MX records.
9. Save your changes and exit the DNS settings. Note that it may take some time for the changes to propagate across the internet.
It’s important to consult your domain registrar or hosting provider’s documentation or support resources if you encounter any difficulties during this process. They can provide specific instructions tailored to their platform.
Now that you have located the MX records and understand the general process of modifying them, let’s move on to the next section to learn how to verify the MX records for your domain.
Verifying MX records
After modifying or adding MX records for your domain, it’s crucial to verify their correct configuration to ensure that your email services function properly. Verifying MX records helps you confirm that the changes you made have propagated correctly and that email delivery is being directed to the desired mail servers.
Here are steps to verify MX records for your domain:
1. Wait for the changes to propagate: It can take anywhere from a few minutes to several hours for DNS changes to propagate across the internet. It’s essential to allow sufficient time for the changes to take effect.
2. Use DNS lookup tools: There are various online tools that allow you to perform DNS lookups to check the current MX records for your domain. Simply enter your domain name or the mail server address you provided in the MX record, and the tool will display the associated MX records.
3. Verify the server addresses and priorities: Compare the server addresses and priorities displayed by the DNS lookup tool with the MX records you entered in the DNS settings. Ensure that they match to confirm that the changes have propagated correctly.
4. Test email delivery: Send a test email to your Google Workspace email address and check if it is successfully delivered. Confirm that the email arrives in the intended recipient’s inbox and not in the spam or junk folder.
5. Monitor email activity: Keep an eye on your email activity to ensure that incoming and outgoing emails are functioning as expected. If there are any issues or errors in email delivery, double-check the MX records and make necessary adjustments.
Verifying MX records is an essential step in setting up and maintaining email services with Google Workspace. By ensuring the correct configuration of MX records, you can guarantee the reliable delivery of emails to your domain.
In the next section, we will discuss common issues that may arise during the configuration of MX records and provide troubleshooting tips to help you resolve them.
Troubleshooting common issues with MX records
While configuring MX records for your domain, you may encounter some common issues that can affect the functionality of your email services. Understanding these issues and knowing how to troubleshoot them can help ensure smooth email delivery. Let’s explore some of the common issues and their troubleshooting steps:
1. Incorrect MX record configuration: Double-check the server addresses and priorities of your MX records to ensure they are entered correctly. Any typos or mistakes can prevent emails from being delivered to the correct mail servers. Correct any errors and verify the changes using DNS lookup tools.
2. Propagation delays: DNS changes, including MX record updates, can take time to propagate across the internet. If you recently made changes to your MX records, allow sufficient time for the changes to propagate. Be patient and check the records periodically for any updates.
3. DNS caching issues: DNS records, including MX records, can be cached by DNS resolvers and ISPs. This means that even after making changes, your DNS changes might not be immediately reflected. To resolve this, you can flush your DNS cache or wait for the caching period to expire.
4. Incorrect priority settings: Ensure that you have correctly configured the priorities of your MX records. The priority determines the order in which mail servers are attempted for email delivery. Make sure the lowest priority value corresponds to the primary mail server for your domain.
5. Conflict with other DNS records: Check for any conflicts between your MX records and other DNS records, such as A, CNAME, or TXT records. Ensure that there are no conflicting records that might interfere with email delivery.
6. Firewall or port blocking: If you have strict firewall settings or port blocking in place, it could prevent incoming email traffic to the specified mail servers. Review your firewall settings to ensure that the necessary ports (typically port 25 or 587 for SMTP) are open for incoming email traffic.
7. Spam filtering issues: In some cases, email servers might treat incoming emails from new or modified MX records as suspicious. Monitor your spam or junk folders to ensure legitimate emails are not being marked as spam. Whitelist the sender or adjust your spam filter settings if necessary.
If you encounter any persistent issues or difficulties in troubleshooting MX record problems, it’s recommended to reach out to your domain registrar, hosting provider, or Google Workspace support for further assistance.
In the next section, we will provide a brief summary of the guide and reiterate the importance of correctly configuring MX records for optimal email delivery.
Conclusion
In this guide, we covered the process of locating MX records in the Google Workspace Admin Console and provided a step-by-step guide for modifying them through your domain registrar or hosting provider. We emphasized the importance of correctly configuring MX records to ensure reliable email delivery for your domain.
While MX records cannot be directly modified within the Google Workspace Admin Console, the Admin Console provides the necessary information to configure MX records in your DNS settings. By accessing the DNS settings outside of Google Workspace, you can modify the MX records for your domain.
Remember to verify the MX records after making changes by using DNS lookup tools and testing email delivery. This ensures that the changes have propagated correctly and that your email services are functioning as expected.
If you encounter any issues during the MX record setup, we provided troubleshooting steps to help you resolve common problems. It is crucial to check for errors, delays in propagation, conflicts with other DNS records, and potential firewall or spam filtering issues.
Properly configured MX records are essential for the smooth operation of email services in Google Workspace. By following the guidelines outlined in this guide, you can ensure that emails sent to your domain are directed to the correct Google Workspace email servers.
If you are unsure about modifying your MX records or experience persistent issues, it is recommended to consult with your domain registrar, hosting provider, or Google Workspace support for further assistance.
By understanding and effectively managing your MX records, you can ensure seamless email communication within your Google Workspace environment, providing a reliable and efficient communication channel for your organization or business.