Introduction
Welcome to the world of tablets! These innovative devices have revolutionized the way we consume media, stay connected, and get work done on the go. Whether you’re a tech-savvy individual or a newbie to the tablet world, this comprehensive guide will help you navigate through the process of setting up your new tablet.
Tablets offer a portable and convenient alternative to traditional computers. With their touchscreens and compact size, they provide a seamless user experience that combines the functionalities of a smartphone and a laptop. Whether you’re using your tablet for work, entertainment, or a bit of both, the setup process is essential to ensure that you can make the most out of your device.
Choosing the right tablet for your needs is the first step. Consider factors such as screen size, operating system, processing power, and storage capacity. Depending on your preferences and budget, you can choose between Android tablets, iPads, or Windows-based tablets. Each platform offers its own set of features and benefits, so take your time to research and make an informed decision.
Once you’ve got your hands on the perfect tablet, it’s time to unbox and set it up. This involves a series of steps that will get your tablet ready for use. From connecting to Wi-Fi to configuring essential settings, we’ll walk you through the process, ensuring that you have a smooth and hassle-free setup experience.
But before we dive into the technical details, it’s important to mention that throughout this guide, we’ll be referring to common setup procedures that are applicable to most tablets. However, please note that specific steps and options may vary depending on the make and model of your device. Be sure to consult the user manual that accompanies your tablet for any specific instructions provided by the manufacturer.
So, without further ado, let’s begin our journey to set up your new tablet and unlock its full potential!
Choosing the Right Tablet
With a wide range of tablets available in the market, choosing the right one can seem like a daunting task. However, by considering a few key factors, you can narrow down your options and find a tablet that suits your needs perfectly.
The first decision you’ll need to make is the operating system. The three main options are Android, iOS (found on iPads), and Windows. Each platform has its own set of pros and cons, so it’s important to evaluate your preferences and requirements.
Android tablets offer a wide range of options and customization features. They provide access to the Google Play Store, which houses a vast library of apps, games, and entertainment options. Android tablets are known for their versatility and affordability.
iPads, on the other hand, run on iOS, Apple’s operating system. iPads are highly regarded for their sleek design, intuitive interface, and seamless integration with other Apple devices. They offer a curated app selection through the App Store and are known for their powerful performance and high-quality displays.
If you’re more comfortable with the Windows operating system, you can opt for a Windows-based tablet. These tablets provide a familiar desktop-like experience and are ideal for those who rely heavily on Microsoft Office or other Windows-specific software.
Once you’ve determined the operating system, consider the size and display of the tablet. Tablets are available in various screen sizes, typically ranging from 7 to 12 inches. Larger screens offer a better multimedia experience, while smaller screens are more portable. Additionally, pay attention to the display resolution and quality, as this can greatly impact your viewing experience.
Processing power and storage capacity are also important factors to consider. If you plan on running resource-intensive applications or multitasking, opt for a tablet with a powerful processor and ample RAM. Similarly, if you have a large collection of media files or intend to download many apps, choose a tablet with sufficient storage space or expandable storage options.
Budget is another crucial consideration. Determine how much you’re willing to invest in a tablet and look for options within your price range. Setting a budget will help you prioritize your requirements and find the best value for your money.
Lastly, don’t forget to read reviews and compare specifications of different tablet models. Reviews from experts and users can provide valuable insights into the performance, durability, and overall user experience of a tablet. Take your time to research and weigh your options before making a decision.
By considering these factors and personal preferences, you can choose a tablet that aligns with your needs and ensures a satisfying user experience. So, take your time, do your research, and find the perfect tablet that will be your trusted companion in both work and play.
Unboxing and Initial Setup
Excitement fills the air as you unbox your brand new tablet. Before diving into the world of apps and entertainment, there are a few essential steps you need to take to ensure a smooth and successful setup process.
The first thing you should do is carefully remove the tablet from its packaging. Take a moment to appreciate its sleek design and handle it with care to avoid any accidental damage. Look for any additional accessories included in the box, such as a charging cable, adapter, or stylus.
Next, locate the power button or switch and turn the tablet on. Many tablets have a startup screen that displays the manufacturer’s logo. Patience is key during this stage as the device may take a few moments to boot up for the first time.
Once the tablet is powered on, you will be greeted with a series of setup screens. Follow the on-screen prompts to select your language, time zone, and other basic settings. These initial setup screens are designed to personalize your tablet and lay the foundation for a smooth user experience.
One crucial step during the setup process is connecting the tablet to Wi-Fi. Choose your Wi-Fi network from the available options and enter the password, if necessary. A stable internet connection is essential for downloading updates, installing apps, and accessing online content.
After connecting to Wi-Fi, the tablet will likely prompt you to sign in with your Google, Apple, or Microsoft account. A linked account provides access to various services and allows you to sync your data across multiple devices. If you don’t have an account, you can create one during this step.
During the setup process, you may also encounter options to enable or disable certain features such as location services, automatic updates, and usage data sharing. These settings are personal preferences, so choose according to your needs and privacy concerns.
Once you’ve completed the initial setup screens, your tablet is ready to use. Spend some time familiarizing yourself with the interface, exploring pre-installed apps, and accessing the app store to download additional apps and games.
Before you get lost in the world of apps and content, it’s essential to ensure that your tablet is up to date. Manufacturers regularly release software updates to improve performance, fix bugs, and enhance security. Check for available updates in the settings menu and install them to keep your tablet in optimal condition.
Congratulations! You have successfully unboxed and set up your new tablet. Now, it’s time to delve into its countless features and customize it to your liking. Whether you’re using it for work, entertainment, or both, your tablet is a versatile device that can enhance your productivity and entertainment experience.
In the next sections, we will guide you through various settings and configurations to further customize your tablet and make the most of its capabilities.
Connecting to Wi-Fi
One of the first essential tasks after setting up your new tablet is connecting it to a Wi-Fi network. A stable internet connection enables you to browse the web, download apps, stream media, and stay connected with friends and colleagues. Here’s a step-by-step guide on how to connect your tablet to Wi-Fi.
First, ensure that you are within range of a Wi-Fi network. Most tablets have an indicator showing the strength of nearby Wi-Fi signals, allowing you to choose the network with the best reception.
Go to the settings menu on your tablet. This can usually be accessed through an icon in the app drawer or by swiping down from the top of the screen and tapping on the settings icon.
In the settings menu, look for the Wi-Fi option. On some tablets, it may be named “Network & Internet” or something similar.
Tap on the Wi-Fi option to view available networks.
A list of nearby Wi-Fi networks will be displayed. Choose your preferred network from the list by tapping on its name. If the network is password-protected, you will be prompted to enter the Wi-Fi password. Enter the password using the on-screen keyboard and tap “Connect” or “Join.”
Your tablet will attempt to establish a connection to the selected Wi-Fi network. Once connected, you will see a confirmation message along with the Wi-Fi network’s name. Additionally, the Wi-Fi icon in the status bar at the top of the screen should display signal bars to indicate a successful connection.
It is worth noting that some public Wi-Fi networks may require authentication or acceptance of terms and conditions. If you’re connecting to a public network, follow any on-screen prompts or instructions to gain access.
Once your tablet is connected to Wi-Fi, you can enjoy all the benefits of internet access. Launch your web browser to browse websites, access online services, and stay updated with the latest news and information. You can also download and install apps from the app store, stream videos, and connect with friends on social media platforms.
In case you encounter any issues with the Wi-Fi connection, try the following troubleshooting steps:
- Ensure that you’re within range of the Wi-Fi network.
- Restart your tablet and the Wi-Fi router.
- Double-check the Wi-Fi password for any typing errors.
- Remove and re-add the Wi-Fi network on your tablet.
- If all else fails, contact your internet service provider or consult the tablet manufacturer’s support resources for further assistance.
With a stable Wi-Fi connection, your tablet becomes a powerful tool for productivity, entertainment, and staying connected. Now that you’re connected, let’s move on to the next steps in setting up your tablet to maximize its potential.
Updating the Operating System
Keeping your tablet’s operating system up to date is crucial for maintaining optimal performance, enhancing security, and gaining access to new features and improvements. Manufacturers regularly release software updates to address bugs, fix vulnerabilities, and introduce enhancements to the overall user experience. Here’s a step-by-step guide on how to update the operating system of your tablet.
Start by accessing the settings menu on your tablet. Look for the “System” or “About” option, as this is where you’ll find information about software updates on most devices.
Tap on the “System” or “About” option to view the system settings.
Within the system settings, look for an option named “Software Update,” “System Update,” or similar wording. Tap on this option to check for available updates.
Your tablet will connect to the internet to check for updates. If an update is available, you’ll be prompted to download and install it. Depending on the size of the update and your internet connection speed, this process may take some time.
Before proceeding with the update, ensure that your tablet is connected to a reliable Wi-Fi network and has sufficient battery charge. Software updates can consume a significant amount of data and battery power, so it’s best to perform the update while connected to a power source.
If the update requires your permission to proceed, you may be prompted to confirm before the installation begins. Follow the on-screen instructions to proceed with the update installation.
During the update process, your tablet may restart several times. This is normal and part of the update process. Be patient and avoid interrupting the installation process.
Once the update is complete, your tablet will restart, and you’ll have the latest version of the operating system installed. You may notice improvements in performance, new features, or changes to the user interface.
It’s important to note that some updates may require you to accept new terms and conditions or review privacy settings. Take the time to review and adjust these settings according to your preferences.
If, for any reason, you’re unable to find the software update option within the settings menu, consult the user manual or visit the manufacturer’s website for guidance on updating your specific tablet model.
Regularly checking for software updates and keeping your tablet’s operating system up to date is vital for performance, security, and compatibility with the latest apps and services. Make it a habit to periodically check for updates and install them to ensure you’re getting the most out of your tablet.
Now that you have updated your operating system, let’s move on to the next steps in setting up your tablet to make it truly personalized and optimized for your needs.
Setting Up User Accounts and Profiles
Setting up user accounts and profiles on your tablet allows you to personalize your device, keep your information separate, and share it with other users if needed. User accounts provide a level of privacy and customization, ensuring that each person using the tablet has their own personalized experience. Here’s a guide on how to set up user accounts and profiles on your tablet.
Start by accessing the settings menu on your tablet. Look for an option named “Users” or “Accounts.” This is where you’ll find settings related to user accounts and profiles.
Tap on the “Users” or “Accounts” option to view the user settings.
You will likely see an option to add a new user. Tap on this option to create a new user account.
You may be prompted to enter the new user’s name and select a profile picture, if desired. These details will help differentiate between user accounts.
Once you’ve entered the necessary details, you may have the option to set the new account as a “Restricted Profile” or a “Guest Account.” Restricted profiles limit access to certain apps or features, making them ideal for children or other users who should have limited access. Guest accounts provide temporary access without affecting the settings or data of the primary user.
If required, you can set a password or PIN for the new user account to keep it secure and prevent unauthorized access.
If your tablet supports it, you may have the option to add multiple user accounts. This is useful when sharing the tablet with family members or colleagues, as each person can have their own personalized space.
Once the user accounts are set up, you can switch between them by accessing the user menu from the settings or by tapping on the user profile icon in the notification panel.
Each user account functions independently, meaning that each user can have their own app preferences, settings, and data. This ensures that personal information, such as contacts, emails, and app data, remains separate and accessible only to the respective user.
Additionally, some tablets offer a “Guest Mode” feature, which allows you to quickly switch to a clean slate where you can allow others to use your tablet without accessing your personal information or accounts.
Setting up user accounts and profiles on your tablet provides a personalized and secure experience for each user. Whether you’re sharing your tablet with family members, friends, or colleagues, or simply want to have separate spaces for work and personal use, user accounts allow you to customize settings, access apps, and maintain privacy.
Now that you have set up user accounts and profiles, let’s move on to configuring display settings and making your tablet visually appealing and comfortable to use.
Configuring Display Settings
Configuring the display settings on your tablet can greatly enhance your user experience by tailoring the screen’s appearance and functionality to meet your specific needs. Whether you prefer larger text for better readability, a specific color temperature, or a customized screen timeout, adjusting the display settings allows you to personalize your tablet. Here’s a guide on how to configure the display settings on your tablet.
Start by accessing the settings menu on your tablet. Look for an option titled “Display” or “Screen.” Tap on this option to access the display settings.
Within the display settings menu, you’ll find various options to customize the appearance and behavior of the screen. Let’s explore some of the key settings:
- Brightness: Adjust the brightness level to your preference. You can manually slide the brightness bar or enable the auto-brightness feature, which automatically adjusts brightness based on ambient light conditions.
- Font Size: Increase or decrease the font size to make text more legible. This setting is particularly useful for users with visual impairments or those who prefer larger text.
- Display Size: Resize the overall display to make content and icons larger or smaller. This option helps accommodate different visual preferences and screen sizes.
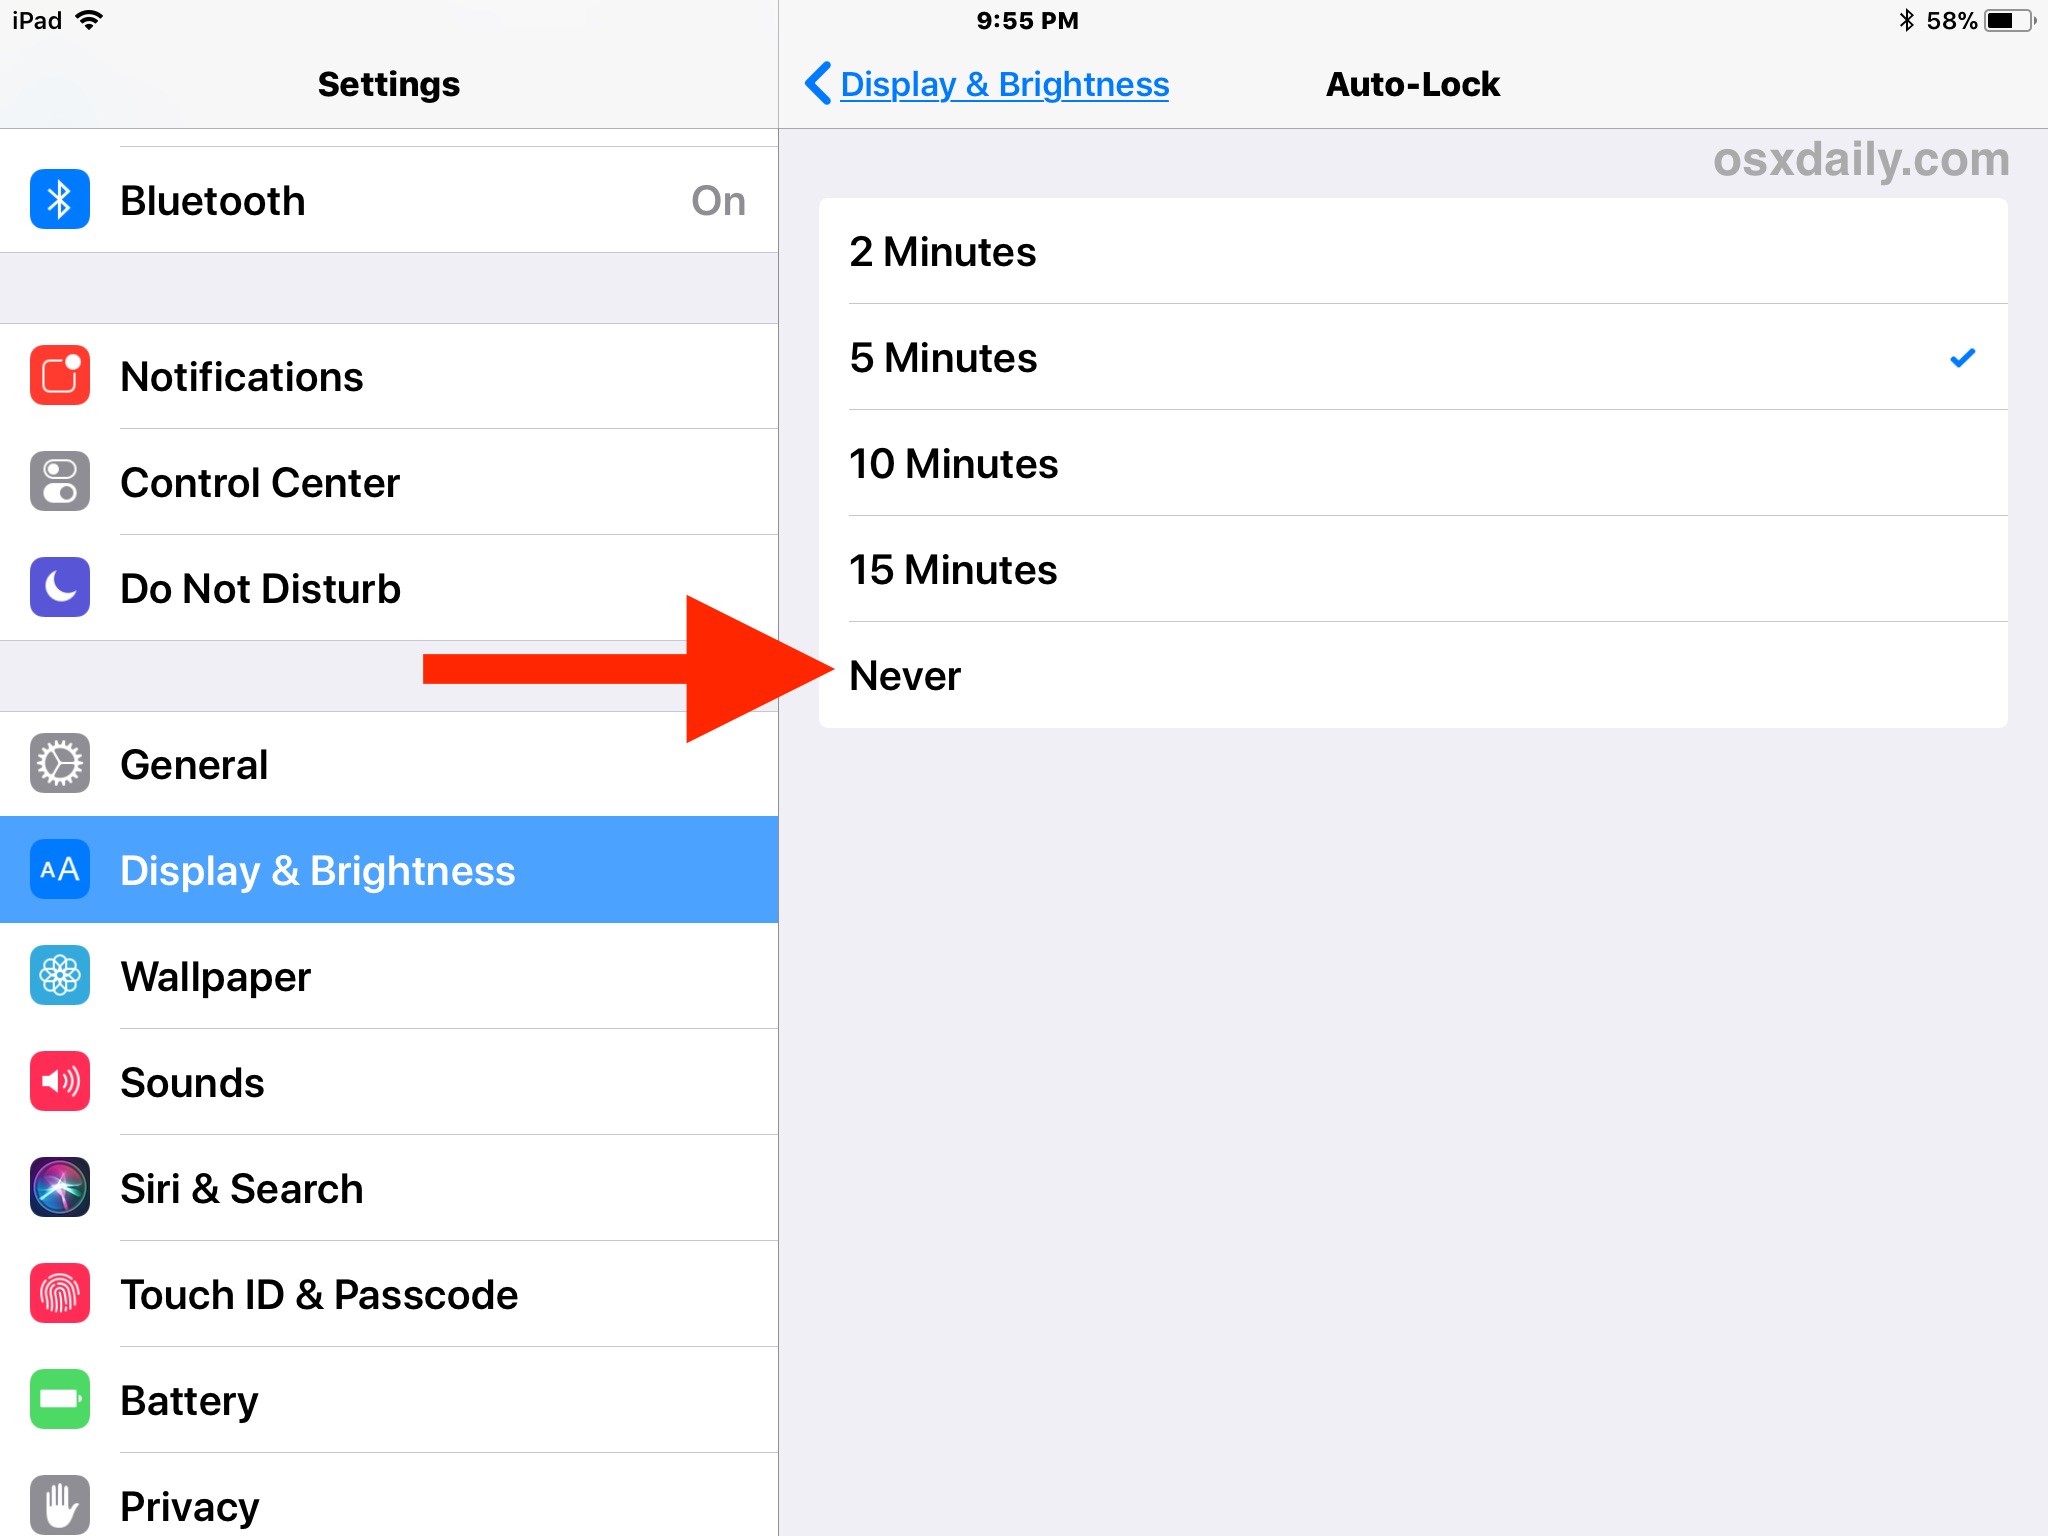
- Screen Timeout: Set the duration before the screen automatically turns off when idle. You can choose from various time intervals or set the screen to stay on indefinitely.
- Wallpaper: Customize the background image or wallpaper on your tablet’s home and lock screens. Choose from pre-installed wallpapers or use your own pictures.
- Screen Saver: Configure the screen saver settings to activate when your tablet is idle. You can select various types of screen savers, such as photos, colors, or interactive animations.
- Color Mode: Some tablets offer color mode options, allowing you to adjust the color temperature of the display. By choosing warmer or cooler colors, you can optimize the screen for your surroundings and reduce eye strain.
- Auto-Rotate: Enable or disable the auto-rotate feature, which automatically adjusts the screen orientation based on your tablet’s physical orientation. This is useful when switching between landscape and portrait modes.
Explore each setting and adjust them according to your preferences. Take the time to test different configurations and find what works best for you.
In addition to the display settings mentioned above, you may also find options to adjust the color calibration, enable dark mode, or activate blue light filters. These settings can enhance your viewing experience, reduce eye strain, and improve readability, especially during nighttime use.
It’s worth noting that some tablets offer advanced display settings, such as high-refresh-rate options for smoother motion, screen calibration tools, or HDR support. If your tablet has these features, explore the settings menu or consult the user manual for instructions on how to optimize the display to your liking.
Configuring the display settings on your tablet is an integral part of personalizing your device. By adjusting the brightness, font size, and other visual elements, you can create a comfortable and visually appealing experience. Take advantage of the available display settings to optimize your tablet’s screen to meet your specific needs and preferences.
Now that you have configured the display settings, let’s move on to managing app permissions and ensuring that your tablet is secure and private.
Managing App Permissions
Managing app permissions on your tablet is essential for maintaining your privacy and controlling what access and information each app has on your device. By managing app permissions, you can decide which apps can access your location, camera, microphone, contacts, and other sensitive data. This gives you greater control over your personal information and helps safeguard your privacy. Here’s how you can manage app permissions on your tablet.
Start by accessing the settings menu on your tablet. Look for an option named “Apps,” “Applications,” or “App Manager.” Tap on this option to view the list of installed apps.
Select the app for which you want to manage permissions. You can scroll through the list or use the search function to find a specific app.
Once you’ve selected the desired app, you’ll see an option for “Permissions” or “App Permissions.” Tap on this option to view and manage the app’s permissions.
Within the app permissions menu, you’ll see a list of permissions that the app may request. These permissions may include access to your location, camera, microphone, contacts, storage, or other device features. Each permission will have a toggle switch or checkmark next to it.
Review each permission and decide whether you want to grant or deny access to that particular feature for the app. You can easily toggle the switch on or off to grant or revoke the permission.
It’s important to note that some apps may require certain permissions to function properly. For example, a navigation app requires access to your location to provide accurate directions. However, exercise caution when granting permissions and consider the necessity of the permission for the app’s functionality.
If you’re unsure about a specific permission or want more information, you can tap on the permission to see a brief description or additional details about why the app requires that permission.
Additionally, some Android devices offer more advanced app permission controls, such as granting permissions on a per-session basis or granting temporary permissions. These features provide even more granular control over app access and data usage. Check your device’s settings or consult the user manual for instructions on how to utilize these advanced permission management features.
Regularly reviewing and managing app permissions is crucial for protecting your privacy and ensuring that your personal data remains secure. It’s a best practice to periodically check and adjust app permissions, especially after installing new apps or after system updates.
By managing app permissions on your tablet, you’re taking an important step towards safeguarding your personal information and ensuring that only trusted apps have access to your sensitive data. Make it a habit to grant permissions judiciously and review them regularly to maintain control over your privacy.
Now that you’ve learned how to manage app permissions, let’s move on to setting up email and contacts on your tablet.
Setting Up Email and Contacts
Setting up email and contacts on your tablet allows you to stay connected and organized while on the go. By configuring your email account and syncing your contacts, you can easily send and receive emails, manage your contacts, and stay in touch with friends, family, and colleagues. Here’s a guide on how to set up email and contacts on your tablet.
Start by accessing the settings menu on your tablet. Look for an option named “Accounts,” “Email,” or “Mail.” Tap on this option to access the account settings.
Within the account settings, you’ll see an option to add a new account. Tap on this option to begin setting up your email account.
You’ll be presented with a list of popular email providers such as Gmail, Outlook, Yahoo, or Exchange. Choose your email provider from the list. If your email provider is not listed, select “Other” or “IMAP/POP” and enter your email address and password manually.
Enter your email address and password in the designated fields. If necessary, you may also need to provide additional details such as the server settings or authentication method. These details can usually be found in the email provider’s support documentation or by contacting their customer support.
After providing the necessary information, tap on “Next” or “Sign In” to proceed. Your tablet will attempt to verify the account settings and establish a connection to the email server. This may take a few moments.
Once your email account is successfully added, you’ll have the option to sync your emails, contacts, calendar, and other data associated with the account. Select the desired options based on your preferences. Enabling contact syncing is particularly important as it allows you to access and manage your contacts directly from your tablet.
If you have multiple email accounts, repeat the above steps to add additional accounts to your tablet.
Once your email accounts are set up, you can access them through a dedicated email app or the default email client on your tablet. Launch the email app and select the account you want to use. You’ll see your inbox, and you can start sending and receiving emails.
To manage your contacts, open the Contacts app on your tablet. You should see a list of your synced contacts. From here, you can add, edit, or delete contacts, create contact groups, and manage contact details.
It’s worth noting that some tablets may offer additional features for email and contact management, such as the ability to set up email filters, manage multiple email signatures, or integrate with third-party contact management apps. Explore the settings of your email and contact apps to discover these advanced features.
Regularly check your email settings and update them as needed, such as changing your password or adjusting the sync frequency. This ensures that your email and contact data remain up to date and accessible.
By setting up email and contacts on your tablet, you’re streamlining your communications and staying organized in one convenient device. Whether for personal or professional use, having access to your emails and contacts on your tablet ensures you can stay connected and manage your relationships efficiently.
Now that you have set up email and contacts, let’s move on to installing and managing apps on your tablet.
Installing and Managing Apps
One of the greatest advantages of owning a tablet is the wide range of apps available for download. Whether you need productivity tools, entertainment apps, or utilities, installing and managing apps allows you to customize your tablet to suit your needs and preferences. Here’s a guide on how to install and manage apps on your tablet.
Start by accessing the app store on your tablet. Depending on your device, this may be the Google Play Store for Android tablets, the App Store for iPads, or the Microsoft Store for Windows-based tablets.
Once you’re in the app store, you’ll see various categories and featured apps. You can browse through these sections or use the search function to find specific apps.
When you find an app you want to install, tap on it to access its details page. Here, you can read the app description, check user reviews and ratings, and view screenshots or preview videos to get an idea of what the app offers.
If you decide to proceed with the installation, tap on the “Install” or “Get” button, depending on the app store. You may be prompted to grant permissions, such as access to device storage or location, before the installation starts. Review the permissions and tap “Accept” or “Allow” if you’re comfortable with them.
The app will begin downloading and installing. Depending on the size of the app and your internet connection speed, this process may take a few seconds to several minutes. Once the installation is complete, you’ll see a notification confirming that the app is ready to use.
The newly installed app will usually appear on your home screen or in the app drawer, depending on your tablet’s interface. You can tap on the app icon to launch it and start using it.
To manage your installed apps, go to the settings menu on your tablet and look for an option labeled “Apps,” “Applications,” or “App Manager.” Tap on this option to access a list of all installed apps.
Within the app manager, you can view and manage your installed apps. You can uninstall apps you no longer need, clear app data and cache to free up storage space, or manage app-specific settings and permissions.
It’s important to regularly update your apps to ensure you have the latest features, bug fixes, and security enhancements. Most app stores provide an “Updates” section that shows available updates for your installed apps. Simply tap on the update button next to an app to download and install the latest version.
Keep in mind that some tablets may have additional app management features, such as app folders, app suggestions, or the ability to restrict app access for certain user accounts. Explore your tablet’s settings or consult the user manual for these advanced app management capabilities.
Furthermore, be cautious when installing apps from unfamiliar sources. Stick to reputable app stores to minimize the risk of installing potentially harmful or malicious apps.
Installing and managing apps on your tablet allows you to unlock its full potential, making it a powerful tool for productivity, entertainment, and staying connected. Take the time to explore different apps, try new ones, and customize your tablet to suit your lifestyle.
Now that you know how to install and manage apps, let’s move on to connecting your tablet to Bluetooth devices for wireless connectivity.
Connecting to Bluetooth Devices
Bluetooth technology allows you to connect your tablet wirelessly to a wide range of devices, including speakers, headphones, keyboards, mice, and more. Establishing a Bluetooth connection enables you to enjoy a cord-free experience and expand the functionality of your tablet. Here’s a guide on how to connect your tablet to Bluetooth devices.
Start by accessing the settings menu on your tablet. Look for an option named “Bluetooth” or a Bluetooth icon, usually represented by a stylized “B.”
Tap on the “Bluetooth” option to enable the Bluetooth functionality on your tablet. This will initiate a search for nearby Bluetooth devices.
Ensure that the Bluetooth device you want to connect to is turned on and in pairing mode. Refer to the device’s user manual for instructions on how to activate its pairing mode if you’re unsure.
Within the Bluetooth settings on your tablet, you’ll see a list of available devices. Tap on the name of the device you want to connect to.
If prompted, enter a pairing code or PIN as shown on your tablet or device. Some devices may automatically pair without requiring a code.
Once the pairing process is complete, your tablet will display a confirmation message indicating a successful connection. The connected device may also provide a visual or audible confirmation.
Your tablet is now connected to the Bluetooth device, and you can begin using it. For example, if you connected wireless headphones, you can play music or videos through them. If you connected a Bluetooth keyboard, you can start typing without the need for physical cables.
To disconnect a Bluetooth device, simply return to the Bluetooth settings on your tablet and tap on the device name. You’ll have the option to disconnect or “Forget” the device, removing it from the list of available devices.
Keep in mind that some Bluetooth devices may have additional settings or features that you can access through your tablet’s Bluetooth settings or in the companion app for the device.
It’s worth noting that Bluetooth connections have a limited range, typically around 30 feet (10 meters). Ensure that the connected devices remain within this range to maintain a stable connection.
If you encounter any issues with the Bluetooth connection, try the following troubleshooting steps:
- Ensure that Bluetooth is enabled on both your tablet and the device you’re trying to connect to.
- Restart both your tablet and the Bluetooth device.
- Ensure that the device you’re connecting to is not already paired with another device, as Bluetooth devices can typically only connect to one device at a time.
- Check for any available firmware or software updates for your Bluetooth device.
- If all else fails, consult the user manual or contact the manufacturer’s support for further assistance.
Connecting your tablet to Bluetooth devices offers a world of wireless possibilities. It allows you to enjoy music, improve productivity, and expand the capabilities of your tablet. Whether connecting to speakers for a party or using a wireless keyboard for enhanced typing, Bluetooth connectivity enhances your tablet experience.
Now that you’ve learned how to connect to Bluetooth devices, let’s move on to customizing the home screen of your tablet to make it your own.
Customizing the Home Screen
The home screen of your tablet is your gateway to your apps and personalization. Customizing the home screen allows you to organize your apps, personalize the appearance, and have quick access to the features and information that matter most to you. Here’s how you can customize the home screen of your tablet.
First, locate the home screen of your tablet by pressing the home button or swiping up from the bottom of the display, depending on your device’s navigation gestures.
To rearrange app icons or widgets on the home screen, long-press on an app icon or widget until it becomes draggable. You can then move it to a different location on the home screen by dragging it with your finger. Release your finger to drop the app icon or widget into the desired position.
You can also create app folders to group related apps together. Long-press an app icon, drag it onto another app icon, and release your finger to create a folder. You can then customize the name of the folder and add or remove apps within it. This helps keep your home screen organized and decluttered.
If you want to add a widget to your home screen, long-press on an empty space on the home screen and tap on the “Widgets” or “+” option, depending on your device. This will display a list of available widgets you can choose from. Tap on a widget to select it, and then drag it to the desired location on the home screen.
To customize the appearance of your home screen, you may have options to change the wallpaper or add live wallpapers. Long-press on an empty space on the home screen and select “Wallpapers” or a similar option. Choose from the provided wallpapers or use your own image to set as the background of your home screen.
Depending on your tablet and the launcher you’re using, you may be able to change the grid size of the home screen, adjust the icon size, or apply themes to change the overall look and feel of the home screen and app icons. Explore the settings of your launcher app or consult the user manual for more details on customization options.
Some tablets and launchers also support additional home screen features, such as app shortcuts, app suggestions based on usage, or specialized widgets for weather, calendar, or news. Take the time to explore the settings and features available to you to personalize your home screen even further.
Remember that you can always revert any changes you make to the home screen by long-pressing on an app icon, widget, or folder and selecting the appropriate options that appear, such as “Remove,” “Delete,” or “Uninstall,” depending on the action you want to take.
Customizing the home screen of your tablet allows you to create a personalized and efficient user experience. Take the time to arrange your apps, add widgets, and customize the appearance to suit your preferences and needs. Your tablet’s home screen becomes a reflection of your style and a tool that enhances your productivity and enjoyment.
Now that you’ve customized your home screen, let’s move on to setting up security measures on your tablet to protect your data and personal information.
Setting Up Security Measures
Setting up security measures on your tablet is crucial for protecting your data, personal information, and ensuring the privacy of your device. By implementing strong security measures, you can safeguard your tablet against unauthorized access and potential threats. Here’s a guide on how to set up security measures on your tablet.
Start by accessing the settings menu on your tablet. Look for an option labeled “Security” or “Lock Screen & Security.” Tap on this option to access the security settings.
Here are some security measures you can set up on your tablet:
- Screen Lock: Enable a screen lock to require a PIN, password, pattern, or biometric authentication (such as fingerprint or face recognition) to unlock your tablet. Choose a lock method that offers a balance between security and convenience.
- Find My Device: Enable this feature to locate, lock, or erase your tablet remotely in case it is lost or stolen. This requires your tablet to have a Google account connected and Location services turned on.
- App Permissions: Review and manage the permissions granted to each app on your tablet. Ensure that apps have access only to the information and features they require.
- Secure Lock Screen Notifications: Hide sensitive information from appearing on the lock screen, preventing unauthorized users from accessing your notifications.
- Auto-Lock Settings: Set a specific time interval for your tablet to automatically lock itself when not in use. This helps protect your tablet if it is left unattended.
- Secure Startup: Enable this feature to encrypt your tablet’s data and require a PIN or password to decrypt it during startup. This adds an extra layer of security to your device.
- Remote Lock and Wipe: If you’ve enabled the Find My Device feature, you can remotely lock or erase your tablet if it is lost or stolen, ensuring that your data remains safe.
- App Verification: Enable this feature to protect your tablet against potential security threats by scanning and verifying apps installed from unknown sources.
While implementing these security measures is important, it’s equally crucial to keep your tablet’s operating system and apps updated. Regularly install software updates to ensure that you have the latest security patches and bug fixes.
If your tablet supports it, consider using a reliable security app or antivirus software to further enhance your device’s protection and detect any potential threats.
Remember to choose strong, unique passwords for your accounts and avoid using the same password across multiple platforms. Using a password manager can help you generate and store complex passwords securely.
It’s also a good practice to be cautious when connecting your tablet to public Wi-Fi networks, as these networks may pose security risks. Avoid accessing sensitive information or making online transactions when connected to public Wi-Fi unless you’re using a secure and trusted connection.
By setting up robust security measures on your tablet, you can have peace of mind knowing that your data and personal information are protected. While no security measure is foolproof, implementing multiple layers of security significantly reduces the risk of unauthorized access and data breaches.
Now that you’ve set up security measures on your tablet, you can use your device with confidence, knowing that your data and personal information are well protected.
Configuring Battery and Power Settings
Configuring battery and power settings on your tablet is essential for optimizing battery life, managing power consumption, and ensuring that your device lasts as long as possible before needing to be recharged. By taking control of the battery and power settings, you can make efficient use of your tablet’s battery and enhance its overall performance. Here’s a guide on how to configure battery and power settings on your tablet.
Start by accessing the settings menu on your tablet. Look for an option labeled “Battery” or “Power.” Tap on this option to access the battery and power settings.
Within the battery and power settings, you’ll find various options and features to help you manage the power usage on your tablet:
- Battery Percentage: Enable the battery percentage display on the status bar to get a more accurate representation of the remaining battery level.
- Battery Saver: Enable this feature to conserve battery life by limiting background activity, disabling certain visual effects, and reducing performance when the battery is low.
- Power Optimization: Some tablets have a power optimization feature that automatically adjusts various settings to conserve battery power. Check if your tablet has this feature and enable it if desired.
- Screen Timeout: Set a shorter screen timeout duration to automatically turn off the display when the tablet is idle, conserving battery power.
- Auto-Brightness: Enable the auto-brightness feature to automatically adjust the screen brightness based on ambient lighting conditions, optimizing both battery life and visibility.
- Background App Refresh: Limit or disable the ability of apps to refresh their content in the background, reducing battery drain caused by background activity.
- Uninstall Unnecessary Apps: Remove any apps that you no longer use, as excess apps can consume system resources and drain battery life.
- Manage Connectivity: Turn off connectivity features such as Wi-Fi, Bluetooth, and GPS when not in use, as these can drain battery power even when not actively being used.
- Use Wi-Fi Instead of Mobile Data: When available, connect to a Wi-Fi network instead of using mobile data, as Wi-Fi typically consumes less battery power.
It’s important to note that some tablets may have additional power-saving options or advanced battery management features. Explore the battery and power settings of your device or consult the user manual for more specific information regarding your tablet’s capabilities.
Monitoring and managing your battery usage can help prolong the overall lifespan of your tablet’s battery. Avoid frequently letting your tablet’s battery fall to 0% or keeping it at a constant full charge. Instead, aim to keep the battery level between 20% and 80% for optimum longevity.
Lastly, be mindful of the temperature at which you use and store your tablet. Extreme temperatures, both hot and cold, can affect the performance and lifespan of the battery. Avoid exposing your tablet to excessive heat or extreme cold for prolonged periods.
By configuring battery and power settings on your tablet, you can optimize battery life, reduce power consumption, and ensure that your device operates smoothly and efficiently. Take advantage of these settings to make the most out of your tablet’s battery and improve its overall performance.
Now that you’ve configured the battery and power settings, let’s move on to managing storage and memory on your tablet to ensure efficient performance and ample space for your apps and files.
Managing Storage and Memory
Managing storage and memory on your tablet is crucial for maintaining efficient performance, maximizing available space for apps and files, and ensuring smooth multitasking. By effectively managing your tablet’s storage and memory, you can optimize its overall functionality. Here’s a guide on how to manage storage and memory on your tablet.
Start by accessing the settings menu on your tablet. Look for an option labeled “Storage,” “Storage & USB,” or a similar term. Tap on this option to access the storage settings.
Within the storage settings, you’ll find various options and features to help you manage the storage and memory on your tablet:
- Storage Overview: Review the storage overview to see how much total storage is available on your tablet and how much is currently used by various categories like apps, media, and system files.
- Clear Cache: Clear the cache for specific apps or system-wide to free up storage space. Cached data is temporary storage used by apps for faster access, but it can accumulate over time and occupy significant space.
- Manage Downloads: Access the Downloads folder on your tablet to review and delete any unnecessary files that may be occupying storage space.
- App Storage: Review the storage usage of individual apps and uninstall any apps that you no longer use or need. This will free up storage space and improve performance.
- Move Apps to SD Card: If your tablet has an SD card slot, you may have the option to move supported apps from internal storage to the SD card to free up space. Keep in mind that not all apps can be moved to the SD card.
- Cloud Storage: Consider utilizing cloud storage services like Google Drive, Dropbox, or Microsoft OneDrive to store your files and free up local storage space.
- Memory Optimization: Some tablets have a feature to optimize memory usage by closing background apps and processes to free up RAM and improve performance. Enable this feature if available.
- Uninstall Unnecessary Files: Regularly review and delete any unnecessary files, such as duplicate photos, old documents, or unused media files, to free up storage space.
It’s important to note that as part of managing storage and memory, regularly backing up your important files and data is strongly recommended. This ensures that your data is secure and can be recovered in case of accidental deletion or device failure.
If you find that you’re consistently running low on storage space, consider investing in a high-capacity SD card if your tablet supports it. This will provide additional storage for your files, media, and apps.
Finally, keep an eye out for the storage and memory usage of your installed apps. Some apps may consume a significant amount of storage or use excessive amounts of RAM, impacting overall tablet performance. Consider alternative apps or lightweight versions if necessary.
By effectively managing storage and memory on your tablet, you can ensure that your device operates smoothly, has ample space for your apps and files, and delivers optimal performance. Regularly review and maintain your tablet’s storage and memory to keep it running efficiently.
Now that you’ve learned how to manage storage and memory on your tablet, you can make the most out of its available space and optimize its performance.
Troubleshooting Common Issues
While tablets are generally reliable devices, there may be occasions when you encounter common issues that affect their performance or functionality. Knowing how to troubleshoot these issues can help you quickly resolve them and get your tablet back up and running smoothly. Here are some common issues and troubleshooting steps to consider:
1. Slow Performance: If you notice that your tablet is running slowly, try the following steps:
- Close unused apps running in the background.
- Clear the app cache and temporary files.
- Restart your tablet to refresh the system.
- Consider removing unnecessary apps or files to free up storage space.
2. Connectivity Problems: If you’re experiencing issues with Wi-Fi, Bluetooth, or other connectivity features, try these troubleshooting steps:
- Ensure that your tablet’s Wi-Fi or Bluetooth is turned on and the device you’re connecting to is within range.
- Restart your tablet and the router or device you’re trying to connect to.
- Forget the Wi-Fi network or Bluetooth device on your tablet and reconnect to it.
- Check for any available system updates for your tablet and install them.
3. Battery Drain: If your tablet’s battery is draining quickly, try these methods to preserve battery life:
- Adjust the screen brightness or enable auto-brightness.
- Reduce the screen timeout duration or enable a power-saving mode.
- Restrict background app activity and close unused apps.
- Keep your tablet’s operating system and apps up to date.
4. App Crashes: If you’re experiencing frequent app crashes, consider these troubleshooting steps:
- Ensure that your tablet has sufficient storage space for the app to function properly.
- Clear the app cache or reinstall the app to resolve any software glitches.
- Check for and install any available app updates.
- If the problem persists, contact the app developer’s support team for further assistance.
5. Touchscreen Issues: If the touchscreen is unresponsive or behaving erratically, follow these troubleshooting steps:
- Clean the screen with a soft, lint-free cloth to remove any dirt or smudges.
- Remove any screen protectors or cases that may be interfering with touch sensitivity.
- Restart your tablet to refresh the system.
- If the problem continues, consult the tablet’s user manual or contact the manufacturer’s support for guidance.
If you’re experiencing a problem that is not listed here or have exhausted these troubleshooting steps without success, it may be beneficial to consult the tablet’s user manual, visit the manufacturer’s support website, or reach out to their customer support team for further assistance. They can provide specific guidance based on your tablet’s model and the issue you’re facing.
Remember to keep your tablet’s software up to date with the latest updates and practice regular maintenance to ensure smooth and reliable performance. By troubleshooting common issues, you can quickly resolve any problems and continue enjoying the benefits of your tablet.
Conclusion
Congratulations! You have successfully set up and customized your tablet to meet your needs and preferences. By following the steps outlined in this guide, you have configured various settings, connected to Wi-Fi and Bluetooth devices, managed app permissions, and optimized battery usage. Additionally, you have learned troubleshooting techniques to address common issues that may arise.
Remember that every tablet is unique, and some steps or options may differ based on your device’s make and model. It’s always a good idea to consult the user manual or the manufacturer’s support resources for specific instructions tailored to your tablet.
As you continue to use your tablet, don’t hesitate to explore and experiment with its features. Whether you’re using it for work, entertainment, or both, your tablet is a versatile tool that can greatly enhance your productivity and enjoyment in today’s digital world.
Regularly updating your tablet’s operating system and apps, practicing good security measures, managing storage and memory, and troubleshooting common issues will help you maintain optimal performance and prolong the lifespan of your device.
Lastly, remember to have fun! Tablets are designed to simplify and enrich your digital experience. Take advantage of the countless apps, creative tools, and entertainment options available to you.
Thank you for following this guide, and we hope that it has been helpful in setting up and getting the most out of your tablet. Enjoy your newfound mobility, productivity, and entertainment on your tablet!