Introduction
Have you ever experienced the frustration of running out of storage space on your tablet? It’s a common issue that can hinder your device’s performance and limit your ability to download new apps or store important files. Thankfully, there is a solution to this problem – moving apps from the SD card to your tablet’s internal storage.
Many Android tablets come with the option to expand storage using an external SD card. While this is a convenient way to increase storage capacity, apps installed on the SD card may not run as smoothly as those stored in the internal memory. By moving these apps to your tablet’s internal storage, you can improve performance and free up space on your SD card for other files and media.
In this article, we will guide you through the process of moving apps from the SD card to your tablet’s internal storage. By following these steps, you can optimize your device’s storage and ensure smooth operation for all your favorite apps.
Before we begin, it’s important to note that the steps may vary slightly depending on your tablet’s make and model, as well as the version of Android software you are running. However, the general process should be similar across most devices.
Now, let’s dive into the specifics of how to move apps from your SD card to your tablet’s internal storage, so you can enjoy a clutter-free and efficient device.
Why Move Apps From SD Card to Tablet?
There are several reasons why you might want to consider moving apps from your SD card to your tablet’s internal storage:
1. Performance: Apps that are stored on the internal memory tend to run faster and smoother compared to those stored on the SD card. This is because the internal memory provides faster read and write speeds, allowing apps to load and operate more efficiently.
2. Reliability: The SD card can sometimes become corrupted or damaged, leading to errors or even data loss. By moving your important apps to the tablet’s internal storage, you reduce the risk of losing valuable data and ensure the reliability of your apps.
3. Updates and Compatibility: Certain apps may require updates or compatibility with specific Android versions. If an app is installed on the SD card, it may not receive updates or function properly with the latest Android software. Moving the app to the internal storage ensures that it can receive updates and remain compatible with your tablet’s operating system.
4. Storage Management: Moving apps from the SD card to internal storage allows you to better manage your device’s storage capacity. You can free up space on the SD card to store photos, videos, and other media files, while keeping the internal storage primarily reserved for apps and system files.
5. App Accessibility: Some apps may not function properly when installed on the SD card, particularly if they require frequent access to system resources or if the SD card gets unmounted for any reason. By moving these apps to the internal storage, you ensure seamless accessibility and uninterrupted functionality.
Overall, moving apps from the SD card to your tablet’s internal storage provides performance improvements, increases app reliability, ensures compatibility, helps with storage management, and enhances app accessibility. Now that you understand the benefits, let’s move on to the next steps of the process.
Check Tablet’s Storage Capacity
Before you start moving apps from your SD card to the tablet’s internal storage, it’s essential to check the available storage capacity on your device. This will help you determine if you have enough space to accommodate the apps you wish to transfer.
To check your tablet’s storage capacity, follow these steps:
- Go to your tablet’s Settings menu, which is usually represented by a gear icon.
- Scroll down and tap on “Storage” or “Storage & USB” (the exact wording may vary depending on your device).
- You will see an overview of your tablet’s storage usage, including the amount of space used and available. It may be represented in both percentage and actual storage size.
- Take note of the available space to ensure you have enough capacity for the apps you plan to move.
If you find that your tablet’s internal storage is nearly full, it may be a good idea to consider deleting unused apps or moving other files, such as photos or videos, to free up space. This will create more room for the apps you want to transfer from the SD card.
Additionally, keep in mind that some Android devices have a designated “apps” or “internal storage” section within the storage settings. This section will provide a more detailed breakdown of the space occupied by apps on your tablet.
By checking your tablet’s storage capacity before moving apps, you can ensure that you have enough available space for a smooth and successful transfer process. Let’s proceed to the next step – unmounting the SD card.
Unmount the SD Card
Before you can begin moving apps from your SD card to your tablet’s internal storage, you need to unmount the SD card. This ensures that it is safely removed from your tablet and allows you to transfer apps without any interruptions or errors.
Here’s how you can unmount the SD card:
- Open your tablet’s Settings menu.
- Scroll down to the “Storage” or “Storage & USB” option.
- Tap on the “SD card” or “External storage” option.
- In the SD card settings, you will typically find an option to unmount or eject the SD card. Tap on this option.
- A confirmation message will appear, asking if you want to unmount the SD card. Tap “OK” or “Unmount” to proceed.
Once you have successfully unmounted the SD card, it is safe to proceed with moving your apps to the tablet’s internal storage. Remember, if you need to access files or media on the SD card in the future, you will need to remount it by following the same steps and selecting the “Mount” or “Mount SD card” option.
It’s worth noting that the precise steps to unmount the SD card may differ slightly depending on your tablet’s make and model. However, the general process remains similar across most Android devices. If you encounter any difficulties, refer to your tablet’s user manual or consult the manufacturer’s support documentation for specific instructions.
Now that you have successfully unmounted the SD card, it’s time to move on to the next step – accessing the Settings menu.
Access Settings Menu
In order to move apps from your SD card to your tablet’s internal storage, you need to access the device’s Settings menu. This menu gives you control over various settings and options on your tablet.
Finding the Settings menu may vary slightly depending on your tablet’s make and model, but here are the general steps to access it:
- Locate the app drawer icon on your tablet’s home screen. This is usually represented by a grid of small squares or dots.
- Tap on the app drawer icon to open it.
- Look for the “Settings” app within the app drawer. The icon may resemble a gear or cogwheel.
- Tap on the “Settings” app to open the Settings menu.
If you are unable to find the Settings app in the app drawer, you can also swipe down from the top of your tablet’s screen to access the Quick Settings menu. In the Quick Settings menu, you may find a gear-shaped icon that represents the Settings app. Tap on it to open the Settings menu.
Once you have successfully accessed the Settings menu, you are ready to proceed to the next step – selecting the Apps or Applications option.
Keep in mind that the exact appearance and organization of the Settings menu may vary depending on your tablet’s manufacturer and software version. However, the general steps outlined above should work for most Android devices.
Now that you have found the Settings menu, let’s move on to the next step – selecting the Apps or Applications option to begin moving your apps.
Select Apps or Applications
In order to move apps from your SD card to your tablet’s internal storage, you need to access the Apps or Applications section within the Settings menu. This section allows you to manage and control the apps installed on your device.
Here’s how you can find and access the Apps or Applications section:
- Open the Settings menu on your tablet.
- Scroll down and look for the “Apps” or “Applications” option. Tap on it to proceed.
On some devices, you may find this option listed directly in the main Settings menu, while on others, it may be placed under a sub-menu like “Device” or “Applications & Notifications”. The exact location and name of the option may vary, but it should be relatively easy to find.
Once you have accessed the Apps or Applications section, you will see a list of the apps installed on your tablet. You can usually view them in different tabs or categories such as “Downloaded”, “System”, or “All”. You may also have the option to search for specific apps using the search bar at the top of the screen.
Take your time to familiarize yourself with the Apps or Applications section. This is where you can manage all aspects of your installed apps, including moving them between the SD card and internal storage.
Now that you are in the Apps or Applications section, let’s proceed to the next step – choosing the app you want to move from the SD card to the tablet’s internal storage.
Choose App to Move
Now that you’ve located the Apps or Applications section in the Settings menu, it’s time to choose the specific app that you want to move from your SD card to your tablet’s internal storage.
Follow these steps to select the app you wish to move:
- Open the Apps or Applications section within the Settings menu on your tablet.
- Scroll through the list of installed apps and find the one you want to move.
- Tap on the app to open its information page.
On this information page, you will find details about the app, such as its size, version, and other relevant information. Additionally, you will see buttons or options related to the app’s storage and usage.
While the specific options may vary depending on your device and Android version, look for an option that mentions “Storage” or “Storage Usage”. This is the section where you can manage the app’s storage location.
Keep in mind that not all apps can be moved to the tablet’s internal storage. Some system apps or pre-installed apps may not have the option to be moved. However, many regular apps can be relocated to free up space on your SD card.
Note: Moving an app from the SD card to the internal storage may take some time and temporarily increase the app’s storage usage on the internal memory. Make sure you have enough free space on the tablet to accommodate the app.
Now that you’ve selected the app you want to move, let’s move on to the next step – choosing the “Move to Internal Storage” option.
Choose Move to Internal Storage
After selecting the app you want to move from your SD card to your tablet’s internal storage, the next step is to find the option to move the app. This option is usually labeled as “Move to Internal Storage” or something similar.
Follow these steps to choose the “Move to Internal Storage” option:
- Open the information page of the app you want to move within the Apps or Applications section of the Settings menu.
- Look for the “Storage” or “Storage Usage” section on the app’s information page.
- Tap on the “Storage” or “Storage Usage” option to access the storage settings for that app.
- In the storage settings, you should see an option that allows you to move the app to the internal storage. It may be labeled as “Move to Internal Storage” or similar wording.
- Tap on the “Move to Internal Storage” option to begin the process of moving the app from the SD card to the tablet’s internal storage.
Once you select the “Move to Internal Storage” option, the app will begin the transferring process. The time it takes to move the app will vary depending on its size and your tablet’s performance. During the transfer, it’s important to keep your tablet charged and avoid interrupting the process to ensure a smooth and successful move.
After the app has been moved to the internal storage, you will notice that its storage location has changed in the Apps or Applications section. It should now indicate that the app is stored in the internal memory of your tablet.
Now that you’ve chosen the “Move to Internal Storage” option, let’s move on to the next step – confirming the move and monitoring storage usage.
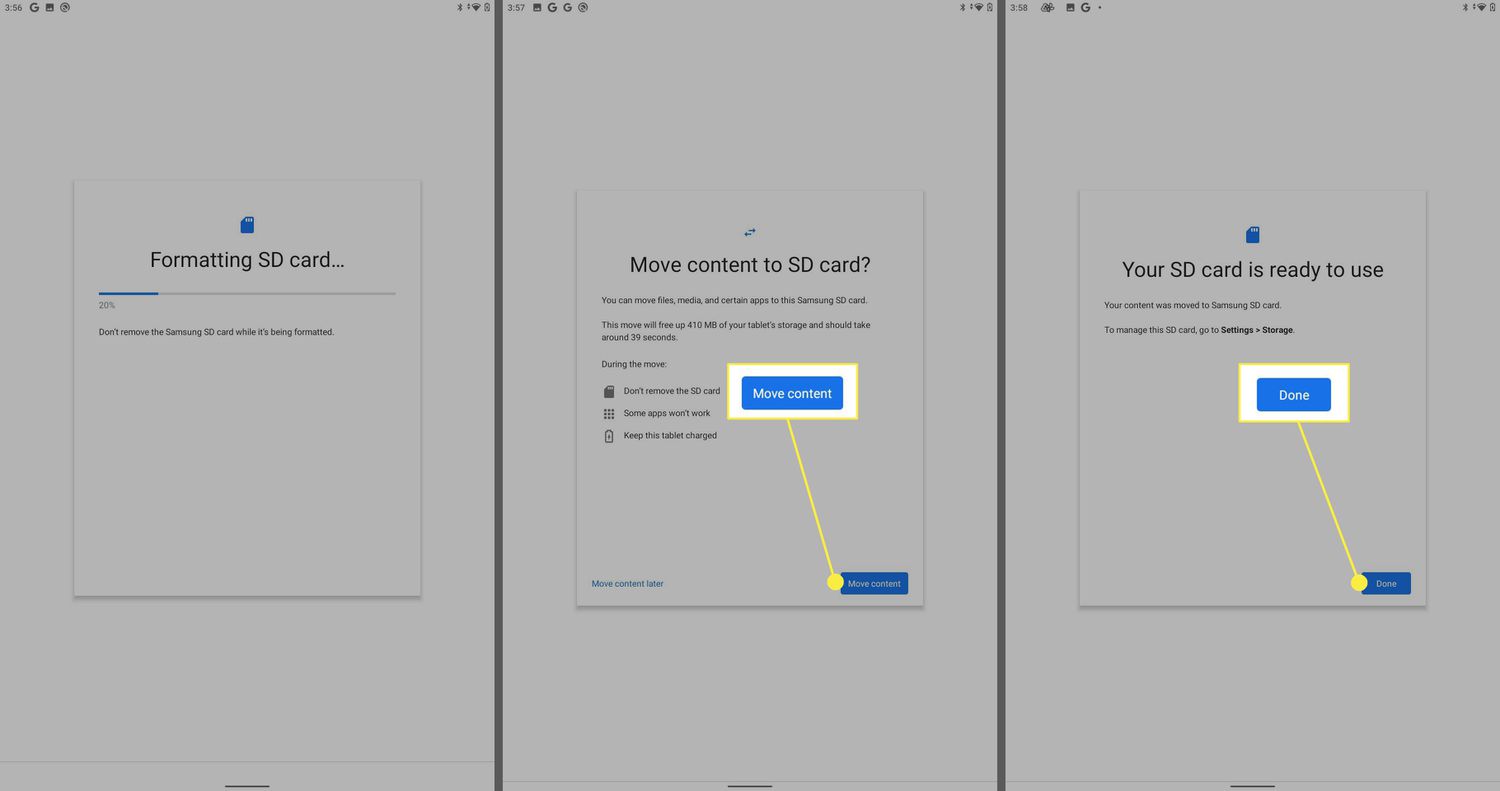
Confirm Move
After selecting the “Move to Internal Storage” option for the app you want to transfer, you will be prompted to confirm the move. This confirmation step ensures that you intend to move the app from your SD card to your tablet’s internal storage.
Follow these steps to confirm the move:
- Once you have chosen the “Move to Internal Storage” option for the app, a confirmation message will appear on your screen.
- Read the message carefully to ensure that you understand the consequences of moving the app. It may mention that the app’s storage location will be changed and that it may temporarily increase the app’s storage usage.
- If you are sure about the move and its implications, tap on the “Confirm” or “Move” button to proceed.
By confirming the move, the app will begin the transfer process from the SD card to the tablet’s internal storage. Depending on the app’s size and your tablet’s performance, it may take some time to complete the transfer. During this time, it’s recommended to keep your tablet charged and avoid interrupting the process to ensure a successful move.
Once the app transfer is complete, you will receive a notification or see a confirmation message on your screen. The app will now be stored in the tablet’s internal memory, which will help improve its performance and ensure smoother operation.
Remember that once the app has been successfully moved, the original app data and files on the SD card will no longer be needed. However, it’s always a good idea to back up your important app data before moving it, just in case.
Now that you have confirmed the move, let’s move on to the next step – monitoring your tablet’s storage usage to ensure efficient storage management.
Monitor Storage Usage
After successfully moving the app from your SD card to your tablet’s internal storage, it’s important to monitor your tablet’s storage usage going forward. This will help you keep track of available space and ensure efficient storage management on your device.
Here are some tips for monitoring your tablet’s storage usage:
- Open the Settings menu on your tablet.
- Scroll down and tap on the “Storage” or “Storage & USB” option.
- You will see an overview of your tablet’s storage usage, including the amount of space used and available.
- Take note of the current storage status, especially the internal storage section.
- Regularly check the storage usage to ensure you have enough space for new apps, files, and media.
- If you notice that the internal storage begins to fill up again, consider deleting unnecessary files or apps or moving them to the SD card (if available) to free up space.
- Be cautious not to overcrowd the internal storage, as it may affect your tablet’s performance.
It’s also a good practice to periodically evaluate the apps on your tablet and uninstall any that you no longer use or need. This will help keep your storage clean and free up valuable space for new apps or files.
Additionally, consider utilizing cloud storage services or external storage options, such as an SD card or USB drive, to further expand your tablet’s storage capacity if needed.
By regularly monitoring your tablet’s storage usage and making adjustments as necessary, you can ensure efficient storage management and optimize the performance of your device.
Now that you are equipped with the knowledge to monitor your tablet’s storage, you can enjoy a clutter-free and efficient device with ample space for your apps and files.
Conclusion
Moving apps from your SD card to your tablet’s internal storage is a practical solution to optimize your device’s performance and manage storage efficiently. By following the steps outlined in this guide, you can enjoy a smoother user experience, increased reliability, and improved compatibility with your tablet’s operating system.
Checking your tablet’s storage capacity is crucial before starting the app transfer process. This ensures that you have enough space to accommodate the apps you plan to move. Unmounting the SD card is the next step, which safely removes it from your tablet and prepares it for the app moving process.
Accessing the Settings menu and selecting the Apps or Applications section allows you to choose the specific app you want to move. Once selected, you can choose the “Move to Internal Storage” option to initiate the transfer. Confirming the move enables the app to begin transferring from the SD card to the tablet’s internal memory.
After successfully moving apps, it is important to monitor your tablet’s storage usage regularly. Checking the available space, deleting unused apps, and utilizing cloud or external storage options can help maintain efficient storage management.
By following these steps and implementing storage management practices, you can ensure a clutter-free and optimized tablet experience with sufficient space for all your apps and files.
We hope this guide has been helpful in providing you with the knowledge and steps required to move apps from your SD card to your tablet’s internal storage. Embrace the benefits of improved performance, reliability, and storage management, and enjoy the full potential of your tablet.