Introduction
Welcome to this guide on how to change storage to SD card on your Samsung tablet. If you’re running out of internal storage space on your tablet and want to utilize the extra storage capacity offered by an SD card, you’ve come to the right place. By following the steps outlined in this article, you’ll be able to easily change the storage settings on your Samsung tablet and make the SD card your default storage option.
Many Samsung tablets come with limited internal storage, which can fill up quickly with apps, photos, videos, and other files. Fortunately, most Samsung tablets support expandable storage through an SD card. By using an SD card, you can significantly increase the available storage space on your tablet and free up valuable internal storage for important system files and apps.
Before we dive into the steps, it’s important to note that not all tablets support external storage. You need to check if your Samsung tablet has an SD card slot and supports expandable storage. If your tablet doesn’t have an SD card slot, unfortunately, you won’t be able to change the storage to an SD card. However, if your tablet does support external storage, let’s proceed with the steps to change the storage settings.
In the following sections, we’ll walk you through the process of inserting an SD card, formatting it, changing the storage settings, and moving existing files to the SD card. We’ll also show you how to set the default storage location to the SD card, so that new files are automatically saved to the card. With these steps, you’ll be able to make the most of the external storage capability on your Samsung tablet.
Step 1: Check if your tablet supports external storage
Before proceeding with changing the storage to an SD card on your Samsung tablet, it’s important to verify if your tablet supports external storage. Not all tablets have an SD card slot or support expandable storage, so it’s essential to check compatibility before investing in an SD card.
To check if your Samsung tablet supports external storage, follow these steps:
- Power on your tablet and navigate to the Settings app. You can usually find the Settings app in the app drawer or by swiping down from the top of the screen and tapping the gear icon.
- In the Settings menu, scroll down and look for the “Storage” or “Storage & USB” option. Tap on it to open the storage settings.
- Within the storage settings, you should see information about your tablet’s internal storage and any available external storage options. Look for a section mentioning “SD card” or “External storage” to confirm if your tablet supports it.
- If you see an “SD card” or “External storage” option, then your tablet supports expandable storage through an SD card. Congratulations! You can proceed with the following steps to change the storage settings on your tablet.
- However, if you don’t have an “SD card” or “External storage” option in your storage settings, unfortunately, your tablet doesn’t support external storage. In this case, you won’t be able to change the storage to an SD card.
It’s worth noting that some Samsung tablets may have different variations, and the exact location of the storage settings can vary. If you’re having trouble finding the storage settings on your tablet, refer to your tablet’s user manual or perform a quick online search with your tablet model name and the phrase “storage settings.”
By verifying if your Samsung tablet supports external storage, you can ensure that you can proceed with the steps to change the storage settings and make the most out of the additional storage offered by an SD card.
Step 2: Insert the SD card into your tablet
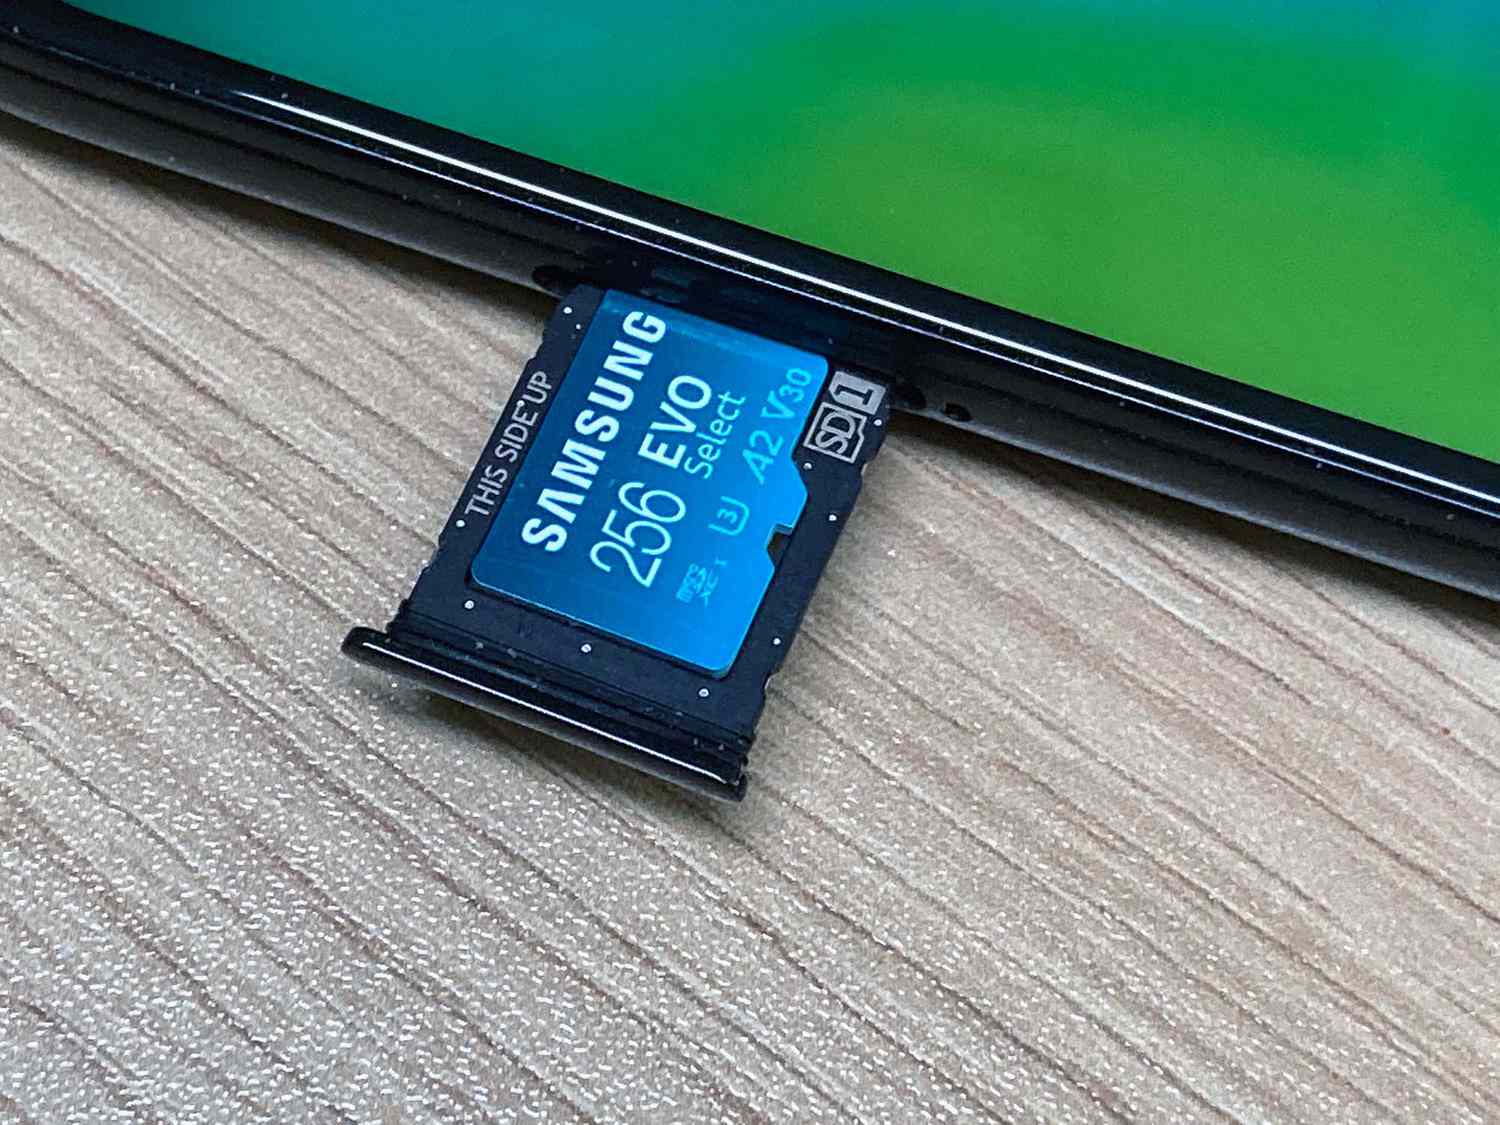
Now that you’ve confirmed that your Samsung tablet supports external storage, it’s time to insert the SD card into your device. The SD card provides an additional storage option that can help alleviate the space constraints on your tablet. Follow the steps below to insert the SD card:
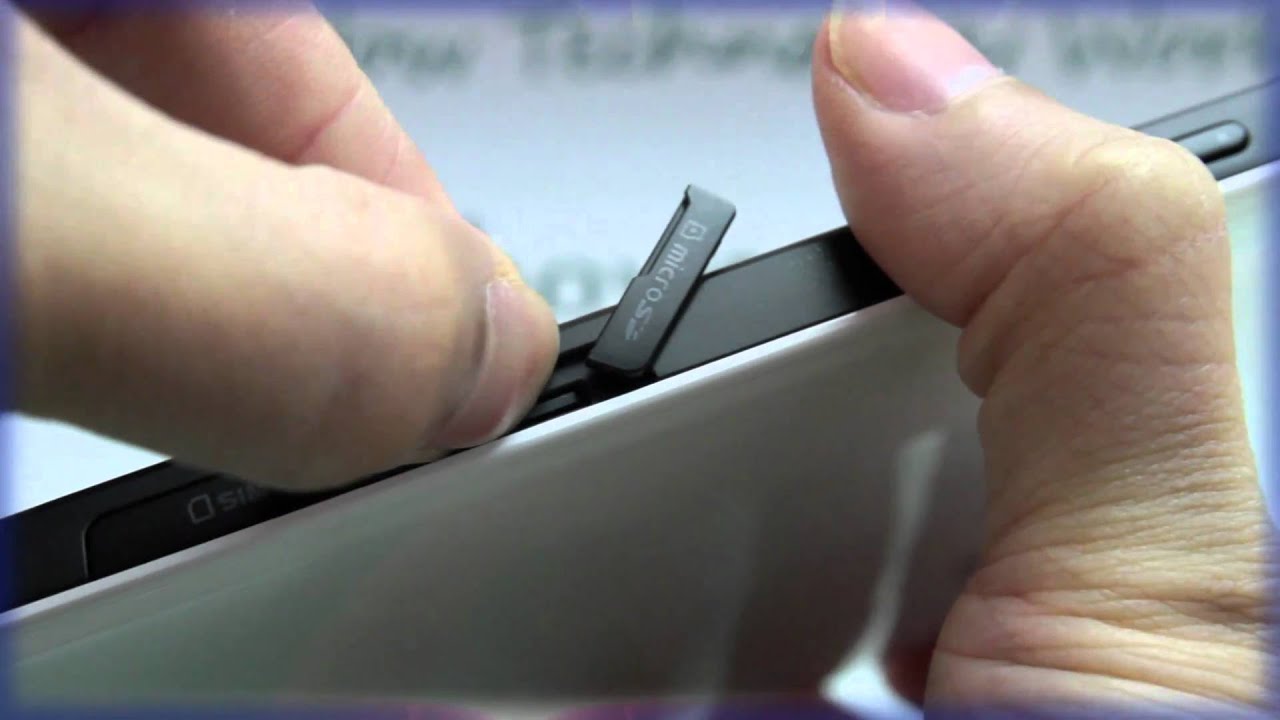
- Locate the SD card slot on your tablet. The location of the slot can vary depending on the tablet model but is commonly found on the side or top of the device. Consult your tablet’s user manual or perform a quick online search for the specific location.
- Power off your tablet. It’s important to turn off your tablet before inserting or removing the SD card to prevent any potential data loss or damage.
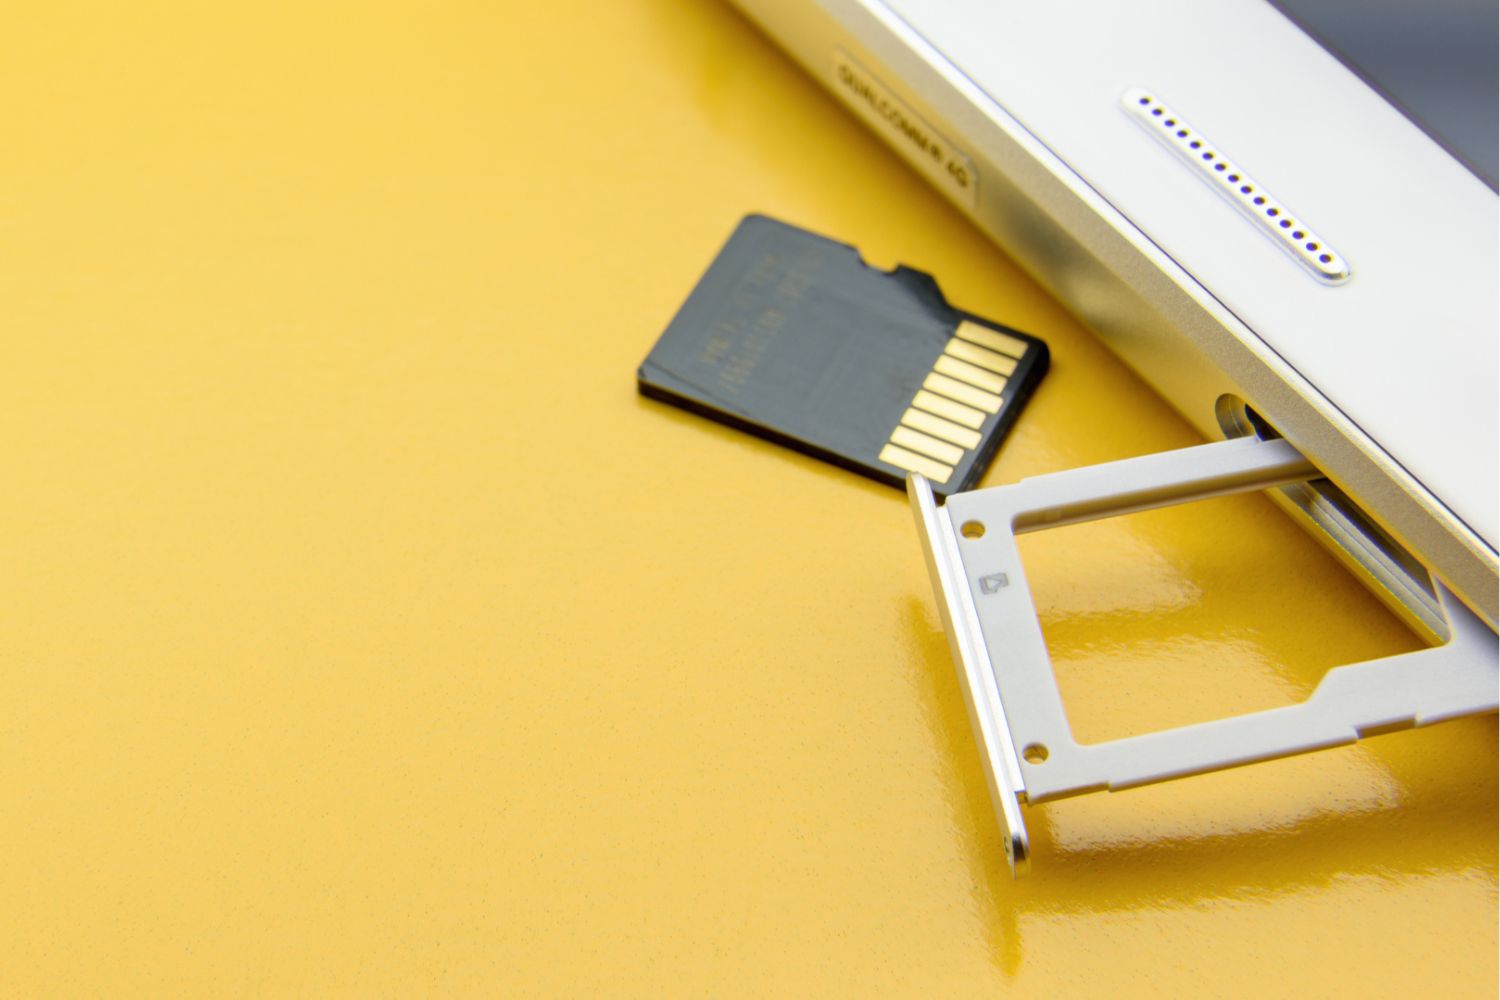
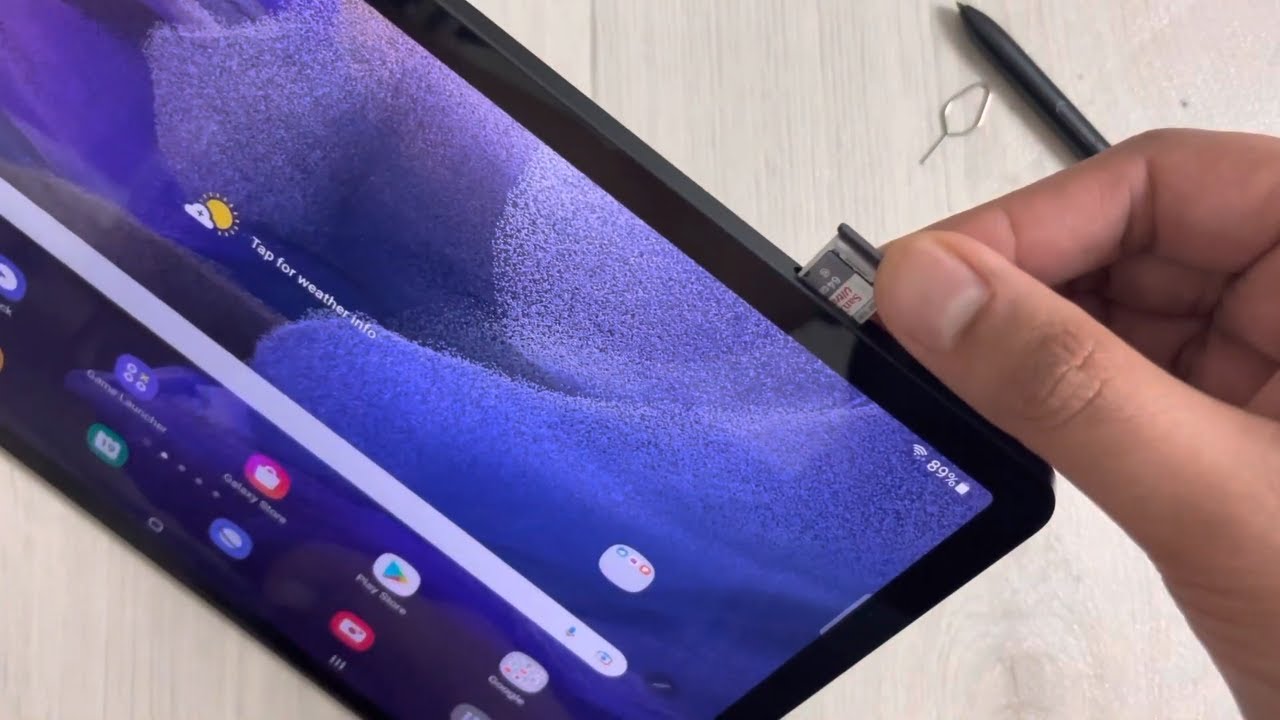
- Using a small pin or the eject tool that typically comes with your tablet, gently push the tool into the small hole next to the SD card slot to eject the SIM tray or SD card tray.
- Once the tray is ejected, carefully place the SD card into the appropriate slot. Ensure that the gold contacts on the SD card are facing downwards and align them with the pins or connectors in the slot.
- Push the SD card tray back into the slot until it clicks into place. Make sure the tray is flush with the tablet’s body.
- Power on your tablet. Once your tablet is powered on, it will detect the presence of the inserted SD card and prompt you to format it if it hasn’t been formatted before. Follow the on-screen instructions to format the SD card.
After following these steps, your SD card should be successfully inserted into your Samsung tablet. It’s now ready to be used as additional storage for your files, apps, and media. In the next steps, we will guide you through formatting the SD card and changing the storage settings on your tablet to utilize this external storage option.
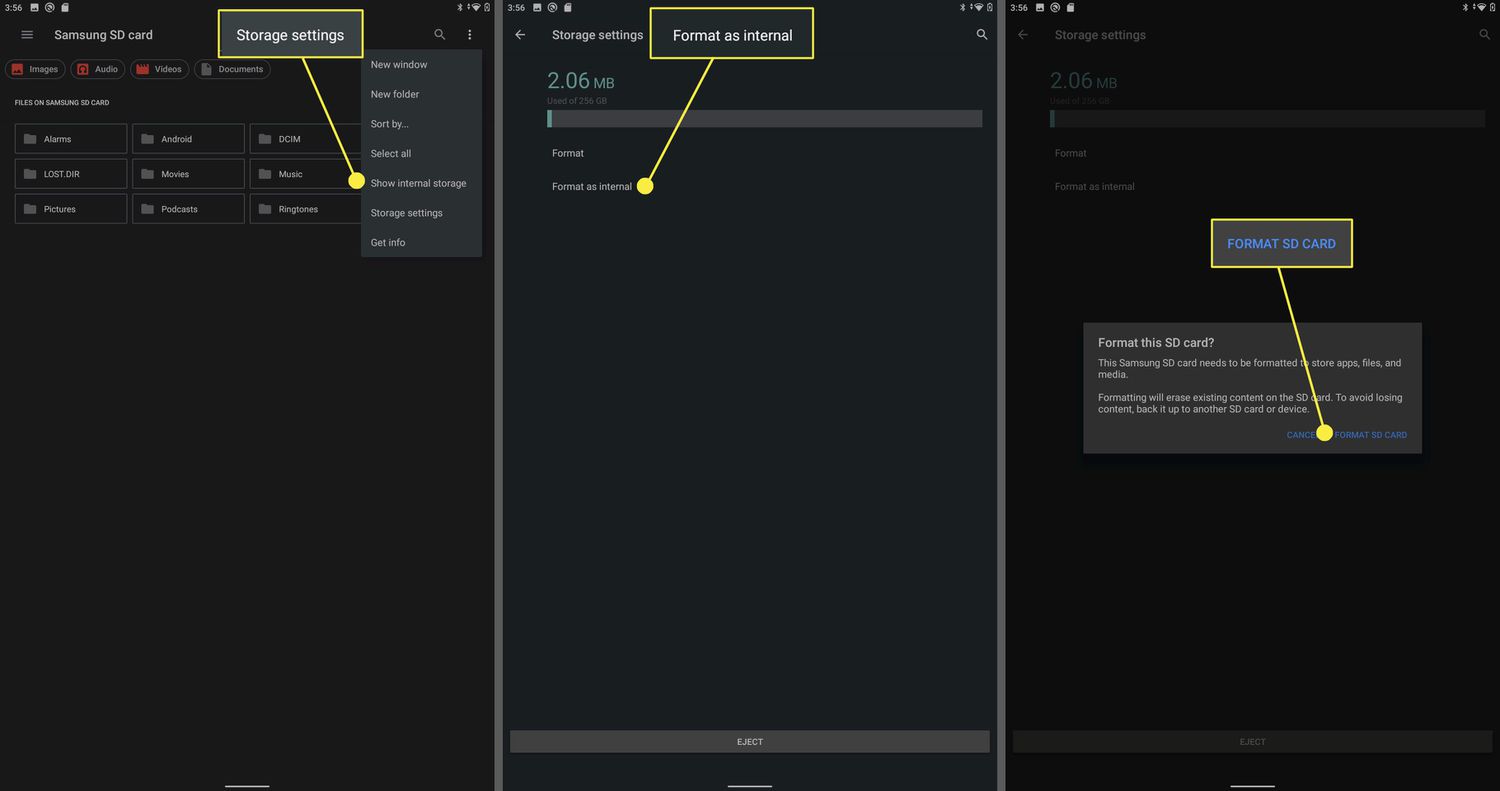
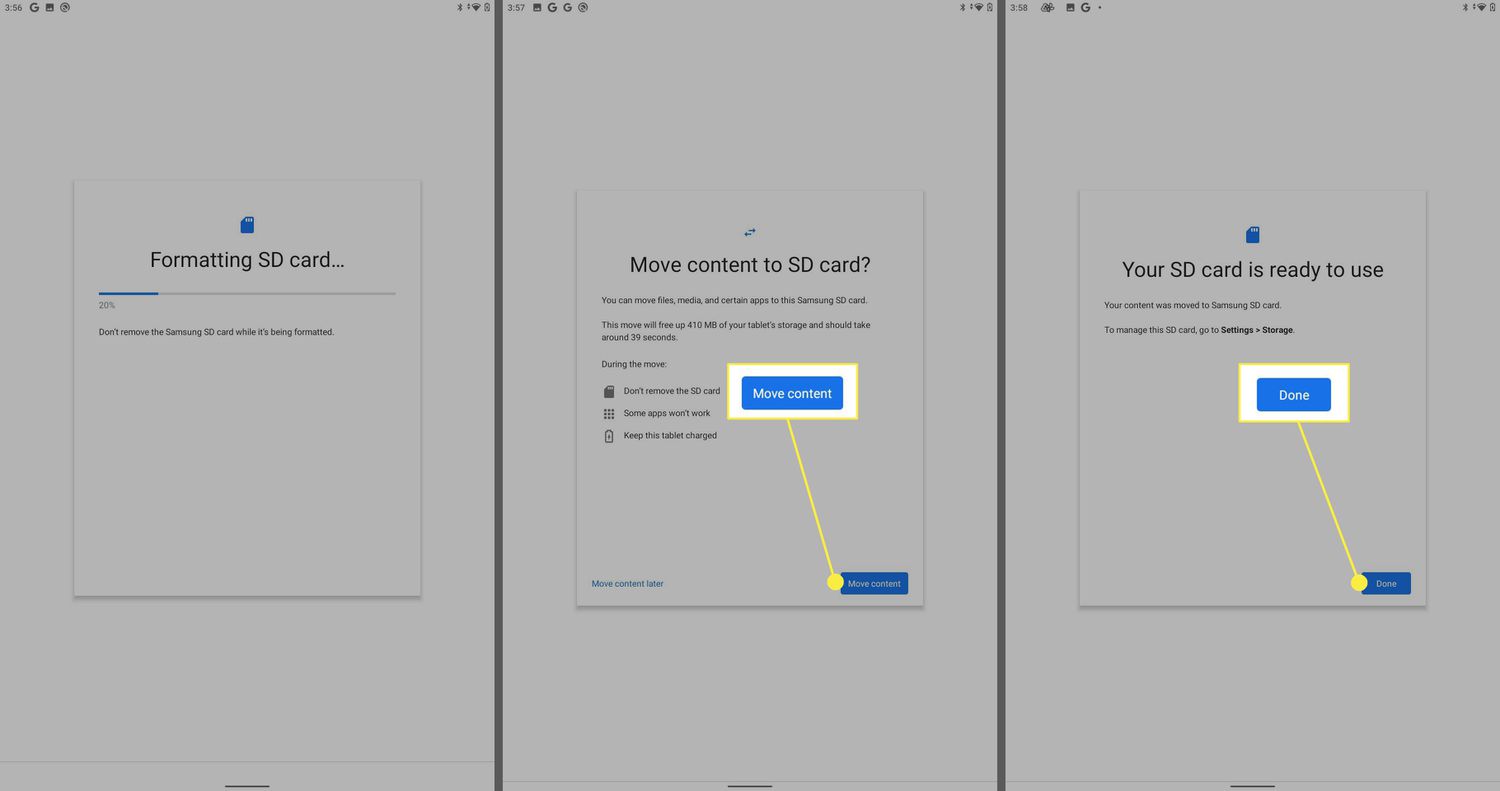
Step 3: Format the SD card
After successfully inserting the SD card into your Samsung tablet, the next step is to format it. Formatting the SD card prepares it for use with your tablet and ensures compatibility and optimal performance. Follow the steps below to format the SD card:
- Go to the Settings app on your tablet. You can find the Settings app in the app drawer or by swiping down from the top of the screen and tapping the gear icon.
- Scroll down and tap on “Storage” or “Storage & USB” to open the storage settings.
- Within the storage settings, you should see the SD card listed under the external storage section. Tap on the SD card to access the card settings.
- In the SD card settings, you’ll find options to unmount the SD card, format it, or view its details. Tap on the “Format” or “Format SD card” option.
- A warning message will appear, informing you that formatting the SD card will erase all data on it. Make sure to back up any important files before proceeding. If you’re ready to proceed, tap on “Format” or “Format SD card” to start the formatting process.
- Wait for the formatting process to complete. This might take a few moments, depending on the size of the SD card.
- Once the SD card is formatted, you’ll receive a confirmation message. You can now start using the SD card as additional storage on your tablet.
Formatting the SD card ensures that it is compatible with your tablet’s file system and removes any existing data or partitions, creating a clean and optimized storage space. Keep in mind that formatting will erase all data on the SD card. If you had any important files on the card, make sure to back them up before formatting.
Now that you have successfully formatted the SD card, you’re ready to proceed to the next step of changing the storage settings on your Samsung tablet.
Step 4: Change the storage settings to SD card
Now that you have inserted and formatted the SD card in your Samsung tablet, it’s time to change the storage settings to utilize the SD card as the default storage option. By doing this, your tablet will automatically save new files and apps to the SD card, freeing up valuable internal storage space. Follow the steps below to change the storage settings:
- Open the Settings app on your tablet.
- Navigate to the “Storage” or “Storage & USB” section, as mentioned in the previous steps.
- Look for an option that allows you to set the default storage location. It might be labeled as “Default storage” or “Storage location.” Tap on it to open the storage settings.
- Within the storage settings, select the option to change the storage location to the SD card. This option might be named “SD card” or “External storage” depending on your tablet’s interface.
- You may be prompted to confirm the change and acknowledge that all new files will be saved to the SD card. Tap “OK” or “Confirm” to proceed.
By changing the storage settings, you are ensuring that any new files, including photos, videos, and downloaded apps, will be automatically saved to the SD card. This helps prevent your tablet’s internal storage from filling up too quickly and allows you to take full advantage of the extra storage space offered by the SD card.
Keep in mind that changing the storage settings only affects newly created files. Existing files and apps on your tablet’s internal storage will still need to be moved manually to the SD card, which we will cover in the following step.
Now that you have changed the storage settings, let’s proceed to the next step to learn how to move existing files to the SD card.
Step 5: Move existing files to the SD card
After changing the storage settings to the SD card on your Samsung tablet, it’s time to move existing files from the internal storage to the SD card. By doing this, you can free up space on the internal storage and make better use of the external storage option provided by the SD card. Follow the steps below to move existing files to the SD card:
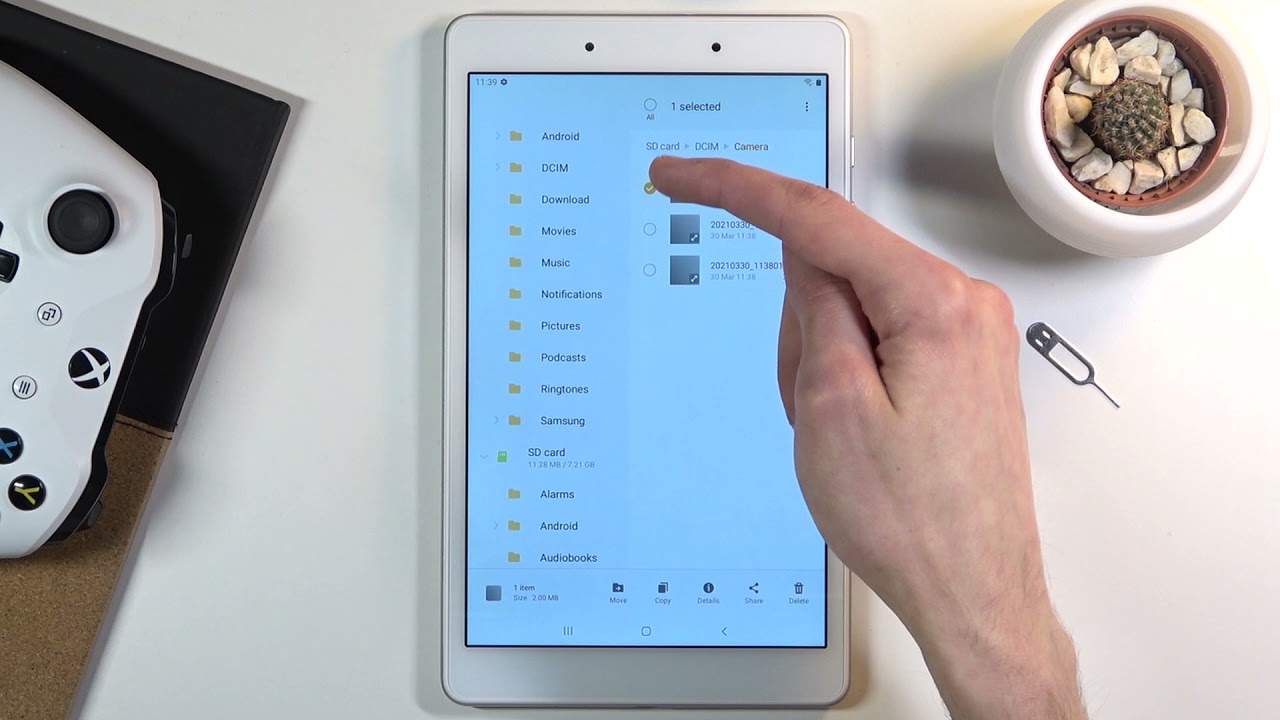
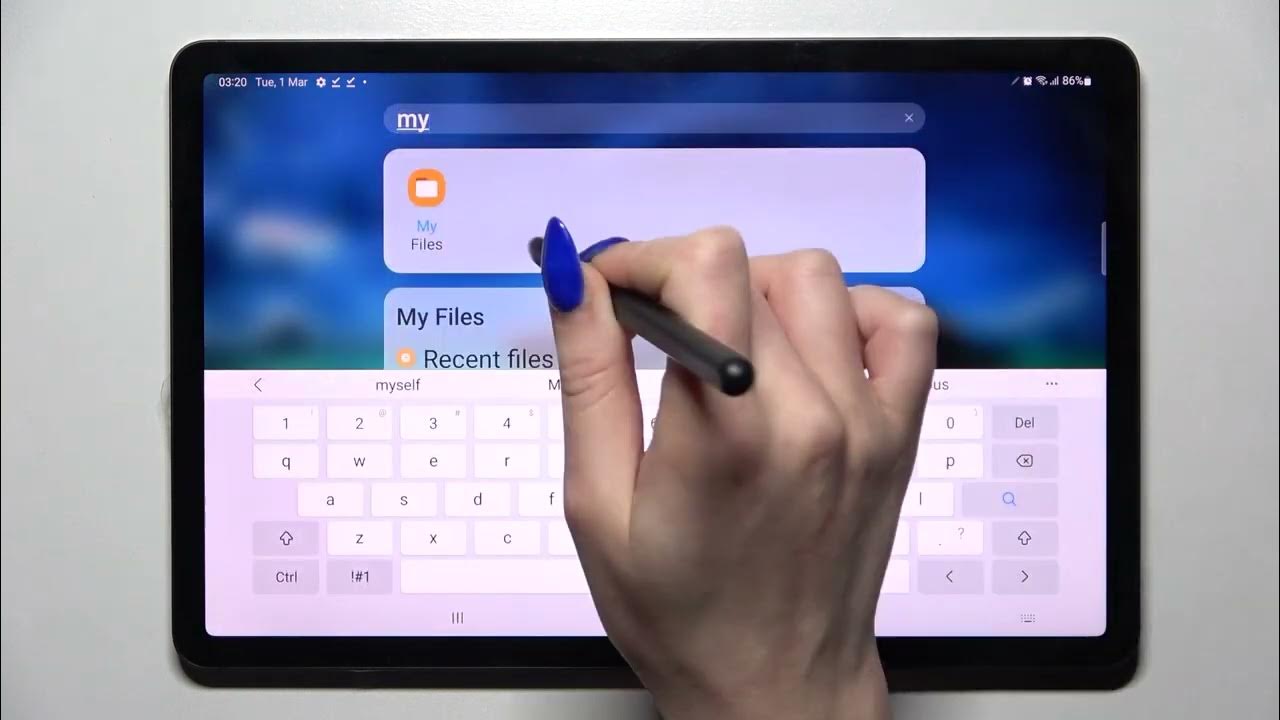
- Open the file manager app on your tablet. This app is typically labeled as “File Manager,” “My Files,” or something similar. If you can’t find a file manager app on your tablet, you can download one from the Google Play Store.
- Navigate to the location of the files you want to move. This may include photos, videos, documents, or any other files that are taking up space on your tablet’s internal storage.
- Long-press on a file to select it. Once selected, you can choose multiple files by tapping on them.
- Look for an option to move or copy the selected files. This option is typically represented by an icon with a cut or copy symbol.
- After selecting the files and choosing the move or copy option, navigate to the SD card location. This is usually represented by a folder or path labeled “SD card” or “External storage.”
- Paste the files into the desired location on the SD card. You can typically paste the files by long-pressing in the target location and selecting the paste option.
- Repeat this process for all the files you want to move to the SD card.
By moving existing files to the SD card, you are freeing up space on your tablet’s internal storage and making room for more apps, photos, and videos. It’s a good idea to periodically check your internal storage and move files to the SD card to maintain optimal storage capacity on your tablet.
Now that you have successfully moved existing files to the SD card, the next step is to set the default storage location to the SD card, ensuring that all new files are saved directly to the external storage. Let’s proceed to the next step to learn how to do this.
Step 6: Set default storage location to SD card
In the previous steps, you changed the storage settings on your Samsung tablet to utilize the SD card as the default storage option. However, there may still be certain apps or settings that are saving data to the internal storage. To ensure that all new files, apps, and data are automatically saved to the SD card, it’s important to set the default storage location for your device. Follow the steps below to set the default storage location to the SD card:
- Open the Settings app on your tablet.
- Navigate to the “Apps” or “Applications” section. The exact label may vary depending on your tablet model and the version of the operating system.
- Within the apps settings, you’ll see a list of all the installed applications on your tablet. Scroll through the list and select the app for which you want to set the default storage location.
- Once you’ve selected the app, look for an option labeled “Storage” or “Storage & cache.” Tap on it to access the storage settings for that particular app.
- In the storage settings, you’ll find an option to change the default storage location. This option may be named “Storage location,” “Storage settings,” or something similar.
- Select the option to change the default storage location and choose the SD card as the preferred storage location for that app.
- Repeat this process for any other apps that you want to set the default storage location to the SD card.
By setting the default storage location to the SD card, you ensure that all new files, apps, and data generated by those apps are automatically saved to the external storage. This helps maintain a significant amount of free space on your tablet’s internal storage and enables you to take full advantage of the additional storage capacity provided by the SD card.
It’s important to note that not all apps may have the option to change the default storage location. Some apps are designed to save data exclusively to the internal storage. In such cases, you can manually move the app’s data to the SD card, if supported by the app.
With the default storage location set to the SD card, you have successfully completed the steps to change the storage to an SD card on your Samsung tablet. Enjoy the increased storage capacity and make the most out of your device!
Conclusion
Congratulations! You have successfully learned how to change the storage to an SD card on your Samsung tablet. By following the steps outlined in this guide, you can now make the most of the extra storage capacity offered by the SD card and free up valuable internal storage space on your device.
Throughout this guide, we covered the essential steps to check if your tablet supports external storage, how to insert and format the SD card, and how to change the storage settings to utilize the SD card as the default storage location. We also explored how to move existing files to the SD card and set the default storage location for individual apps.
Remember that periodically checking your tablet’s storage and moving files to the SD card can help you maintain optimal storage capacity and keep your device running smoothly. The SD card provides a convenient solution to expand the storage capabilities of your Samsung tablet, allowing you to store more photos, videos, music, and apps without worrying about running out of space.
Keep in mind that not all tablets support external storage, so it’s crucial to verify the compatibility of your tablet before investing in an SD card. Additionally, some apps may not have the option to change the default storage location, limiting the extent to which you can utilize the SD card. In such cases, manually moving app data to the SD card, if supported, can still help free up valuable internal storage space.
With the storage set to the SD card, you can enjoy a more seamless experience on your Samsung tablet, without the constant worry of running out of space. Whether you’re an avid photographer, a video enthusiast, or simply need extra space for your favorite apps, the SD card offers a practical solution to meet your storage needs.
Thank you for following this guide. We hope it has been helpful in enabling you to optimize your tablet’s storage capacity and enhance your overall user experience. Happy storing!