Introduction
When it comes to building or upgrading a computer, one component that often gets overlooked is the CPU cooler. A reliable CPU cooler helps dissipate heat generated by the processor, ensuring optimal performance and preventing overheating. But did you know that the application of thermal paste plays a crucial role in the effectiveness of the CPU cooler?
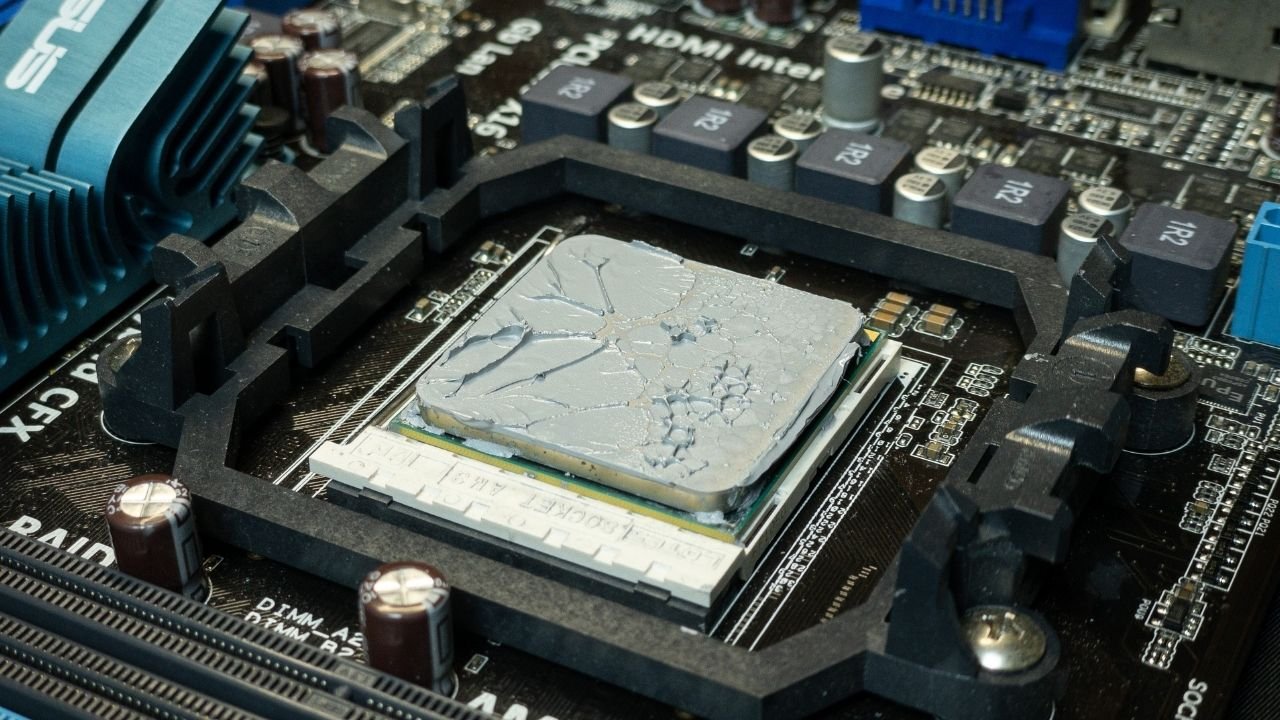
Thermal paste, also known as thermal compound or grease, is a heat-conductive substance used to fill the microscopic gaps between the CPU and the cooler, ensuring efficient heat transfer. In essence, it acts as a bridge between the two surfaces, allowing heat to flow from the CPU to the cooler more effectively.
While the concept of thermal paste may seem straightforward, the question of how much to apply can be a subject of debate among PC enthusiasts. Too much thermal paste can create air bubbles that hinder heat transfer, while too little can lead to uneven coverage and ineffective cooling.
In this article, we will discuss the importance of thermal paste in CPU cooling and explore different methods of applying thermal paste. By the end, you will have a clear understanding of the appropriate amount of thermal paste to use for your CPU cooler.
So, whether you’re a seasoned computer builder or a newbie just starting out, read on to discover the secrets of achieving optimal thermal paste application for your CPU cooler.
What is Thermal Paste?
Thermal paste, also referred to as thermal compound or thermal grease, is a crucial component in the cooling system of a computer. It is a thermally conductive substance that helps improve heat transfer between the CPU (central processing unit) and the CPU cooler.
The CPU generates a significant amount of heat when it is functioning, and without proper cooling, it can lead to performance issues, instability, and even permanent damage to the processor. The CPU cooler’s primary purpose is to dissipate this heat and keep the CPU operating at safe temperatures. However, the surfaces of the CPU and the cooler are not perfectly smooth, which creates microscopic gaps and imperfections that hinder heat transfer.
This is where thermal paste comes in. Its unique properties allow it to fill these minuscule gaps and create a smooth and conductive interface between the CPU and the cooler. By eliminating air pockets, it maximizes the contact area between the two surfaces, promoting efficient heat transfer.
Thermal paste is typically composed of a mixture of silicone compounds, along with other materials such as metallic particles or ceramics. These additives enhance the thermal conductivity of the paste, enabling it to conduct heat away from the CPU more effectively.
It is important to note that the effectiveness of thermal paste degrades over time due to factors like drying out or becoming less viscous. Therefore, it is recommended to periodically replace the thermal paste to maintain optimal cooling performance.
Now that we understand what thermal paste is and its role in CPU cooling, let’s delve into the critical factor of how much thermal paste you should apply for the best results on your CPU cooler.
Importance of Thermal Paste
Thermal paste is a small but vital component in the overall cooling system of a computer. It plays a crucial role in maintaining optimal temperatures for the CPU and ensuring its longevity and performance. Let’s explore the importance of thermal paste in more detail:
1. Heat Transfer: The primary purpose of thermal paste is to facilitate efficient heat transfer between the CPU and the CPU cooler. By filling in the microscopic gaps and imperfections on the CPU and cooler surfaces, thermal paste enhances the contact between them, allowing heat to more effectively travel from the CPU to the cooler. This ensures that the CPU remains at safe operating temperatures, preventing thermal throttling and potential damage.
2. Even Heat Distribution: Another significant benefit of thermal paste is its ability to promote even heat distribution across the CPU surface. Without thermal paste, air pockets and uneven contact between the CPU and the cooler can result in hotspots and temperature variations. Thermal paste eliminates these inconsistencies, ensuring that heat is evenly spread across the CPU and effectively transferred to the cooler.
3. Longevity and Stability: Consistent and efficient heat transfer provided by thermal paste helps maintain the longevity and stability of the CPU. Excessive heat can degrade the performance of the CPU and reduce its lifespan. By utilizing thermal paste, the CPU remains within safe operating temperatures, prolonging its overall life and ensuring stable and reliable performance.
4. Enhanced Overclocking Potential: If you are an enthusiast looking to push your CPU to its limits through overclocking, thermal paste becomes even more critical. Overclocking increases the CPU’s power and generates more heat. Using an appropriate amount of high-quality thermal paste ensures that the increased heat is efficiently transferred to the cooler, allowing for better overclocking potential while maintaining stability.
5. Noise Reduction: Efficient heat transfer provided by thermal paste can indirectly contribute to noise reduction. When a CPU operates at higher temperatures, the cooling system has to work harder, resulting in increased fan speeds and noise. By using thermal paste to improve the cooling efficiency, the CPU can maintain lower temperatures, allowing the cooling system to run at lower speeds and reducing overall noise levels.
In summary, thermal paste is a crucial component that enables effective heat transfer, even heat distribution, longevity, stability, enhanced overclocking potential, and noise reduction. Its proper application ensures that your CPU operates within safe temperatures, optimizing performance and protecting your investment.
How Much Thermal Paste Should You Use?
One common question that arises when applying thermal paste is how much should be applied. The goal is to achieve the perfect balance between too much and too little thermal paste. Let’s explore three popular methods used to apply thermal paste:
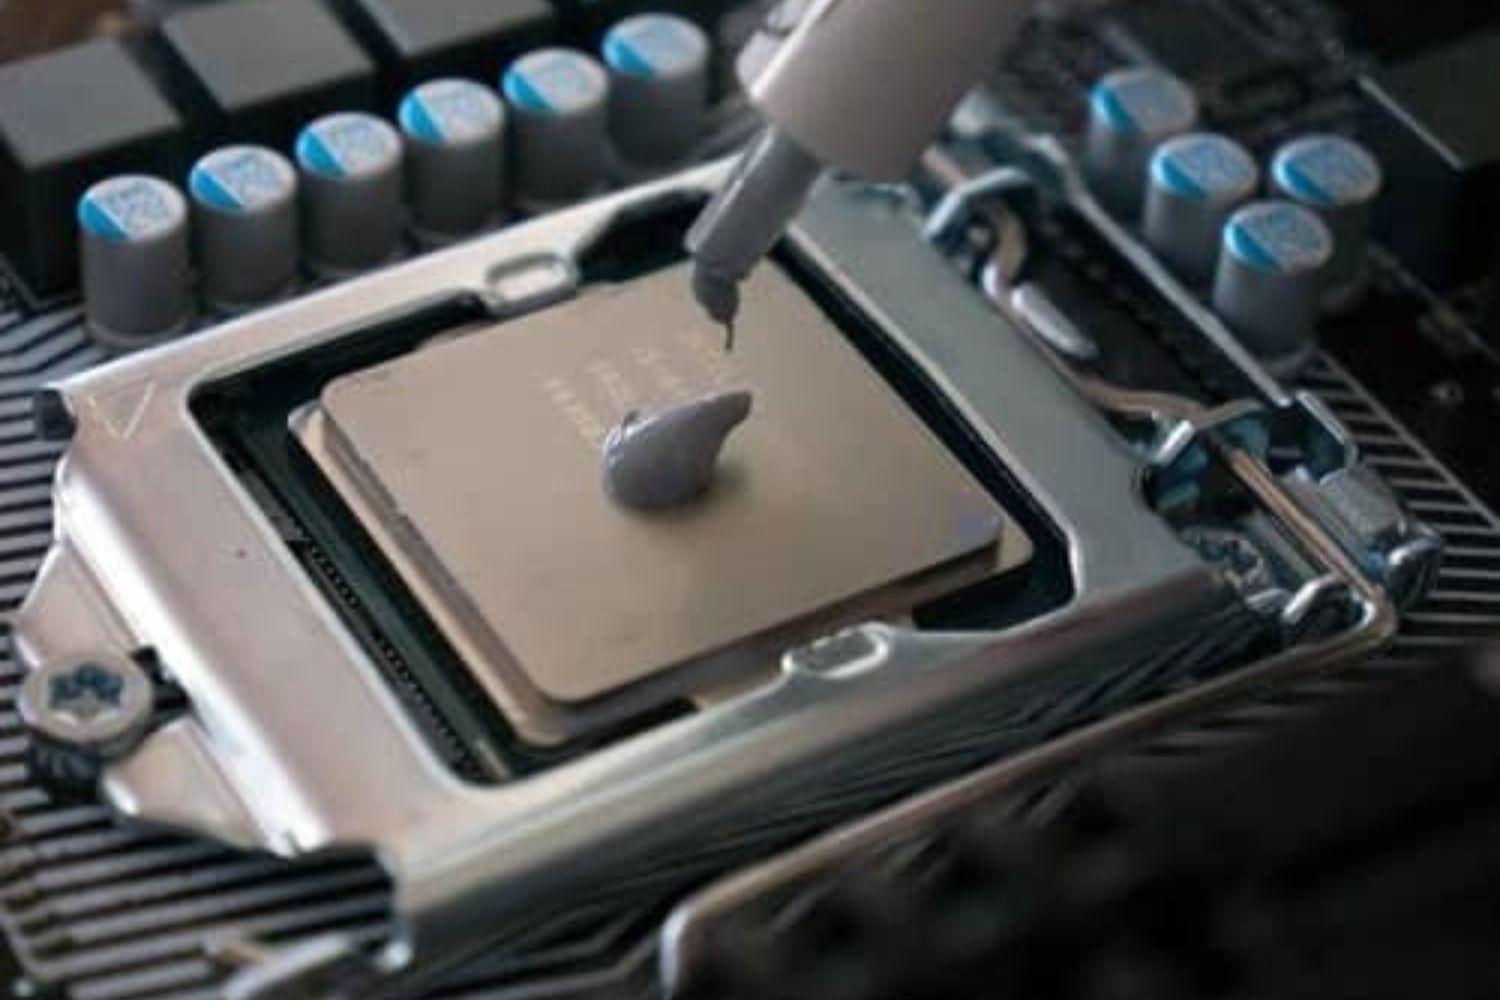
1. Pea-Sized Blob Method: This is perhaps the most widely recommended method for applying thermal paste. With this method, a small pea-sized blob of thermal paste is placed at the center of the CPU surface. When the CPU cooler is installed, it evenly spreads the thermal paste across the CPU. The pressure and heat from the CPU cooler help distribute the paste and ensure proper coverage. This method is simple, convenient, and generally provides satisfactory results.
2. X Method: The X method involves applying four lines of thermal paste in the shape of an “X” on the CPU surface. The lines should extend diagonally from each corner of the CPU. When the CPU cooler is installed, the pressure will spread and distribute the thermal paste evenly. This method is thought to provide more coverage than the pea-sized blob method and is often preferred for CPUs with larger heat spreaders.
3. Spreading Method: The spreading method involves manually spreading a thin layer of thermal paste across the entire CPU surface using a flat and clean object like a plastic card or a thermal paste spreading tool. This method requires careful precision to ensure even coverage and avoid air pockets. While this method can be effective, it is also more time-consuming and runs the risk of applying too much or too little thermal paste.
Each method has its pros and cons, and the suitable method may vary depending on factors such as CPU type, cooler design, and personal preference. The key is to apply sufficient thermal paste to cover the entire CPU surface without excess. Too much thermal paste can lead to air bubbles that impede heat transfer, while too little may result in uneven coverage and inadequate cooling.
Ultimately, the amount of thermal paste you use should be enough to form a thin and uniform layer between the CPU and the cooler. Remember that the pressure and heat from the CPU cooler will help spread and distribute the thermal paste for optimal coverage. It is always a good practice to refer to the CPU manufacturer’s guidelines and the thermal paste manufacturer’s recommendations for specific details and instructions.
By finding the right balance and following the appropriate method, you can ensure efficient heat transfer and maximize the cooling performance of your CPU cooler.
Method 1: Pea-Sized Blob
One popular method for applying thermal paste is the pea-sized blob method. This method is straightforward, widely used, and generally provides satisfactory results. Here’s how to apply thermal paste using the pea-sized blob method:
Step 1: Begin by preparing your CPU and CPU cooler. Ensure that both surfaces are clean and free from any old thermal paste residues or debris. You can use isopropyl alcohol and a lint-free cloth or thermal paste remover to clean the surfaces effectively.
Step 2: Once the surfaces are clean, it’s time to apply the thermal paste. Take a small pea-sized amount of thermal paste and place it at the center of the CPU surface. You don’t need to spread or flatten the paste at this stage.
Step 3: Gently position the CPU cooler on top of the CPU, aligning the mounting screws or brackets. Apply even and steady pressure to secure the cooler in place. The pressure applied during installation will cause the thermal paste to spread and ensure proper coverage between the CPU and the cooler.
Step 4: Once the CPU cooler is securely attached, check to see if the thermal paste has spread evenly across the CPU surface. If you notice any gaps or areas with inadequate coverage, you may consider reinstalling the cooler with slight adjustments to improve the spread. However, be cautious and avoid excessive adjustments that could introduce air bubbles or misalign the cooler.
Step 5: Finally, double-check that the CPU cooler is properly fastened and aligned. Make sure all screws or brackets are tightened evenly. This ensures not only a secure attachment but also consistent pressure for optimal heat transfer.
By using the pea-sized blob method, you ensure that the right amount of thermal paste is applied to facilitate efficient heat transfer. The small blob in the center allows for even spreading when the cooler is installed, optimizing coverage and minimizing the risk of air bubbles.
It’s always a good practice to follow the CPU manufacturer’s recommendations and guidelines for thermal paste application. While the pea-sized blob method is widely accepted, some CPUs may have specific instructions or alternative methods due to unique designs or requirements.
Experimenting with different methods and observing temperature readings can help you determine the most effective application technique for your specific CPU and cooler combination. Remember, the ultimate goal is to achieve proper coverage and consistent heat transfer to keep your CPU running cool and performing at its best.
Method 2: X Method
Another commonly used method for applying thermal paste is the X method. The X method is particularly favored when dealing with CPUs that have larger heat spreaders or when a wider coverage of thermal paste is desired. Here’s how to apply thermal paste using the X method:
Step 1: Prepare the CPU and CPU cooler by ensuring that both surfaces are clean and free from any debris or old thermal paste residue. Use isopropyl alcohol and a lint-free cloth or thermal paste remover to clean the surfaces effectively.
Step 2: Take your syringe or thermal paste applicator and squeeze out a small amount of thermal paste. Begin by applying a line of thermal paste diagonally from one corner of the CPU to the opposite corner, creating an “X” shape. The line should be thin and even, extending from the edge of the CPU to the center.
Step 3: Repeat the process by applying another line of thermal paste from the remaining corners of the CPU, again forming an “X” shape. Ensure that the lines intersect at the center of the CPU.
Step 4: Gently place the CPU cooler on top of the CPU, aligning it with the mounting screws or brackets. Apply even and steady pressure to secure the cooler in place. As the cooler is attached, the pressure will cause the thermal paste to spread, creating a thin and consistent layer between the CPU and the cooler.
Step 5: After attaching the CPU cooler, carefully inspect the spread of the thermal paste. The lines should spread evenly and cover the entire CPU surface. If there are any gaps or areas with inadequate coverage, you may consider reinstalling the cooler with slight adjustments to improve the spread. However, be cautious not to disrupt the spread too much, as this can introduce air bubbles or misalign the cooler.
By using the X method, you aim to achieve a broader coverage and ensure that the thermal paste is evenly distributed across the CPU surface. The lines allow for effective spreading and filling of the microscopic gaps, promoting efficient heat transfer.
It’s important to note that the X method may not be suitable for all CPU and cooler combinations. Some CPUs may have specific instructions or alternative methods due to unique designs or requirements. Always follow the manufacturer’s guidelines and recommendations for thermal paste application.
Experimenting with different methods and monitoring temperature readings can help you determine the most effective application technique for your CPU and cooler. Remember, the key is to achieve proper coverage and consistent heat transfer to keep your CPU operating within safe temperatures and performing optimally.
Method 3: Spreading Method
One alternative method for applying thermal paste is the spreading method. This method involves manually spreading a thin layer of thermal paste across the entire CPU surface using a flat and clean object, such as a plastic card or a dedicated thermal paste spreading tool. Here’s how to apply thermal paste using the spreading method:
Step 1: Start by cleaning the CPU and CPU cooler surfaces thoroughly. Ensure that all remnants of old thermal paste and contaminants are removed. Use isopropyl alcohol and a lint-free cloth or thermal paste remover to clean the surfaces effectively.
Step 2: Squeeze a small amount of thermal paste onto the CPU surface, preferably at the center. The amount should be sufficient to create a thin layer when spread out evenly. It is always better to start with less paste and add more if needed.
Step 3: Take the flat object, such as a plastic card or a thermal paste spreading tool, and slowly and gently spread the thermal paste across the CPU surface. Ensure that you apply even pressure and maintain a smooth and consistent layer of paste. Spread the paste in a radial motion, moving outwards from the center towards the edges of the CPU.
Step 4: Once the thermal paste is spread across the CPU surface, inspect it to ensure uniform coverage. Make sure there are no areas with gaps or excessive paste accumulation. Adjust the spread if necessary by redistributing the paste with the flat object.
Step 5: After achieving satisfactory coverage and distribution, carefully place the CPU cooler on top of the CPU, aligning it with the mounting screws or brackets. Apply even and steady pressure to secure the cooler in place. The pressure from the cooler will help further distribute the thermal paste and ensure proper contact between the CPU and the cooler.
The spreading method allows for manual control over the thickness and coverage of the thermal paste layer. However, it requires precision and attention to avoid applying too much or too little paste, which can result in inadequate cooling or air bubbles.
While the spreading method can be effective when done correctly, it is essential to note that it may not be suitable for all CPU and cooler combinations. Some CPUs may have specific instructions or alternative methods due to unique designs or requirements. Always follow the manufacturer’s guidelines and recommendations for thermal paste application.
Experimenting with different methods and monitoring temperature readings can help you determine the most effective application technique for your CPU and cooler. The key is to achieve proper coverage, consistent heat transfer, and optimum cooling performance to ensure the longevity and stability of your CPU.
Pros and Cons of Each Method
Each method of applying thermal paste has its own advantages and disadvantages. Understanding the pros and cons of each method can help you determine which approach is most suitable for your specific CPU and cooler combination. Let’s examine the pros and cons of the three common methods: pea-sized blob, X method, and spreading method.
Pea-Sized Blob Method:
- Pros:
- Easy and straightforward method
- Minimal risk of applying too much or too little paste
- Appropriate for most CPU and cooler combinations
- Cons:
- May not provide as wide coverage as other methods
- Dependent on the CPU cooler’s pressure and heat for optimal spreading
X Method:
- Pros:
- Offers a wider coverage of thermal paste
- Spread is aided by the intersecting lines of the X shape
- Suitable for CPUs with larger heat spreaders
- Cons:
- May require more precision during application to avoid excessive spreading
- Not as widely recommended for all CPU and cooler combinations
Spreading Method:
- Pros:
- Allows for precise control over the thickness and coverage of the thermal paste
- Can provide a more even layer of paste
- Cons:
- Requires careful application to avoid applying too much or too little paste
- Time-consuming compared to other methods
- May introduce air bubbles if not executed properly
Ultimately, the choice of method depends on various factors, such as your comfort level, the specific CPU and cooler you have, and your desired coverage and precision. The pea-sized blob method is often recommended for its simplicity and effectiveness. However, if you have a larger heat spreader or prefer wider coverage, the X method may be more suitable. Meanwhile, the spreading method allows for manual control but requires careful execution to achieve optimal results.
It’s important to consider the recommendations provided by both the CPU and thermal paste manufacturers. They often provide specific instructions or preferred methods that are most suitable for their products.
Experimentation and monitoring temperature readings can help you determine which method yields the best cooling performance for your particular CPU and cooler setup. Remember, the goal is to achieve proper coverage, consistent heat transfer, and efficient cooling to ensure the longevity and stability of your CPU.
Factors to Consider When Applying Thermal Paste
When applying thermal paste, several factors should be taken into consideration to ensure optimal cooling performance and longevity of your CPU. Let’s explore the key factors that you should consider:
1. CPU and Cooler Type: Different CPUs and coolers may have specific guidelines or recommendations for thermal paste application. It is essential to consult the CPU and cooler manufacturer’s documentation to understand any specific instructions or requirements for your particular hardware.
2. Thermal Paste Quality: The quality of the thermal paste you use can significantly impact its performance. It’s recommended to choose a high-quality thermal paste with excellent thermal conductivity properties. Conduct research and consider user reviews to select a reputable brand that suits your needs.
3. Application Method: As discussed earlier, the method you choose to apply thermal paste can have an impact on its effectiveness. Consider factors such as coverage, ease of application, and CPU cooler pressure when selecting a method. Experimentation and monitoring temperature readings can help determine the most effective method for your specific CPU and cooler combination.
4. Thermal Paste Quantity: Applying the right amount of thermal paste is crucial. Too much paste can lead to air bubbles and decreased heat transfer efficiency, while too little may result in inadequate coverage and cooling performance. Follow the recommended guidelines provided by the CPU and thermal paste manufacturers to determine the appropriate quantity for your specific CPU and cooler combination.
5. CPU Die Size: The size of the CPU die can affect the amount of thermal paste required. Larger CPUs may require more thermal paste to ensure sufficient coverage, while smaller CPUs may need smaller amounts. Consider the size of your CPU when determining the quantity of thermal paste to apply.
6. Ambient Temperatures: The ambient temperature of the environment in which your computer operates can impact CPU cooling. Higher ambient temperatures may require more efficient thermal paste application to maintain safe operating temperatures. Monitor the ambient temperature and adjust your thermal paste application accordingly.
7. Maintenance and Reapplication: Over time, thermal paste can degrade, dry out, or become less effective. It’s recommended to periodically replace the thermal paste to ensure optimal cooling performance. Consider your maintenance schedule and plan for reapplication of thermal paste accordingly.
8. Uniformity and Spreading: Regardless of the method chosen, it’s critical to achieve uniform spreading of the thermal paste across the CPU surface. Ensure even coverage to avoid hotspots and uneven heat distribution. Properly spreading the paste without air bubbles or excessive application is key to efficient heat transfer.
9. Stability and Mounting: Once the thermal paste is applied, securing the CPU cooler properly is essential. Ensure that the cooler is securely fastened and aligned with even pressure. Proper mounting ensures consistent contact between the CPU and the cooler, optimizing heat transfer and cooling performance.
Taking these factors into account when applying thermal paste will help you achieve efficient cooling performance, maintain safe operating temperatures, and extend the longevity of your CPU. Remember to refer to the manufacturer’s guidelines and recommendations for your specific CPU and cooler combination, and monitor temperature readings to ensure optimal performance.
Conclusion
Applying thermal paste may seem like a small task in the grand scheme of building or upgrading a computer, but it plays a critical role in maintaining optimal CPU temperatures and enhancing overall performance. By understanding the importance of thermal paste and employing the appropriate application method, you can ensure efficient heat transfer and prevent potential issues caused by overheating.
In this article, we explored three popular methods of applying thermal paste – the pea-sized blob method, the X method, and the spreading method. Each method has its own pros and cons, and the most suitable approach depends on factors such as CPU type, cooler design, and personal preference.
Regardless of the method chosen, several factors need to be considered when applying thermal paste. These factors include CPU and cooler types, thermal paste quality, application method, thermal paste quantity, CPU die size, ambient temperatures, maintenance and reapplication, uniformity and spreading, as well as stability and mounting.
By considering these factors and following the recommended guidelines provided by CPU and thermal paste manufacturers, you can achieve optimal thermal paste application and promote efficient heat transfer between the CPU and the cooler.
Remember, the ultimate goal is to maintain safe operating temperatures, prevent CPU overheating, and ensure the longevity and stability of your CPU. Regular monitoring of temperature readings and periodic maintenance, such as replacing the thermal paste, will help to maximize cooling performance over time.
With proper application techniques, you can optimize the performance of your CPU, whether you are a computer enthusiast looking to push overclocking limits or a casual user seeking stable and reliable operation. By mastering the art of thermal paste application, you can keep your CPU running cool, efficient, and operating at its best.