Introduction
When it comes to building or upgrading a computer, one essential component that often goes unnoticed is the thermal paste on a CPU cooler. But what exactly is this paste, and why is it necessary? In this article, we will explore the role of thermal paste in keeping your computer cool and functioning optimally.
The CPU (Central Processing Unit) of a computer is the ‘brain’ of the system, responsible for executing and managing all the tasks. During its operation, the CPU generates a significant amount of heat, which, if not properly dissipated, can lead to overheating and performance issues. This is where thermal paste comes into play.
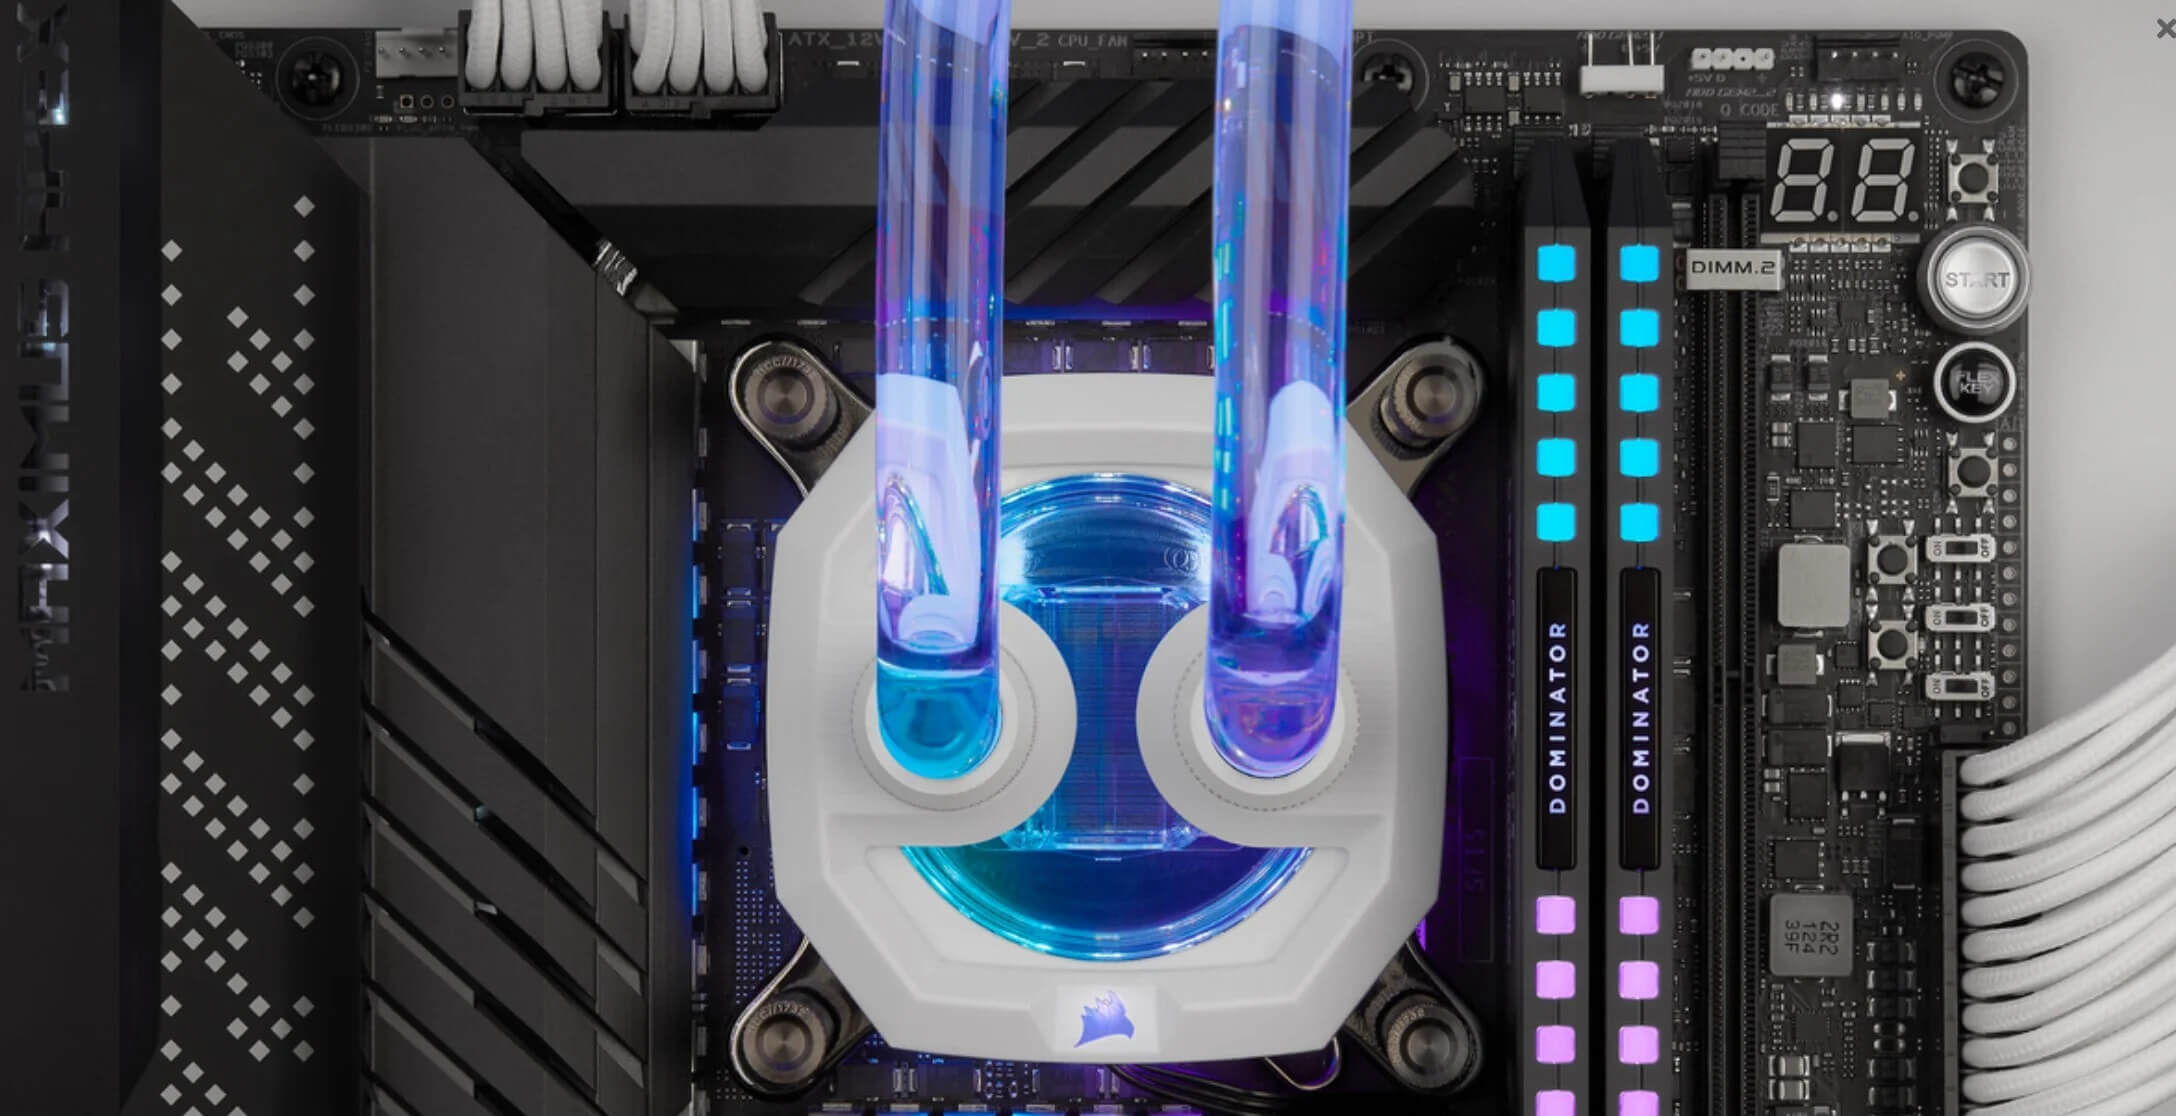
Thermal paste, also known as thermal compound or grease, is a heat-conductive material that aids in transferring heat from the CPU to the CPU cooler or the heat sink. Its primary purpose is to fill in the microscopic imperfections and air gaps between the CPU and cooler, ensuring maximum heat transfer and efficient cooling.
Without thermal paste, the contact between the CPU and cooler would be compromised, resulting in air pockets that act as barriers to heat transfer. As a result, the CPU would heat up more rapidly, leading to higher temperatures and potential thermal throttling. This can drastically affect the performance and longevity of your computer’s CPU.
Now that we understand the importance of thermal paste, let’s delve into how it works and the different types available in the market. Understanding these aspects will help us make informed decisions about the most suitable thermal paste for our specific needs. Additionally, we will explore the correct method of applying and removing thermal paste and discuss common mistakes to avoid during the process.
So, whether you are a computer enthusiast looking to build a high-performance rig or someone in need of upgrading your existing setup, understanding the role of thermal paste is crucial. By the end of this article, you will have a clear understanding of the significance of thermal paste and how to ensure optimal heat transfer for your CPU’s longevity and performance.
What is the paste on a CPU cooler?
The paste found on a CPU cooler is known as thermal paste, thermal compound, or thermal grease. It is a critical component that aids in the transfer of heat from the CPU to the CPU cooler or heat sink. This paste serves as a medium between these two components, ensuring efficient heat dissipation and preventing the CPU from overheating.
Thermal paste is designed to fill in the microscopic imperfections and gaps that exist between the CPU and the cooler. These imperfections and gaps, even if they are too small to be seen with the naked eye, can create air pockets that impede heat transfer. By applying thermal paste, these air pockets are minimized or eliminated, allowing for better thermal conductivity between the CPU and cooler.
Thermal paste is typically made up of a compound that possesses high thermal conductivity properties. It is engineered to be electrically non-conductive, preventing any accidental short circuits between the components. Manufacturers use various materials in the production of thermal paste, such as ceramic, metal, carbon, or silicone-based compounds.
The paste comes in a small tube or syringe-like container, making it easy to dispense and apply. It is a viscous substance that is slightly sticky, allowing it to cling to the CPU surface and maintain a good contact between the CPU and the cooler. The amount of thermal paste needed for proper application is usually minimal, just enough to create a thin, even layer between the two surfaces.
It is important to note that not all CPU coolers require the use of thermal paste. Some coolers, especially those with integrated thermal solutions (such as liquid cooling), already come with pre-applied thermal paste. In such cases, it is essential to follow the manufacturer’s instructions and avoid adding additional thermal paste.
The thermal paste on a CPU cooler plays a crucial role in maintaining the temperature of the CPU. By ensuring efficient heat transfer, it helps prevent thermal throttling and allows the CPU to operate at its optimal performance level. In the next section, we will explore why thermal paste is necessary and the consequences of neglecting to use it.
Why is the paste necessary?
The thermal paste on a CPU cooler is a vital component for several reasons. One of the primary reasons is that it helps improve the thermal conductivity between the CPU and the cooler or heat sink. Without thermal paste, there would be gaps and microscopic imperfections that hinder the efficient transfer of heat. As a result, the CPU would experience elevated temperatures, leading to performance degradation and potential damage.
Thermal paste fills in the small air gaps and imperfections, allowing for better contact and heat transfer between the CPU and the cooler. It ensures that the heat generated by the CPU is quickly and effectively drawn away, preventing overheating.
Moreover, the thermal paste also helps to eliminate uneven surfaces and microscopic irregularities between the CPU and the cooler. Even though these imperfections may seem insignificant, they can significantly impact the heat transfer process. The thermal paste acts as a smoothing agent, creating a more uniform surface and promoting optimal contact between the CPU and cooler.
Another reason thermal paste is necessary is that it can prevent air pockets from forming between the CPU and cooler. Air is a poor conductor of heat, so any air gaps present would hinder the efficient dissipation of heat. The thermal paste fills in these gaps, minimizing the chances of air pockets and ensuring maximum heat transfer.
Using thermal paste is especially important when applying aftermarket coolers or when reattaching an existing cooler. Over time, the original thermal paste may dry out or become less effective, requiring replacement. Applying fresh thermal paste helps restore the optimal heat transfer capability and prevents potential overheating issues.
In summary, the thermal paste is necessary to improve the thermal conductivity between the CPU and cooler, fill in gaps and imperfections, eliminate air pockets, and ensure optimal heat transfer. By using thermal paste correctly, you can maintain the temperature of your CPU, prolong its lifespan, and avoid performance bottlenecks that arise from overheating. Next, let’s explore how thermal paste works to dissipate heat efficiently.
How does thermal paste work?
Thermal paste is a crucial component in ensuring efficient heat transfer between the CPU and the cooler or heat sink. But how does it actually work? Thermal paste operates by filling in microscopic imperfections and air gaps on the surfaces of the CPU and cooler, allowing for better thermal conductivity.
The main property of thermal paste that enables it to improve heat transfer is its high thermal conductivity. This means that thermal paste is designed to efficiently conduct heat from one surface to another. When applied between the CPU and the cooler, the thermal paste acts as a bridge, facilitating the transfer of heat away from the CPU and toward the cooler.
The thermal paste is typically made up of a combination of materials, such as metal oxide, silicone, ceramic, or carbon-based compounds. These materials have excellent heat-conductive properties, allowing them to effectively transfer heat away from the CPU. Some thermal pastes also contain tiny particles or additives that further enhance their thermal conductivity.
When the thermal paste is applied and fills in the microscopic imperfections on the CPU and cooler surfaces, it eliminates air gaps that can hinder heat flow. This ensures that maximum surface contact is achieved between the two components, allowing for better heat transfer.
Additionally, the thermal paste helps to temporarily fill in any uneven surfaces or microscopic irregularities on the CPU and cooler. These imperfections, even though they may be invisible to the naked eye, can create air pockets that impede heat transfer. By filling in these gaps, thermal paste ensures a smooth and continuous flow of heat, preventing hotspots and promoting uniform cooling.
It’s important to note that applying too much thermal paste can actually hinder heat transfer rather than improve it. When too much paste is used, it can create a thick layer that acts as an insulator, increasing the distance between the CPU and cooler. This can negatively affect heat dissipation. Therefore, it’s crucial to apply a thin and even layer of thermal paste to achieve the best results.
In summary, thermal paste works by filling in microscopic imperfections and air gaps, improving surface contact between the CPU and cooler, and enhancing the flow of heat. Its high thermal conductivity properties enable it to transfer heat away from the CPU efficiently. Understanding how thermal paste works is essential for proper application and ensuring optimal cooling performance. In the next section, we will explore the different types of thermal paste available in the market.
Types of thermal paste
When it comes to choosing thermal paste for your CPU, you’ll find several options available in the market. Each type of thermal paste has its own unique properties and advantages. Let’s take a look at some of the most common types:
- Silicone-based thermal paste: This type of thermal paste is popular due to its ease of application and affordability. Silicone-based thermal paste has good thermal conductivity and is electrically non-conductive, ensuring that it won’t short-circuit your components. It is suitable for most CPU cooling applications and offers decent performance.
- Metal-based thermal paste: Metal-based thermal paste, such as those made with silver or copper particles, offers higher thermal conductivity than silicone-based ones. These pastes provide excellent heat transfer capabilities and are well-suited for CPUs that generate a lot of heat, such as overclocked processors. However, metal-based pastes can be electrically conductive, so extra care must be taken to avoid any accidental short circuits.
- Ceramic-based thermal paste: Ceramic-based thermal paste is known for its long-lasting performance and stability. It offers good thermal conductivity and is electrically non-conductive. Ceramic pastes are ideal for systems that require consistent heat dissipation over extended periods, such as servers or high-performance workstations.
- Graphite-based thermal paste: Graphite-based thermal paste is becoming increasingly popular due to its exceptional thermal conductivity. It provides excellent heat transfer while remaining electrically non-conductive. Graphite-based paste is commonly used in applications where high heat output is a concern, such as gaming PCs and high-end processors.
- Liquid metal thermal compound: Liquid metal thermal compound is a specialized type of thermal paste that contains tiny particles of metal alloy, such as gallium or indium. It offers exceptional thermal conductivity, surpassing other types by a significant margin. Liquid metal paste is typically reserved for advanced users and enthusiasts due to its higher cost and the caution required during application. This type of paste should never be used with aluminum heatsinks, as it can cause corrosion.
It’s essential to choose a thermal paste that suits your specific needs and cooling requirements. Factors such as the type of CPU, heat output, and intended usage should be considered when selecting the right thermal paste. Additionally, it’s important to follow the manufacturer’s recommendations and guidelines for applying the chosen thermal paste to ensure optimal performance and longevity of your CPU cooling system.
In the next section, we will discuss the proper method of applying thermal paste to achieve the best heat transfer between the CPU and the cooler.
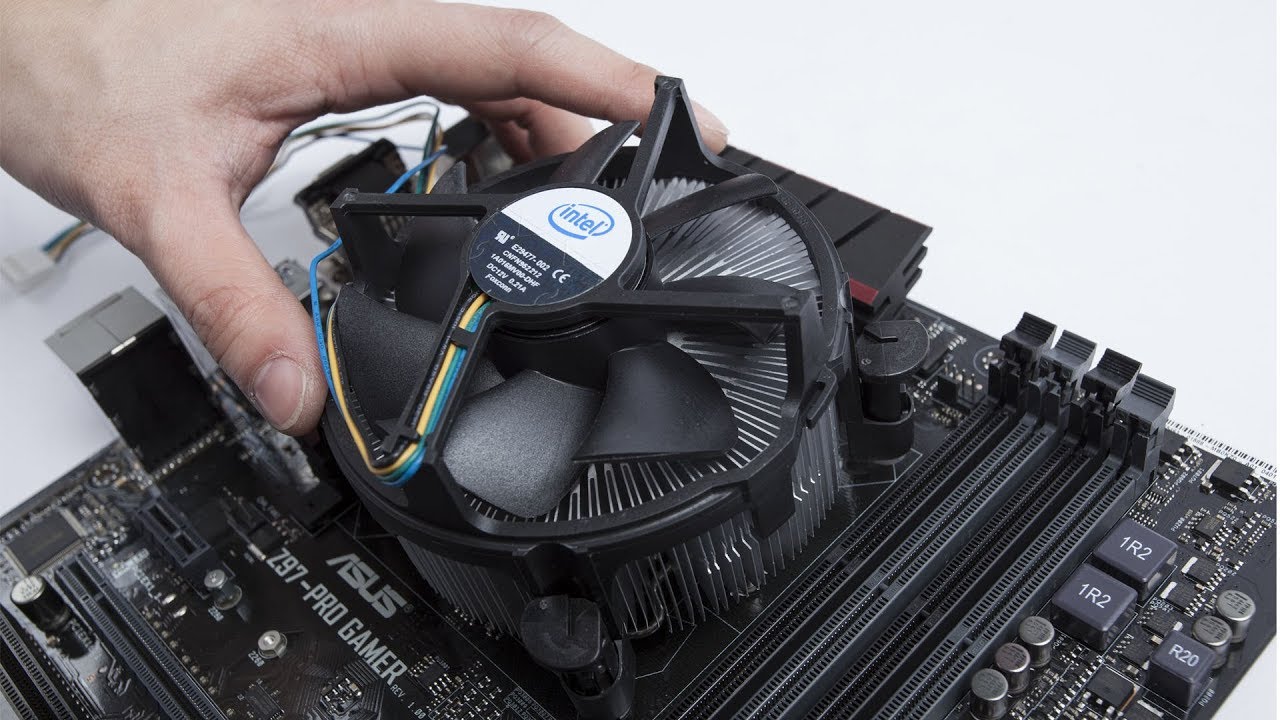
Applying thermal paste
Proper application of thermal paste is crucial to ensure optimal heat transfer between the CPU and the cooler. Here are the steps to follow when applying thermal paste:
- Clean the surfaces: Start by cleaning the CPU and the cooler surfaces. Use a lint-free cloth or a cotton swab with a small amount of isopropyl alcohol to remove any existing thermal paste or debris. Ensure that both surfaces are completely clean and dry before proceeding.
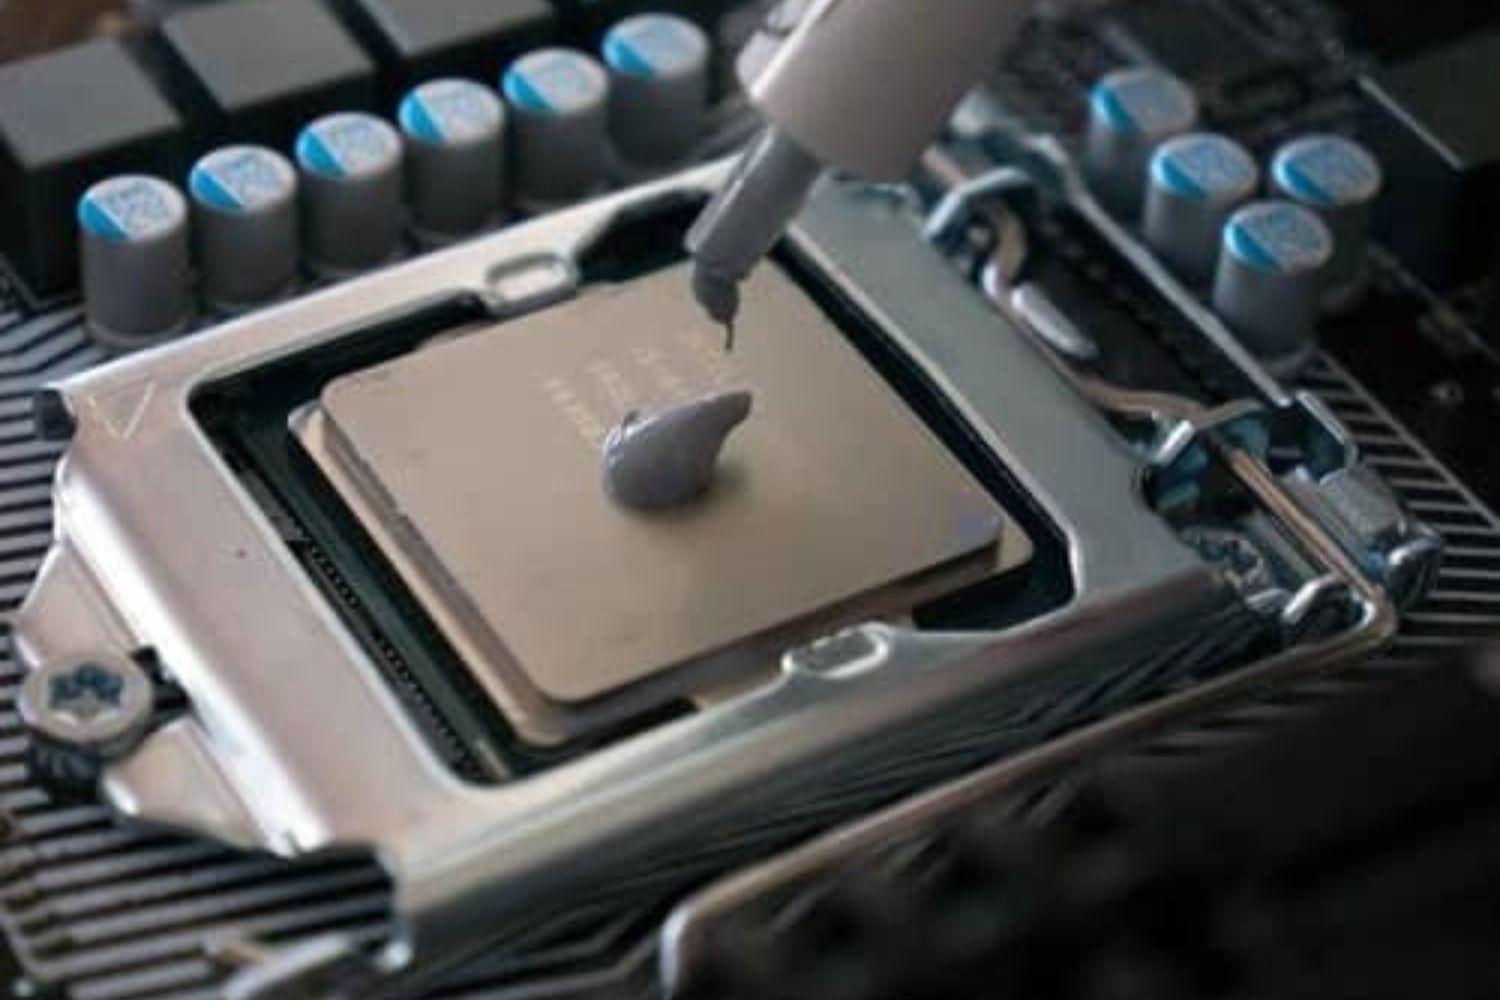
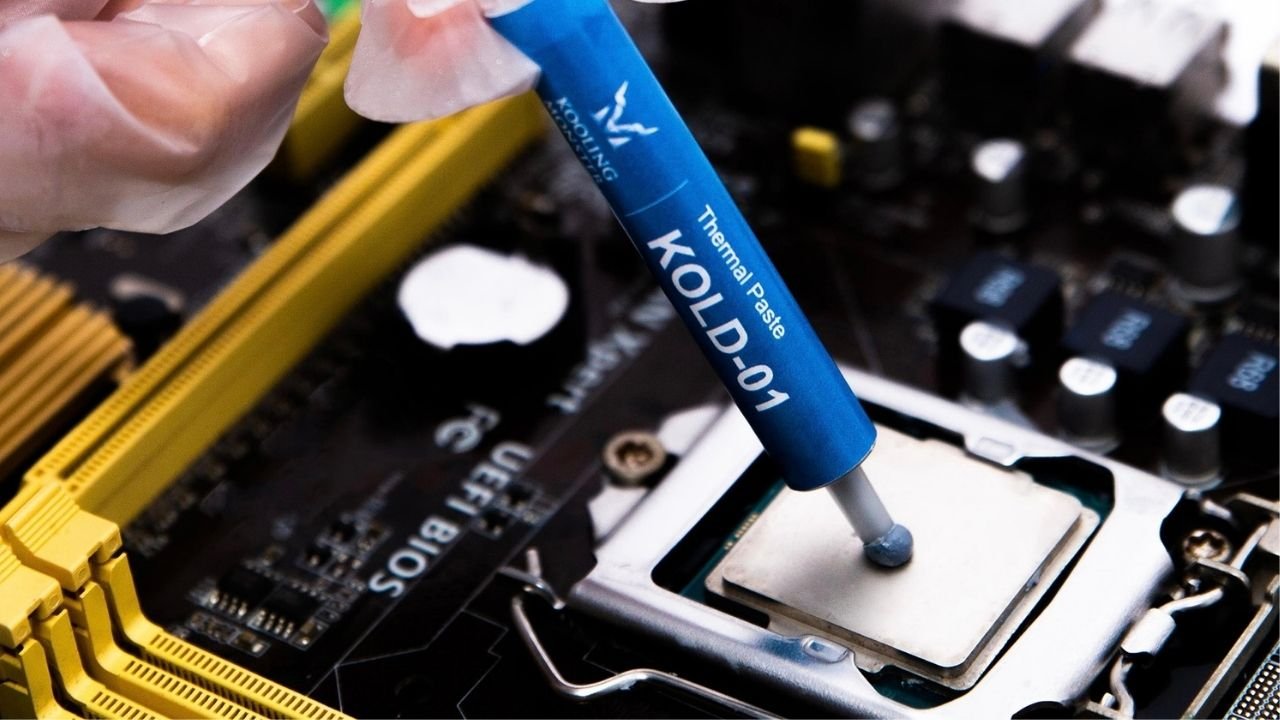
- Apply a small amount of thermal paste: Dispense a small pea-sized amount of thermal paste onto the center of the CPU. Remember, a little goes a long way, so avoid using too much paste as it can hinder heat transfer. The pressure applied when attaching the cooler will evenly spread the paste.
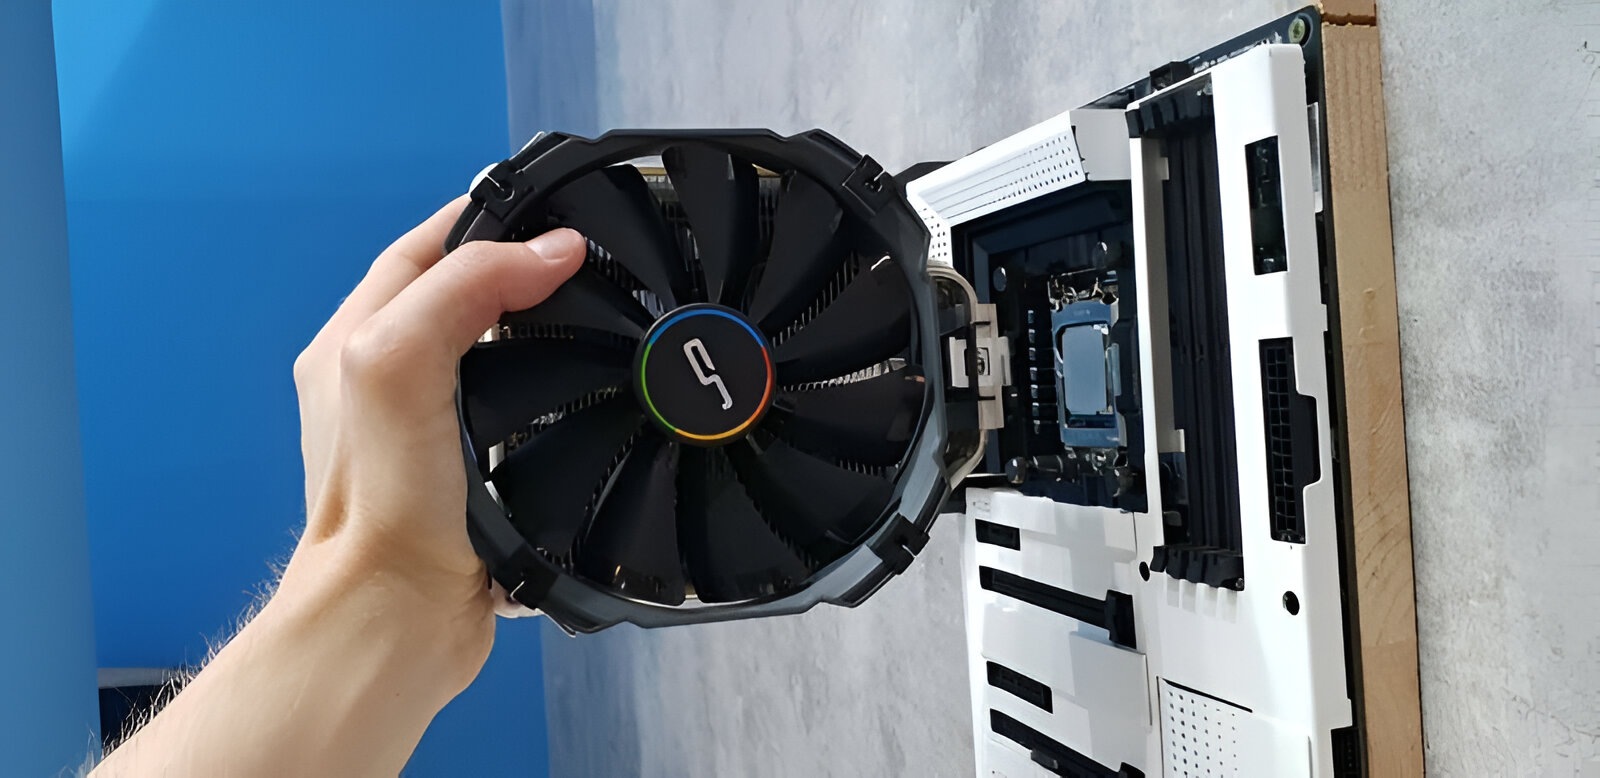
- Spread the paste: Gently place the cooler on top of the CPU, making sure the mounting screws or clips align with the motherboard socket. Apply even pressure, and allow the cooler to spread the thermal paste naturally while you secure it in place. Avoid twisting or moving the cooler excessively, as it can disrupt the even spreading of the paste.
- Tighten the cooler: Use the appropriate screws or clips to secure the cooler firmly onto the CPU. Ensure that it is tightly secured but be careful not to overtighten, as excessive pressure can damage the CPU or motherboard. Follow the manufacturer’s instructions for the correct tightening procedure.
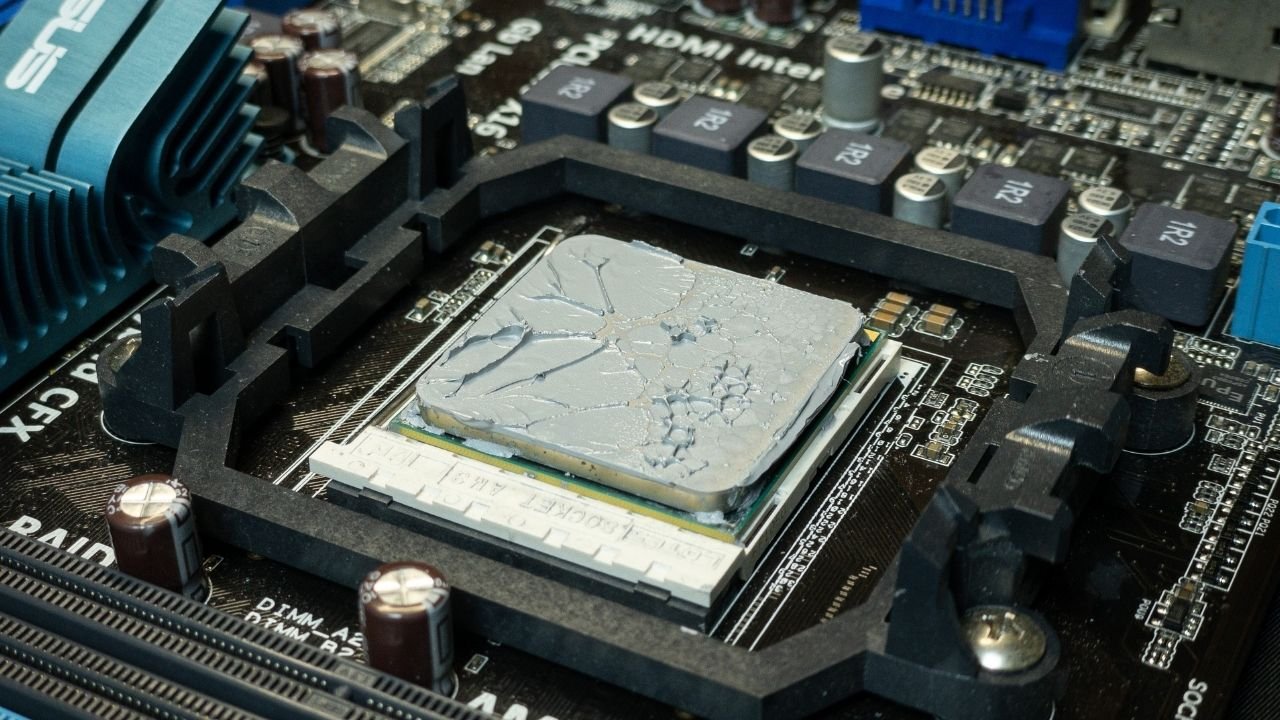
- Verify the coverage: After attaching the cooler, inspect the edges of the CPU to ensure that the thermal paste has spread evenly. Ideally, you should see a thin, uniform layer of paste covering the CPU surface. If the coverage seems uneven or there are areas with no paste, it may be necessary to remove and reapply the paste.
Remember, each type of thermal paste may have specific instructions or recommendations from the manufacturer. It is crucial to refer to these guidelines for the best results and to avoid any potential issues. Additionally, be cautious when handling the CPU and cooler, as they are delicate components that can be easily damaged if mishandled.
Now that you are familiar with the steps involved in applying thermal paste correctly, let’s move on to the next section, where we will discuss the process of removing old thermal paste.
Removing old thermal paste
Before applying a fresh layer of thermal paste, it is essential to remove any remnants of the old paste from the CPU and cooler surfaces. Here are the steps you can follow to remove old thermal paste:
- Gather your supplies: To remove the old thermal paste, you’ll need isopropyl alcohol (preferably 90% or higher concentration), lint-free cloths or cotton swabs, and a plastic or non-abrasive scraper.
- Clean the surfaces: Start by powering off your computer and unplugging it from the power source. Remove the cooler from the CPU carefully. Next, using a lint-free cloth or cotton swab soaked in isopropyl alcohol, gently wipe away the old thermal paste from the CPU surface. Repeat this process for the cooler’s base as well.
- Remove stubborn residue: If there are any stubborn traces of thermal paste left on the surfaces, you can use a plastic or non-abrasive scraper to carefully scrape it off. Be cautious not to scratch or damage the CPU or cooler surfaces.
- Clean with isopropyl alcohol: Once the majority of the old thermal paste is removed, apply a small amount of isopropyl alcohol to a clean cloth or cotton swab and use it to thoroughly clean the surfaces. The alcohol will help dissolve any remaining residue and ensure a clean, pristine surface for the new thermal paste.
- Allow surfaces to dry: After cleaning, allow the surfaces to air dry completely. Ensure that there is no residual alcohol remaining before applying the new thermal paste.
Properly removing the old thermal paste is essential to ensure the best performance from the new paste. Any remnants of the old paste can hinder the heat transfer and impact the effectiveness of the new layer.
It is important to note that if you are using a pre-applied thermal pad or tape on your cooler, different procedures may be required for removal and cleaning. It is recommended to consult the manufacturer’s instructions or documentation specific to your cooler model for proper cleaning guidance.
With the old thermal paste removed and the surfaces clean and dry, you are ready to apply a fresh layer of thermal paste onto your CPU. In the next section, we will cover some common mistakes to avoid during the thermal paste application process.
Common mistakes to avoid when applying thermal paste
When applying thermal paste to your CPU, it is important to be aware of common mistakes that can have a negative impact on heat transfer and cooling efficiency. By avoiding these mistakes, you can ensure optimal performance and prolong the lifespan of your CPU. Here are some common errors to avoid when applying thermal paste:
- Using too much thermal paste: Applying an excessive amount of thermal paste is a common mistake. It can lead to a thick layer that hinders heat transfer instead of facilitating it. Remember, a small pea-sized amount is sufficient to create a thin and even layer for effective heat dissipation.
- Spreading the paste manually: It is generally advised to let the cooler spread the thermal paste naturally when applying it. Manually spreading the paste with tools or your fingers can result in uneven distribution and air pockets, which can impact heat transfer.
- Overtightening the cooler: Applying excessive force when securing the cooler can lead to damage to the CPU or motherboard. It is important to follow the manufacturer’s instructions for tightening the cooler, ensuring a secure fit without overtightening.
- Using improper cleaning techniques: Inadequate cleaning of the CPU and cooler surfaces before applying thermal paste can result in poor contact and reduced heat transfer. Take the time to properly clean the surfaces with isopropyl alcohol and lint-free cloths or cotton swabs.
- Using the wrong type of thermal paste: Different CPUs and cooling systems may require different types of thermal paste. It is important to choose a paste that suits your specific needs and follows the manufacturer’s recommendations.
- Not reapplying thermal paste when upgrading coolers: When upgrading coolers, it is important to remove the old thermal paste and apply a fresh layer. Reusing old thermal paste can result in decreased performance and potential overheating issues.
To ensure the best results, it is crucial to carefully follow the manufacturer’s instructions for both the thermal paste and the CPU cooler. Taking the time to apply the thermal paste correctly can make a significant difference in the temperature management and overall performance of your CPU.
By avoiding these common mistakes and applying thermal paste with care and precision, you can maximize the efficiency of your CPU cooling system and maintain optimal temperatures for your computer. Now that you are aware of these mistakes, you are better equipped to achieve the best results when applying thermal paste to your CPU.
Conclusion
Thermal paste is a vital component in maintaining the optimal performance of your CPU and preventing overheating. By filling in microscopic imperfections, eliminating air gaps, and enhancing thermal conductivity, thermal paste ensures efficient heat transfer between the CPU and the cooler. It plays a crucial role in preventing performance issues and extending the lifespan of your CPU.
Throughout this article, we have explored the significance of thermal paste, its various types, and the correct methods of application and removal. We have also discussed common mistakes to avoid when applying thermal paste. By understanding these key factors, you can ensure maximum heat dissipation and achieve the best cooling performance for your computer system.
Whether you are a computer enthusiast building a high-performance rig or someone seeking to upgrade their existing setup, the importance of thermal paste cannot be overstated. It acts as a critical link between the CPU and cooler, optimizing heat transfer and safeguarding your CPU against potential damage caused by overheating.
By carefully selecting the appropriate thermal paste for your specific needs, following proper application techniques, and avoiding common mistakes, you can create an efficient and reliable cooling solution for your CPU. Regularly monitoring and maintaining your thermal paste will help keep your computer running smoothly and ensure consistent performance.
Remember, when it comes to thermal paste, a little goes a long way. Applying the right amount and ensuring proper contact between the CPU and the cooler will provide the best results. With the proper application and maintenance of thermal paste, you can enhance the performance, stability, and longevity of your CPU, resulting in a smoother and more enjoyable computing experience.