Introduction
Welcome to this step-by-step guide on how to remove the CPU cooler from your Dell Studio computer. Over time, the CPU cooler can become clogged with dust and debris, leading to increased temperatures and a decrease in performance. Removing and cleaning the CPU cooler is a crucial maintenance task that helps to ensure optimal cooling and performance of your computer.
Before we dive into the process, please note that opening your computer case and handling its internal components should be done with caution. Make sure to follow the instructions carefully, and if you are unsure or uncomfortable with the process, it is recommended to seek professional assistance.
In this guide, we will cover everything you need to know about safely removing the CPU cooler from your Dell Studio computer. We will go through the necessary tools, step-by-step instructions, and precautions to take along the way. By the end of this guide, you will be equipped with the knowledge to effectively remove and clean your CPU cooler, leading to improved cooling performance and a smoother computing experience.
Step 1: Gathering the necessary tools
Before you begin the process of removing the CPU cooler from your Dell Studio computer, it’s essential to gather all the necessary tools. Having the right tools on hand will ensure a smooth and efficient process. Here are the tools you will need:
- Screwdriver set: You will need a set of screwdrivers, including both flathead and Phillips-head screwdrivers. Different screws may require different types of screwdrivers, so having a set is essential.
- Thermal paste remover: This solution will help you remove the old thermal paste from the CPU and cooler. It’s important to clean the surfaces thoroughly for optimal heat transfer.
- Clean, lint-free cloth or paper towels: These will be used to clean the CPU and cooler surfaces after removing the old thermal paste.
- Isopropyl alcohol: This is used to clean the surfaces and ensure there is no residue left from the thermal paste remover.
- New thermal paste: After cleaning the surfaces, you will need to apply new thermal paste to ensure proper heat transfer between the CPU and cooler.
- Antistatic wrist strap (optional): While not necessary, an antistatic wrist strap can help prevent static electricity from damaging sensitive computer components.
- Compressed air can or an air blower: These tools are handy for blowing away dust and debris from the CPU cooler and other areas inside the computer case.
Make sure all the tools are within reach before beginning the process. This will save you time and make the overall experience more efficient. Additionally, it’s always a good idea to work on a clean and well-lit workspace to avoid any mishaps.
Step 2: Shutting down the computer and disconnecting the power source
Before proceeding with any internal computer maintenance, it’s crucial to shut down the computer properly and disconnect the power source. This step ensures your safety and prevents any potential damage to your computer components. Here’s how to do it:
- Save your work and close all running applications: Before shutting down the computer, make sure to save any unsaved work and close all running applications. This will prevent data loss and ensure a smooth shutdown process.
- Shut down the computer: Click on the “Start” button in the bottom left corner of your screen, then select “Shut Down” from the options. Wait for the computer to shut down completely before proceeding to the next step. Alternatively, you can press and hold the power button on your computer tower until it powers off.
- Unplug the power cable: Locate the power cable at the back of your computer and unplug it from the power outlet. This will ensure that no electricity is running through the system and eliminate the risk of electric shock.
- Ground yourself: To prevent static electricity from damaging sensitive computer components, it’s recommended to ground yourself. You can do this by touching a metal object or wearing an antistatic wrist strap.
Once you have completed these steps, you can proceed to the next stage of removing the CPU cooler from your Dell Studio computer. Remember, taking the time to properly shut down the computer and disconnect the power source is essential for your safety and the well-being of your computer components.
Step 3: Opening the computer case
Now that the computer is powered down and disconnected from the power source, it’s time to open the computer case to access the internals. Here’s how you can open the case of your Dell Studio computer:
- Locate the computer case: The computer case is the enclosure that houses all the internal components of your Dell Studio computer. It usually has a side panel that allows access to the components. Identify the case and position it in a way that gives you easy access to the side panel.
- Remove the screws: Most computer cases have screws that secure the side panel in place. Use your screwdriver to carefully remove these screws. Make sure to keep them in a safe place since you’ll need them when reassembling the computer later on.
- Remove the side panel: Once the screws have been removed, gently slide or lift off the side panel of the computer case. Some cases may have latches or other mechanisms for removing the panel, so be sure to follow the manufacturer’s instructions if applicable.
With the side panel removed, you’ll have direct access to the internal components of your computer, including the CPU cooler. Take a moment to familiarize yourself with the layout of the internal components before moving on to the next step.
Opening the computer case is a crucial step in the process of removing the CPU cooler. Be gentle when handling the case and avoid putting excessive pressure on any components. By following these steps, you’ll be one step closer to safely removing and cleaning your CPU cooler.
Step 4: Locating and removing the CPU cooler mounting bracket
Once you have successfully opened the computer case, the next step is to locate and remove the CPU cooler mounting bracket. The mounting bracket holds the CPU cooler in place and allows for secure installation. Here’s how you can do it:
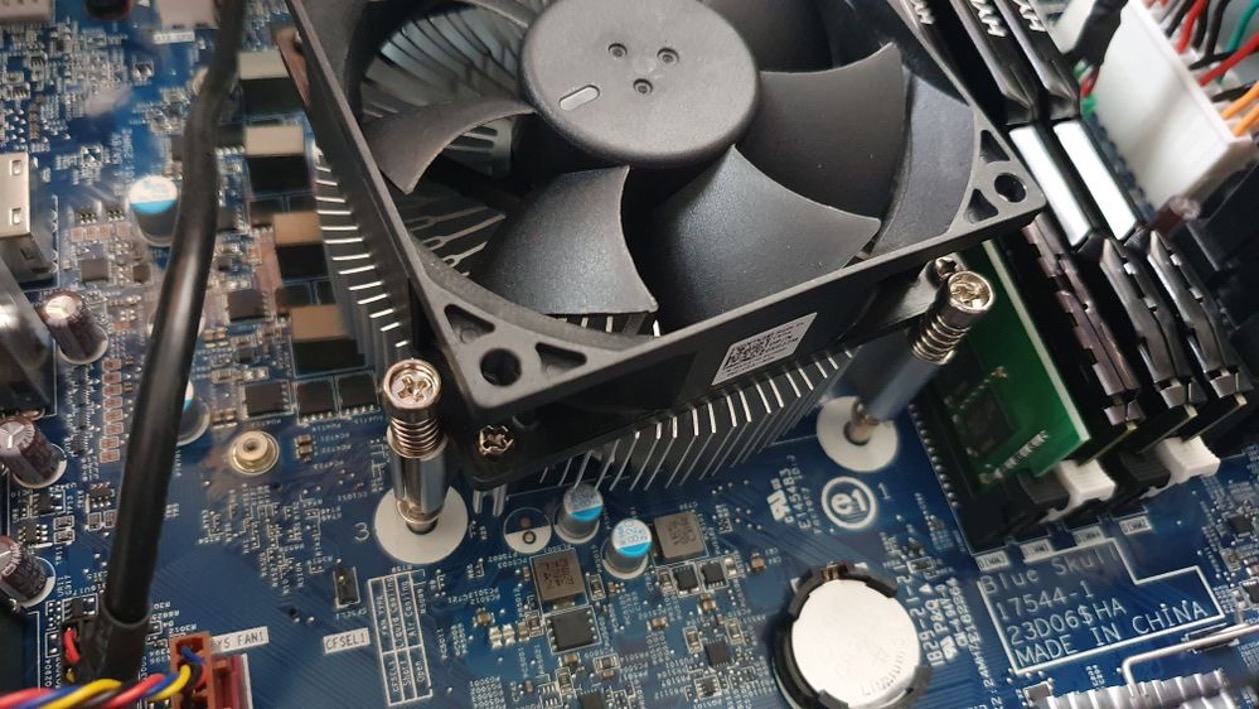
- Locate the CPU cooler: The CPU cooler is typically positioned directly on top of the CPU. It is a metal or plastic assembly with a fan attached to it. Take a moment to identify the CPU cooler and its surrounding components.
- Identify the mounting bracket: The CPU cooler is attached to the motherboard through a mounting bracket. This bracket secures the cooler in place. Look for the mounting bracket, which is usually located around the CPU socket area.
- Remove the screws or clips: Depending on the design of the mounting bracket, you may need to remove screws or unclip the bracket to release the CPU cooler. Carefully unscrew the screws or unclip the bracket using a screwdriver or your fingers. Set aside the screws or clips in a safe place as you may need them when reinstalling the CPU cooler.
- Gently remove the CPU cooler: With the mounting bracket loosened, gently lift the CPU cooler off the CPU. Be cautious not to apply too much force or twist the cooler, as this can damage the CPU or the motherboard.
Once you have successfully removed the CPU cooler mounting bracket, you can proceed to the next step of actually removing the CPU cooler itself. Keep in mind that the CPU cooler may still have thermal paste applied to it, so handle it with care to avoid any mess or contamination.
By following these steps, you’ll be able to locate the CPU cooler mounting bracket and remove it safely. This will allow you to proceed to the next stage of the process, which involves removing the CPU cooler itself for cleaning or replacement.
Step 5: Removing the CPU cooler
Now that you have successfully removed the CPU cooler mounting bracket, it’s time to proceed with removing the CPU cooler itself. The CPU cooler is responsible for dissipating heat from the CPU to keep it running at optimal temperatures. Here’s how you can safely remove the CPU cooler:
- Inspect the CPU cooler: Take a moment to examine the CPU cooler and familiarize yourself with its design. Identify any screws, clips, or brackets that secure the cooler in place.
- Remove any securing mechanisms: Depending on the type of CPU cooler, there may be screws, clips, or other securing mechanisms that hold it in place. Use your screwdriver or fingers to carefully remove these mechanisms, following the manufacturer’s instructions if available.
- Gently detach the CPU cooler: With the securing mechanisms removed, gently lift the CPU cooler away from the CPU socket. Be cautious not to apply excessive force or twist the cooler, as this can damage the CPU or the motherboard.
- Inspect for any remaining thermal paste: Once the CPU cooler is removed, take a look at the CPU and the base of the cooler. Check for any remaining thermal paste that may still be on the surfaces. If there is old thermal paste, it’s important to clean it off before applying new thermal paste.
Removing the CPU cooler requires careful handling to avoid any damage to the CPU or other components. Take your time and be gentle throughout the process. Once you have successfully removed the CPU cooler, you’re one step closer to cleaning or replacing it, which will enhance the cooling performance of your Dell Studio computer.
By following these steps, you can safely remove the CPU cooler from your Dell Studio computer. With the cooler removed, you can proceed to the next step, which involves cleaning the CPU and applying new thermal paste for optimal heat transfer.
Step 6: Cleaning the CPU and applying new thermal paste
With the CPU cooler removed, it’s important to clean the CPU and prepare it for the application of new thermal paste. Cleaning the CPU involves removing old thermal paste residue and ensuring a clean surface for optimal heat transfer. Here’s how you can clean the CPU and apply new thermal paste:
- Remove any remaining thermal paste: Use a clean, lint-free cloth or a paper towel and a small amount of thermal paste remover or isopropyl alcohol to gently clean off any remaining thermal paste from the surface of the CPU. Be careful not to apply too much pressure or scratch the CPU.
- Clean the CPU cooler base: Similarly, clean the base of the CPU cooler to remove any old thermal paste residue. Use a cloth or paper towel dampened with a small amount of thermal paste remover or isopropyl alcohol to wipe it clean. Ensure that both the CPU and the CPU cooler base are completely free from any debris or residue.
- Apply a new thermal paste: Once the surfaces are clean, it’s time to apply a small amount of new thermal paste to the center of the CPU. Use a pea-sized drop or a thin line of thermal paste, depending on the manufacturer’s instructions. Avoid applying too much paste, as it can lead to excessive heat buildup.
- Spread the thermal paste: Carefully place the CPU cooler back onto the CPU, ensuring that the mounting holes align properly. Apply slight pressure to evenly spread the thermal paste across the CPU surface. This will ensure maximum heat transfer and optimal cooling performance.
It’s important to note that thermal paste is a crucial component for maintaining proper heat dissipation. It helps to fill any microscopic gaps between the CPU and the CPU cooler, allowing for efficient heat transfer. Applying the right amount of thermal paste is key to achieving optimal cooling.
By following these steps, you can effectively clean the CPU and apply a fresh layer of thermal paste. This will help to improve the heat dissipation and overall performance of your Dell Studio computer. With the CPU cleaned and ready, it’s time to proceed to the next step of installing the new CPU cooler.
Step 7: Installing the new CPU cooler
After cleaning the CPU and applying new thermal paste, it’s time to move forward with installing the new CPU cooler. Installing a new CPU cooler is crucial for maintaining optimal cooling performance and preventing overheating. Here’s how you can install the new CPU cooler in your Dell Studio computer:
- Align the CPU cooler with the mounting holes: Carefully position the new CPU cooler over the CPU socket, aligning the mounting holes on the cooler with the corresponding holes or brackets on the motherboard. Ensure that the cooler is oriented correctly and is not crooked or misaligned.
- Secure the CPU cooler: Once the CPU cooler is properly aligned, insert the screws or clips that came with the cooler through the mounting holes. Apply even pressure while tightening the screws or clipping the cooler into place. Ensure that the cooler is securely attached to the motherboard, but be careful not to overtighten the screws, as this can damage the motherboard or CPU.
- Connect the CPU fan: Locate the fan connector on the CPU cooler and plug it into the corresponding fan header on the motherboard. This will provide power to the fan and allow it to operate. Make sure the connection is secure.
It’s important to follow the manufacturer’s instructions for installing the specific CPU cooler model you have. This will ensure proper installation and prevent any damage to the cooler or other components.
By carefully following these steps, you can successfully install the new CPU cooler in your Dell Studio computer. With the new cooler in place, you will experience improved cooling performance and a more stable computing experience.
Step 8: Reassembling the computer case
Now that you have installed the new CPU cooler, it’s time to reassemble the computer case and ensure everything is properly put back together. Here’s how you can reassemble the computer case of your Dell Studio computer:
- Place the side panel back: Carefully align the side panel of the computer case with the edges of the case. Slide it or lower it into place until it aligns properly. Make sure the panel is securely attached and there are no gaps.
- Secure the side panel: Once the side panel is in place, use the screws that you had previously removed to secure it back onto the case. Use your screwdriver to tighten the screws, but make sure not to overtighten them, as it can damage the case or the screws themselves.
- Check all connections: Before powering on the computer, double-check all the connections inside the case. Ensure that all cables, wires, and components are properly connected and secured. This includes connections to the motherboard, power supply, hard drives, and any other peripherals.
- Plug in the power cable: Lastly, plug the power cable back into the power outlet. Ensure a secure connection to provide power to the computer.
Once the computer case is reassembled and all connections are checked, you can move on to powering on the computer and testing the new CPU cooler. It’s recommended to monitor the temperatures and performance of your computer after the installation to ensure everything is functioning properly.
By following these steps, you can successfully reassemble the computer case of your Dell Studio computer. With the case securely put back together, you’re ready to enjoy the improved cooling performance and enhanced functionality of your computer.
Conclusion
Congratulations! You have successfully learned how to remove the CPU cooler from your Dell Studio computer. By following this step-by-step guide, you were able to gather the necessary tools, shut down the computer, open the computer case, locate and remove the CPU cooler mount bracket, remove the CPU cooler, clean the CPU and apply new thermal paste, install the new CPU cooler, and reassemble the computer case.
Regularly cleaning and maintaining the CPU cooler is vital for ensuring optimal cooling performance and extending the lifespan of your computer. Removing dust and debris, applying fresh thermal paste, and installing a new CPU cooler when needed can help prevent overheating issues and improve overall system stability.
Remember, when working on the internal components of your computer, it is important to exercise caution and carefully follow the instructions. If you are unsure or uncomfortable with performing these tasks, it is always recommended to seek professional assistance.
By successfully completing these steps, you have taken a proactive approach to maintain your Dell Studio computer’s cooling system. Your computer will now have better heat dissipation, leading to improved performance, reduced strain on components, and a more reliable computing experience.
Make sure to periodically clean and inspect your CPU cooler to ensure optimal cooling. With proper maintenance, your computer will continue to run smoothly for years to come.
Thank you for following this guide, and happy computing!