System Requirements
To download and use Zoom on your Mac, you need to ensure that your system meets the following requirements:
- A Mac running OS X 10.9 or later
- A dual-core 2.0GHz CPU or higher
- 4GB of RAM or higher
- At least 100MB of free disk space
- High-speed internet connection (wired or wireless)
It’s important to have a compatible operating system and sufficient hardware resources to run Zoom smoothly. The recommended system specifications ensure optimal performance during video calls, conferences, and screen sharing.
For the best experience, it’s also recommended to have a microphone and speakers or headphones to participate in audio discussions. Additionally, a webcam is needed if you want to host or join video conferences.
If you meet these system requirements, your Mac should be capable of running Zoom effectively, allowing you to take full advantage of its features and functionalities. Now that you know the system requirements, let’s move on to the next steps in the process of downloading Zoom on your Mac.
Step 1: Visit the Zoom Website
The first step in downloading Zoom on your Mac is to visit the official Zoom website. Open your preferred web browser and type in “zoom.us” in the address bar. Press Enter to load the Zoom homepage.
Once the webpage loads, you will be greeted with the Zoom homepage, which provides information about the various features and services offered by Zoom. Take a moment to explore the website and familiarize yourself with what Zoom has to offer.
On the Zoom homepage, you will find navigation options at the top of the page, allowing you to access different sections of the website. These sections include Home, Solutions, Products, Pricing, Resources, and Support. You can click on any of these sections to learn more about Zoom’s offerings.
If you are new to Zoom and want to learn more about its features and capabilities, you can visit the “Products” section. This section provides detailed information about Zoom’s products, including Zoom Meetings, Zoom Phone, and Zoom Rooms.
Additionally, the “Pricing” section provides information about the different plans and pricing options available for individuals, small businesses, and enterprises. You can explore the pricing options to find the plan that best fits your needs.
Once you have familiarized yourself with the Zoom website, you can proceed to the next step in the process, which is to access the Download Center to download Zoom for your Mac.
Step 2: Select the Download Center
After visiting the Zoom website, the next step to download Zoom on your Mac is to navigate to the Download Center. The Download Center is where you can find the necessary files to install Zoom on your Mac.
To access the Download Center, look for the navigation bar at the top of the Zoom website. Locate the “Resources” section and hover your cursor over it. A dropdown menu will appear, and in the menu, click on the “Download Center” option.
The Download Center is a hub for all the downloads related to Zoom. It provides access to the latest versions of Zoom for various platforms, including Mac, Windows, and mobile devices.
Once you click on the “Download Center” option, you will be directed to a new page where you can find different download options. Look for the download button specifically intended for Mac users.
Before you proceed with the download, take a moment to double-check that you are downloading the correct version of Zoom for your Mac. Ensure that the download is compatible with your Mac’s operating system version and meets the system requirements.
Upon confirming the correct download option, click on the download button. Your browser may prompt you to save the file or confirm the download. Follow the on-screen instructions to complete the download process.
Now that you have selected the Download Center and chosen the appropriate Zoom version for your Mac, it’s time to move on to the next step: downloading and installing Zoom on your Mac.
Step 3: Download Zoom for Mac
Now that you have accessed the Download Center on the Zoom website, it’s time to proceed with downloading Zoom for your Mac. This step will guide you through the process of downloading the Zoom installation file to your computer.
On the Download Center page, locate the download button specifically labeled for Mac users. Click on the download button to start the download process.
Depending on your browser settings, the download may automatically start or you may be prompted to choose a location to save the file. Select a suitable location on your Mac where you want to save the Zoom installation file.
Keep in mind that the file size of the download can vary, so it may take some time depending on your internet connection speed. Be patient during the download process and avoid interrupting it to ensure a successful download.
Once the download is complete, you will have the Zoom installation file saved on your Mac. The file will typically have a .dmg extension. It contains all the necessary files and resources needed to install Zoom on your Mac.
Before moving on to the next step, take a moment to double-check that the downloaded file is intact and hasn’t been corrupted during the download process. You can verify this by ensuring that the file size matches the expected size provided on the Zoom website.
Now that you have successfully downloaded Zoom for your Mac, it’s time to proceed with the installation process. The next step will guide you through opening the Zoom installer on your Mac.
Step 4: Open the Zoom Installer
With the Zoom installation file saved on your Mac, it’s time to open the Zoom installer and prepare for the installation process. Follow these steps to open the Zoom installer:
- Navigate to the location on your Mac where you saved the Zoom installation file. It is typically located in your Downloads folder.
- Locate the Zoom installation file with the .dmg extension.
- Double-click on the Zoom installation file to open it. This will mount the installation disk image and display its contents.
- A new window will appear on your screen, showing the contents of the Zoom installation disk image.
- Inside the window, you will see the Zoom application icon and potentially other files or folders related to the installation.
- Click on the Zoom application icon to start the installation process. This will launch the Zoom installer on your Mac.
Opening the Zoom installer is a crucial step in preparing to install Zoom on your Mac. The installer will guide you through the necessary steps to complete the installation process.
Keep in mind that you may be prompted to enter your system’s password or provide permission to continue with the installation. This is a standard security measure to ensure that you have the necessary authority to install software on your Mac.
Now that you have successfully opened the Zoom installer on your Mac, you are ready to proceed with the installation process. The next step will guide you through installing Zoom on your Mac.
Step 5: Install Zoom on your Mac
After opening the Zoom installer, you are now ready to proceed with the installation of Zoom on your Mac. Follow these steps to complete the installation process:
- The Zoom installer will display a welcome screen, providing you with information about the installation process. Click on the “Continue” button to proceed.
- Read and review the Zoom License Agreement. If you agree to the terms, click on the “Agree” button to continue with the installation.
- Next, you will be prompted to choose the destination where Zoom will be installed. By default, the installer selects the Applications folder on your Mac. If you want to change the destination, click on the “Change Install Location” button and choose a different location.
- Once you have selected the installation destination, click on the “Install” button to start the installation process.
- The installation may take a few moments to complete. A progress bar will display the installation status, allowing you to track the progress.
- Upon successful installation, the Zoom installer will display a confirmation message. Click on the “Close” button to exit the installer.
Congratulations! You have successfully installed Zoom on your Mac. The Zoom application is now ready to use on your computer.
After the installation, you can find the Zoom application in your Applications folder. You can also access it by searching for “Zoom” in Spotlight or by adding it to your Dock for easy access.
Now that you have installed Zoom on your Mac, the next step is to sign in or sign up for a Zoom account. This will allow you to fully utilize Zoom’s features and start hosting or joining meetings on your Mac.
Step 6: Sign in or Sign up for Zoom
Now that you have successfully installed Zoom on your Mac, the next step is to sign in to an existing Zoom account or sign up for a new one. Here’s how to proceed:
- Launch the Zoom application on your Mac by clicking on the application icon in your Applications folder or Dock.
- Upon opening the Zoom application, you will see the login screen. If you already have a Zoom account, enter your email address and password in the provided fields, and then click on the “Sign In” button.
- If you don’t have a Zoom account yet, click on the “Sign Up Free” button instead. This will take you to the Zoom website, where you can create a new account.
- On the Zoom website, you will be prompted to enter your email address. Provide a valid email address and click on the “Sign Up” button.
- An email will be sent to the provided email address with a verification link. Open your email inbox, locate the email from Zoom, and click on the verification link to verify your email address.
- After verifying your email, you will be redirected back to the Zoom website to complete the sign-up process. Fill out the required information, such as your name, password, and any additional details if prompted.
- Once you have completed the sign-up process, return to the Zoom application on your Mac.
- Enter your newly created Zoom account email address and password in the login screen, and then click on the “Sign In” button.
After signing in or signing up, you will have access to your Zoom account on your Mac. This will allow you to initiate or join meetings, schedule webinars, and utilize all the features and functionalities Zoom has to offer.
Remember to keep your Zoom account credentials secure and avoid sharing them with others to protect your account’s privacy.
Now that you have signed in or signed up for Zoom on your Mac, you are ready to customize your Zoom settings to suit your preferences and start using Zoom for your communication needs.
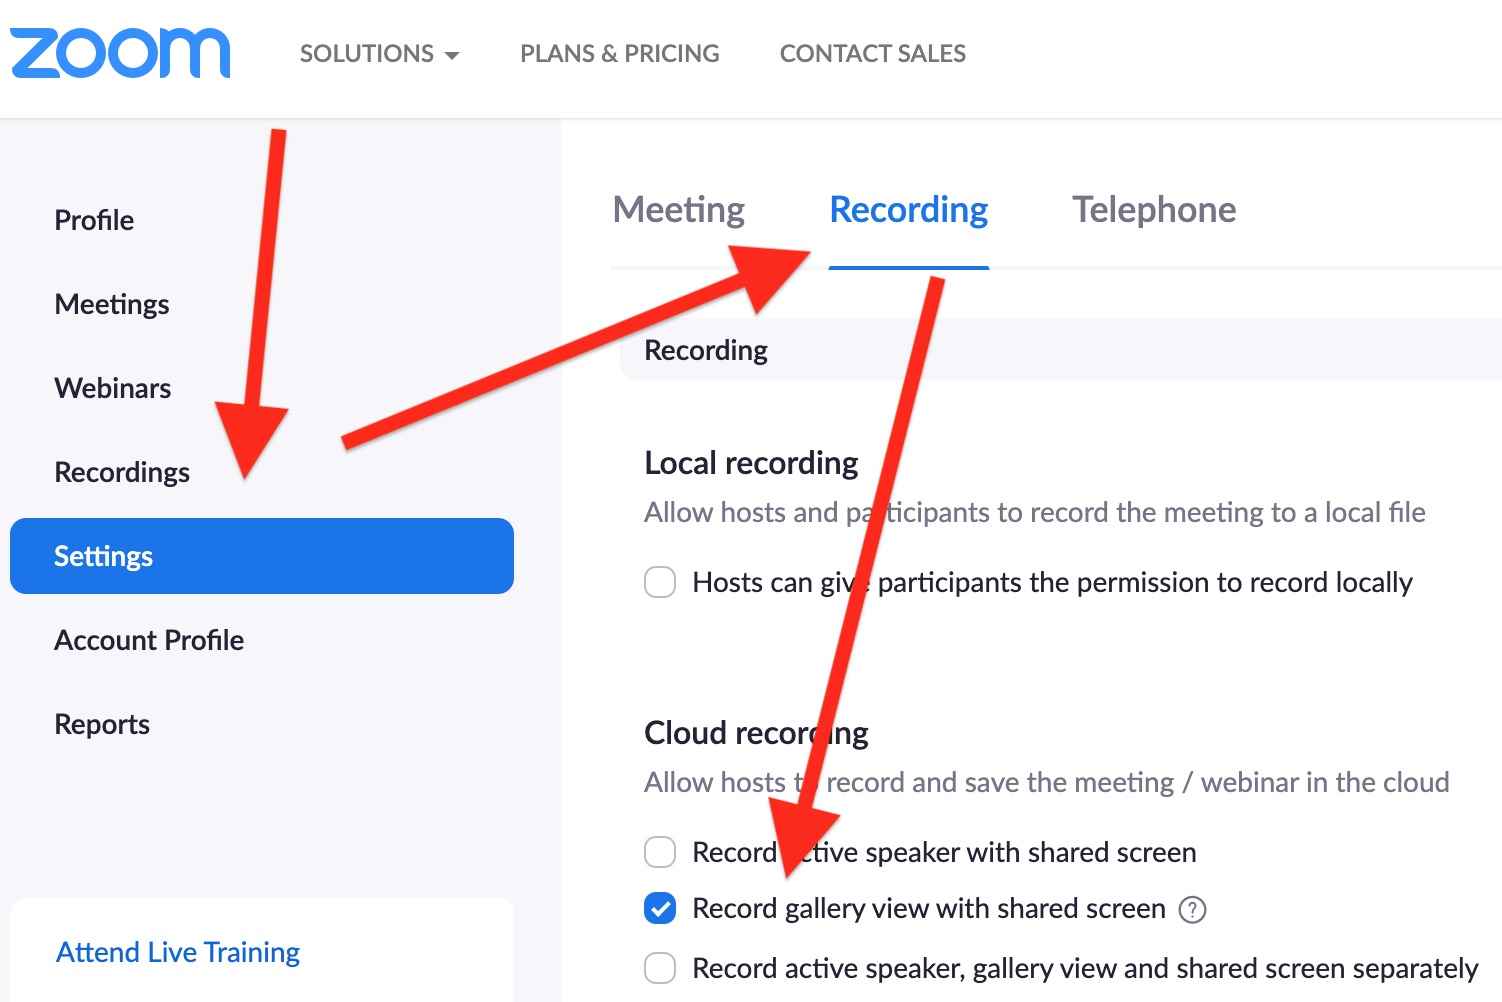
Step 7: Customize your Zoom Settings
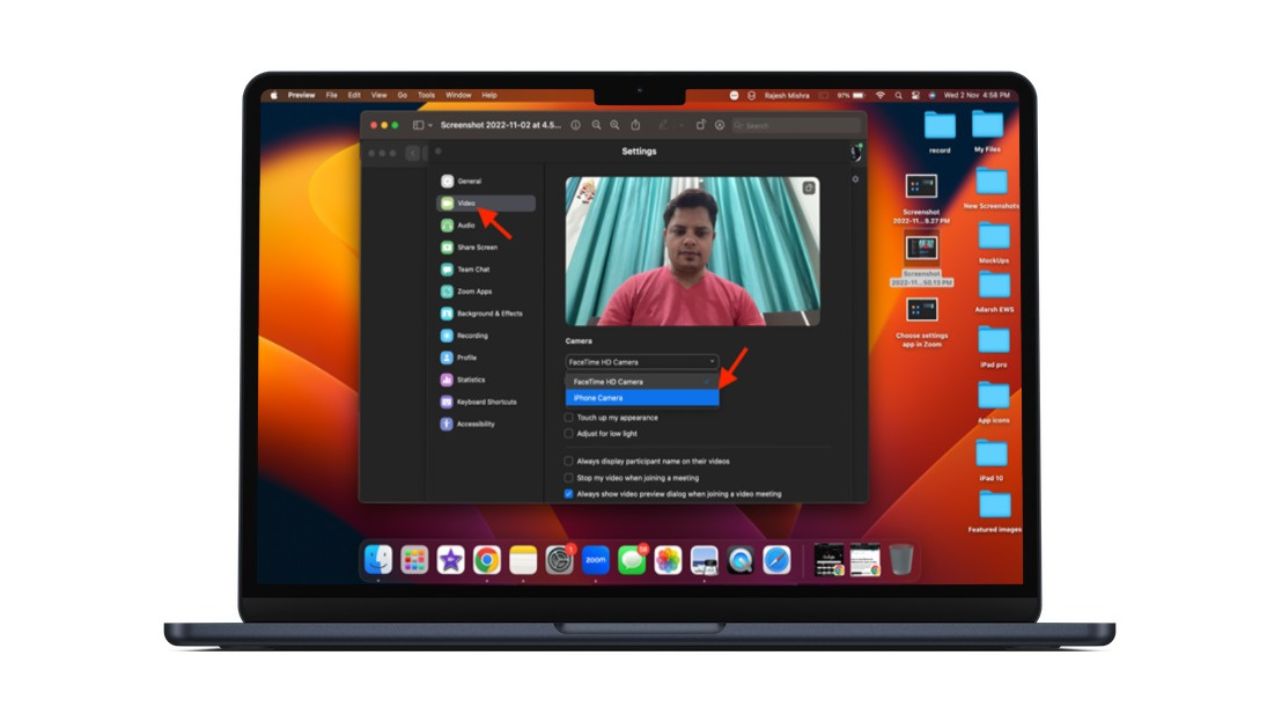
After signing in to your Zoom account on your Mac, it’s important to customize your Zoom settings to optimize your experience and meet your specific needs. Here’s how to customize your Zoom settings:
- Launch the Zoom application on your Mac, if it’s not already open.
- Click on the “Zoom” menu in the top menu bar and select “Preferences” from the dropdown menu.
- In the Preferences window, you will find various tabs that allow you to customize different aspects of Zoom. Explore these tabs to modify settings related to audio, video, meetings, chat, and more.
- Under the “Audio” tab, you can select your preferred microphone and speaker settings, adjust audio input and output volume levels, and perform a test to ensure your audio is working properly.
- In the “Video” tab, you can choose your desired camera device, adjust video settings such as video resolution and frame rate, and enable virtual backgrounds or video filters if desired.
- The “Meetings” tab provides options to customize meeting settings, such as enabling or disabling participant video upon joining, selecting the default screen sharing mode, and configuring the meeting invitation settings.
- Explore other tabs, including “General,” “Keyboard Shortcuts,” and “Chat,” to customize additional settings according to your preferences.
- Once you have made the desired changes to your Zoom settings, click on the “Save” button to apply the changes.
- You can revisit the Zoom Preferences at any time to make further adjustments and modifications to your settings.
By customizing your Zoom settings, you can optimize your audio and video quality, streamline your meeting experience, and tailor Zoom to your specific requirements. It’s recommended to review and adjust these settings periodically to ensure your Zoom sessions are smooth and efficient.
Now that you have customized your Zoom settings, you are ready to start using Zoom on your Mac for meetings, webinars, and other collaboration endeavors.
Step 8: Start using Zoom on your Mac
With Zoom installed and customized on your Mac, you are now ready to start using it for all your communication and collaboration needs. Follow these steps to begin using Zoom:
- Launch the Zoom application on your Mac by double-clicking on the Zoom app icon in your Applications folder or clicking on the Zoom icon in your Dock.
- Upon opening Zoom, you will see the Zoom home screen. Here, you will find options to join a meeting, start a meeting, schedule a meeting, or share your screen.
- To join a meeting, click on the “Join” button and enter the Meeting ID provided by the meeting host. You can also enter your name and choose your preferred audio and video settings before joining.
- To start a meeting, click on the “New Meeting” button. This will instantly start a new meeting and provide you with options to invite participants, enable or disable your video and audio, and more.
- To schedule a meeting, click on the “Schedule” button. This will allow you to specify the date, time, and other meeting details, and send invitations to participants in advance.
- If you want to share your screen, click on the “Share Screen” button. This will give you the option to share your entire screen, a specific application window, or a specific portion of your screen.
- As you use Zoom, familiarize yourself with additional features and tools available during meetings. These include chat messaging, virtual backgrounds, recording capabilities, and more.
- Explore the Zoom menu at the top of your screen during meetings to access additional options like participant management, audio controls, and more.
- Remember to follow proper meeting etiquette, such as muting yourself when not speaking, being respectful to other participants, and utilizing Zoom’s security features when necessary.
Zoom provides a range of features and capabilities to enhance your virtual interactions, whether it’s for business meetings, online classes, or social gatherings. Take some time to experiment with different options and features to maximize your Zoom experience.
Now that you know how to start using Zoom on your Mac, you can seamlessly connect with colleagues, friends, and family to collaborate, communicate, and stay connected from the comfort of your own Mac.
Troubleshooting Tips
While using Zoom on your Mac, you may encounter occasional issues and challenges. Here are some troubleshooting tips to help resolve common problems:
- Check your internet connection: Ensure that you have a stable and high-speed internet connection. Unstable or slow internet can lead to audio or video issues during meetings.
- Update Zoom: Keep your Zoom application up to date by regularly checking for updates. This ensures that you have the latest features and bug fixes.
- Restart your Mac and Zoom: If you experience any issues, try restarting your Mac and relaunching the Zoom application. This can resolve temporary glitches or conflicts.
- Adjust audio and video settings: If your audio or video is not working properly, check your Zoom settings to ensure the correct microphone and camera are selected. Additionally, adjust volume levels and video resolution if needed.
- Verify permissions: Make sure that Zoom has the necessary permissions to access your microphone, camera, and other required resources on your Mac. Check your Mac’s privacy settings to ensure that Zoom is allowed access.
- Disable unnecessary background processes: Close any other applications or processes running on your Mac that could be using significant system resources. This can help improve Zoom performance.
- Clear Zoom cache: If you experience performance issues or unusual behavior, clearing the Zoom cache can help. Go to the Zoom Preferences, select the “Advanced” tab, and click on the “Clean Cache” button.
- Contact Zoom support: If you are unable to resolve the issue on your own, reach out to Zoom support for further assistance. They can provide guidance or solutions specific to your problem.
- Check system requirements: Ensure that your Mac meets the minimum system requirements for running Zoom. If your Mac falls short, consider upgrading hardware or software to ensure smooth operation.
By following these troubleshooting tips, you can address common issues that arise while using Zoom on your Mac. However, if the problem persists, don’t hesitate to seek further assistance from Zoom’s support team or refer to their online resources for additional troubleshooting steps.
Now you are equipped with troubleshooting knowledge to resolve common Zoom issues and ensure a seamless experience on your Mac.