Introduction:
Welcome to the world of iCloud, Apple’s cloud storage service that allows you to store and access your photos, videos, documents, and more across all your Apple devices. If you’ve been using iCloud to back up your precious memories and want to download your photos to your computer, you’ve come to the right place. In this guide, we’ll walk you through the step-by-step process of downloading your photos from iCloud.
Whether you want to save a backup of your photos, transfer them to another device, or simply free up space on your iCloud storage, downloading your photos is a straightforward and hassle-free task. With just a few clicks, you can have all your cherished moments saved safely on your computer.
One of the great advantages of iCloud Photos is that it syncs seamlessly across all your Apple devices. So, any changes you make on one device automatically reflect on the others. This means that when you download your photos from iCloud to your computer, you’ll have an exact replica of your photo library at that point in time. It’s a convenient way to keep your memories organized and accessible.
In the following sections, we’ll guide you through the process of signing in to iCloud on your computer, accessing iCloud Photos, selecting the specific photos you want to download, and finally, downloading them to your computer. So, let’s get started and learn how to download your photos from iCloud!
Step 1: Sign in to iCloud on your computer
The first step in downloading your photos from iCloud is to sign in to your iCloud account on your computer. This will allow you to access your iCloud Photos and begin the download process. Follow these simple steps to sign in:
- Open a web browser on your computer.
- Go to the iCloud website by typing www.icloud.com in the address bar.
- Enter your Apple ID and password in the respective fields.
- Click on the arrow or press Enter to proceed.
If you have enabled two-factor authentication for your iCloud account, you will need to enter the verification code that is sent to your trusted device. This adds an extra layer of security to protect your account from unauthorized access.
Once you have successfully signed in to your iCloud account, you will be taken to the iCloud homepage, where you can access various iCloud services, including iCloud Photos.
Pro Tip: To make it more convenient to access iCloud Photos in the future, you can bookmark the iCloud website in your browser. This way, you can easily navigate to it with just a click or two.
Now that you have signed in to iCloud on your computer, you are ready to move on to the next step and access your iCloud Photos.
Step 2: Access iCloud Photos
After signing in to your iCloud account on your computer, the next step is to access your iCloud Photos. This is where all your photos and videos that you have stored in iCloud are located. Follow these steps to access your iCloud Photos:
- On the iCloud homepage, you will see various icons representing different iCloud services. Look for the icon labeled “Photos” and click on it.
- This will take you to the iCloud Photos page, where you can view and manage your photo library.
On the iCloud Photos page, you will see your photos organized by date and location. You can navigate through your photo collection by scrolling up and down or by using the “Month”, “Year”, and “All Photos” tabs on the left-hand side. You can also use the search bar at the top to search for specific photos by keywords, locations, or people.
Additionally, you have the option to view your photos in different layouts, such as “Moments”, “Collections”, and “Years”. These views provide a more visually pleasing and organized way to browse through your photos.
With iCloud Photos, you can also create albums, add captions, and edit your photos right from the browser. These changes are automatically synced across all your Apple devices, ensuring that your photo library is always up to date.
Now that you have accessed your iCloud Photos, it’s time to move on to the next step and select the specific photos you want to download onto your computer.
Step 3: Select the photos you want to download
Once you have accessed your iCloud Photos, it’s time to select the specific photos you want to download onto your computer. Follow these steps to choose the photos:
- On the iCloud Photos page, navigate to the specific album or view that contains the photos you want to download.
- Click on the first photo you want to download to select it.
- If you want to select multiple photos, hold down the Shift key (for a consecutive selection) or the Ctrl/Cmd key (for a non-consecutive selection) while clicking on the individual photos.
- You can also use the “Select Photos” option in the toolbar to choose all the photos in the current album or view.
As you select photos, you will notice that they are highlighted or marked with checkmarks to indicate they have been selected. You can always deselect a photo by clicking on it again. This gives you the flexibility to make changes to your selection before proceeding to the download step.
If you prefer to download an entire album or view, simply click on the “Select Photos” option in the toolbar and choose “All” to select all photos in that album or view. This is a convenient way to download a large collection of photos with just one click.
Pro Tip: If you have a large number of photos and want to select all of them, scroll to the very beginning of your photo collection, hold down the Shift key, and click on the last photo. This will automatically select all the photos in between.
Now that you have selected the photos you want to download, let’s move on to the next step and learn how to download them onto your computer.
Step 4: Download photos to your computer
Now that you have selected the photos you want to download from your iCloud Photos, it’s time to proceed with the actual download process. Follow these steps to download the photos to your computer:
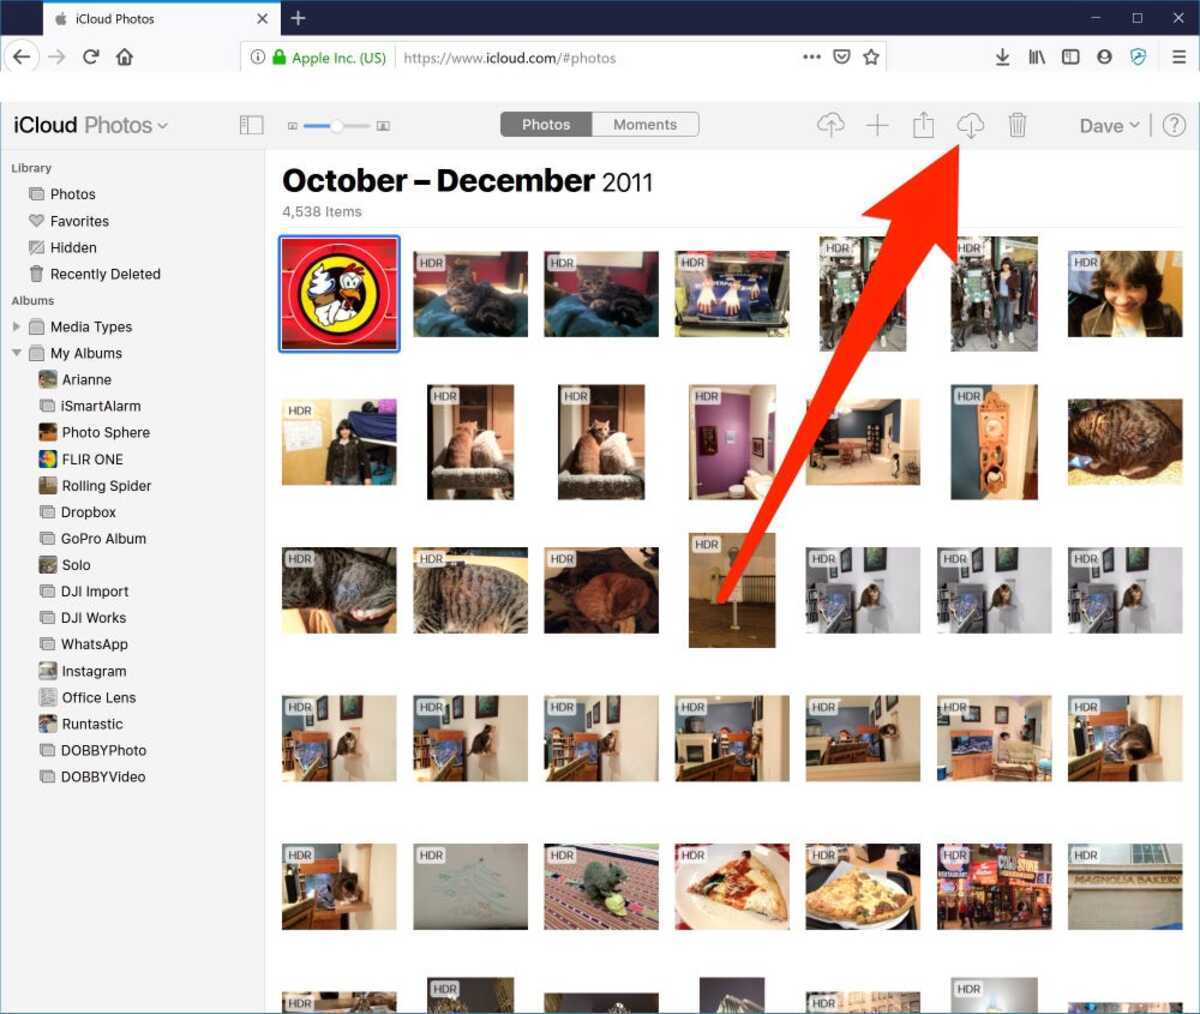
- In the top right corner of the iCloud Photos page, you will see a cloud icon with an arrow pointing down. Click on this icon to initiate the download.
- A pop-up window will appear confirming the number of photos you have selected to download. You can choose to download them in their original format or in a compatible format suitable for your computer.
- Select your preferred option and click on the “Download” button.
- Choose a location on your computer where you want to save the downloaded photos. You can create a new folder specifically for these photos or select an existing folder.
- Click on the “Download” or “Save” button, depending on your browser, to start the download process.
The download speed will depend on the size of the selected photos and your internet connection. Once the download is complete, you will have a local copy of the photos on your computer, which you can access anytime even without an internet connection.
Pro Tip: To save time and streamline the download process, you can download photos from multiple albums or views simultaneously. Simply repeat the previous steps for each selection, and the photos will be downloaded to the chosen location accordingly.
Now that you have successfully downloaded your selected photos from iCloud to your computer, let’s move on to the final step and make sure the photos have been downloaded properly.
Step 5: Check the downloaded photos
After downloading your photos from iCloud to your computer, it’s important to check and verify that the download was successful. Follow these steps to ensure that your photos have been downloaded properly:
- Open the folder on your computer where you saved the downloaded photos. This is the location you selected during the download process.
- Verify that all the photos you selected for download are present in the folder. Double-click on individual photos to open them and confirm that they are displaying correctly.
- Check the file formats of the downloaded photos. If you chose to download in their original format, the file extensions should match the formats of the photos (e.g., .jpg, .png, .heic). If you chose a compatible format, the file extensions may vary.
- Compare the sizes of the downloaded photos with the original sizes displayed in iCloud Photos. In most cases, the sizes should remain similar, indicating that the photos were not compressed or altered during the download process.
- If your download included multiple albums or views, organize the downloaded photos into separate folders to maintain the same organizational structure as in iCloud Photos.
By taking these steps to check the downloaded photos, you can ensure that your precious memories are safely stored on your computer and ready for further use, such as creating photo albums, editing, or sharing with friends and family.
If you encounter any issues, such as missing photos or corrupted files, you may need to repeat the download process or contact Apple Support for further assistance. It’s always a good practice to periodically back up your downloaded photos to an external hard drive or cloud storage service to prevent any potential data loss.
Congratulations! You have successfully downloaded and checked your photos from iCloud to your computer. Your cherished memories are now at your fingertips, ready to be enjoyed and preserved for years to come!
Conclusion
Downloading your photos from iCloud to your computer is a simple process that allows you to have a local backup of your cherished memories. By following the steps outlined in this guide, you can easily access your iCloud account, select the photos you want to download, and save them directly onto your computer.
iCloud Photos provides a convenient way to sync and manage your photo library across all your Apple devices. With just a few clicks, you can have all your photos accessible on your computer, allowing for easy editing, organizing, and sharing.
Remember to regularly download and back up your photos to ensure that you always have a secure copy of your memories. It’s also a good idea to periodically check the downloaded photos to ensure that they have been downloaded correctly and are ready for use.
Whether you’re looking to create a photo album, edit your photos, or simply keep a backup, downloading your photos from iCloud to your computer gives you the flexibility and control over your personal media collection.
We hope this guide has been helpful in assisting you throughout the download process. Enjoy your downloaded photos and continue to capture and store new precious memories on iCloud!