Introduction
Welcome to this guide on how to download more than 1000 photos from iCloud! iCloud is a cloud storage and computing service provided by Apple, allowing users to store and access various types of data, including photos. However, downloading a large number of photos from iCloud can be a time-consuming and tedious process. Luckily, in this article, we will walk you through a step-by-step tutorial on how to efficiently download more than 1000 photos from iCloud.
With iCloud Photos, you can easily access your entire photo library on any device connected to your iCloud account. This means that you can view and manage your photos on your iPhone, iPad, Mac, or even through a web browser. However, when it comes to downloading a large number of photos, the traditional method of downloading them one by one can be frustrating and impractical.
To overcome this limitation, we will not only guide you through the standard method of downloading photos from iCloud to your computer, but also introduce you to third-party software that can expedite the process by enabling batch downloads. By following the steps outlined in this article, you will be able to efficiently download more than 1000 photos from iCloud, saving you time and effort.
Whether you want to create backups of your precious memories, free up space on your iCloud storage, or simply have offline access to your photo library, this guide will provide you with the necessary tools and instructions to accomplish your goal. So, without further ado, let’s dive into the step-by-step process of downloading more than 1000 photos from iCloud.
Step 1: Access iCloud Photos on your computer
The first step in downloading more than 1000 photos from iCloud is to access your iCloud Photos on your computer. Here’s how:
- Open a web browser: Launch your preferred web browser on your computer.
- Go to iCloud.com: Type in icloud.com in the address bar and press Enter.
- Sign in: Enter your Apple ID and password to log into your iCloud account.
- Navigate to Photos: Once signed in, click on the “Photos” icon to access your iCloud photo library.
Once you have successfully reached the Photos section of your iCloud account, you will be able to browse and manage your entire photo collection.
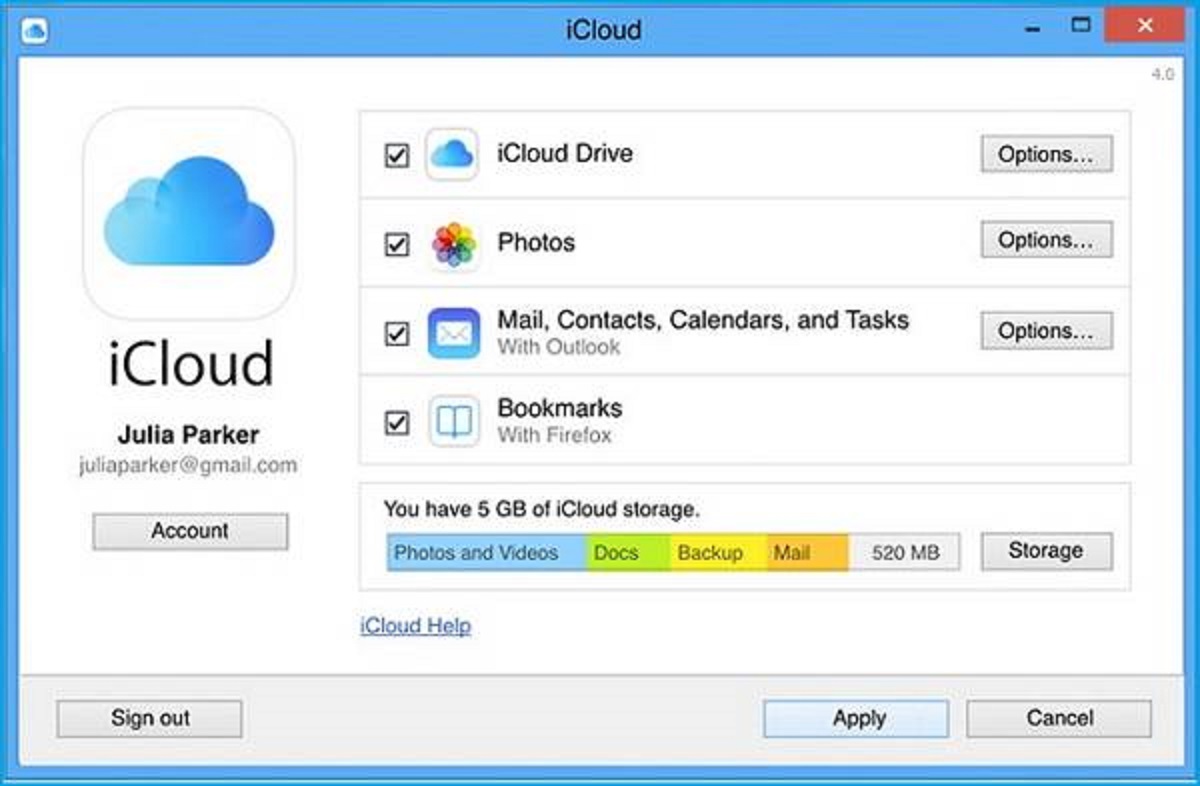
Note that you can also access your iCloud Photos on a Mac by using the Photos app, or on a Windows computer by downloading and installing the iCloud for Windows software.
By accessing your iCloud Photos on your computer, you are now ready to proceed with the next steps of the process, which involve selecting and downloading the photos you want.
Step 2: Select all photos you want to download
Now that you have accessed your iCloud Photos on your computer, it’s time to select the photos you want to download. Follow these steps:
- Select a single photo: Click on a photo to select it. To select multiple photos, hold down the Ctrl (Windows) or Command (Mac) key while clicking on each photo.
- Select multiple contiguous photos: To select a range of photos, click on the first photo, then hold down the Shift key and click on the last photo. All photos in between will be selected.
- Select all photos: To select all photos in your iCloud library, use the keyboard shortcut Ctrl + A (Windows) or Command + A (Mac). Alternatively, you can click on the first photo, scroll to the end, hold down the Shift key, and select the last photo.
By following these steps, you will be able to quickly and easily select the desired photos for downloading. It’s important to note that if you have a large number of photos in your iCloud library, selecting all of them at once may not be practical due to limitations in your web browser’s performance. In such cases, it is recommended to select photos in smaller batches.
Once you have selected the photos you want to download, you are ready to move on to the next step, which involves downloading the selected photos to your computer.
Step 3: Download selected photos
After selecting the photos you want to download from your iCloud library, you can proceed to download them to your computer. Follow these simple steps:
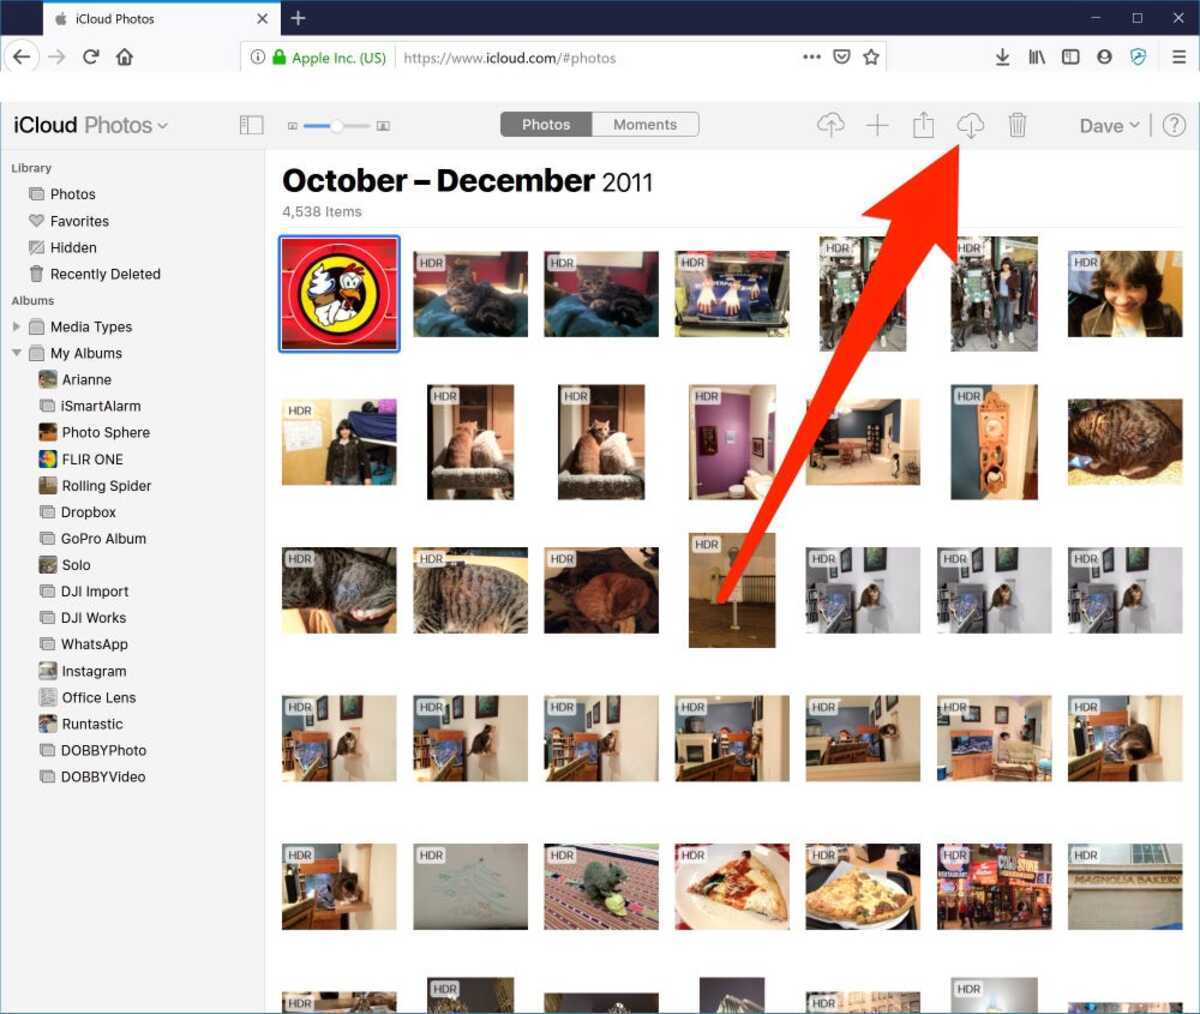
- Click on the Download icon: In the top-right corner of the iCloud Photos page, you will find a download icon. Click on it to initiate the download process.
- Select a download location: A pop-up window will appear, allowing you to choose a location on your computer where you want to save the downloaded photos. Browse to the desired folder, or create a new one, and click on “Save”.
- Wait for the download to finish: Depending on the number and size of the selected photos, the download may take some time. Be patient and allow the process to complete.
Once the download is complete, you will have the selected photos saved to your computer, ready to be accessed and organized as you wish. It’s important to note that the downloaded photos will retain their original file names and formats, ensuring that you have an exact copy of your iCloud photos.
If you have a large number of photos to download, it’s recommended to download them in smaller batches to avoid overwhelming your computer or encountering any technical issues.
Congratulations! You have successfully downloaded the selected photos from your iCloud library. Now, let’s explore an alternative method that allows you to download more than 1000 photos from iCloud using third-party software.
Step 4: Use third-party software to batch download iCloud photos
If you have a large number of photos in your iCloud library, downloading them one by one using the standard method can be time-consuming and impractical. Thankfully, there are third-party software options available that can streamline the process and allow you to batch download more than 1000 photos from iCloud. Here’s how:
- Choose a reliable software: Research and select a reputable third-party software that specializes in downloading iCloud photos in bulk. Some popular options include iCloud Control Panel for Windows, AnyTrans, and iMobie PhoneRescue.
- Download and install the software: Visit the official website of your chosen software and follow the provided instructions to download and install it on your computer.
- Launch the software: Open the downloaded software and ensure it is properly connected to your iCloud account. Follow any additional setup instructions or login prompts that may be required.
- Select the photos to download: Using the software’s interface, navigate to the photo section and select the photos you want to download. Depending on the software, you may be able to choose specific albums, dates, or tags to filter the selection.
- Choose a download location: Specify the location on your computer where you want the downloaded photos to be saved. Create a new folder if necessary.
- Start the bulk download: Initiate the download process within the software and wait for it to complete. The software will handle the downloading of all selected photos, allowing you to download more than 1000 photos from iCloud in one go.
By utilizing third-party software, you can save time and effort in downloading a large number of photos from iCloud. These software options often provide additional features such as automatic backups, photo management, and file organization, enhancing your overall experience with your iCloud photo library.
Keep in mind that the specific steps and features may vary depending on the software you choose. It’s essential to thoroughly read the software’s documentation or user guide to ensure you maximize its potential and download your photos in the most efficient manner.
With the completion of Step 4, you have learned how to use third-party software to batch download more than 1000 photos from iCloud. This alternative method provides a quicker and more streamlined approach, especially when dealing with a large number of photos. Now, let’s wrap up this guide with a recap of the key points discussed.
Conclusion
Downloading more than 1000 photos from iCloud can be a daunting task if done manually, but with the right approach, it becomes a manageable process. In this guide, we have walked you through the step-by-step process of downloading your iCloud photos to your computer, whether it be through the standard method or by utilizing third-party software.
By accessing your iCloud Photos on your computer, you gain the ability to easily select the photos you want to download. From there, you can initiate the download process, choosing a location on your computer to save the photos and patiently waiting for the download to complete.
If you have a large number of photos in your iCloud library, using third-party software can significantly speed up the process. These software options allow you to batch select and download more than 1000 photos at once, saving you valuable time and effort.
Remember to choose a reliable and reputable software that suits your needs and preferences. Read through the documentation provided by the software developers to ensure you are making the best use of its features and capabilities.
By following the steps outlined in this guide, you can efficiently download your iCloud photos and have offline access to your cherished memories. Whether you want to create backups, free up iCloud storage space, or simply have your photos readily available on your computer, this guide has provided you with the necessary instructions to accomplish your goal.
Now, it’s time for you to put this knowledge into action and start downloading your iCloud photos. Enjoy your newly downloaded photos and the convenience of having them at your fingertips!