Introduction
Welcome to the world of Salesforce, a powerful and popular Customer Relationship Management (CRM) platform used by businesses of all sizes. When working with Salesforce, one of the key features is the ability to create and run reports to gain valuable insights into your business data. These reports can be a goldmine of information, providing you with valuable metrics, trends, and analytics.
While viewing and analyzing reports within the Salesforce platform is useful, there are times when you may need to download these reports and work with them in other formats, such as Excel. Whether it’s for further analysis, sharing with colleagues, or creating visualizations, downloading a Salesforce report to Excel can be a game-changer.
In this guide, we will walk you through the step-by-step process of downloading a Salesforce report to Excel. We will cover everything you need to know, from logging into Salesforce to customizing the report format and finally exporting it to Excel.
By the end of this guide, you will be equipped with the knowledge and skills to effortlessly download your Salesforce reports, empowering you to dig deeper into your data and drive data-informed decisions for your business.
Step 1: Login to Salesforce
The first step in downloading a Salesforce report to Excel is logging into your Salesforce account. To do this, you will need your unique username and password provided by your Salesforce administrator. Follow these simple steps to log in:
- Open your preferred web browser and enter the Salesforce login URL.
- On the Salesforce login page, enter your username and password in the respective fields.
- Click on the “Log In” button to proceed.
Once you have successfully logged into Salesforce, you will be directed to the homepage or the personalized dashboard of your account. Here, you will have access to various features and functionalities offered by Salesforce.
It’s worth noting that if you are unable to log in or have forgotten your login credentials, you can click on the “Forgot Your Password?” link on the login page to initiate a password reset process. Alternatively, you can reach out to your Salesforce administrator for assistance.
Now that you have successfully logged into Salesforce, you are ready to move on to the next step: navigating to reports.
Step 2: Navigate to Reports
After logging into Salesforce, the next step in downloading a Salesforce report to Excel is to navigate to the reports section. The reports section is where you can access and manage all your reports within the Salesforce platform. Follow these steps to find the reports section:
- On the Salesforce homepage or dashboard, locate the navigation menu at the top of the screen.
- Hover over the “App Launcher” icon, which looks like a grid of dots, and click on it.
- In the App Launcher, you will find a list of Salesforce apps and features. Look for the “Reports” option and click on it. This will take you to the reports section.
Alternatively, if you have a customized Salesforce setup, the reports section may be accessible through a different pathway. In this case, consult with your Salesforce administrator or refer to your organization’s documentation for specific instructions.
Once you have reached the reports section, you will see a list of your saved reports along with options to create new reports and folders. Take a moment to familiarize yourself with the layout and organization of the reports section, as this will make it easier to find and run the desired report in the next steps.
Now that you have successfully navigated to the reports section, it’s time to move on to the next step: running the desired report.
Step 3: Run the Desired Report
Once you have accessed the Salesforce reports section, the next step in downloading a report to Excel is to run the desired report. The reports in Salesforce are pre-built or custom-created to capture specific data sets and metrics relevant to your business needs. Here’s how to run a report:
- Navigate to the reports section of Salesforce using the steps outlined in the previous section.
- In the reports section, you will see a list of your saved reports. Locate the report you want to download to Excel.
- If the report is already listed, simply click on the report’s name to open and view it.
- If the report is not listed, you may need to search for it using the search bar or navigate through report folders to locate it.
- Once you have found the desired report, click on it to open it.
When the report opens, you will see the data presented in a tabular format, along with various filtering and customization options. Take a moment to review the report’s content and ensure that it matches the data you need.
Depending on the report type and your Salesforce permissions, you may be able to modify the report by adding or removing columns, applying filters, and adjusting the report criteria. These customizations can help narrow down the data and provide more specific insights.
Keep in mind that Salesforce offers different types of reports, including tabular, summary, and matrix reports. Each type presents data in a different format, so make sure you are familiar with the report type and its specific features.
Now that you have successfully executed the desired report, it’s time to move on to the next step: customizing the report format.
Step 4: Customize the Report Format
After running the desired report in Salesforce, you have the option to customize the report format to meet your specific needs. This customization can include adjusting the layout, adding or removing columns, applying filters, and more. Follow these steps to customize the report format:
- With the report open in Salesforce, look for customization options located either at the top of the report or within the report toolbar.
- To add or remove columns from the report, find the “Columns” or “Fields” option and click on it.
- A pop-up or drop-down menu will appear, displaying a list of available fields. Select the fields you want to include in the report by checking or unchecking the corresponding checkboxes.
- To apply filters to the report, locate the “Filters” option and click on it.
- In the filter menu, you can define conditions based on specific field values, date ranges, or other criteria. Specify the desired filter conditions to narrow down the report data.
- Depending on the report type, you may have additional customization options such as sorting, grouping, and summarizing data. Explore these options as needed.
It’s important to remember that your customization options may vary depending on your Salesforce user permissions and the type of report you are working with. Some reports may have limited customization capabilities.
Take your time to adjust the report format according to your requirements. Experiment with different customization options to refine the report and present the data in a manner that best suits your needs.
Now that you have personalized the report format, it’s time to move on to the next step: exporting the report to Excel.
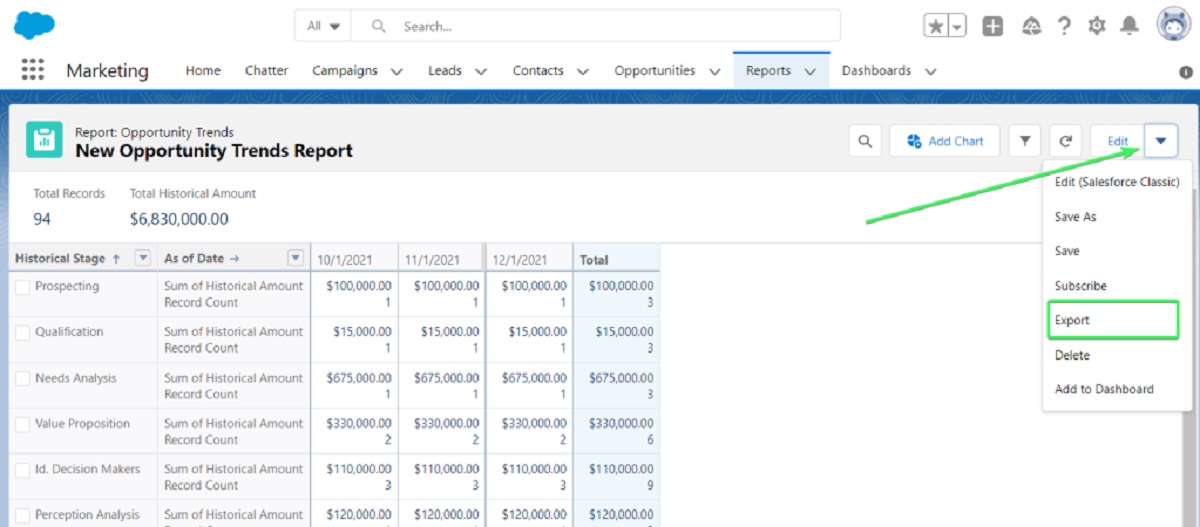
Step 5: Export the Report to Excel
Once you have customized the report format to your satisfaction, the next step is to export the report from Salesforce to Excel. Exporting the report allows you to save the data in a format that can be easily manipulated and analyzed offline. Follow these steps to export the report:
- In the report view, locate the toolbar or menu options at the top of the page.
- Look for the “Export” or “Download” option and click on it.
- A drop-down menu will appear with various export format options. Select “Excel” or “CSV” as the desired export format.
- Depending on your browser settings, a file download prompt may appear. Choose a location on your computer to save the exported file and click “Save.”
- Wait for the export process to complete. This may take a few moments, especially for large reports with extensive data.
- Once the export is complete, you will have a downloadable file in Excel or CSV format.
It’s worth noting that Salesforce allows you to export reports directly to other formats, such as PDF or PowerPoint, if needed. However, for the purpose of this guide, we are focusing on exporting to Excel.
By exporting the report to Excel, you gain the flexibility to manipulate and analyze the data in a familiar and powerful spreadsheet application. You can perform further calculations, create charts and graphs, apply additional filters, and collaborate with colleagues using Excel’s robust features.
Now that you have successfully exported the report to Excel, it’s time for the final step: saving the Excel file.
Step 6: Save the Excel File
After exporting the Salesforce report to Excel, the final step is to save the Excel file to a location of your choice. Saving the file ensures that you can access and work with the report data anytime in the future. Follow these steps to save the Excel file:
- Locate the downloaded Excel file on your computer. By default, the file will be saved in the designated download location specified by your browser.
- Click on the file to open it in Excel.
- In Excel, go to the “File” menu located at the top-left corner of the application window.
- Select the “Save As” option from the drop-down menu.
- A new window will appear, allowing you to specify the file name and choose the desired file location on your computer or a connected storage device.
- Enter a descriptive file name that reflects the content of the report and select the appropriate folder for storage.
- Click on the “Save” button to save the file.
It’s recommended to choose a file name that is easily recognizable and gives you a clear understanding of the report’s contents. This helps in organizing and finding the file later.
Once the file is saved, you can close Excel and access the report file anytime by navigating to the chosen file location on your computer.
Now that you have successfully saved the Excel file, you have a local copy of the Salesforce report ready for further analysis, sharing, or presentation.
Congratulations! You have completed the process of downloading a Salesforce report to Excel. By following these steps, you can harness the power of Salesforce’s reporting capabilities and seamlessly transfer the data to a format that’s convenient for your specific needs.
Conclusion
Downloading a Salesforce report to Excel provides you with the convenience and flexibility to further analyze, manipulate, and share your business data. By following the simple steps outlined in this guide, you can easily export your Salesforce reports to Excel and unlock a wealth of insights.
Starting with logging into Salesforce, you navigated to the reports section, ran the desired report, customized its format, and ultimately exported it to Excel. The ability to customize the report format allows you to focus on the most relevant data points and tailor the report to your specific requirements.
Exporting the report to Excel empowers you to harness the full potential of spreadsheet functionalities, from performing complex calculations to creating interactive visualizations. You can collaborate with colleagues, share the report with stakeholders, and gain deeper insights into your business performance.
Remember to save the Excel file to a location of your choice to ensure easy access in the future. The saved file becomes a valuable resource that you can refer back to or incorporate into presentations, reports, or other analytical processes.
With the knowledge and skills gained from this guide, you are now equipped to confidently download Salesforce reports to Excel and leverage the power of data to make informed business decisions.
So go ahead, dive into your Salesforce reports, export them to Excel, and unlock the full potential of your data!