Introduction
Welcome to this step-by-step guide on how to download music to your iPhone from iTunes. Listening to music on your iPhone has never been easier, thanks to the convenience of iTunes. Whether you want to sync your favorite albums, create customized playlists, or discover new music, iTunes provides a vast library of songs for you to choose from. In this guide, we will walk you through the simple process of downloading music from iTunes to your iPhone.
Before we begin, it is important to note that iTunes is a free application developed by Apple and can be installed on both Windows and Mac computers. Additionally, you will need a USB cable to connect your iPhone to your computer. If you meet these requirements, let’s dive into the step-by-step instructions and start enjoying your favorite music on your iPhone!
Throughout this guide, we will outline each step of the download process, ensuring that you have a seamless experience. From launching iTunes on your computer to accessing the downloaded music on your iPhone, we’ve got you covered. So without further ado, let’s get started with Step 1: Launch iTunes on your computer.
Step 1: Launch iTunes on your computer
The first step in downloading music to your iPhone from iTunes is to launch the iTunes application on your computer. iTunes can be downloaded and installed from the Apple website for both Windows and Mac operating systems. Once you have installed iTunes, follow these simple steps to get started:
- Open the iTunes application by locating it in your computer’s applications folder or by using the search function.
- If this is your first time launching iTunes, you will be prompted to sign in with your Apple ID. Enter your credentials and click “Sign In.”
- If you don’t have an Apple ID, you can create one by clicking on “Create Apple ID” and following the on-screen instructions.
- Once you are signed in, you will be greeted with the iTunes interface, where you will find a variety of options for managing your music, movies, and more.
Now that you have successfully launched iTunes on your computer, you are ready to move on to the next step: connecting your iPhone.
It’s important to note that iTunes provides a user-friendly interface that allows you to easily navigate through your music library and download songs to your iPhone. The application also offers a range of features such as creating playlists, managing your music library, and even accessing the iTunes Store to discover new music.
With iTunes up and running, you are well on your way to enjoying your favorite tunes on your iPhone. Let’s move on to the next step and learn how to connect your iPhone to your computer.
Step 2: Connect your iPhone to the computer
In order to download music from iTunes to your iPhone, it is essential to connect your iPhone to your computer using a USB cable. Follow these simple steps to establish a connection:
- Locate the USB cable that came with your iPhone. This cable has a Lightning connector on one end and a USB connector on the other.
- Plug the USB connector into an available USB port on your computer.
- Take the other end of the cable with the Lightning connector and insert it into the charging port on your iPhone.
- Once the cable is securely connected to both your iPhone and computer, you will notice that your iPhone’s screen will light up and display the charging symbol.
At this point, your iPhone is successfully connected to your computer. The next step is to select your iPhone in iTunes and proceed with downloading the desired music.
It is worth mentioning that connecting your iPhone to the computer also enables you to perform other tasks such as transferring files, making backups, and managing your device through iTunes. Establishing this connection is an essential step in the download process, ensuring a seamless transfer of music to your iPhone.
Now that your iPhone is connected, let’s move on to the next step: selecting your iPhone in iTunes and preparing for the music download.
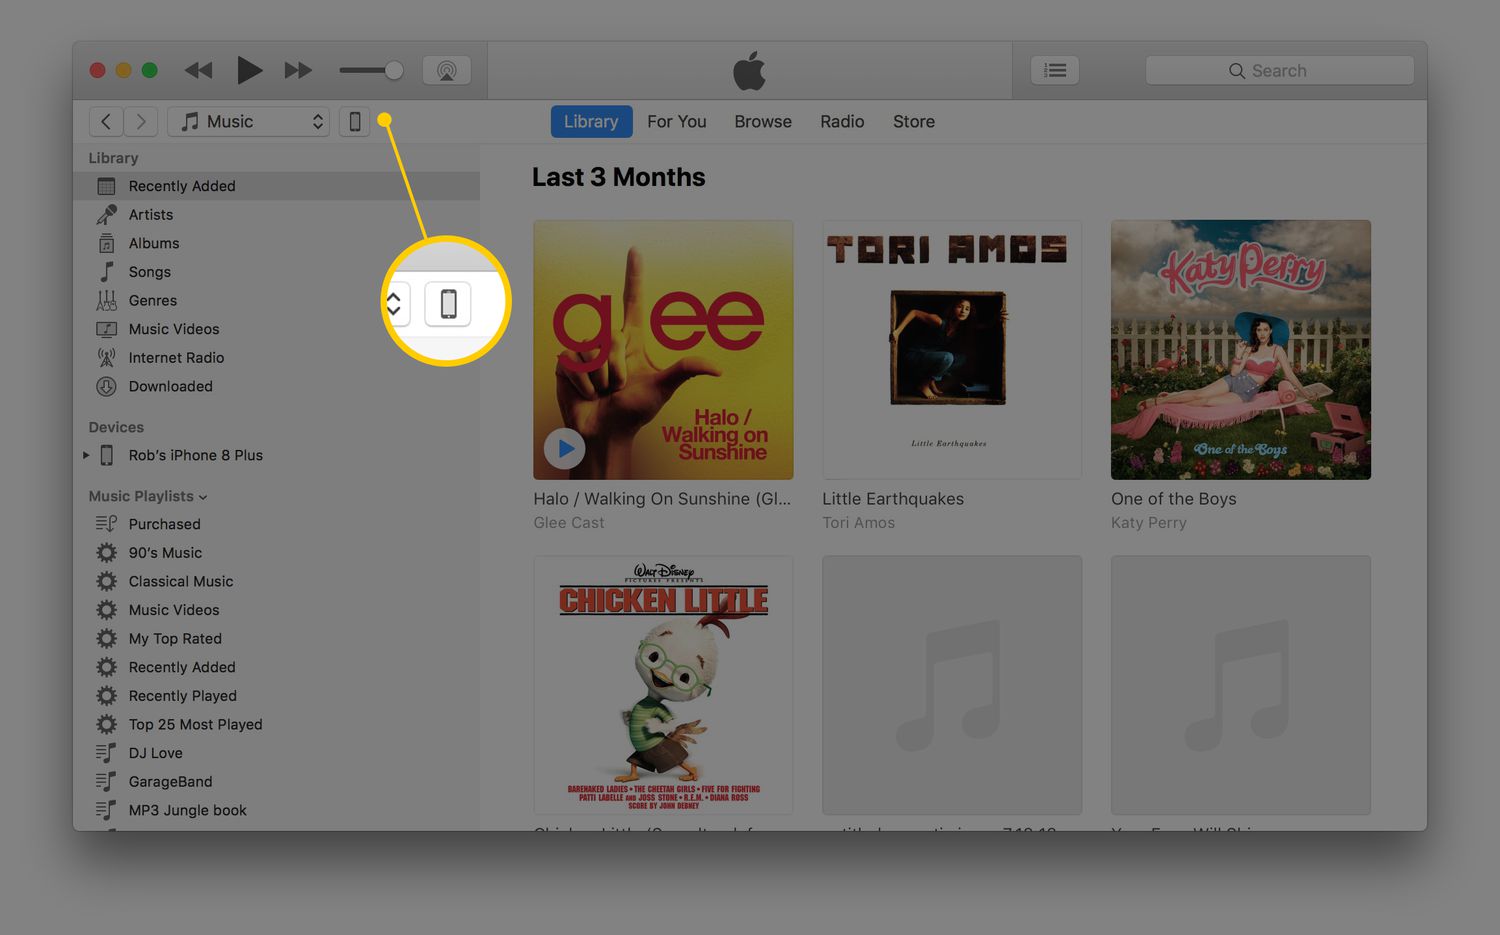
Step 3: Select your iPhone in iTunes
Now that your iPhone is connected to your computer, it’s time to select your iPhone in iTunes so you can manage its content and download music. Follow these simple steps to select your iPhone:
- In the iTunes application on your computer, you will see a row of icons at the top left corner. Click on the “Devices” icon. This will display a dropdown menu.
- From the dropdown menu, select your iPhone. You will now be directed to your iPhone’s dedicated page within iTunes.
- On the left-hand side of the iTunes interface, you will find a menu that provides various options for managing your iPhone. These options include “Music,” “Movies,” “Podcasts,” and more. Click on “Music” to access the music management settings for your iPhone.
By selecting your iPhone in iTunes, you are now ready to manage and sync your music library. This step is crucial in order to download music to your iPhone and have it available for playback.
It’s important to note that selecting your iPhone in iTunes allows you to customize and control what music is synced to your device. You can choose to sync your entire music library, specific playlists, or individual songs. This flexibility gives you the freedom to tailor your music collection to your preferences.
Now that you have successfully selected your iPhone in iTunes, let’s move on to the exciting part: choosing the music you want to download to your device.
Step 4: Choose the music to download
With your iPhone selected in iTunes, it’s time to choose the music that you want to download and have available on your device. Follow these steps to select the music:
- Within the “Music” section of your iPhone’s page in iTunes, you will see a list of options and settings related to managing your music. To start choosing the music you want to download, focus on the options under the “Sync Music” checkbox.
- If you want to sync your entire music library to your iPhone, simply check the “Sync Music” box. This will download all your music onto your device.
- If you prefer to be more selective, you can choose to sync specific playlists, albums, artists, or genres by checking the relevant boxes just below the “Sync Music” option.
- If you want to manually manage your music and have more control over the content on your iPhone, you can uncheck the “Sync Music” box and manually drag and drop songs or playlists onto your device from the iTunes library.
By choosing the music you want to download and sync to your iPhone, you have the power to curate a personalized music collection that suits your taste. This flexibility allows you to make the most of your iPhone’s storage capacity and ensures that you have your favorite tracks ready to enjoy anytime, anywhere.
Keep in mind that you can always update and change the music selection on your iPhone by revisiting the music management settings in iTunes. This gives you the flexibility to update your music library as your preferences evolve and as new songs catch your attention.
Now that you understand how to choose the music you want to download, let’s move on to the next step: syncing the music to your iPhone and making it readily available for playback.
Step 5: Sync the music to your iPhone
Once you have selected the music you want to download to your iPhone in iTunes, it’s time to sync the music and transfer it to your device. Follow these steps to sync the music:
- Ensure that your iPhone is still selected in iTunes and that you are on the “Music” section of your iPhone’s page.
- If you have chosen to sync your entire music library or specific playlists, albums, artists, or genres, simply click on the “Apply” or “Sync” button at the bottom right corner of the iTunes interface. This will initiate the synchronization process and begin transferring the selected music to your iPhone.
- If you have opted for manual management, you can now proceed to manually drag and drop your desired songs or playlists onto your iPhone from the iTunes library. Once you have finished selecting the music, click on the “Apply” or “Sync” button to apply the changes and sync the music to your device.
- Be patient as the synchronization process may take a few moments, depending on the amount of music and the speed of your computer. A progress bar will appear in iTunes, indicating the status of the sync.
- Once the sync is complete, you will receive a confirmation message, and you can disconnect your iPhone from the computer.
By syncing the music to your iPhone, you are now ready to enjoy your favorite songs wherever you go. The music will be available in the Music app on your iPhone, allowing you to listen to it at any time, whether you are commuting, working out, or relaxing.
Keep in mind that you can always go back and modify the music selection in iTunes, allowing you to update your music library and sync new songs or playlists to your iPhone. This flexibility ensures that your music collection stays fresh and in line with your evolving musical preferences.
With the music successfully synced to your iPhone, let’s move on to the final step: accessing the downloaded music on your device and enjoying the tunes!
Step 6: Access the downloaded music on your iPhone
Now that you have successfully synced the music to your iPhone, it’s time to access and enjoy the downloaded tracks. Follow these steps to access the music on your device:
- Unlock your iPhone by entering your passcode or using Face ID or Touch ID.
- Locate the Music app on your iPhone’s home screen. The Music app icon is a colorful musical note on a white background.
- Tap on the Music app to open it. This will take you to the main music interface on your iPhone.
- In the Music app, you will find different tabs such as “Library,” “For You,” “Browse,” and more. Tap on the “Library” tab to access your music library.
- Within the “Library” tab, you will see a range of options and categories, including playlists, artists, albums, songs, and genres. Tap on the desired category to locate and access your downloaded music.
- Once you have selected the desired category, you will see a list of the corresponding music. Simply tap on a song or album to start playing the music on your iPhone.
- You can further customize your music experience by creating playlists, adding songs to your favorites, or exploring recommended music based on your preferences.
Congratulations! You have successfully accessed the downloaded music on your iPhone. Now, you can enjoy your favorite songs, create personalized playlists, and have a limitless musical experience wherever you go.
Keep in mind that the Music app on your iPhone offers various features and settings to enhance your music listening experience. Explore the different tabs and options to discover new artists, create curated playlists, and access your recently played music.
With the downloaded music readily available on your iPhone, you are now ready to immerse yourself in the power of music whenever you desire.
Conclusion
Congratulations! You have successfully learned how to download music to your iPhone from iTunes. With the simple step-by-step process outlined in this guide, you can now enjoy your favorite tunes on your device and have them at your fingertips wherever you go.
By following the steps, you have learned how to launch iTunes on your computer, connect your iPhone, select your device in iTunes, choose the music you want to download, sync the music to your iPhone, and access the downloaded music on your device.
iTunes provides a user-friendly interface that allows you to easily manage your music library, create personalized playlists, and discover new music. Whether you prefer syncing your entire music library or selecting specific songs, the flexibility of iTunes ensures that you can tailor your music collection to your preferences.
Remember that you can always update and modify your music selection in iTunes, giving you the freedom to keep your music library fresh and up to date. As your musical tastes evolve, you can easily sync new songs and playlists to your iPhone.
Now that you have the knowledge and the ability to download music to your iPhone, it’s time to dive into the world of endless melodies, set the mood with your favorite tracks, and enjoy the power of music on your device.
So, go ahead and start exploring the vast music library available in iTunes, sync your preferred songs, and unleash the musical journey on your iPhone!