Why Download Music for a PowerPoint Presentation?
Adding music to a PowerPoint presentation can greatly enhance its effectiveness and impact. It has the power to engage the audience, create a mood, and make the information more memorable. Music can help set the tone of the presentation and evoke emotions that align with the message you are trying to convey. Whether you are creating a professional business slideshow, an educational presentation, or a personal slideshow for an event, incorporating music can take it to the next level.
Music has a universal language that can connect with people on an emotional level. It can create a sense of anticipation, excitement, or calmness depending on the genre and tempo. For example, using upbeat and energizing music can help to grab the attention of the audience and create a positive atmosphere. On the other hand, using soft and soothing music can help to create a peaceful and reflective ambiance.
In addition to enhancing the overall experience, music can also aid in conveying the message more effectively. By carefully selecting the right music, you can reinforce the main points, emphasize key moments, and create seamless transitions between slides. Music can also provide a sense of rhythm and pace to the presentation, making it more engaging and keeping the audience’s attention throughout.
Moreover, music can help to fill any gaps of silence, preventing awkward moments during the presentation. It can also act as a background noise filter, masking any external distractions and ensuring that the audience remains focused on the content. The right music choice can make the presentation more enjoyable and captivating, leaving a lasting impression on the audience.
However, it is crucial to use music that is appropriate for the content and the audience. The selection should align with the topic, theme, and purpose of the presentation. It is also important to consider the preferences and tastes of the audience to ensure that the music appeals to them. By downloading music specifically for your PowerPoint presentation, you have full control over the audio elements and can tailor it to perfectly complement your slides and deliver your message effectively.
Step 1: Choose the Right Music
Choosing the right music for your PowerPoint presentation is essential to create the desired atmosphere and enhance the overall impact. Here are some tips to help you select the perfect music:
1. Understand the Purpose: Consider the purpose of your presentation and the message you want to convey. Is it a professional business presentation or a personal slideshow? Are you trying to inspire, educate, or entertain? Understanding the purpose will guide your music selection process.
2. Suit the Tone: Determine the tone or mood you want to establish during the presentation. Do you want it to be uplifting and energetic, or calm and soothing? Match the music style, tempo, and genre to align with the desired tone.
3. Know Your Audience: Consider the preferences and taste of your audience. Think about their age group, cultural background, and interests. By choosing music that resonates with them, you can better engage and connect with your audience.
4. Consider the Length: Pay attention to the duration of your presentation. Ensure that the selected music fits well within the allotted time without overshadowing the content or feeling rushed.
5. Avoid Distracting Elements: As tempting as it may be to choose catchy or popular songs, be mindful of lyrics that may distract from your message. Instrumental tracks or background music without vocals are often a safe choice.
6. Match the Style: Harmonize the music with the overall style and design of your presentation. If you have a professional and minimalistic theme, opt for a more elegant and subtle soundtrack. If your slides are vibrant and dynamic, choose music that sets a lively and energetic mood.
7. Test it Out: Before finalizing your music selection, test it with your presentation. Play the music while going through your slides to ensure that it enhances the content and doesn’t overpower the narration or distract the audience.
Remember: The right music should enhance your presentation, not overshadow or detract from it. The goal is to find a balance that creates a seamless fusion between your message and the audio backdrop, resulting in a captivating and impactful presentation.
Step 2: Find a Reliable Music Download Website
Once you have a clear idea of the type of music you want to incorporate into your PowerPoint presentation, the next step is to find a reliable music download website. Here are some guidelines to help you choose a trustworthy source for downloading music:
1. Research and Review: Start by conducting thorough research and reading reviews of different music download websites. Look for reputable platforms that have a good track record and positive user feedback. This will ensure that you can rely on the website for high-quality music files.
2. Check for Legal Compliance: It is crucial to choose a website that operates legally and respects copyright laws. Verify that the music download website obtains licenses for the songs they offer, ensuring that you are not infringing on any artists’ rights by using their music in your presentation.
3. User-Friendly Interface: Look for a website that has a user-friendly interface and is easy to navigate. This will save you time and make the downloading process more efficient. An intuitive search function and well-organized categories can help you find the music you need quickly.
4. Extensive Music Library: Opt for a music download website that offers a wide range of songs and genres. Having access to a diverse music library will increase the likelihood of finding the perfect music that fits your presentation theme and style.
5. High-Quality Audio Files: The quality of the music files is important to ensure a smooth and immersive listening experience for your audience. Look for websites that provide high-quality audio files in formats that are compatible with PowerPoint, such as MP3 or WAV.
6. Preview Options: A reliable music download website should offer preview options for the songs. This allows you to listen to a sample of the music before downloading it, ensuring it matches your requirements and meets your expectations.
7. Licensing Information: Verify that the website provides clear licensing information for the music they offer. This information should specify the terms of usage, whether it is for personal, non-commercial, or commercial use. Make sure the licensing terms align with your intended use of the music in your presentation.
8. Pricing and Download Options: Consider the pricing and download options provided by the website. Some websites offer free music downloads for personal use, while others may require a subscription or payment for commercial use. Choose an option that best suits your needs and budget.
By selecting a reliable music download website, you can access a vast music library and ensure that the music you choose for your PowerPoint presentation is legal, high-quality, and enhances the overall impact of your slides.
Step 3: Search for the Desired Song
After finding a reliable music download website, the next step in downloading music for your PowerPoint presentation is to search for the desired song. Here’s how you can efficiently find the perfect track:
1. Utilize the Search Bar: Most music download websites have a search bar that allows you to enter keywords related to the song or artist you are looking for. Type in the title of the song, the artist’s name, or relevant keywords to narrow down your search.
2. Refine Your Search: If you receive a large number of results, you can refine your search further by adding additional keywords or specifying the genre, mood, or tempo. This will help you find music that aligns more closely with your specific requirements and the theme of your presentation.
3. Browse Categories and Genres: Many music download websites categorize their songs into different genres and categories. Take advantage of these categories to browse through relevant sections and discover new songs that you may not have considered initially.
4. Pay Attention to Song Duration: When searching for music, consider the duration of the song. Ensure that it matches the length of your presentation or the specific section you want to add music to. Choosing a song that is too short or too long may disrupt the flow of your presentation.
5. Listen to Song Previews: Most reputable music download websites offer song previews or samples that you can listen to before downloading. Take advantage of these previews to get a sense of the song’s style, instrumentation, and suitability for your presentation.
6. Consider the Lyrics: If the song includes lyrics, pay attention to the content and message conveyed in the lyrics. Ensure that they align with the theme and tone of your presentation. Avoid choosing songs with lyrics that might distract or contradict the message you are delivering.
7. Read User Reviews: Some music download websites provide user reviews or ratings for songs. Reading these reviews can give you insight into the quality, popularity, and compatibility of the song with your presentation. Consider the feedback from other users to make a confident decision.
8. Create a Shortlist: As you go through your search, create a shortlist of potential songs that meet your criteria. This will help you compare and evaluate your options before making a final decision.
Remember: Take your time to search for the desired song that best complements your presentation’s theme, style, and purpose. By considering factors like genre, duration, lyrics, and user reviews, you can choose a song that enhances your PowerPoint presentation and creates a memorable and impactful experience for your audience.
Step 4: Check the Licensing and Usage Rights
Before downloading music for your PowerPoint presentation, it is crucial to check the licensing and usage rights associated with the song. This step ensures that you are using the music legally and abiding by copyright laws. Here’s what you need to do:
1. Read the Terms of Use: Visit the music download website and locate the terms of use or licensing information. Read through this section carefully to understand the permissions and restrictions regarding the usage of the music.
2. Determine the License Type: Pay attention to the type of license associated with the song. Some music may be available under a Creative Commons license, which specifies the terms of use for non-commercial projects. Other songs may require a commercial license for use in presentations that involve financial transactions or business-related activities.
3. Identify the Usage Limitations: Take note of any limitations or restrictions mentioned in the licensing terms. Some common restrictions include limiting the usage to a specific number of presentations, prohibiting the use of music in advertisements, or requiring attribution to the artist or source.
4. Consider Royalty-Free Music: If you are unsure about licensing and usage rights, consider opting for royalty-free music. Royalty-free music is pre-licensed for specific uses, and after a one-time purchase or fee, you can use the music within certain parameters without additional costs or legal implications.
5. Verify Commercial Usage: If you intend to use the presentation in a commercial or professional setting, ensure that the music you choose allows for commercial use. Some music download websites provide filters or options specifically for commercial use to make it easier to find suitable music for your needs.
6. Understand Public Performance Rights: In some cases, if you are presenting the slideshow publicly, such as in a conference or event, you may need to secure public performance rights for the music. Check with the music download website or consult a legal professional to understand the specific requirements in your jurisdiction.
7. Keep Documentation: Once you have determined that the licensing and usage rights align with your intended use, keep a copy of the licensing agreement or confirmation of your rights. This documentation serves as proof that you have obtained the necessary permissions to use the music legally if any questions or concerns arise in the future.
Remember: Understanding and respecting licensing and usage rights is essential to ensure that you are using music legally and ethically. By checking the licensing terms and adhering to the restrictions, you can confidently incorporate music into your PowerPoint presentation without the risk of copyright infringement or legal complications.
Step 5: Download the Music File
Once you have identified the perfect music for your PowerPoint presentation and have confirmed the licensing and usage rights, the next step is to download the music file. Here’s how you can download and save the music onto your device:
1. Click on the Download Button: Locate the download button or link next to the selected music file. Depending on the website, this button may be labeled as “Download,” “Save,” or represented by an arrow pointing downwards.
2. Choose the File Format: Some music download websites offer different file formats for downloading the music. Select the file format that is compatible with PowerPoint, such as MP3 or WAV. If you are unsure, check the system requirements for audio files in PowerPoint.
3. Select the Destination Folder: When prompted, choose the folder or directory on your device where you want to save the downloaded music file. It is recommended to save it in a location that is easily accessible and organized for future reference.
4. Be Mindful of Copyright Metadata: Some music files contain copyright metadata that may include information about the licensing rights and usage restrictions. Keep this information intact when you download the file, as it can serve as a reference and proof of licensing for your presentation.
5. Scan for Viruses: To ensure the safety of your device, it is advisable to run an antivirus scan on the downloaded music file before using it in your PowerPoint presentation. This precautionary measure helps protect against any potential malware or viruses.
6. Rename the File (Optional): If desired, you can consider renaming the music file to something that is more descriptive or memorable. This can help you easily locate and identify the correct music file when you come to insert it into your presentation.
7. Backup and Store: Once the music file is downloaded, it is a good practice to create a backup copy and store it in a secure location. This ensures that you have a duplicate in case of any accidental deletion or loss of data.
Remember: Make sure to follow the terms and conditions specified by the music download website and the licensing agreement. Avoid sharing or distributing the downloaded music files without proper permission, as this can violate copyright laws. By downloading the music file legally and responsibly, you can proceed to the next step of inserting it into your PowerPoint presentation with confidence.
Step 6: Insert the Music into Your PowerPoint Presentation
With the music file downloaded and ready, it’s time to insert it into your PowerPoint presentation. Here’s how you can incorporate the music seamlessly:
1. Open Your Presentation: Launch PowerPoint and open the presentation you want to add the music to. Go to the slide where you want the music to start playing or create a new slide specifically for the music.
2. Navigate to the Insert Tab: On the PowerPoint ribbon, click on the “Insert” tab. This tab contains various options for adding media and objects to your presentation.
3. Click on Audio: In the “Media” group on the right side of the ribbon, click on the “Audio” button. This will display a drop-down menu with different audio options.
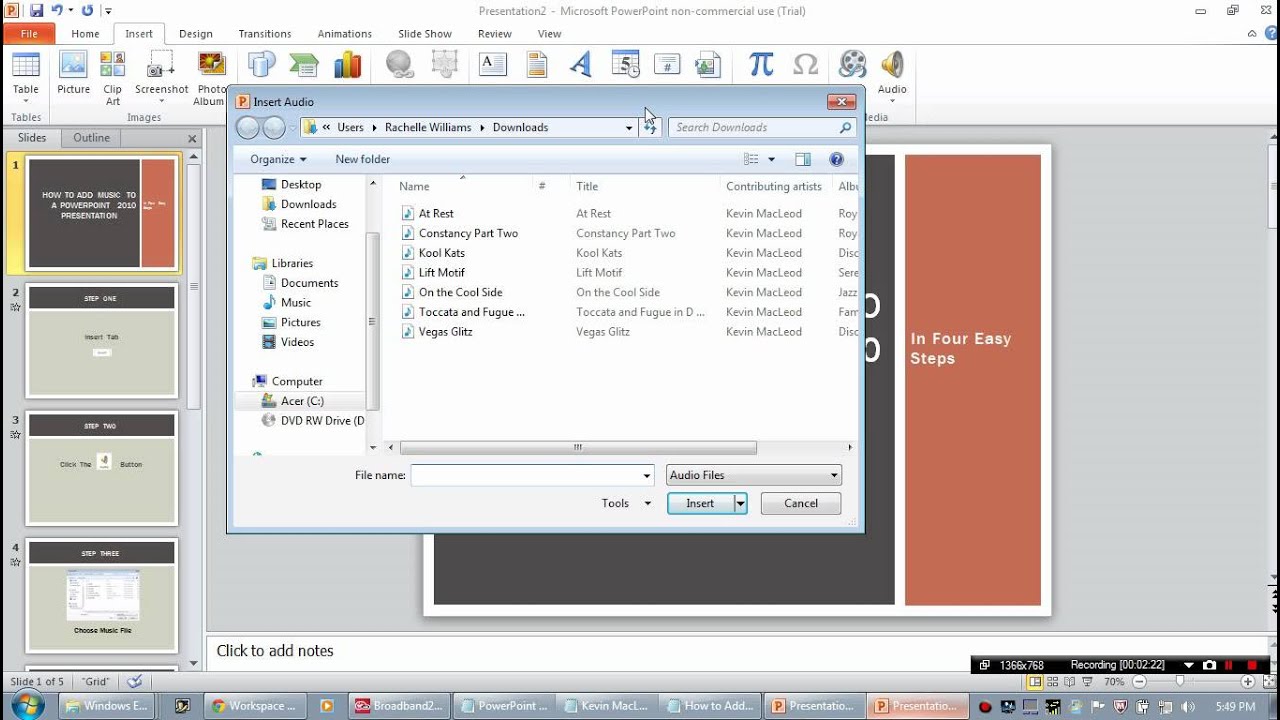
4. Insert Audio from File: From the drop-down menu, select “Audio on My PC” or “Audio from File,” depending on the version of PowerPoint you are using. This will open a file explorer window to locate and select the downloaded music file.
5. Adjust the Playback Options: Once the music file is inserted, a small speaker icon will appear on the slide. Click on it to display the “Audio Tools” tab on the ribbon. Here, you can explore various playback options, like selecting whether the music starts automatically or on click, adjusting the volume, and setting loop playback if needed.
6. Customize the Music Playback: If you only want the music to play during specific slides, select the audio icon and navigate to the “Audio Tools” tab. In the “Audio Options” group, click on “Playback” and choose “Play Across Slides” or “Play on This Slide” based on your preference.
7. Fine-Tune the Timing: To control when the music starts playing, select the audio icon and again go to the “Audio Tools” tab. In the “Audio Options” group, click on “Start” and choose from the available options like “Automatically” or “On Click.” You can also set a specific time duration for each slide if required.
8. Preview and Adjust: Play the presentation from the beginning or the specific slide with the music to preview the playback. Make any necessary adjustments to the volume, timing, or other settings to ensure that the music harmonizes well with your presentation.
Remember: The music should complement and enhance your presentation, rather than overpowering or distracting from the content. Use the playback options to fine-tune the audio settings until you achieve the desired effect. By inserting the music file correctly and adjusting the playback settings, you can create an engaging and immersive experience for your audience.
Step 7: Adjust the Music Settings
After inserting the music into your PowerPoint presentation, it’s important to adjust the music settings to ensure that it blends seamlessly with your content and enhances the overall experience. Here’s how you can fine-tune the music settings:
1. Volume Control: Adjust the volume of the music to strike the right balance with your narration or other audio elements in your presentation. You can modify the volume by selecting the audio icon on the slide and navigating to the “Audio Tools” tab where you can adjust the volume slider.
2. Fade In and Out: If you want to create a smoother transition between your slides and the music, consider applying a fade in and fade out effect to the music. This gradual increase and decrease in volume can help in eliminating sudden audio transitions.
3. Loop Playback: Decide whether you want the music to play continuously or stop after a particular slide. To create a background ambiance, you can set the music to loop throughout the entire presentation by selecting the audio icon, navigating to the “Audio Tools” tab, and enabling the loop playback option.
4. Sync with Visuals: Coordinate the timing of the music with specific visual elements on your slides. Adjust the duration of each slide to match the tempo and progression of the music. This synchronization can enhance the impact of your presentation and create a more cohesive experience for the audience.
5. Crossfade Between Slides: If your presentation includes multiple slides with music transitions, consider using a crossfade effect between each slide. This blending technique helps in smoothening the transition between different music tracks or sections.
6. Silence Unused Sections: If there are sections in your presentation where you do not want the music to play, such as during a video or a specific slide, silence those sections. This can be done by adjusting the timing and triggers of the audio playback to align with the content flow of your presentation.
7. Test the Settings: Play through your presentation again to validate the adjusted music settings. Ensure that the volume levels are consistent, the transitions are seamless, and the music enhances the intended mood and message of each slide.
Remember: The goal of adjusting the music settings is to create a harmonious and immersive experience for your audience. By fine-tuning the volume, applying fade effects, synchronizing with visuals, and testing the settings, you can ensure that the music enhances your presentation and leaves a lasting impact on your audience.
Step 8: Test the Presentation with the Music
Before delivering your PowerPoint presentation to an audience, it is essential to thoroughly test the presentation with the incorporated music. Testing ensures that everything works smoothly and that the music enhances the overall impact. Here’s how you can conduct a comprehensive test:
1. Verify Compatibility: Make sure that the music plays correctly in the version of PowerPoint you are using, including any special effects, transitions, or animations that are synchronized with the music. Test the presentation on different devices to ensure compatibility.
2. Check Playback on Different Operating Systems: If your presentation will be viewed on various operating systems, such as Windows, macOS, or Linux, test the playback on each system to ensure that the music functions as intended across different platforms.
3. Test Different Playback Scenarios: Try different scenarios to ensure the music starts and stops when intended. Test both manual (clicking or pressing a key) and automatic (timed) playback options to make sure the music aligns with the flow of your presentation.
4. Evaluate Sound Quality: Pay attention to the sound quality during the test. Confirm that the volume level is appropriate, the music is clear and audible, and there are no distortions or other audio issues. Adjust the volume or settings if necessary.
5. Rehearse Timing: Rehearse delivering your presentation with the music to ensure that you are comfortable with the timing and transitions. Practice operating the slides and audio cues smoothly to create a cohesive and engaging experience for the audience.
6. Gather Feedback: Share your presentation with trusted individuals, such as colleagues or friends, and request their feedback on the music integration. Ask for their opinion on whether the music enhances the message and if there are any areas for improvement.
7. Make Adjustments if Necessary: Based on the feedback and your own observations, make any necessary adjustments to the music settings, timing, or sections where the music plays. Iteratively refine your presentation until you are satisfied with the overall impact.
8. Final Test Run: Conduct a final test run of your presentation, ensuring that all the modifications and adjustments have been implemented successfully. Review the entire presentation, paying attention to the smoothness of transitions and the cohesiveness of the music with the visual content.
Remember: Testing your presentation with the music is a crucial step to ensure a flawless delivery. By verifying compatibility, evaluating sound quality, rehearsing timing, collecting feedback, and making necessary adjustments, you can confidently present your PowerPoint with seamless music integration.
Conclusion
Adding music to your PowerPoint presentation can elevate its impact and engage your audience on a deeper level. By following these steps, you can successfully download and incorporate the right music into your presentation:
Start by choosing the right music that aligns with the purpose, tone, and preferences of your audience. Then, find a reliable music download website that offers a diverse music library and respects licensing and usage rights. Search for the desired song, considering factors like genre, duration, and lyrics. Verify the licensing and usage rights to ensure that you are using the music legally and responsibly.
Once you have confirmed the legalities, download the music file and save it onto your device. Insert the music into your PowerPoint presentation and adjust the music settings to achieve the desired volume, timing, and synchronization with your visuals. Test the presentation thoroughly, checking for compatibility, sound quality, and smooth transitions.
Remember that the purpose of adding music is to enhance your presentation, not overpower it. The music should complement your message, create an appropriate mood, and engage your audience. With careful consideration and testing, you can seamlessly integrate music into your PowerPoint presentation, creating a memorable and impactful experience.
So, go ahead and download the perfect music for your next presentation, and let it elevate your message and captivate your audience!


