Introduction
Welcome to this tutorial on how to download music for free and add it to your iMovie projects! Music plays a vital role in enhancing the overall impact of your videos, adding emotion, depth, and ambiance. However, finding high-quality music that fits your project’s theme without violating copyright laws can be a challenge.
In this guide, we’ll show you step-by-step how to navigate copyright restrictions and discover royalty-free music that you can legally use in your iMovie projects. We’ll explore different sources for free music and explain the process of downloading and importing music into iMovie.
Before we dive into the steps, it’s important to have a basic understanding of copyright laws and licensing. Copyright protects the rights of the original creators, granting them exclusive control over the use and distribution of their work. Using copyrighted music without proper authorization can result in legal consequences, including the removal of your content or even facing financial penalties.
To avoid any legal issues, it’s essential to make sure you’re using music that is either in the public domain or has been licensed for use. There are several websites and platforms that offer royalty-free music, which means you can use it in your projects without worrying about copyright violations.
Now that we’ve covered the important legal aspects, let’s move on to step one, where we’ll delve deeper into copyright laws and licensing.
Step 1: Understanding Copyright Laws and Licensing
Before you start downloading music for your iMovie projects, it’s crucial to have a clear understanding of copyright laws and licensing. Copyright protects the original creators’ rights and gives them sole ownership over their work, including music compositions and recordings.
Using copyrighted music without proper authorization can lead to legal consequences, such as content takedowns, copyright strikes, or even being sued for damages. Therefore, it’s important to know your rights and the restrictions surrounding the use of copyrighted material.
There are specific instances where you can use copyrighted music without infringing on the creator’s rights. One common exception is fair use, which allows you to use portions of copyrighted music for purposes such as criticism, commentary, or educational use. However, fair use is a legal doctrine that is subject to interpretation, so it’s wise to consult with legal professionals if you’re unsure whether your use falls under fair use guidelines.
To avoid any potential legal issues, it’s best to search for music that is specifically labeled as “royalty-free” or “copyright-free.” Royalty-free music refers to tracks that you can use without paying ongoing fees for each use. However, it’s important to note that even royalty-free music may have certain conditions for use, such as attribution requirements or limitations on commercial use.
Another option is to use music that is released under a Creative Commons (CC) license. CC licenses allow creators to specify the ways in which others can use their work. Some CC licenses may require attribution, while others may restrict commercial use or modifications. It’s important to read and understand the specific terms of each CC license before using the music in your iMovie project.
In addition to royalty-free music and Creative Commons licenses, there are also websites that offer music in the public domain. Public domain music is not protected by copyright and can be used freely without any restrictions. However, it’s essential to verify the status of the music and ensure that it has entered the public domain before using it in your iMovie project.
Now that you have a basic understanding of copyright laws and licensing, you’re ready to move on to step two, where we’ll explore different sources for finding royalty-free music for your iMovie projects.
Step 2: Finding Royalty-Free Music for iMovie
Now that you understand the importance of using royalty-free music, it’s time to explore different sources where you can find suitable tracks for your iMovie projects. There are numerous websites and platforms that offer a wide range of royalty-free music options to choose from.
One popular option is to use royalty-free music libraries. These platforms provide a vast collection of music tracks that are specifically created and licensed for use in various multimedia projects. Some popular royalty-free music libraries include Epidemic Sound, Artlist, and PremiumBeat. These libraries offer a wide variety of genres and styles, allowing you to find the perfect music to complement your iMovie project.
Another option is to use creative commons music repositories. Websites like YouTube Audio Library, SoundCloud, and Free Music Archive offer a wide selection of music tracks that are available under Creative Commons licenses. These platforms make it easy to filter and search for music that suits your project’s needs, and most tracks are free to download and use.
If you’re on a tight budget and looking for free royalty-free music options, there are also websites that offer music specifically for non-commercial use. Some examples include Bensound, Incompetech, and MusOpen. Although these sites may have fewer options compared to paid platforms, they can still be a valuable resource for finding free music that can be used in your iMovie projects.
Another avenue to explore is the YouTube Studio’s Audio Library. If you plan to upload your iMovie project to YouTube, you can find a variety of royalty-free music tracks in the YouTube Audio Library. These tracks are free to use, and you can even filter them based on genre, mood, and attribution requirements.
Lastly, consider reaching out to local musicians or independent artists who may be willing to provide their music for your iMovie projects. Supporting local talent can be a great way to find unique and original music while also building connections within your community.
Now that you know where to find royalty-free music, let’s move on to step three, where we’ll guide you through the process of downloading royalty-free music from free sources.
Step 3: Downloading Royalty-Free Music from Free Sources
Once you’ve identified the free sources where you can find royalty-free music for your iMovie projects, it’s time to learn how to download these tracks and prepare them for use in iMovie. Here’s a step-by-step guide:
- Visit the website or platform where you found the desired royalty-free music track.
- Browse or search for the specific track you want to download.
- Make sure to read and understand the licensing terms for the music track. Look for any requirements, such as giving attribution or providing a link back to the original source.
- Once you’ve selected the track you want to download, look for the download button or link.
- Click on the download button or link to start the downloading process.
- Choose a location on your computer where you want to save the downloaded music track. It’s a good idea to create a dedicated folder for your iMovie music to keep everything organized.
- Wait for the download to complete. The time it takes will depend on the file size and your internet connection speed.
- Once the music track has finished downloading, double-check the file format. iMovie supports various audio file formats, including MP3, WAV, and AIFF. If the downloaded track is in a different format, you may need to convert it using audio conversion software.
- Keep a record of the track’s details, including the artist, title, and any licensing or attribution requirements. This will come in handy later when you add the music to your iMovie project.
Remember to respect the licensing terms and follow any specified requirements for using the royalty-free music. Giving proper attribution is important to acknowledge the work of the original artist and ensure you’re using the music within the permitted usage guidelines.
Now that you’ve successfully downloaded the royalty-free music, let’s move on to step four, where we’ll guide you through the process of importing the music into iMovie.
Step 4: Importing Music to iMovie
Now that you have the royalty-free music downloaded and ready to use, it’s time to import it into iMovie. Follow these steps to seamlessly add the music to your iMovie project:
- Open iMovie on your computer and create a new project or open an existing one.
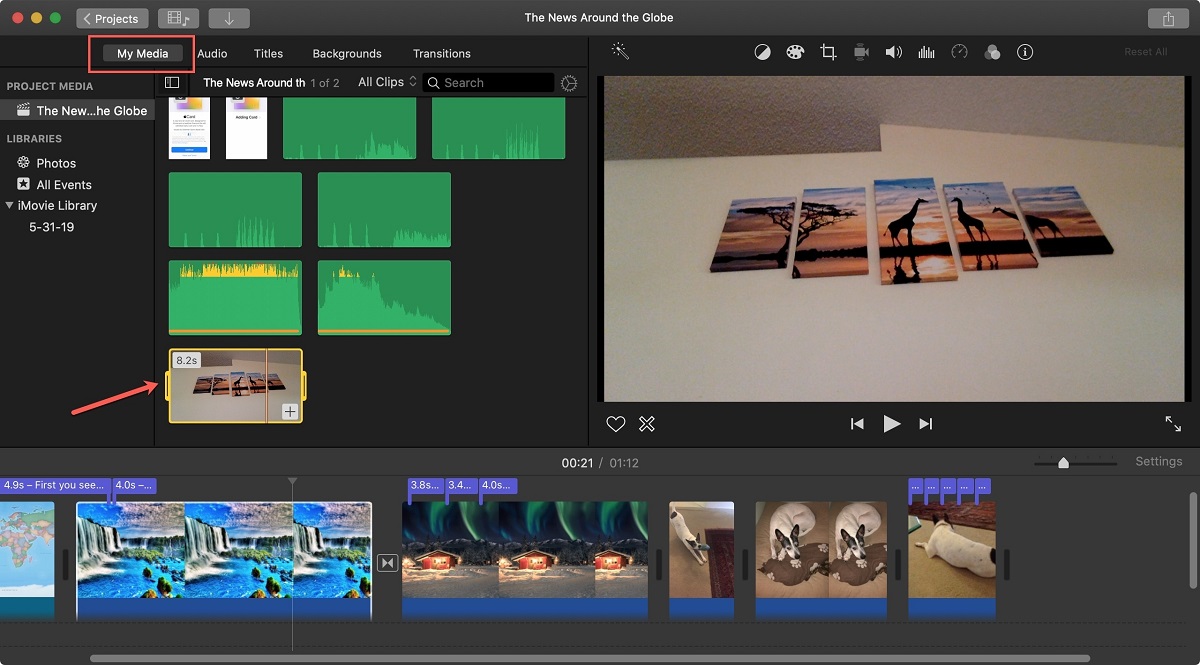
- In the iMovie toolbar, click on the “Music” icon to access the music library.
- Click on the “Import Media” button to locate and open the folder where you saved the downloaded royalty-free music tracks.
- Select the music track you want to import and click “Import Selected.”
- The imported music track will appear in the “Music and Sound Effects” section of the iMovie library.
- Drag and drop the imported music track to the timeline or the desired location in your project.
- You can adjust the length and position of the music track by clicking and dragging the edges of the clip in the timeline.
iMovie allows you to have multiple audio tracks, so you can add additional music or sound effects to enhance your project further. Simply repeat the importing process for any additional music tracks you want to include.
Additionally, iMovie provides various audio editing tools to refine your music. You can adjust the volume of the music track, apply fade-in and fade-out effects, and even change the speed or reverse the audio if desired. Experiment with these features to achieve the desired audio mix for your project.
It’s worth mentioning that iMovie also offers a collection of built-in sound effects and soundtracks that you can explore if you’re looking for additional audio options.
Now with the music tracks imported and positioned in your iMovie project, you’re ready to move on to step five, where we’ll guide you through the process of adding music to your project and fine-tuning it to fit your video’s timing and mood.
Step 5: Adding Music to Your Project in iMovie
With the music tracks imported into iMovie, it’s time to add them to your project and adjust them to fit the timing and mood of your video. Follow these steps to seamlessly incorporate the music into your iMovie project:
- First, identify the specific points in your video where you want the music to start and end. This will help you determine where to place the music clips in the timeline.
- To add the music to a specific part of your video, position the playhead in the timeline at the desired starting point.
- Select the music clip from the iMovie library and drag it to the timeline, aligning it with the playhead position.
- Repeat this process to add more music clips, adjusting them to start and end where you want the music to play in your video.
- If you want to overlap multiple music clips, you can adjust the volume levels of each clip to create a balanced audio mix. Click on the music clip in the timeline and adjust the volume slider in the inspector panel to increase or decrease the volume.
- To fade the music in or out, click on the music clip in the timeline and look for the fade handles at the beginning and/or end of the clip. Drag the handles to create gradual volume changes.
- You can also experiment with audio effects, such as equalization or reverb, to further enhance the music track. Access these options by selecting the music clip in the timeline and clicking on the “Audio Effects” icon in the inspector panel.
Remember to preview your project to ensure that the music is synchronized with your video and enhances the overall storytelling experience. Make any necessary adjustments to the music clips’ positioning, volume, or effects until you achieve the desired outcome.
iMovie’s intuitive interface makes it easy to fine-tune the audio and create seamless transitions between different parts of your video.
Now that you’ve successfully added music to your iMovie project, let’s move on to step six, where we’ll explore additional editing options and adjustments to fully customize your music tracks.
Step 6: Editing and Adjusting Music in iMovie
Now that you have added music to your iMovie project, it’s time to fine-tune and customize the music tracks to enhance their impact on your video. iMovie provides various editing tools and adjustments that allow you to precisely control how the music is presented. Follow these steps to edit and adjust the music in iMovie:
- Click on the music clip in the timeline to select it.
- In the inspector panel, you will find several options to edit and adjust the music track.
- Adjust the volume of the music clip by moving the volume slider. You can make the music louder or softer to fit the desired level of prominence in your video.
- Use the audio fade handles at the beginning and/or end of the music clip to create fade-in and fade-out effects. Drag the handles to specify the duration of the fade.
- If you want to change the speed of the music clip, select the clip and click on the speed adjustment button in the inspector panel. You can speed up or slow down the music to create different effects.
- To reverse the music clip, select it and click on the reverse clip button in the inspector panel. This can add a unique twist to the music and create interesting audio moments.
- If you want to apply audio effects to the music, click on the “Audio Effects” button in the inspector panel. iMovie offers a range of effects, such as equalization, reverb, and more.
- Experiment with different effects and adjustments to find the perfect balance and mood for your video.
Remember to preview your project regularly to ensure that the edited music blends seamlessly with your video and creates the desired emotional impact. Make any necessary adjustments to the volume, fades, speed, or effects until you achieve the desired result.
iMovie’s powerful editing capabilities make it easy to customize your music tracks and create a cohesive audiovisual experience.
Now that you’ve edited and adjusted the music in your iMovie project, let’s move on to step seven, where we’ll explore the process of exporting and sharing your iMovie project without any concerns about copyright.
Step 7: Exporting and Sharing Your iMovie Project with Free Music
Once you have edited and perfected your iMovie project, it’s time to export and share it with others. Follow these steps to export your project while ensuring that the free music you’ve used remains intact:
- In iMovie, click on the “File” menu and select “Share” to access the export options.
- Choose the desired format for your exported video. iMovie offers various options, including “File,” “YouTube,” “Vimeo,” and more.
- Specify the export settings, such as resolution, quality, and file size. Consider the platform or device you plan to share your video on when selecting these settings.
- Ensure that the “Include background music” or similar option is selected. This option ensures that the free music you’ve used in your project is included in the exported video.
- Click “Next” or “Export” to start the exporting process. iMovie will process your project and create the final video file.
- Choose a location on your computer to save the exported video, and give it a meaningful name.
- Wait for the export process to complete. The duration will depend on the length and complexity of your project.
Once the export is finished, you can share your iMovie project with others by uploading it to video-sharing platforms, social media, or by using other distribution methods.
Remember to comply with the terms and conditions of the platform you’re sharing your video on and consider adding proper credits and attributions to the music creators if required.
By following these steps, you can ensure that your iMovie project, along with the free music you’ve used, is shared legally and in accordance with copyright guidelines.
Congratulations! You’ve successfully navigated the process of downloading, importing, editing, and sharing your iMovie project with free music. Enjoy the fruits of your hard work and creativity!