Introduction
Are you tired of being tethered to your computer or smartphone when listening to your favorite music on iTunes? If so, we have good news for you! In this guide, we will show you how to download iTunes music to a thumb drive, giving you the freedom to take your music with you wherever you go.
iTunes is a popular music management software developed by Apple that allows users to organize and play their music collection. However, by default, your music files are stored on your computer’s local storage, limiting your access to your music library.
By transferring your music to a thumb drive, you can free up space on your computer and enjoy your favorite tunes on any device with a USB port – whether it’s your car stereo, portable speaker, or even your smart TV.
The process might seem daunting at first, but fear not! We have broken it down into simple steps to guide you through the process. So, let’s dive in and learn how to download iTunes music to a thumb drive!
Step 1: Connect the Thumb Drive to your Computer
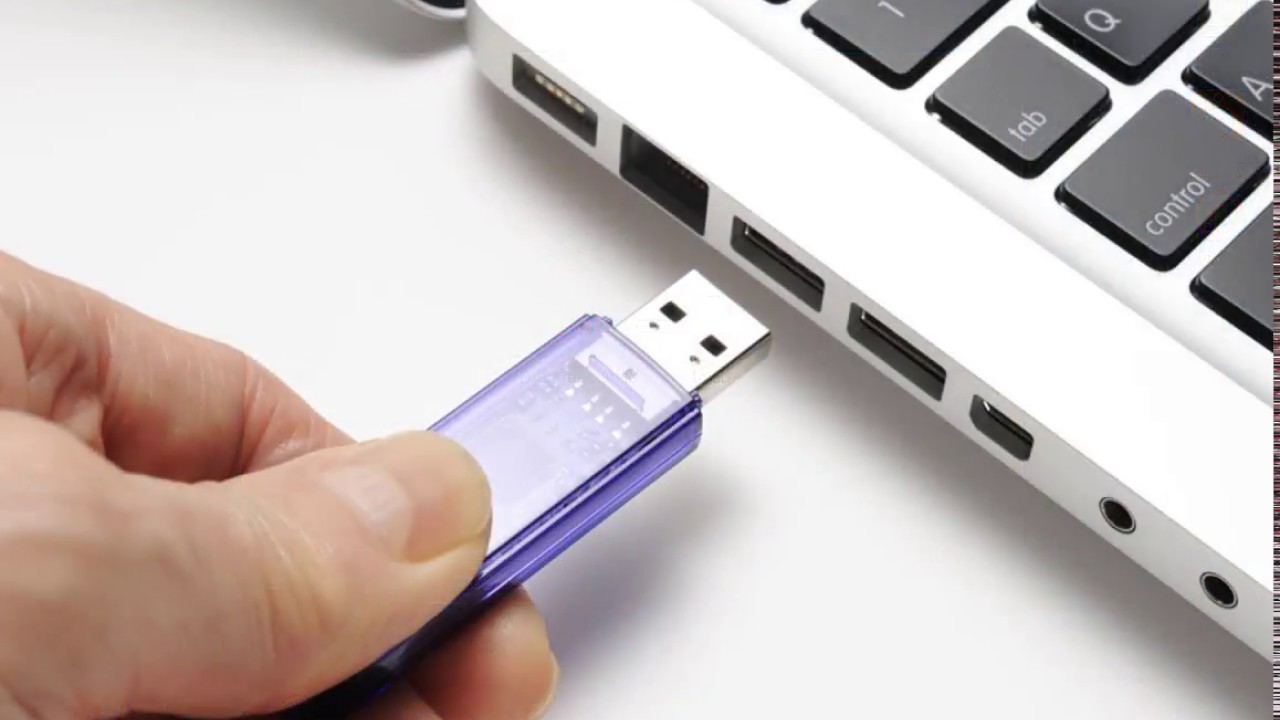
The first step in downloading iTunes music to a thumb drive is to connect the thumb drive to your computer. Locate an available USB port on your computer and insert the thumb drive securely into the port. Make sure that the thumb drive is properly inserted to avoid any connection issues.
Once the thumb drive is connected, your computer should recognize it and assign it a drive letter. This will allow you to access the thumb drive as a storage device on your computer. The drive letter can vary depending on your operating system, but it is typically something like “E:”, “F:”, or “G:”.
Keep in mind that the size of your thumb drive will determine how much music you can store on it. If you have a large music library, you may need a thumb drive with a higher storage capacity. It’s always a good idea to check your thumb drive’s available space before transferring the music to ensure you have enough room for your entire library.
Once you have connected the thumb drive and made note of its assigned drive letter, you are ready to move on to the next step in the process. With your thumb drive connected, we can now proceed with configuring iTunes to save the music files directly to the thumb drive.
Step 2: Open iTunes and Go to the Preferences
To download iTunes music to a thumb drive, we need to change the storage location of your music files in iTunes. This can be done by accessing the Preferences settings in iTunes.
First, open iTunes on your computer. If you don’t already have it installed, you can download it for free from the Apple website. Once iTunes is open, click on the “Edit” menu at the top of the screen (or the “iTunes” menu if you are using a Mac) and select “Preferences” from the dropdown menu.
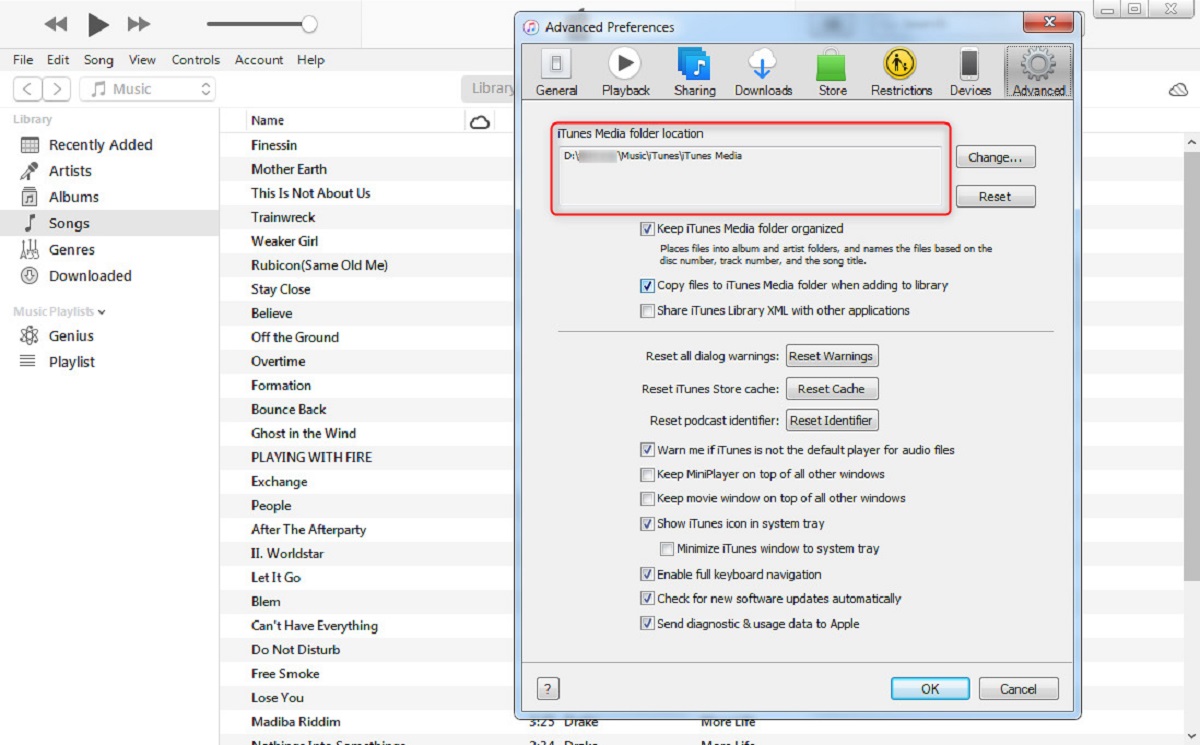
A new window will appear, displaying various settings for iTunes. Look for the “Advanced” tab at the top of the window and click on it. In the “Advanced” tab, you will find options related to the storage and organization of your iTunes media files.
Within the “Advanced” tab, locate the “iTunes Media folder location” section. By default, iTunes stores your music files in a specific folder on your computer’s local storage. We need to change this location to the thumb drive.
Click on the “Change” button next to the current iTunes Media folder location. A file browser window will pop up, allowing you to choose a new location for your music files. Look for the drive letter that corresponds to your thumb drive and select it. Then, click “Open” to confirm the selection and close the file browser window.
Back in the Preferences window, click “OK” to save the changes and exit the Preferences settings. With this step complete, iTunes will now save any new music files and updates to the selected thumb drive location.
In the next step, we will consolidate your iTunes library to ensure that all your music files are included before transferring them to the thumb drive.
Step 3: Change the iTunes Media Folder Location
Now that you have opened the iTunes Preferences window, it’s time to change the default location where iTunes stores your music files. By changing the iTunes media folder location to your thumb drive, you can ensure that all new music added to iTunes will be saved directly onto the thumb drive.
In the “Advanced” tab of the Preferences window, locate the section titled “iTunes Media folder location.” By default, this folder is set to a location on your computer’s local storage. To change it, click on the “Change” button next to the current directory.
A file browser window will appear, allowing you to navigate through your computer’s file system. Look for the drive letter that corresponds to your thumb drive, and select it. Once you have selected the thumb drive, click “OK” to confirm your selection and close the file browser window.
Back in the iTunes Preferences window, you will see that the path for the iTunes Media folder location has been updated with the location of your thumb drive. If you ever need to check or update the location in the future, you can simply revisit the Preferences window.
Click “OK” to save your changes and exit the Preferences window. From now on, any new music you add to iTunes will be saved directly onto your thumb drive, freeing up space on your computer’s local storage.
In the next step, we will consolidate your iTunes library to ensure that all your music files are organized and ready for transfer to the thumb drive.
Step 4: Consolidate your iTunes Library
Before transferring your iTunes music to the thumb drive, it’s important to consolidate your library. Consolidating your library ensures that all your music files, including any external files linked to iTunes, are organized in one central location.
To consolidate your iTunes library, go to the “File” menu at the top of the iTunes window (or the “iTunes” menu if you are using a Mac) and select “Library” from the dropdown menu. Then, choose “Organize Library” from the submenu.
A dialog box will appear, presenting you with a checkbox labeled “Consolidate files.” Make sure this box is checked and click on the “OK” button.
iTunes will now begin the process of consolidating your library. It will copy all the music files from their current locations to the new iTunes Media folder, which is now set to your thumb drive. This may take some time depending on the size of your library.
During the consolidation process, you may be prompted to locate any missing music files. If this happens, simply navigate to the location of the missing file and click “OK.” iTunes will update the file path and continue with the consolidation.
Once the consolidation is complete and all your files are copied to the new iTunes Media folder on the thumb drive, you’re ready to proceed to the next step – copying your iTunes music to the thumb drive.
Step 5: Wait for the Consolidation Process to Complete
After initiating the consolidation process in iTunes, it’s important to be patient and allow the software to complete the task. The duration of the consolidation process will depend on the size of your iTunes library and the speed of your computer.
While iTunes consolidates your library, it will analyze all the music files in your collection and copy them to the new iTunes Media folder on your thumb drive. This ensures that all your music files are stored in one central location, ready to be transferred to your thumb drive.
During the consolidation process, it’s crucial not to interrupt or close iTunes. If you do, the consolidation process may not complete properly, leading to potential file discrepancies or missing music files in your library.
The progress of the consolidation process can be monitored in the top center of the iTunes window. A progress bar will indicate the percentage of completion, giving you an idea of how much longer it will take.
It’s important to note that if you have a large library with a significant number of music files, the consolidation process may take some time to complete. It’s best to leave your computer running and allow iTunes to finish the consolidation without any interruptions.
Once the consolidation process is complete, you will have a consolidated and organized iTunes library, ready for transfer to your thumb drive. In the next step, we will walk you through the process of copying your iTunes music to the thumb drive.
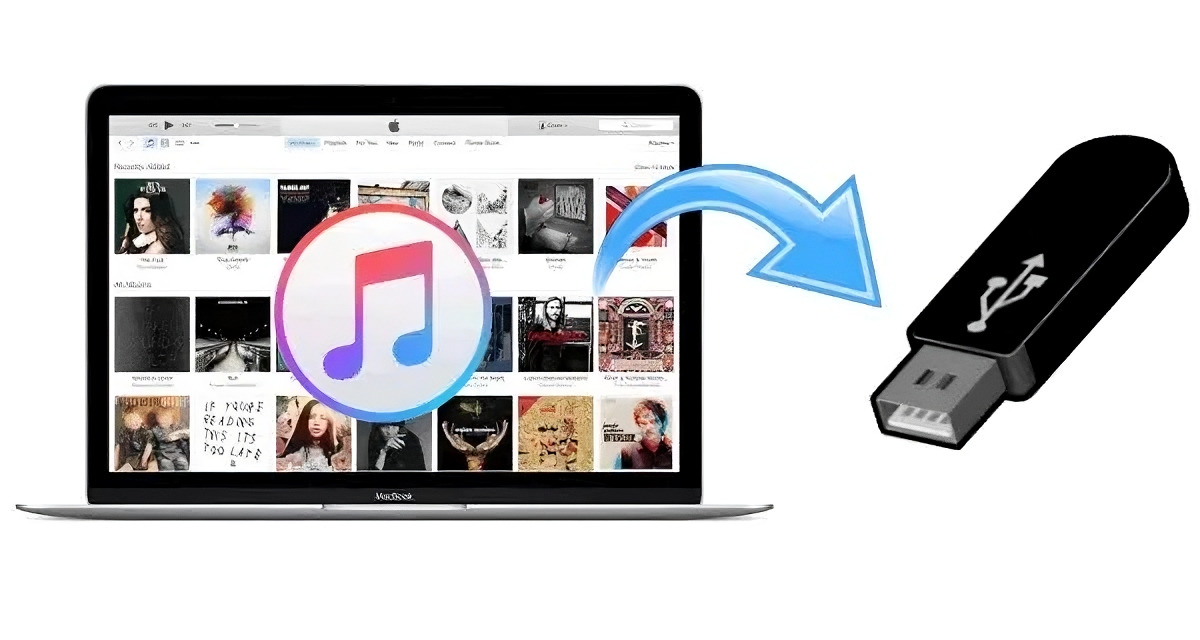
Step 6: Copy the iTunes Music to the Thumb Drive
Now that the consolidation process is complete and your iTunes library is organized, it’s time to transfer your music files to the thumb drive. This step allows you to have a portable version of your iTunes library that you can use on any device with a USB port.
Start by locating the new iTunes Media folder on your thumb drive. Open a new File Explorer (Windows) or Finder (Mac) window and navigate to the drive letter assigned to your thumb drive. Look for a folder named “iTunes” or “iTunes Media” and open it.
Inside the iTunes Media folder, you will find subfolders that contain your music files. These subfolders are organized based on factors like artist, album, or genre, depending on how you have your iTunes library organized.
To copy your iTunes music to the thumb drive, simply select the desired subfolders or individual songs and drag them from the iTunes Media folder to the root directory of your thumb drive. Alternatively, you can use the “Copy” and “Paste” commands to transfer the files.
If you have a large music library and want to copy all your music files to the thumb drive, you can select the entire iTunes Media folder and copy it to the thumb drive. This will create a duplicate library on the thumb drive, ensuring that you have all your music files available.
The duration of the file transfer will depend on the size of your library and the speed of your computer and thumb drive. It’s best to be patient and avoid interrupting the transfer process to ensure all your music files are copied correctly.
Once the file transfer is complete, you can safely eject the thumb drive from your computer and enjoy your iTunes music on any device with a USB port. In the final step, we will cover the process of ejecting the thumb drive safely.
Step 7: Eject the Thumb Drive Safely
After successfully copying your iTunes music to the thumb drive, it’s essential to eject the thumb drive safely from your computer. This ensures that all data is written and no files are in use, minimizing the risk of data corruption or loss.
To safely eject the thumb drive, locate the USB icon in your computer’s system tray or menu bar. Click on the icon to reveal a list of connected devices, including your thumb drive. Identify the entry that corresponds to your thumb drive and click on it.
A pop-up menu will appear, displaying options such as “Eject,” “Disconnect,” or “Safely Remove.” Select the appropriate option to safely eject the thumb drive.
In some cases, you may receive a notification stating that it’s not safe to remove the device yet. This often occurs when files are still being accessed or copied to/from the thumb drive. It’s crucial to wait until all activities are complete before safely ejecting the thumb drive.
Once you have successfully ejected the thumb drive, you can physically remove it from the USB port of your computer. Remember to handle the thumb drive gently and avoid any sudden movements or impacts that could potentially damage it.
Now you can take your thumb drive with your iTunes music library wherever you go. You can plug it into a car stereo, a portable speaker, or any device with a USB port to enjoy your favorite tunes on the go.
By following these steps, you have successfully downloaded and transferred your iTunes music to a thumb drive, freeing up space on your computer’s local storage and granting you the flexibility to enjoy your music library wherever you please.
Conclusion
Congratulations! You have learned how to download iTunes music to a thumb drive, allowing you to enjoy your music library on the go. By connecting the thumb drive to your computer, changing the iTunes media folder location, consolidating your library, copying the music files to the thumb drive, and safely ejecting it, you have successfully created a portable version of your iTunes library.
With the music files stored on the thumb drive, you now have the flexibility to listen to your favorite tunes on various devices, such as car stereos, portable speakers, or even smart TVs. The process of transferring your iTunes music to a thumb drive may take some time, especially for larger libraries, but the reward of having a portable music collection is well worth it.
Remember to always handle the thumb drive with care and keep it in a safe place. It’s a good practice to make regular backups of your iTunes library on another storage device or cloud service to avoid any potential data loss.
Now, go ahead and enjoy your iTunes music on the go, free from the constraints of your computer or smartphone. Whether you’re driving, working out, or simply relaxing, your music collection will be readily available on your trusty thumb drive.