Introduction
Today, smartphones have become the primary device for listening to music, and your iPhone is likely where you store your favorite songs. However, there may arise situations where you want to download the music from your iPhone to your computer, either for backup purposes or simply to enjoy your tracks on a larger screen or different device.
In this article, we will explore various methods that allow you to transfer your music from your iPhone to your computer easily. Whether you have purchased music from the iTunes Store or have a collection of songs from other sources, we will guide you through the steps on how to accomplish this task.
While there are multiple ways to transfer music from your iPhone to your computer, we will discuss the most common and user-friendly methods, including using iTunes, iCloud, third-party apps, File Explorer (for Windows), and AirDrop (for Mac users).
It is important to note that the methods may vary depending on the type of computer you are using, whether it’s Mac or Windows. So, you can choose a method that suits your specific requirements and operating system.
Now, let’s dive into the different methods and discover how to download music from your iPhone to your computer for easy access and enjoyment!
Method 1: Use iTunes to Transfer Purchased Music
One of the easiest and most straightforward ways to transfer purchased music from your iPhone to your computer is by using iTunes. This method is particularly useful if you have a large collection of music that you have obtained through the iTunes Store.
Here is a step-by-step guide on how to use iTunes to transfer purchased music:
- Connect your iPhone to your computer using the USB cable and launch iTunes if it doesn’t open automatically.
- Select your iPhone from the list of available devices within iTunes. You may be prompted to trust the computer on your iPhone for secure connectivity.
- In the top-left corner of the iTunes window, click on the “Music” tab to access your music library on your iPhone.
- Ensure that the “Sync Music” option is selected, and choose whether you want to sync your entire music library or specific playlists, albums, or artists.
- If you only want to transfer purchased music, tick the “Only include checked songs and videos” option under the “Options” section.
- Click on the “Apply” or “Sync” button to initiate the transfer process. Depending on the size of your music library and the connection speed, this could take some time.
- Once the sync is complete, your purchased music will now be available in your iTunes library on your computer.
By following these steps, you can easily transfer your purchased music from your iPhone to your computer. The transferred music files will be stored in your iTunes library, allowing you to access them whenever you want. You can also create backups of your music by exporting it to external storage devices if desired.
This method is specific to purchased music and may not work for songs that you have imported from other sources or downloaded through third-party apps. In the next section, we will explore alternative methods for transferring all types of music from your iPhone to your computer.
Method 2: Transfer Music From iPhone to Computer Using iCloud
If you prefer a wireless method to transfer your music from your iPhone to your computer, using iCloud is a convenient and efficient option. iCloud allows you to store your music, photos, videos, and other files in the cloud, making them accessible across multiple devices.
Here’s how you can transfer music from your iPhone to your computer using iCloud:
- Ensure that you have iCloud Music Library enabled on your iPhone. You can check this by going to Settings > Music > iCloud Music Library and toggling the switch to enable it.
- On your computer, launch a web browser and visit the iCloud website (www.icloud.com).
- Sign in with your Apple ID and password, which should be the same as the one used on your iPhone.
- Click on the “Music” icon to access your music library stored in iCloud.
- Select the songs or albums that you want to download to your computer.
- Click on the download icon, usually represented by a cloud with an arrow pointing downward.
- The selected music will begin downloading to your computer.
- Once the download is complete, you can locate the downloaded music files in your computer’s designated download folder.
Using iCloud to transfer music eliminates the need for a physical connection between your iPhone and computer. It also ensures that your music library stays synced across all your Apple devices. However, it relies on having an active internet connection and sufficient iCloud storage space to accommodate your music collection.
Note that this method is most effective for music that was either purchased from iTunes or imported into your iPhone’s music library using iTunes on your computer. If you have music sourced from other third-party apps or non-iTunes sources, you may need to utilize alternative methods.
Now that you have learned how to transfer your music using iCloud, let’s explore other methods for transferring music from your iPhone to your computer in the following sections.
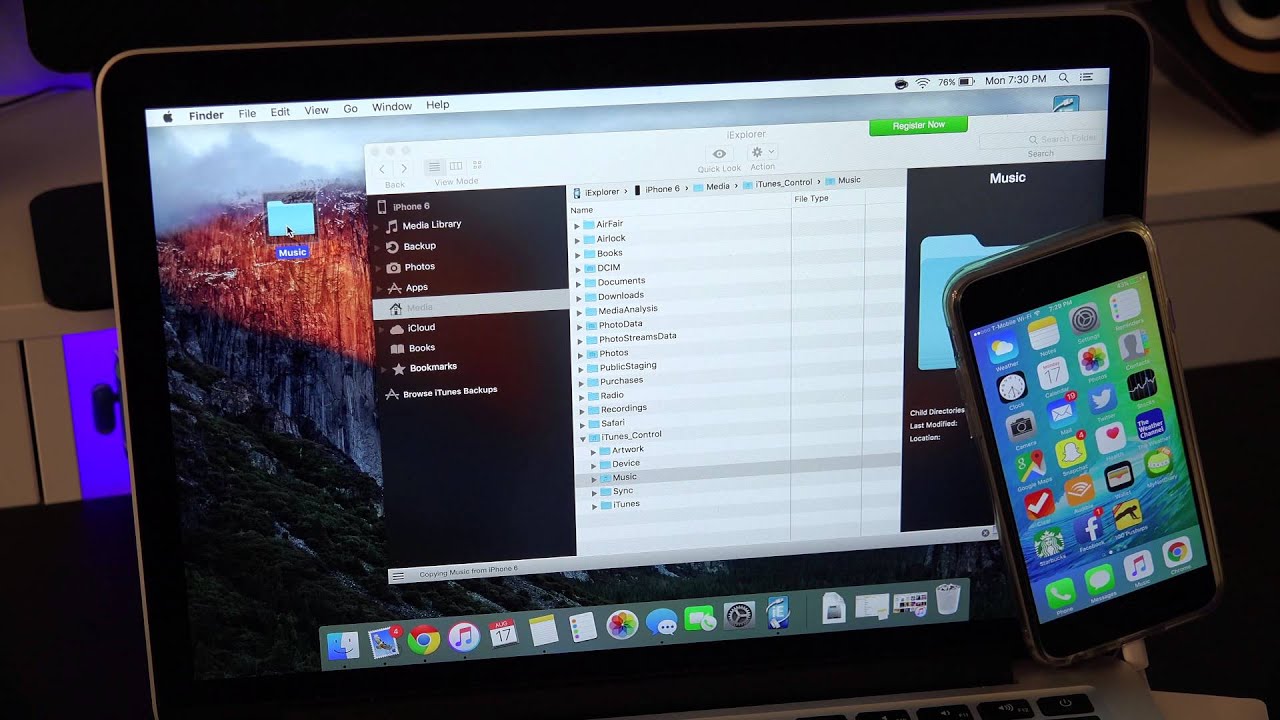
Method 3: Transfer Music From iPhone to Computer Using Third-Party Apps
If you have music on your iPhone that was not purchased from iTunes, or if you want more flexibility in transferring your music, using third-party apps can be an effective solution. There are various apps available that specialize in transferring music from your iPhone to your computer, providing additional features and options.
Here’s how you can transfer music from your iPhone to your computer using third-party apps:
- Search for and download a reliable third-party app on your computer. Some popular apps for transferring music include iExplorer, SynciOS, and iMazing.
- Install and launch the chosen app on your computer.
- Connect your iPhone to your computer using the USB cable.
- Follow the on-screen instructions within the app to establish a connection between your iPhone and computer.
- Navigate to the music section within the app, where you should see a list of music files stored on your iPhone.
- Select the music files or folders that you want to transfer to your computer.
- Choose the destination folder on your computer where you want to save the transferred music.
- Click on the “Transfer” or “Export” button within the app to initiate the transfer process.
- Wait for the transfer to complete, and then you can access the transferred music on your computer.
Using third-party apps for transferring music provides you with more control and flexibility, allowing you to transfer both purchased and non-purchased music. These apps often offer additional features like managing playlists, editing metadata, and transferring other media files.
However, it’s essential to ensure that you download apps from trusted sources and thoroughly research their reviews and ratings before proceeding. Also, be aware that some third-party apps may have limitations or require a paid subscription to access all features.
With the help of third-party apps, you can easily transfer your music from your iPhone to your computer, regardless of its source or whether it was purchased from iTunes. Let’s move on to the next method, which is specifically for Windows users.
Method 4: Transfer Music From iPhone to Computer Using File Explorer (Windows)
If you are a Windows user, you can use the built-in File Explorer feature to transfer your music from your iPhone to your computer. This method is suitable for transferring all types of music files, including both purchased and non-purchased tracks.
Here’s how you can use File Explorer to transfer music from your iPhone to your computer:
- Connect your iPhone to your computer using the USB cable.
- Unlock your iPhone and tap “Trust” on the prompt that appears, granting your computer access to your device.
- Open File Explorer on your computer by clicking on the folder icon on your taskbar or pressing the Windows key + E.
- Under “This PC” or “My Computer” on the left sidebar of File Explorer, you should see your iPhone listed as a portable device. Click on it to access its contents.
- Navigate to the “Internal Storage” or “iPhone” folder, where you will find your music files.
- Select the music files or folders that you want to transfer to your computer.
- Right-click on the selected files and choose “Copy” or use the keyboard shortcut Ctrl + C.
- Navigate to the destination folder on your computer where you want to save the transferred music.
- Right-click on the destination folder and choose “Paste” or use the keyboard shortcut Ctrl + V to transfer the files.
- Wait for the transfer process to complete. Once finished, you can access the transferred music on your computer.
Using File Explorer is a straightforward and reliable method for Windows users to transfer music from their iPhone to their computer. It allows you to transfer music files directly without the need for additional software or apps.
Note that some music files on your iPhone may be in formats that are not natively supported by Windows Media Player or other media players. In such cases, you may need to use a third-party media player or convert the files into a compatible format before playing them on your computer.
Now that you have learned how to transfer music using File Explorer on Windows, let’s move on to the next method, which is specifically for Mac users.
Method 5: Transfer Music From iPhone to Computer Using AirDrop (Mac)
If you own a Mac computer, using AirDrop is an effortless and wireless method to transfer music from your iPhone to your computer. AirDrop allows you to wirelessly share files, including music, between your iPhone and Mac, making it a convenient option for Mac users.
Here’s how you can use AirDrop to transfer music from your iPhone to your Mac:
- Ensure that both your iPhone and Mac are connected to the same Wi-Fi network.
- On your iPhone, swipe up from the bottom of the screen to open the Control Center, or swipe down from the top-right corner of the screen if you have an iPhone X or later model.
- Long-press on the network settings card, which usually displays Wi-Fi, Bluetooth, and other connectivity options.
- Tap on the AirDrop icon to activate it and select “Everyone” or “Contacts Only” to determine who can discover your device.
- On your Mac, open a Finder window by clicking on the Finder icon in the Dock or pressing Command + Space and typing “Finder”.
- In the Finder window, click on “AirDrop” in the left sidebar.
- Make sure that the AirDrop window displays “Allow me to be discovered by: Everyone” or “Contacts Only”, depending on your preference.
- Go to the Music app on your iPhone and select the songs or albums that you want to transfer to your Mac. You can use the share button within the Music app to access the “AirDrop” option.
- On your iPhone, locate the Mac’s name or icon in the AirDrop section and tap on it.
- On your Mac, a notification will appear asking whether to accept the incoming files. Click “Accept” to initiate the transfer process.
- Wait for the transfer to complete, and the music files will be saved in the designated location on your Mac.
Using AirDrop eliminates the need for cables or additional software, providing a seamless and wireless way to transfer your music from your iPhone to your Mac. It is a convenient option if you want to quickly share a few songs or albums without the hassle of physical connections.
However, keep in mind that AirDrop relies on both devices having the AirDrop feature and being within close proximity to establish a connection. Additionally, ensure that both devices have sufficient battery power and are updated to the latest operating system versions for optimal compatibility.
With AirDrop, Mac users can effortlessly transfer their favorite music from their iPhone to their computer. Now that you are familiar with various methods for transferring music, you can choose the one that suits your needs and operating system.
Conclusion
Transferring music from your iPhone to your computer allows you to backup your music collection, enjoy your favorite songs on a larger screen, or share them with others. In this article, we explored several methods to help you accomplish this task.
If you have purchased music from the iTunes Store, using iTunes is the most straightforward option. By connecting your iPhone to your computer, you can sync your music library and transfer your purchased tracks effortlessly.
If you prefer a wireless approach, iCloud is a convenient option. By enabling iCloud Music Library on your iPhone and accessing it via the iCloud website on your computer, you can download your music files from the cloud directly to your computer.
For those who have non-purchased music or want more flexibility, third-party apps provide additional features and options for transferring music. Apps such as iExplorer, SynciOS, and iMazing allow you to transfer music and manage your music library easily.
If you are a Windows user, utilizing File Explorer simplifies the process. By connecting your iPhone to your computer and navigating through File Explorer, you can transfer music files directly without the need for extra software.
For Mac users, AirDrop offers a wireless and hassle-free method. By activating AirDrop on both your iPhone and Mac, you can easily transfer music files with a few taps.
Remember to choose the method that suits your specific needs and operating system. Additionally, always ensure that you have a reliable backup of your music files and that you respect copyright and licensing laws when transferring and using music.
Now that you are equipped with various methods to transfer music from your iPhone to your computer, you can enjoy your favorite tunes wherever and however you desire.