Introduction
Welcome to the world of iCloud and the convenience it brings to your iPhone experience! If you’ve recently purchased a new iPhone and are eager to have all your messages transferred to your shiny new device, you’re in the right place. In this step-by-step guide, we’ll walk you through the process of downloading your messages from iCloud to your new iPhone.
It’s common for iPhone users to have their messages synced with iCloud. This allows you to access your conversations from any iOS device, making it easy to switch to a new iPhone without losing any of your important messages. By following these simple steps, you’ll be able to seamlessly transfer your messages, ensuring that your valuable conversations are safely stored on your new device.
Whether you’re upgrading from an older iPhone or switching from another smartphone, the process remains the same. We’ll outline the necessary steps to ensure that your iCloud Messages sync is turned on, guide you through the setup process on your new iPhone, and explain how to download your messages from iCloud. So, let’s get started!
Step 1: Ensure your iCloud Messages sync is turned on
Before you can begin downloading your messages from iCloud to your new iPhone, it’s important to ensure that your iCloud Messages sync is turned on. This feature allows your messages to be stored in the cloud, making them accessible across all your iOS devices.
To check if iCloud Messages sync is enabled, follow these simple steps:
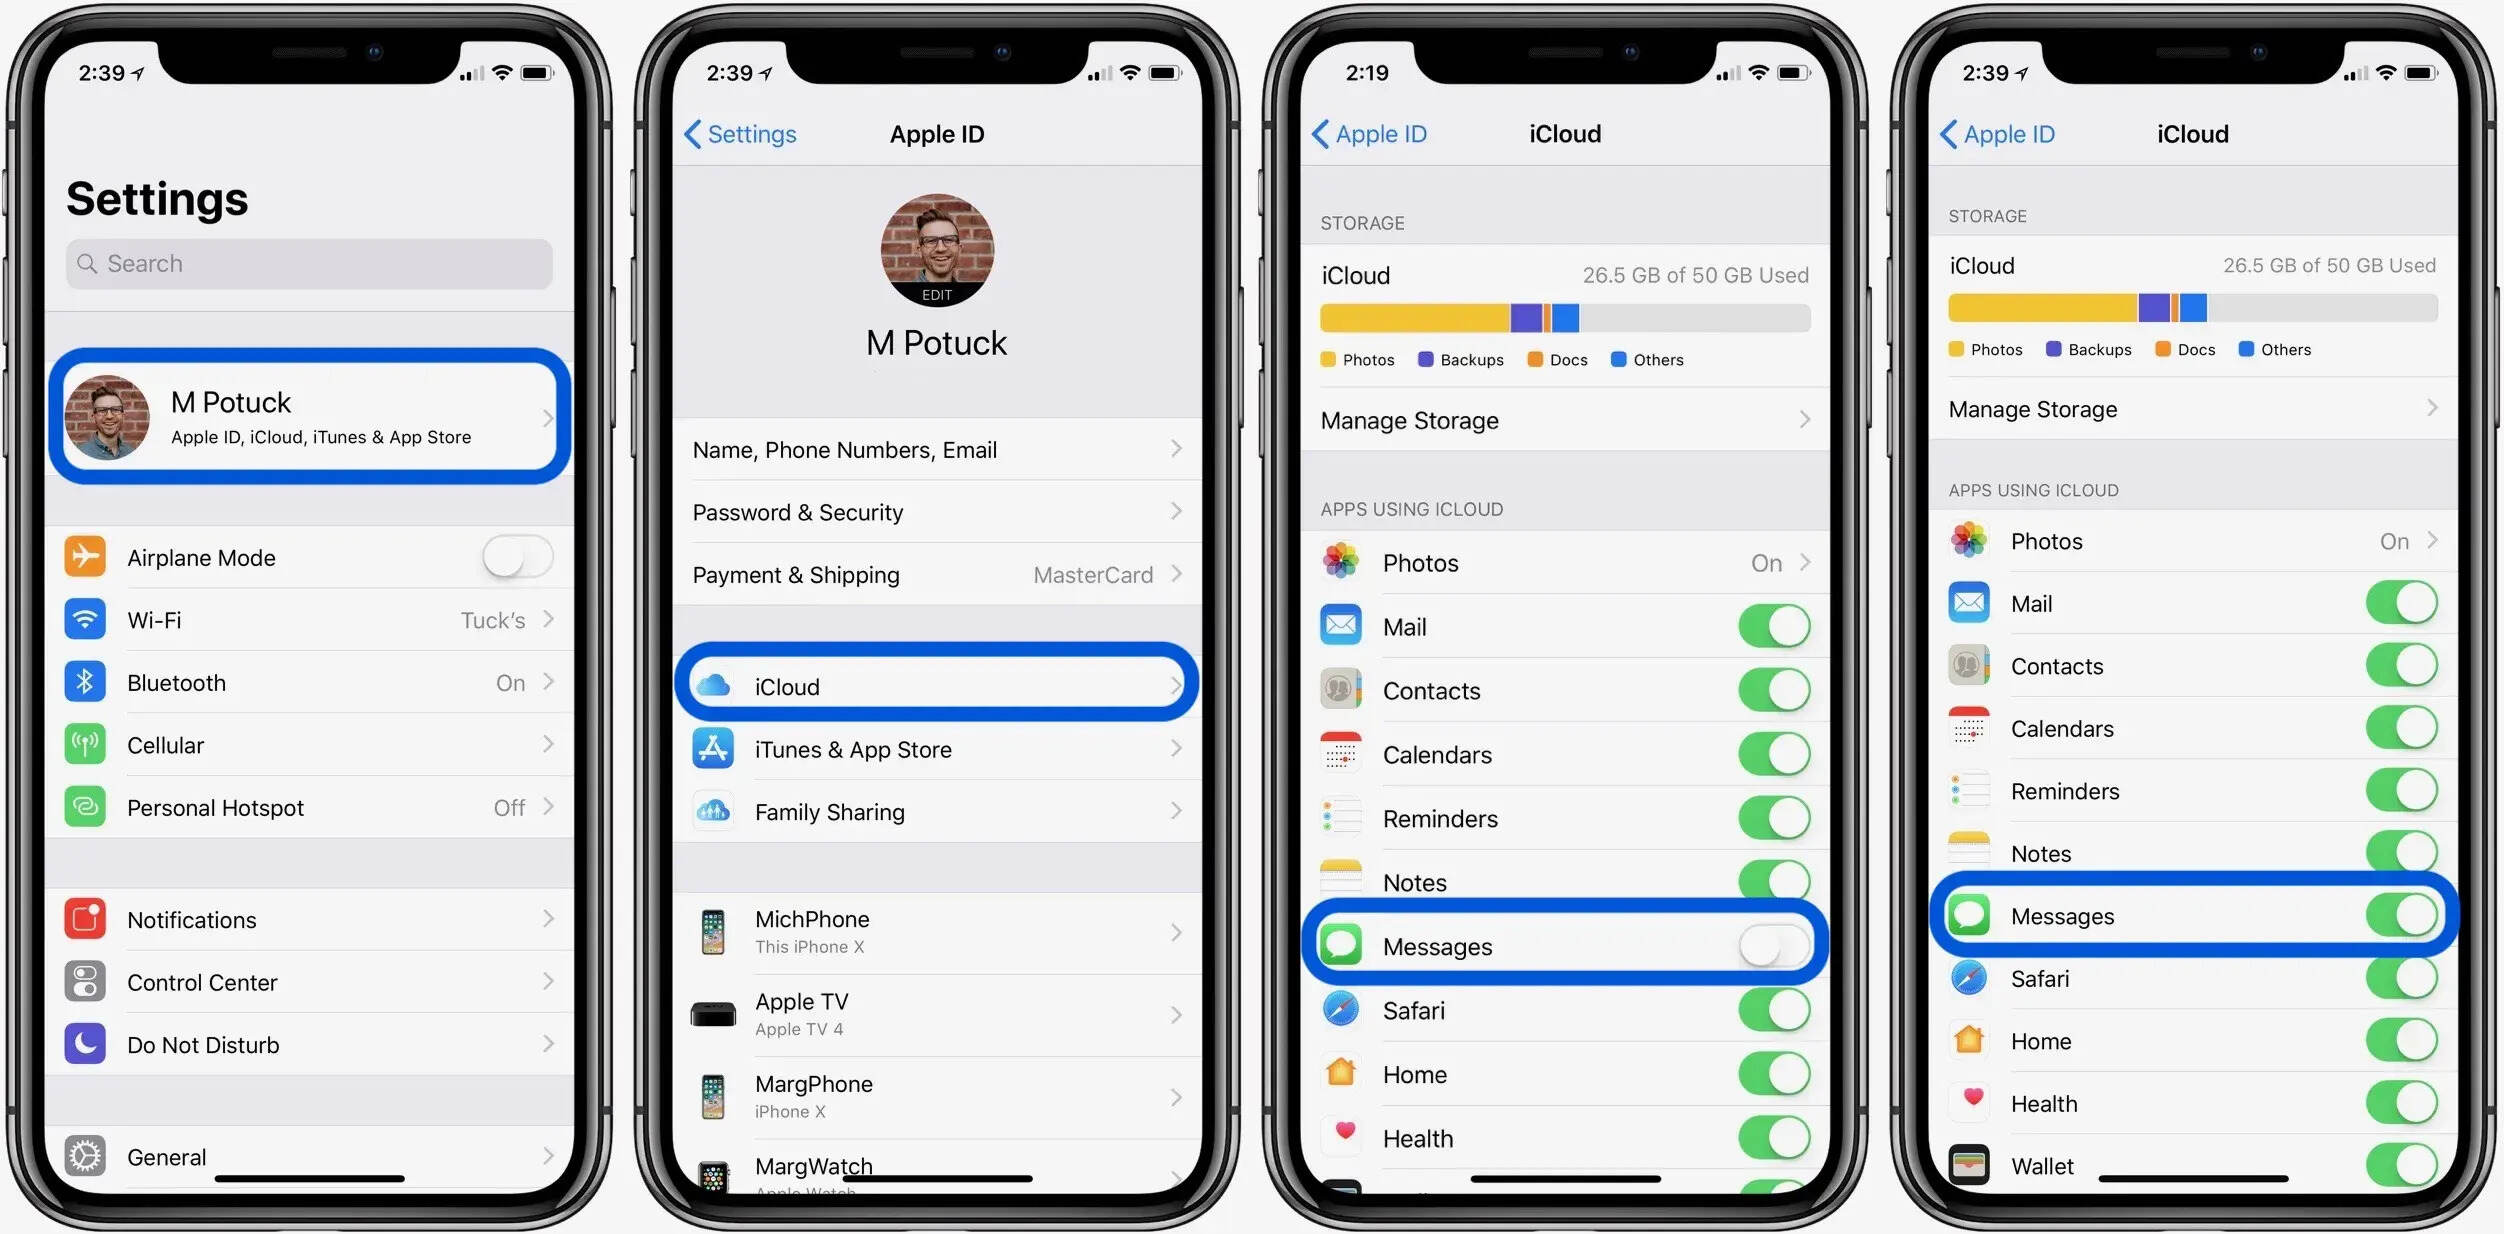
- Open the Settings app on your current iPhone.
- Tap on your Apple ID at the top of the screen.
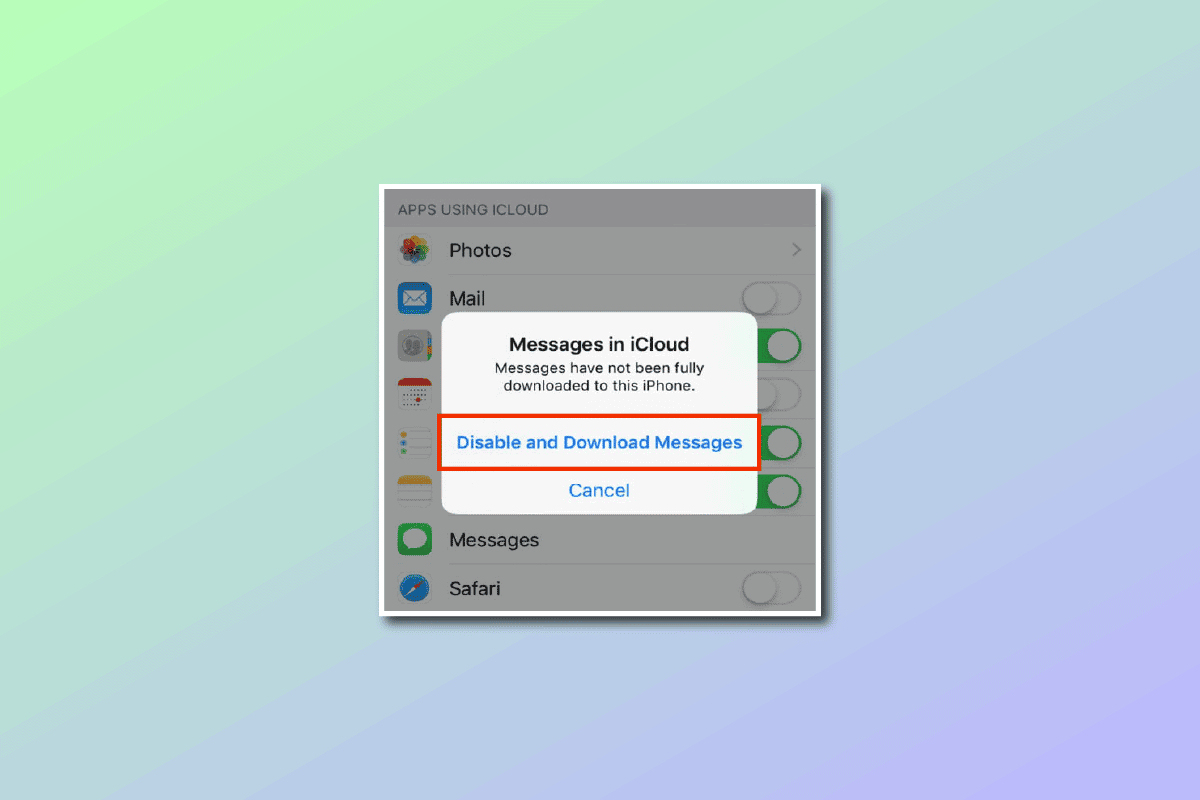
- Select “iCloud” from the list of options.
- Scroll down and locate “Messages” in the list of apps using iCloud.
- Ensure that the toggle switch next to “Messages” is turned on and appears green.
If the toggle switch is already turned on, you’re all set! Your messages are being synced with iCloud, and you can proceed to the next step. However, if the toggle switch is turned off, tap on it to enable iCloud Messages.
Enabling iCloud Messages may take some time, especially if you have a large number of messages. The process involves uploading your existing messages to iCloud, so it’s important to have a stable internet connection and sufficient iCloud storage available. Wait patiently for the messages to be uploaded before proceeding.
Once your iCloud Messages sync is turned on and your messages are successfully uploaded to iCloud, you’re ready to set up your new iPhone and begin the process of downloading your messages. Don’t worry; we’ll guide you through the entire process in the following steps, so let’s move on to the next step!
Step 2: Set up your new iPhone
Now that your iCloud Messages sync is turned on and your messages are securely stored in iCloud, it’s time to set up your new iPhone. Follow these steps to get started:
- Power on your new iPhone by pressing and holding the power button located on the right side or top of the device.
- Follow the on-screen prompts to select your language, region, and other basic settings.
- When you reach the “Apps & Data” screen, select the option to “Restore from iCloud Backup”. If you’re setting up your iPhone as a new device, skip to the next step.
- Sign in to your iCloud account using your Apple ID and password. Make sure to use the same Apple ID that you used on your previous iPhone.
- Agree to the Terms and Conditions and proceed to the next step.
- Select the appropriate backup from the list of available backups. Look for the backup file that contains your messages and select it.
- Wait for the restore process to complete. This may take some time, depending on the size of your backup and the speed of your internet connection.
- Once the restore process is finished, your new iPhone will restart, and you can proceed to set up the device as usual.
If you’re setting up your iPhone as a new device and not restoring from a backup, you can skip the steps related to restoring from iCloud backup. However, keep in mind that this will result in the loss of your previous data, including messages. To ensure that your messages are transferred to your new iPhone, it’s recommended to restore from an iCloud backup.
By setting up your new iPhone using the restore from iCloud backup option, your messages along with other data, such as contacts, photos, and apps, will be transferred to your new device. This includes all the conversations, attachments, and media files shared through the Messages app.
Now that you’ve successfully set up your new iPhone and chosen to restore from an iCloud backup, let’s move on to the next step to learn how to enable iCloud Messages on your new device.
Step 3: Sign in to your iCloud account on your new iPhone
Now that you have set up your new iPhone and chosen to restore from an iCloud backup, the next step is to sign in to your iCloud account. By signing in, you will be able to access all your iCloud data, including your messages.
Follow these simple steps to sign in to your iCloud account on your new iPhone:
- On the Welcome screen or Home screen of your new iPhone, tap on the “Settings” app.
- Scroll down and tap on “Sign in to your iPhone”.
- Enter your Apple ID and password associated with your iCloud account.
- If prompted, enter the verification code sent to your trusted device or phone number to verify your identity.
- Agree to the Terms and Conditions.
- Choose whether to enable or disable iCloud settings, such as iCloud Drive, iCloud Photos, and others. For the purpose of this guide, make sure to enable “Messages” by toggling the switch on.
- Tap on “Merge” to combine your existing messages with the messages downloaded from iCloud.
Once you have successfully signed in to your iCloud account and enabled iCloud Messages, your iPhone will start downloading your messages from iCloud. The duration of this process will depend on the size of your messages and your internet connection speed.
It’s important to note that iCloud Messages will periodically sync with your iPhone to ensure that any new messages you receive are also available on your new device. This seamless synchronization allows you to continue your conversations from where you left off, regardless of the device you’re using.
With your iCloud account signed in and iCloud Messages enabled, you’re now one step closer to having all your messages downloaded and accessible on your new iPhone. In the next step, we’ll walk you through the process of downloading the messages from iCloud. Let’s continue!
Step 4: Enable iCloud Messages on your new iPhone
Now that you have signed in to your iCloud account on your new iPhone, the next step is to enable iCloud Messages. Enabling this feature ensures that your messages are downloaded and synced with your device, allowing you to access them anytime, anywhere.
To enable iCloud Messages on your new iPhone, follow these steps:
- Open the “Settings” app on your new iPhone.
- Scroll down and tap on “Messages”.
- Toggle on the switch next to “iCloud Messages”.
Enabling iCloud Messages may take some time, depending on the number of messages you have and the speed of your internet connection. During this process, your iPhone will download and sync your messages from iCloud, ensuring that they are available locally on your device.
It’s important to note that enabling iCloud Messages on your new iPhone will not affect your messages on other devices connected to the same iCloud account. All your conversations will remain intact and synchronized across all your iOS devices.
By enabling iCloud Messages, you also free up valuable storage space on your iPhone. Rather than storing all your messages locally, they are stored in the cloud, making it easier to manage storage and ensuring that you don’t run out of space on your device.
Once iCloud Messages is enabled, you’re all set to begin the process of downloading your messages from iCloud. In the next step, we’ll guide you through the download process, so you can start accessing your messages on your new iPhone. Let’s move on!
Step 5: Download the messages from iCloud
Now that you have enabled iCloud Messages on your new iPhone, it’s time to download your messages from iCloud. This process ensures that all your conversations, attachments, and media files are available locally on your device.
Follow these steps to download the messages from iCloud:
- Open the “Messages” app on your new iPhone.
- Wait for a few moments as your device starts downloading your messages from iCloud. The time it takes will depend on the size of your messages and your internet connection speed.
- During the download process, you may see a progress indicator at the bottom of the screen. This indicates the status of the download.
- It’s important to ensure that your new iPhone remains connected to a stable Wi-Fi network during the download process. This helps to ensure a smooth and uninterrupted download.
Once the download is complete, all your messages, including text conversations, images, videos, and other media, will be available in the Messages app on your new iPhone. You’ll be able to access and interact with your conversations just as you did on your previous iPhone. The only difference is that your messages are now stored locally on your new device.
Downloading your messages from iCloud allows you to have instant access to your entire message history on your new iPhone. You can seamlessly pick up where you left off and continue your conversations without missing a beat.
Now that your messages have been downloaded from iCloud, let’s move on to the next step, where we’ll discuss how to wait for the messages to finish downloading and ensure everything is ready for you to access them. Keep reading!
Step 6: Wait for the messages to download
After initiating the download of your messages from iCloud, the next step is to patiently wait for the process to complete. The time it takes for the messages to download will depend on various factors, such as the size of your message history and the speed of your internet connection.
While waiting for the messages to download, it’s important to keep your new iPhone connected to a stable Wi-Fi network. This ensures a smooth and uninterrupted download experience. Avoid switching between Wi-Fi networks or turning off your device during the download process.
During the download, you may notice a progress indicator within the Messages app. This provides a visual representation of the download status, allowing you to track the progress. Depending on the size of your messages, this may take some time, so it’s best to be patient and allow the download to complete.
It’s important to note that you can still use your new iPhone and access other features while the messages are being downloaded. The download process runs in the background, allowing you to perform other tasks and use your iPhone as usual.
If you’re in a hurry to access specific conversations or messages, you can start accessing the already downloaded messages while the rest continue to download in the background. This allows you to stay connected and engaged with your conversations, even if the entire message history hasn’t finished downloading yet.
Once the download is complete, you’ll be able to access all your messages on your new iPhone. Make sure to verify that all your conversations, attachments, and media files have been successfully downloaded before proceeding to the next step.
Now that you understand the importance of waiting for the messages to finish downloading, let’s move on to the final step, which explains how to access the downloaded messages on your new iPhone. Keep reading!
Step 7: Access the downloaded messages on your new iPhone
Congratulations, you have successfully downloaded your messages from iCloud to your new iPhone! Now it’s time to access and enjoy your conversations on your shiny new device.
To access the downloaded messages on your new iPhone, follow these simple steps:
- Open the “Messages” app on your new iPhone. You’ll find the app icon with a conversation bubble on your device’s home screen.
- You will now see all your conversations listed within the app. Scroll through the list to find the specific conversation you want to view.
- Tap on a conversation to open it. You will be able to see all the messages, images, videos, and other media files within that conversation.
- Swipe up or down to view older or newer messages within the conversation. You can also tap on individual messages to view additional details or options.
- For multimedia messages, you’ll be able to view images and watch videos directly within the app.
- You can also use the search bar at the top of the app to search for specific keywords or phrases within your messages, making it easier to find specific conversations or information.
With all your messages downloaded and accessible on your new iPhone, you can now continue your conversations seamlessly. Reply to messages, send new ones, and enjoy the convenience of having all your important conversations in one place.
Remember, your new iPhone will continue to sync with iCloud, ensuring that any new messages you receive are available across all your iCloud-connected devices. This synchronization allows you to stay connected and up-to-date with all your conversations, regardless of the device you’re using.
Now that you have successfully accessed your downloaded messages on your new iPhone, you can fully enjoy the benefits of having all your conversations at your fingertips. Take your time to explore the features and settings of the Messages app to personalize your messaging experience.
That concludes our step-by-step guide on how to download messages from iCloud to your new iPhone. We hope this guide has been helpful, and your transition to your new device has been smooth and seamless. Enjoy your conversations and make the most out of your new iPhone!
Conclusion
Congratulations on successfully downloading your messages from iCloud to your new iPhone! By following the steps outlined in this guide, you have ensured that all your important conversations, attachments, and media files are safely transferred to your new device.
iCloud Messages sync provides a seamless way to access your messages across all your iOS devices, making it easy to transition to a new iPhone without losing any valuable conversations. With iCloud Messages enabled, you can enjoy the convenience of having your entire message history available at your fingertips.
Throughout this guide, we walked you through each step of the process. From ensuring your iCloud Messages sync was turned on to setting up your new iPhone, signing in to your iCloud account, and finally downloading and accessing your messages, we aimed to make the process as smooth and straightforward as possible.
Remember to have patience during the download process, as the time it takes will depend on the size of your messages and your internet connection speed. Additionally, keeping your new iPhone connected to a stable Wi-Fi network is crucial for a successful download and synchronization.
Now that your messages are safely stored on your new iPhone, take some time to explore the features and settings of the Messages app. Customize your messaging experience, search for specific conversations, or simply enjoy reconnecting with friends and loved ones through your conversations.
Thank you for following along with our guide. We hope it has provided the guidance you needed to download your messages from iCloud to your new iPhone. If you have any further questions or need assistance, don’t hesitate to consult Apple’s support resources or reach out to their customer service team.
Enjoy your new iPhone and the seamless messaging experience it brings!