Introduction
Welcome to the world of Minecraft Mods! If you’re a Mac user and want to enhance your Minecraft experience with exciting mods, you’ve come to the right place. Mods allow you to add new features, elements, and functionality to the game, taking it to a whole new level of immersion and enjoyment.
Downloading and installing mods on your Mac may seem like a daunting task, but fear not! This comprehensive guide will walk you through the step-by-step process, making it easy for you to download and install mods for Minecraft on your Mac.
Before we dive in, it’s important to note that mods are third-party modifications created by the Minecraft community. They are not officially supported by Mojang, the creators of Minecraft, but they can greatly enhance your gameplay experience. Mods can introduce new blocks, items, creatures, game mechanics, and even completely transform the game world.
Now that you have a basic understanding of what mods are, let’s begin the journey of downloading and installing a mod for Minecraft on your Mac. By the end of this guide, you’ll be ready to explore new and exciting possibilities in the Minecraft universe.
So, grab your pickaxe and buckle up as we embark on this modding adventure!
Step 1: Choose a Mod
The first step to downloading a mod for Minecraft on your Mac is to choose the mod you want to install. There are thousands of mods available, each offering unique features and gameplay enhancements.
When selecting a mod, consider your preferences and what you want to add or change in your Minecraft world. Do you want to add new biomes, creatures, or items? Are you looking for mods that focus on improving gameplay mechanics or graphics? Take some time to explore different mod websites and forums to find a mod that matches your interests.
It’s also crucial to ensure that the mod you choose is compatible with your version of Minecraft and the other mods you may already have installed. Most mod websites will provide compatibility information, so be sure to check before downloading.
Additionally, reading user reviews and comments can give you insights into the mod’s quality, stability, and overall experience. Feedback from other players can help you gauge if a mod is worth your time and effort.
Remember that mods are constantly updated, so be sure to check for the latest version. It’s generally recommended to download mods from reliable sources and reputable modding communities to ensure you receive a safe and trustworthy file.
Once you have chosen a mod that piques your interest and is compatible with your version of Minecraft, it’s time to move on to the next step: finding a reliable source to download the mod file. So let’s delve into the next section of this guide and continue our quest to enhance your Minecraft gameplay with amazing mods!
Step 2: Find a Reliable Source
Now that you have chosen a mod for your Minecraft experience, the next step is to find a reliable source from which to download the mod file. It’s essential to download mods from trustworthy websites to ensure the safety and integrity of your Minecraft installation.
There are several popular modding websites and communities that are known for hosting a wide range of mods. Some of the most reputable sources include CurseForge, Planet Minecraft, Minecraft Forum, and MinecraftMods. These platforms have established a solid reputation for hosting secure and high-quality mods.
When searching for mods, make sure to browse through the categories or use the search function to find the specific mod you’ve selected. Read the descriptions, reviews, and comments on the mod’s page to gather more information about its features and compatibility.
While it is generally safer to download mods from the official Minecraft modding platforms mentioned earlier, exercise caution when exploring other websites. Before downloading from an unknown source, check for user feedback, site reputation, and any indication of potential malware or malicious content.
Always remember to prioritize your online safety when downloading mods. Ensure that you have a reliable antivirus software installed and keep it regularly updated. Scanning the mod file before installation is also a good practice to detect any potential threats.
Now that you are aware of the importance of finding a reliable source, and have your chosen mod in mind, it’s time to move on to the next step: downloading the mod file. Let’s continue this exciting journey to enhance your Minecraft experience!
Step 3: Download the Mod File
With a reliable source in mind, it’s time to download the mod file for your chosen Minecraft mod. Follow these steps to successfully download the file:
- Visit the website where you found the mod and navigate to the mod’s download page.
- Look for the download button or link associated with the mod. It is usually labeled as “Download” or “Download Mod”.
- Click on the download button or link to initiate the download process.
- Depending on your browser settings, you may be prompted to choose a location to save the mod file. Select a location on your Mac where you can easily locate the file.
- Wait for the mod file to finish downloading. The download time will vary depending on the size of the mod and the speed of your internet connection.
It is important to note that some mods may come as .jar or .zip files. These are compressed file formats that need to be extracted before installing the mod.
If you have downloaded a .zip file, locate the file on your Mac and double-click on it. This will automatically extract the contents of the zip file, usually into a new folder with the same name as the mod.
If you have downloaded a .jar file, no extraction is needed. You can proceed to the next steps to install the mod.
Once the mod file is downloaded and extracted (if necessary), you are ready to proceed to the next steps of installing the mod and enjoying its new features in your Minecraft game. So let’s continue this modding adventure by opening the Minecraft directory!
Step 4: Open the Minecraft Directory
In order to install the mod you’ve downloaded, you need to locate the Minecraft directory on your Mac. The Minecraft directory is where the game files are stored and where you will be making the necessary modifications.
To open the Minecraft directory, follow these steps:
- Open the Finder on your Mac by clicking on the Finder icon in the dock.
- In the menu bar at the top of the screen, click on the “Go” option.
- From the dropdown menu, select “Go to Folder…”.
- A new window will pop up, prompting you to enter a folder path. Type “~/Library/Application Support/minecraft” (without the quotation marks) in the text field and click “Go”.
This will take you directly to the Minecraft directory on your Mac.
Alternatively, you can navigate to the Minecraft directory manually by following these steps:
- Open a Finder window.
- In the menu bar, click on “Go”.
- Hold down the “Option” key on your keyboard. This will make the “Library” option appear in the dropdown menu. Click on “Library”.
- Navigate to “Application Support” and then to the “minecraft” folder.
Once you have successfully located the Minecraft directory, you are ready to proceed to the next step: installing Minecraft Forge, which is necessary for running most mods. So let’s embark on the next step of our modding journey!
Step 5: Install Minecraft Forge
In order to run most mods successfully, you will need to install Minecraft Forge. Minecraft Forge is a modding platform that allows mods to be loaded and run in the Minecraft game. Follow these steps to install Minecraft Forge on your Mac:
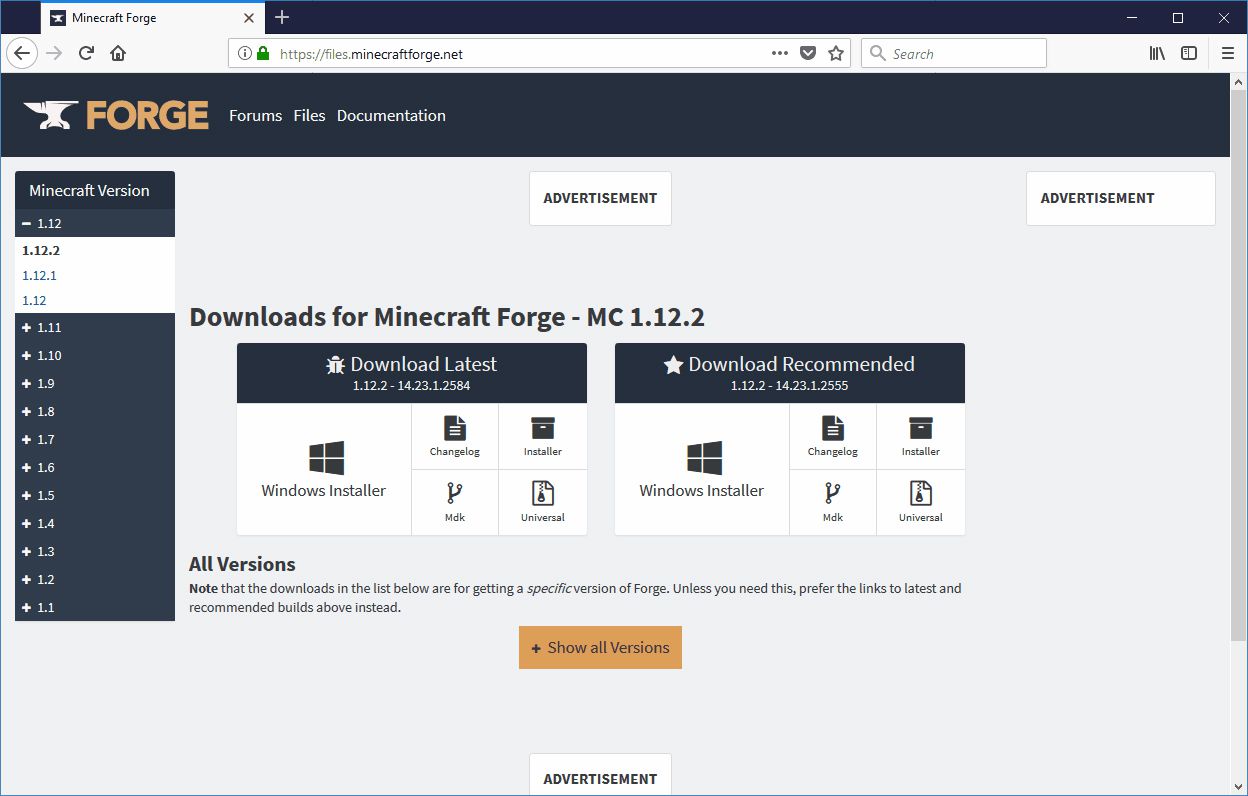
- Firstly, head to the official Minecraft Forge website at https://files.minecraftforge.net/.
- On the homepage, you will see a list of available Minecraft Forge versions. Choose the version that matches your Minecraft game version and click on it to proceed.
- On the download page, you will see a list of available download options. Choose the Installer option and click on it to begin the download.
- Once the installer file is downloaded, locate it on your Mac and double-click on it to launch the installation process.
- You may receive a security prompt asking for your permission to run the installer since it is downloaded from the internet. Click “Open” to proceed.
- The Minecraft Forge installer will open, and you will be prompted to select an installation location. By default, it should detect your Minecraft directory. If it does not, navigate to your Minecraft directory and click “Install”.
- Wait patiently for the installation process to complete. Once it finishes, you will see a message indicating that the installation was successful.
- Close the installer and launch the Minecraft Launcher.
- In the Minecraft Launcher, click on the Installations tab and select the Forge version you just installed from the dropdown menu.
- Click “Play” to launch Minecraft using the Forge version you installed.
Congratulations! You have successfully installed Minecraft Forge on your Mac. Now you are ready to proceed to the next step of locating the mods folder and installing your downloaded mod. Let’s continue our modding journey and bring new features to your Minecraft game!
Step 6: Locate the Mods Folder
In order to install the mod you’ve downloaded, you need to locate the mods folder within the Minecraft directory on your Mac. The mods folder is where you will place the mod file for it to be recognized and loaded by Minecraft. Follow these steps to locate the mods folder:
- Open the Finder on your Mac by clicking on the Finder icon in the dock.
- In the menu bar at the top of the screen, click on the “Go” option.
- From the dropdown menu, select “Go to Folder…”.
- A new window will pop up, prompting you to enter a folder path. Type “~/Library/Application Support/minecraft” (without the quotation marks) in the text field and click “Go”.
- This will take you directly to the Minecraft directory on your Mac.
- Within the Minecraft directory, look for a folder named “mods”. If the folder is not present, you can create a new folder and name it “mods”.
Once you have located or created the mods folder, you are ready to proceed to the next step: moving the mod file into the mods folder. So let’s continue our modding adventure and bring new elements to your Minecraft gameplay!
Step 7: Move the Mod File
Now that you have located the mods folder within your Minecraft directory, it’s time to move the mod file into the mods folder. By doing so, Minecraft will recognize and load the mod when you launch the game. Follow these steps to move the mod file:
- Locate the mod file that you downloaded earlier. It may be in your Downloads folder or another location on your Mac.
- Drag and drop the mod file into the mods folder within the Minecraft directory.
- Once the mod file is in the mods folder, you can close the Finder window.
- It’s important to ensure that the mod file is in the correct format. Some mods may come in a .jar or .zip file format. If the mod file is in a .jar or .zip format, do not extract it. Leave it as is and move it directly into the mods folder.
- If you have multiple mods, you can simply repeat these steps to move all the mod files into the mods folder.
Now that you have successfully moved the mod file into the mods folder, you are just one step away from experiencing the new features and enhancements that the mod offers. In the next step, we will launch Minecraft with the installed mod. So let’s get ready to take your Minecraft gameplay to the next level!
Step 8: Launch Minecraft with the Mod
With the mod file successfully moved into the mods folder, it’s time to launch Minecraft and enjoy the new features and enhancements that the mod brings to the game. Follow these final steps to launch Minecraft with the installed mod:
- Open the Minecraft Launcher on your Mac.
- If you have previously set up a Forge profile, select it from the drop-down menu in the lower-left corner of the launcher. If not, click on “Installations” and then select the Forge version you installed earlier.
- Click on the “Play” button to launch Minecraft with the mod.
- You will see the Minecraft loading screen, and once the game is loaded, you can start a new world or load an existing one.
- Once in-game, you should see the effects of the mod you installed. Explore and enjoy the new features, items, creatures, or gameplay mechanics that the mod offers.
It’s important to note that some mods may require additional setup or configuration within the game. Always refer to the mod’s documentation or instructions provided by the mod creator for any specific requirements or steps needed to fully utilize the mod’s features.
Congratulations! You have successfully installed and launched Minecraft with the mod. Immerse yourself in the new experiences and possibilities that the mod brings to your Minecraft gameplay.
Remember, you can always uninstall a mod by removing the mod file from the mods folder. If you decide to try out different mods in the future, you can repeat the steps outlined in this guide to install and launch them.
Now, go forth and explore the vast world of Minecraft with incredible mods at your disposal! Happy gaming!
Conclusion
Congratulations! You have successfully learned how to download and install mods for Minecraft on your Mac. By following the steps outlined in this guide, you can enhance your Minecraft gameplay and unlock a whole new world of possibilities.
We began by choosing a mod that aligns with your preferences and interests. Then, we discussed the importance of finding a reliable source to download mods from, ensuring the safety and quality of the files you download. After that, we walked through the process of downloading the mod file and locating the Minecraft directory on your Mac.
Next, we installed Minecraft Forge, the modding platform that allows mods to be loaded and run in the game. With Minecraft Forge successfully installed, we were able to move on to locating the mods folder within the Minecraft directory and moving the mod file into it.
Finally, we launched Minecraft with the installed mod, giving you the opportunity to experience the new features and enhancements that the mod has to offer. You are now ready to explore and enjoy all the incredible mods available in the Minecraft modding community.
Remember to always choose mods that are compatible with your Minecraft version and to exercise caution when downloading from unknown sources. Additionally, keep in mind that mods enhance your gameplay experience, but they are not officially supported by Mojang, the developers of Minecraft. Be sure to follow the instructions provided by the mod creators and refer to their documentation for any additional setup or configuration requirements.
Now that you have the knowledge and skills to install mods on your Mac, you can continue to discover and experiment with different mods to tailor your Minecraft experience to your liking. So dive into the world of mods and make your Minecraft adventure truly unique and exciting!
Happy modding and happy crafting!