Introduction
Do you have a DVD collection gathering dust on your shelf, while you find yourself watching movies and TV shows on your iPad instead? Well, you’re not alone. With the rise of portable devices like the iPad, many people are preferring to enjoy their favorite movies and TV shows on the go. However, DVDs are not compatible with iPads, which can be frustrating for those who want to watch their DVD collection on their iPad.
The good news is that you can easily download your DVDs onto your iPad, allowing you to enjoy your favorite movies and TV shows anytime, anywhere. By converting your DVDs into a format that is compatible with the iPad, you can have your entire DVD collection at your fingertips.
There are several benefits to downloading DVDs to iPad. Firstly, it allows you to carry your entire movie collection with you wherever you go, without having to carry the physical discs. This is especially convenient when traveling or commuting, as you can simply load up your iPad with your favorite movies and enjoy them on the journey.
Secondly, downloading DVDs to iPad ensures that you can watch your movies and TV shows without an internet connection. Streaming services like Netflix and Amazon Prime require a stable internet connection, which may not always be available when you’re on the move. By downloading your DVDs, you have the freedom to watch your favorite movies without relying on an internet connection.
Lastly, downloading DVDs to iPad gives you the flexibility to watch your movies and TV shows at your own pace. You can pause, rewind, or fast-forward through scenes, and even watch them in slow motion if you want to catch every detail. With the touch screen interface of the iPad, you have full control over your viewing experience.
In this guide, we will walk you through the step-by-step process of downloading DVDs to your iPad. Whether you’re a tech-savvy individual or a beginner, this guide will provide you with the necessary information to enjoy your favorite DVDs on your iPad. So, let’s get started!
Benefits of Downloading DVD to iPad
There are several compelling reasons why you should consider downloading your DVDs to iPad. Let’s explore the key benefits:
- Portability: By downloading DVDs to your iPad, you can carry your entire movie collection with you wherever you go. No longer will you be limited to the selection of movies available on streaming platforms. Whether you’re on a long flight, waiting for a train, or simply relaxing in the park, you’ll have a variety of movies and TV shows at your fingertips.
- Offline Access: One of the significant advantages of downloading DVDs to iPad is the ability to watch your favorite movies without an internet connection. This is especially advantageous when traveling to areas with limited or no Wi-Fi access. Simply pre-load your iPad with the desired movies, and you’ll never have to worry about buffering or streaming interruptions.
- Customization Options: When you download DVDs to iPad, you have the freedom to customize your viewing experience. You can choose the video quality and compression settings that suit your preferences and storage capacity. Additionally, you can create playlists, organize movies by genre or theme, and even add subtitles or audio tracks to enhance the viewing experience.
- Preservation of DVDs: DVDs can be prone to scratches, disc rot, or general wear and tear over time. By downloading DVDs to iPad, you can protect your physical DVDs from damage and preserve their quality for a longer duration. This is particularly beneficial if you have rare or out-of-print DVDs that are hard to replace.
- Convenience: Downloading DVDs to iPad eliminates the need for DVD players or external devices. With just your iPad, you can seamlessly access and enjoy your movie collection. This is especially convenient for individuals who travel frequently and desire a lightweight, all-in-one entertainment device.
- Compatibility: iPads are incredibly versatile and support a wide range of video formats. Thus, by downloading DVDs to iPad, you can avoid compatibility issues and ensure that your movies and TV shows play smoothly without any glitches or formatting errors.
In summary, downloading DVDs to iPad offers portability, offline access, customization options, preservation of DVDs, convenience, and compatibility. These benefits make it a worthwhile endeavor for anyone who wants to enjoy their favorite movies and TV shows on the go. Now that you are aware of the advantages, let’s delve into the step-by-step process of downloading DVDs to your iPad.
Steps to Download DVD to iPad
If you’re eager to watch your DVD collection on your iPad, follow these simple steps to download DVDs to your iPad:
- Choose a DVD ripping software: Begin by selecting a reliable DVD ripping software that supports converting DVDs to iPad-compatible formats. There are numerous options available, both free and paid, so choose the one that best suits your needs and budget.
- Install the DVD ripping software: Once you’ve chosen the software, download and install it on your computer. Ensure that you follow the installation instructions provided by the software developer to set it up correctly.
- Insert DVD into your computer: Insert the DVD you wish to download to your iPad into your computer’s DVD drive. Ensure that the DVD is in good condition and free from scratches or damage that may affect the ripping process.
- Open the DVD ripping software: Launch the DVD ripping software that you installed earlier. It should detect the DVD automatically and display its contents.
- Select the DVD source: In the DVD ripping software, locate the options or settings that allow you to choose the DVD source. Select the DVD drive where your inserted DVD is located.
- Choose iPad as the output format: Look for the output format settings in the software and select iPad as the target format. This ensures that the converted file will be compatible with your iPad.
- Set the desired video quality and compression settings: Depending on your preferences and available storage space on your iPad, you can adjust the video quality and compression settings. Higher quality settings will generate larger file sizes, while lower quality settings will result in smaller file sizes.
- Start the DVD ripping process: Once you’ve configured the desired settings, initiate the DVD ripping process by clicking the appropriate button in the software. The software will begin converting the DVD into the iPad-compatible format.
- Transfer the ripped DVD file to your iPad: After the ripping process is complete, connect your iPad to your computer using the appropriate USB cable. Open iTunes or your preferred file management software and transfer the converted DVD file to your iPad device.
- Enjoy watching the DVD on your iPad: Once the file is successfully transferred, disconnect your iPad from the computer. Launch the video player on your iPad and locate the downloaded DVD file. You can now sit back, relax, and enjoy watching the DVD on your iPad.
By following these steps, you can easily download your DVD collection to your iPad and enjoy your favorite movies and TV shows on the go. Now that you’re familiar with the process, it’s time to gather the necessary tools and get started on transforming your iPad into a portable movie theater.
Step 1: Choose a DVD Ripping Software
Before you can begin the process of downloading DVDs to your iPad, you need to choose a reliable DVD ripping software. This software will allow you to convert the DVD’s contents into a format that is compatible with your iPad. There are several factors to consider when selecting a DVD ripping software:
- Compatibility: Ensure that the DVD ripping software you choose is compatible with your computer’s operating system. Whether you’re using Windows or macOS, there are options available for both platforms.
- Features and Options: Look for a software that offers a variety of features and options to enhance the DVD ripping process. Some desirable features include the ability to select specific chapters, add subtitles, adjust audio tracks, and customize output settings.
- User-Friendliness: Consider the user-friendliness of the software interface. You’ll want a program that is intuitive and easy to navigate, even if you’re a beginner with minimal technical expertise.
- Conversion Speed: The speed of the DVD ripping process can vary depending on the software you choose. Look for software that offers fast conversion speeds without compromising on the quality of the output file.
- Quality of Output: It’s essential to ensure that the DVD ripping software produces high-quality output files. Look for reviews or user feedback that highlight the software’s ability to retain the original video and audio quality of the DVD.
- Customization Options: Consider the level of customization that the software allows. This includes the ability to adjust video resolution, bitrate, frame rate, and other settings to tailor the output file according to your preferences.
- Support and Updates: Choose a DVD ripping software that offers reliable customer support and regular updates. This ensures that any issues or bugs will be addressed promptly, and you’ll have access to the latest features and improvements.
There are several popular DVD ripping software options available, such as Handbrake, WinX DVD Ripper, MakeMKV, and DVDFab. Research each software’s features, read user reviews, and compare their capabilities to determine which one best aligns with your needs and requirements.
Once you’ve chosen a DVD ripping software, download it from the official website or a reputable source. Ensure that you follow the installation instructions provided by the software developer to set it up correctly on your computer.
Remember, choosing the right DVD ripping software is crucial as it lays the foundation for a successful DVD-to-iPad conversion process. So take your time, evaluate your options, and select the software that will empower you to enjoy your DVD collection on your iPad.
Step 2: Install the DVD Ripping Software
After selecting the DVD ripping software that best suits your needs, it’s time to install it on your computer. Following the installation process correctly ensures that the software functions seamlessly and is ready for you to use. Here’s a step-by-step guide on how to install the DVD ripping software:
- Download the software: Visit the official website of the DVD ripping software you have chosen. Look for the download link, usually located on the homepage or the software’s dedicated download section. Click on the download link to start the downloading process.
- Check system requirements: Before proceeding, make sure that your computer meets the system requirements specified by the software developer. These requirements typically include the operating system version, processor speed, available RAM, and available disk space. Installing software on a computer that does not meet the minimum requirements can result in compatibility issues or unexpected errors.
- Run the installer: Locate the downloaded installer file on your computer, usually found in the “Downloads” folder or your preferred destination for downloaded files. Double-click on the installer file to initiate the installation process.
- Follow the installation wizard: The installer will launch an installation wizard that guides you through the installation process. Read each step carefully and follow the on-screen prompts. You will be presented with options such as selecting the installation location, choosing additional components or features, and accepting the software’s terms and conditions. Make the appropriate selections based on your preferences.
- Customize installation settings (if available): Some DVD ripping software may provide customization options during the installation process. These settings may include choosing the language, creating desktop shortcuts, or specifying the output file directory. Take this opportunity to tailor the installation to your preferences, but you can also leave the default settings unchanged if you’re unsure.
- Wait for the installation to complete: Once you have made all the necessary selections, click on the “Install” or “Next” button to start the installation process. The installer will copy the necessary files and configure the software on your computer. The progress of the installation will be displayed on the screen. Depending on the software and the processing power of your computer, the installation may take a few minutes.
- Finish the installation: Once the installation is complete, you will be prompted with a completion message or a “Finish” button. Click on the “Finish” button to exit the installation wizard.
- Launch the DVD ripping software: After successfully installing the software, locate the program’s shortcut icon on your desktop or in the Start menu. Double-click on the icon to launch the DVD ripping software on your computer.
With the DVD ripping software installed on your computer, you are now one step closer to converting your DVDs into a format compatible with your iPad. Before proceeding to the next steps, make sure to familiarize yourself with the software’s features and options to ensure efficient usage.
Remember, always download the software from the official website or reputable sources to avoid any potential security risks or malware. By following these steps, you will have the DVD ripping software up and running, ready to rip and convert your DVDs.
Step 3: Insert DVD into your computer
Once you have successfully installed the DVD ripping software on your computer, it’s time to insert the DVD that you want to download onto your iPad. This step involves physically inserting the DVD into your computer’s DVD drive. Here’s how you can do it:
- Locate your computer’s DVD drive: Most desktop computers have a built-in DVD drive located on the front panel of the tower. On laptops, the DVD drive is usually on the side of the device. Take a moment to identify where your computer’s DVD drive is located.
- Prepare the DVD: Before inserting the DVD, make sure it is clean and free from any dust, fingerprints, or scratches. Use a soft, lint-free cloth to gently wipe the surface of the DVD. This helps ensure smooth operation and prevents potential read errors during the ripping process.
- Power on your computer: If your computer is not already powered on, turn it on and wait for the operating system to boot up. Make sure your computer is fully powered up and ready to use before proceeding to the next step.
- Open the DVD drive tray: Locate the button or lever on the front of your computer’s DVD drive that opens the tray. Press the button or gently pull the lever to slide open the tray. The tray will extend outwards, allowing you to access the DVD loading area.
- Place the DVD into the tray: Carefully position the DVD, with the label side facing up, on the center spindle of the open DVD drive tray. Ensure that the DVD is properly aligned and sits flat on the spindle.
- Close the DVD drive tray: Once the DVD is in place, gently push the tray back into the DVD drive until it is fully closed. You might hear a clicking sound as the tray locks into place.
After you have successfully inserted the DVD into your computer’s DVD drive, the DVD ripping software should detect the DVD and display its contents on the screen. You are now ready to proceed to the next step of selecting the DVD source in the DVD ripping software.
Note: If your computer does not have a built-in DVD drive, you may need to use an external DVD drive that connects to your computer via USB. Simply connect the external DVD drive to your computer and follow the same steps mentioned above to insert the DVD.
By following these steps, you have successfully inserted the DVD into your computer and made it accessible to the DVD ripping software. The software can now read the contents of the DVD and begin the process of converting it into a format compatible with your iPad.
Step 4: Open the DVD Ripping Software
Now that you have successfully inserted the DVD into your computer’s DVD drive, it’s time to open the DVD ripping software. Opening the software will allow you to access the DVD’s contents and begin the process of converting it into a format suitable for your iPad. Here’s how to open the DVD ripping software:
- Locate the DVD ripping software icon: Look for the DVD ripping software icon on your computer’s desktop or in the Start menu. Typically, the icon will display the software’s logo or name.
- Double-click on the software icon: Using your mouse or trackpad, double-click on the DVD ripping software icon. This action will initiate the opening of the software.
- Wait for the software to load: Once you have clicked on the icon, the DVD ripping software will start to load. Depending on the software and the processing power of your computer, it may take a few seconds to load all the necessary components.
- Review the software interface: Once the software has opened, take a few moments to familiarize yourself with the user interface. The interface may include various sections, such as a file explorer, settings panel, and preview window. This will enable you to navigate through the software more efficiently.
- Check for DVD detection: After the software has loaded, it should automatically detect the DVD that you inserted into your computer. Look for an option or button within the software that allows you to select the DVD as the source for ripping. Typically, there will be an icon or a dropdown menu labeled “Source” or “DVD Drive.”
- Select the DVD: Click on the appropriate option within the software to select the DVD inserted into your computer’s DVD drive as the source for ripping. The software will then display the contents of the DVD, such as the movie or TV show titles.
- Explore the software’s features: Take some time to explore the features and options provided by the DVD ripping software. You may find options such as selecting specific chapters, adding subtitles or audio tracks, or adjusting output settings. Familiarize yourself with these features as they will allow you to customize the DVD ripping process according to your preferences.
Once you have opened the DVD ripping software and selected the DVD as the source, you are ready to proceed to the next steps of choosing the output format and starting the ripping process. Make sure to follow the instructions provided by the software developer to ensure a smooth and successful DVD conversion process.
By opening the DVD ripping software, you have gained access to the tools and functionalities necessary for converting the DVD into a format compatible with your iPad. Now, let’s move on to the next step of selecting the DVD source to proceed with the conversion process.
Step 5: Select the DVD Source
With the DVD ripping software open and the DVD inserted into your computer’s DVD drive, the next step is to select the DVD as the source for the ripping process. This allows the software to access the content of the DVD and prepare it for conversion. Follow these steps to select the DVD source:
- Locate the DVD source option: Within the DVD ripping software interface, look for an option or button that allows you to choose the DVD source. This option is usually labeled “Source,” “DVD Drive,” or something similar. It may be located at the top of the software’s window or in a sidebar menu.
- Click on the DVD source option: Once you have located the DVD source option, click on it to open a dropdown menu or a dialog box. The menu or dialog box will display the available DVD drives or devices that are connected to your computer.
- Select the DVD drive: From the list of available drives or devices, choose the DVD drive that corresponds to the one in which you inserted your DVD. If you have multiple DVD drives connected to your computer, make sure to select the correct one.
- Confirm the DVD selection: After selecting the DVD drive, the software should display the name or identification of the DVD that is present in the drive. Verify that the displayed DVD matches the one you inserted. This confirmation ensures that the correct DVD is selected as the source for the ripping process.
- Proceed to the next steps: Once you have confirmed the DVD selection, you can move on to the subsequent steps of choosing the output format, adjusting the settings, and initiating the ripping process. These steps will be covered in the following sections of this guide.
By selecting the DVD as the source in the DVD ripping software, you are ready to convert the content of the DVD into a format that can be played on your iPad. Double-check that the correct DVD is chosen to avoid any errors or issues during the ripping process.
Now that the DVD source has been selected, you can proceed to the next step, where you will choose the output format for the converted file. This will ensure that the ripped DVD content is compatible with your iPad and can be enjoyed seamlessly.
Step 6: Choose iPad as the Output Format
After selecting the DVD as the source in the DVD ripping software, the next step is to choose the output format. Since the goal is to watch the DVD on your iPad, you need to select a format that is compatible with your device. Follow the steps below to choose the iPad as the output format:
- Access the output format options: Within the DVD ripping software interface, locate the output format settings. This section may be labeled as “Output Format,” “Profile,” or something similar. It is usually located in the main settings panel or toolbar of the software.
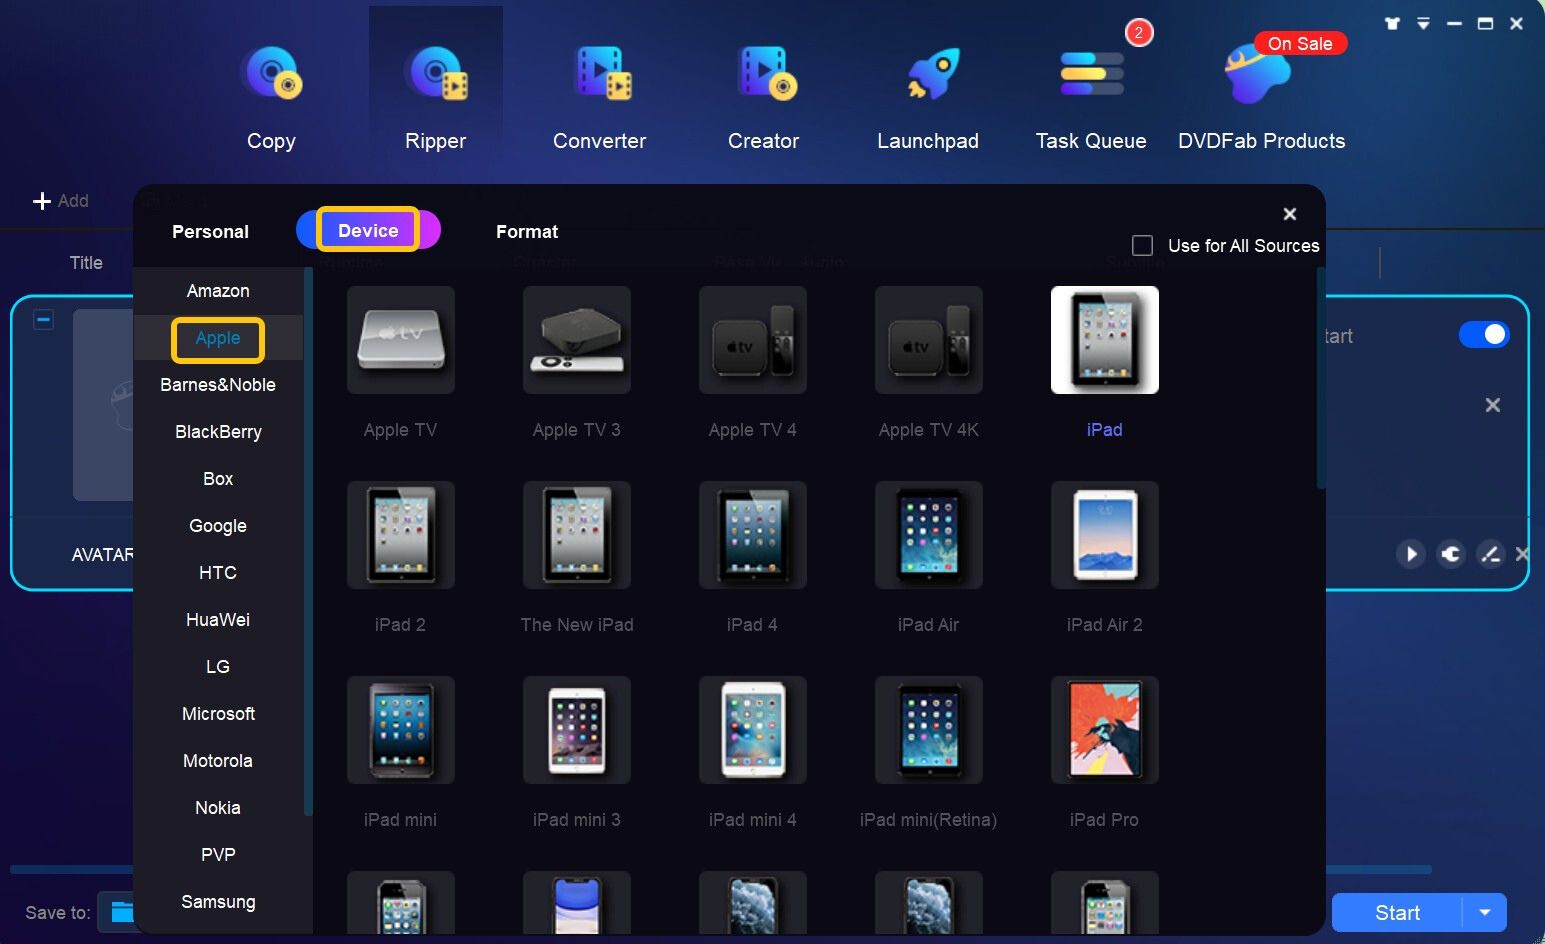
- Explore the available formats: Click on the output format option to expand a list of available formats. Scroll through the list to find the formats compatible with iPad devices. The formats may be denoted by specific terms such as “iPad,” “Apple iPad,” or “MP4 (iPad).” You can also look for the Apple logo or iPad icon as an indication of the compatible formats.
- Select the iPad-compatible format: Once you have located the iPad-compatible formats, choose the one that best suits your preferences and requirements. Consider factors such as file size, video quality, and compatibility with your iPad model.
- Adjust any additional settings: Depending on the DVD ripping software, you may have the option to adjust additional settings before choosing the output format. These settings might include resolution, video codec, audio codec, or bitrate. Make any necessary adjustments based on your preferences or requirements.
- Confirm the output format selection: After choosing the iPad-compatible format and adjusting the settings, double-check your selection to ensure that the output will be in a format suitable for your iPad. Verify that the chosen format is marked or highlighted within the software interface.
- Proceed to the next steps: Once you have confirmed the output format selection, you can proceed to the subsequent steps of setting video quality, compression settings, and initiating the ripping process. These steps will be covered in the following sections of this guide.
By choosing the iPad as the output format, you ensure that the converted file will be compatible with your iPad device. This allows you to seamlessly transfer and watch the ripped DVD on your iPad, enjoying your favorite movies and TV shows on the go.
With the output format selected, you can proceed to the next steps, where you will configure the desired video quality, compression settings, and other customizations to personalize the ripping process according to your preferences.
Step 7: Set the Desired Video Quality and Compression Settings
After choosing the iPad as the output format in the DVD ripping software, the next step is to set the desired video quality and compression settings. This step allows you to customize the output file according to your preferences and the available storage space on your iPad. Follow these steps to configure the video quality and compression settings:
- Locate the video quality and compression settings: Within the DVD ripping software interface, find the section or options related to video quality and compression settings. This may be labeled as “Video Settings,” “Quality,” “Resolution,” or similar terms. Look for the settings that allow you to adjust the video resolution, bitrate, or other relevant parameters.
- Choose the desired video resolution: Select the video resolution that suits your needs. Higher resolutions offer better image quality but result in larger file sizes. If you prefer high-definition (HD) video, choose a resolution that matches or is close to the display resolution of your iPad. Alternatively, for smaller file sizes and efficient storage usage, you can opt for a lower resolution.
- Adjust the video bitrate: The video bitrate affects the quality and file size of the output video. Higher bitrates result in better quality but larger file sizes. Lower bitrates reduce file sizes but may impact the visual quality. Consider your preferences and the available storage capacity on your iPad when selecting the video bitrate.
- Consider other compression settings: Depending on the DVD ripping software, you may have additional compression settings to adjust, such as audio bitrate or audio codec options. These settings can help further optimize the output file size and audio quality. Review the available options and make any desired adjustments.
- Preview the changes (if available): Some DVD ripping software provides a preview feature that allows you to see the effect of the chosen video quality and compression settings. If this feature is available, take advantage of it to ensure that the changes meet your expectations.
- Confirm the video quality and compression settings: Once you have adjusted the video quality and compression settings to your satisfaction, double-check your selections to ensure they align with your preferences. Verify that the chosen settings are reflected within the software interface.
- Proceed to the next steps: After confirming the video quality and compression settings, you can move on to the subsequent steps of starting the DVD ripping process and transferring the ripped DVD file to your iPad. These steps will be covered in the following sections of this guide.
By setting the desired video quality and compression settings, you can customize the output file to suit your preferences and optimize it for your iPad’s storage capacity. Consider balancing the file size and video quality to achieve the best viewing experience on your device.
Now that you have configured the video quality and compression settings, you are ready to proceed to the next steps, where you will initiate the DVD ripping process and prepare the ripped DVD file for transfer to your iPad.
Step 8: Start the DVD Ripping Process
Once you have set the desired video quality and compression settings in the DVD ripping software, it’s time to start the DVD ripping process. This step initiates the conversion of the DVD’s contents into the chosen output format for your iPad. Follow these steps to begin the DVD ripping process:
- Locate the “Start” or “Convert” button: Look for a prominent button within the DVD ripping software interface that is labeled as “Start,” “Rip,” “Convert,” or a similar term. This button typically starts the DVD ripping process.
- Click on the “Start” button: Once you have located the appropriate button, click on it to initiate the DVD ripping process. The software will verify your settings, confirm the output format, and begin converting the DVD’s contents into the desired format for your iPad.
- Monitor the ripping progress: During the ripping process, the DVD ripping software will display a progress indicator or a status bar. This provides information about the remaining time, completion percentage, or other relevant details. It is a good idea to keep an eye on the progress to ensure that the process is running smoothly.
- Do not interrupt the process: It is important to let the DVD ripping process run its course without interruption. Avoid closing the DVD ripping software, shutting down your computer, or ejecting the DVD during the conversion. Interrupting the process may result in incomplete or corrupted output files.
- Wait for the ripping process to complete: Depending on the length and complexity of the DVD, the ripping process may take some time. Be patient and let the software complete the conversion. The software will notify you when the DVD ripping process is finished.
Once the DVD ripping process is complete, the software will have generated a converted file in the selected output format. This file contains the content of the DVD, transformed and optimized for your iPad. You are now ready to transfer this ripped DVD file to your iPad for playback.
With the DVD successfully ripped into the chosen format, you can move on to the next step, where you will learn how to transfer the converted file from your computer to your iPad for easy access and enjoyment of your favorite movies and TV shows.
Step 9: Transfer the Ripped DVD File to Your iPad
Now that you have successfully ripped the DVD into the desired format, the next step is to transfer the converted file to your iPad. This will allow you to have your favorite movies and TV shows readily available for playback on your iPad. Follow these steps to transfer the ripped DVD file to your iPad:
- Connect your iPad to your computer: Use the appropriate USB cable to connect your iPad to your computer. Ensure that both devices are powered on and functioning correctly.
- Open iTunes or file management software: On your computer, open iTunes or any file management software that allows you to manage files on your iPad. If using iTunes, make sure you have the latest version installed.
- Locate your iPad in iTunes or the file management software: Within iTunes or the file management software, locate your iPad. It should be listed under the devices section.
- Navigate to the appropriate file transfer section: In iTunes, click on your iPad to access its overview. From there, select the “Movies” or “File Sharing” tab. If using file management software, navigate to the appropriate folder or section that allows you to transfer files to your iPad.
- Locate the ripped DVD file on your computer: Using the file explorer in Windows or Finder on macOS, navigate to the location where the ripped DVD file is saved on your computer. This is the file that was generated during the DVD ripping process.
- Drag and drop the ripped DVD file to the transfer section: Click and hold the ripped DVD file, then drag it to the movies or file sharing section in iTunes or the file management software. Release the mouse button to drop the file.
- Wait for the file transfer to complete: The file transfer will initiate, and a progress indicator will display the status of the transfer. Wait for the transfer to complete. The duration will depend on the file size and the speed of your computer and USB connection.
- Disconnect your iPad from the computer: Once the file transfer is complete, safely disconnect your iPad from the computer by ejecting it from iTunes or the file management software. You can now unplug the USB cable.
- Access the ripped DVD file on your iPad: On your iPad, navigate to the appropriate app or media player that allows you to access and play the transferred movie. This could be the built-in “Videos” app or any third-party media player app you prefer.
- Enjoy watching the DVD on your iPad: Launch the media player app on your iPad and locate the ripped DVD file. Tap on it to start playing the movie or TV show. Sit back, relax, and enjoy watching the DVD on your iPad at your convenience.
By following these steps, you have successfully transferred the ripped DVD file from your computer to your iPad. Now you can enjoy your favorite movies and TV shows on your iPad anytime and anywhere without the need for an internet connection.
With the file successfully transferred to your iPad, you have completed the process of downloading and transferring a DVD to your iPad. Now you can relish in the convenience of having your DVD collection at your fingertips on your portable device, making your entertainment truly mobile.
Step 10: Enjoy Watching the DVD on Your iPad
Now that you have transferred the ripped DVD file to your iPad, it’s time to sit back, relax, and enjoy watching your favorite movies and TV shows on your iPad. With the convenience of having your DVD collection at your fingertips, you can indulge in a personalized and portable entertainment experience. Follow these steps to enjoy watching the DVD on your iPad:
- Unlock your iPad: If your iPad is locked, press the Home or Power button to wake it up. Unlock your iPad by entering your passcode, using Touch ID, or Face ID. This will bring you to the home screen of your iPad.
- Locate the media player app: Navigate to the home screen or the app library on your iPad to locate the media player app you prefer to use. This could be the default “Videos” app or any third-party media player app you may have downloaded.
- Open the media player app: Tap on the icon of the media player app to launch it. The app should open up, displaying a home screen or a library of media files.
- Access the ripped DVD file: Look for the ripped DVD file within the media player app. The file may be located in a dedicated folder, a “Movies” or “Videos” section, or any other category based on the app’s organization. Navigate to the appropriate section to find the ripped DVD file.
- Select and play the DVD: Tap on the ripped DVD file to start playing it. The media player app will begin playback, and you can now enjoy watching the movie or TV show on your iPad’s screen.
- Make use of playback controls: While watching the DVD on your iPad, you can control the playback using the available controls. These may include play/pause, fast forward, rewind, volume adjustment, and even subtitle selection if the media player app supports it.
- Enjoy the movie on your iPad: Sit back, relax, and enjoy watching the DVD on your iPad. Take advantage of your iPad’s portability to watch your favorite movies and TV shows at your convenience, whether you’re at home, on a journey, or anywhere else.
- Pause, resume, or stop playback: If you need to pause the movie or TV show, simply tap on the pause button. You can then resume playback by tapping play or stop altogether by tapping the stop button.
- Explore additional features: Depending on the media player app, you may have access to additional features such as creating playlists, adjusting playback settings, or even connecting your iPad to external displays or speakers for a more immersive experience.
- Enjoy your DVD collection on the go: With your DVD successfully transferred and playing on your iPad, you now have the freedom to enjoy your DVD collection anytime and anywhere. Whether it’s a long flight, a road trip, or simply relaxing at home, your iPad provides a convenient and portable way to enjoy your favorite movies and TV shows.
By following these steps, you can fully immerse yourself in the enjoyment of watching the DVD on your iPad. Embrace the convenience and portability of your iPad to create a personalized movie theater experience wherever you go.
Congratulations! You have now completed the entire process of downloading, transferring, and watching a DVD on your iPad. Embrace the freedom of enjoying your DVD collection on your iPad’s vibrant screen, and have a fantastic viewing experience!
Conclusion
Congratulations on successfully downloading and transferring your DVD collection to your iPad! You can now enjoy your favorite movies and TV shows on the go. Converting your DVDs into a format compatible with your iPad not only provides convenience but also preserves your DVD collection and allows for seamless playback without the need for an internet connection.
Throughout this guide, we have explored the step-by-step process of downloading DVDs to your iPad. Starting from choosing a reliable DVD ripping software, installing it on your computer, and inserting the DVD, all the way to selecting the DVD source, choosing the output format, setting video quality and compression settings, and initiating the DVD ripping process. Finally, we walked through transferring the ripped DVD file to your iPad and enjoying the movie or TV show on your device.
By following these steps, you have unlocked a whole new level of entertainment and flexibility. Your iPad has transformed into a portable movie theater, allowing you to carry your entire DVD collection with you, ready to be enjoyed at any time and in any location. No longer restricted by DVD players or physical discs, you have the freedom to watch movies and TV shows on your own terms.
Remember, always ensure the legality of ripping DVDs and respect copyright laws. Make sure you are ripping DVDs that you own or have the rights to copy for personal use. Be mindful of the intellectual property rights of content creators and respect their work.
Now that you have mastered the art of downloading DVDs to your iPad, gather your favorite DVDs, grab your iPad, and embark on a journey of endless entertainment. Enjoy your movie marathon, catch up on your favorite TV shows, and immerse yourself in the magic of cinema right at your fingertips.
Let your iPad be your ultimate entertainment companion and rejoice in the convenience, portability, and versatility it offers. The world of your DVD collection is now translated into a digital format, ready to be explored and enjoyed wherever your adventures take you.