Introduction
Having a personalized ringtone for your phone can add a touch of individuality and excitement to your daily life. Instead of using a default ringtone, you can download a song of your choice and set it as your ringtone. This way, every time your phone rings, you’ll hear a melody that reflects your unique taste.
Gone are the days when you had to rely on limited options provided by phone manufacturers. With the advancement of technology, there are numerous websites and apps available that allow you to easily download songs and convert them into ringtones. Whether you prefer a catchy pop song, a soothing classical melody, or a hip-hop beat, you can find the perfect ringtone to match your style.
In this guide, we will walk you through the step-by-step process of how to download a song and turn it into a ringtone. From finding a reliable website or app to transferring the ringtone to your phone, we’ve got you covered. So, let’s get started on customizing your phone’s ringtone and adding a touch of personalization to your device.
Before we dive into the steps, it’s important to note that the process might vary slightly depending on the device and operating system you’re using. However, the general concept remains the same. So, regardless of whether you’re using an iPhone, Android, or any other device, you’ll be able to follow these steps and set up a customized ringtone.
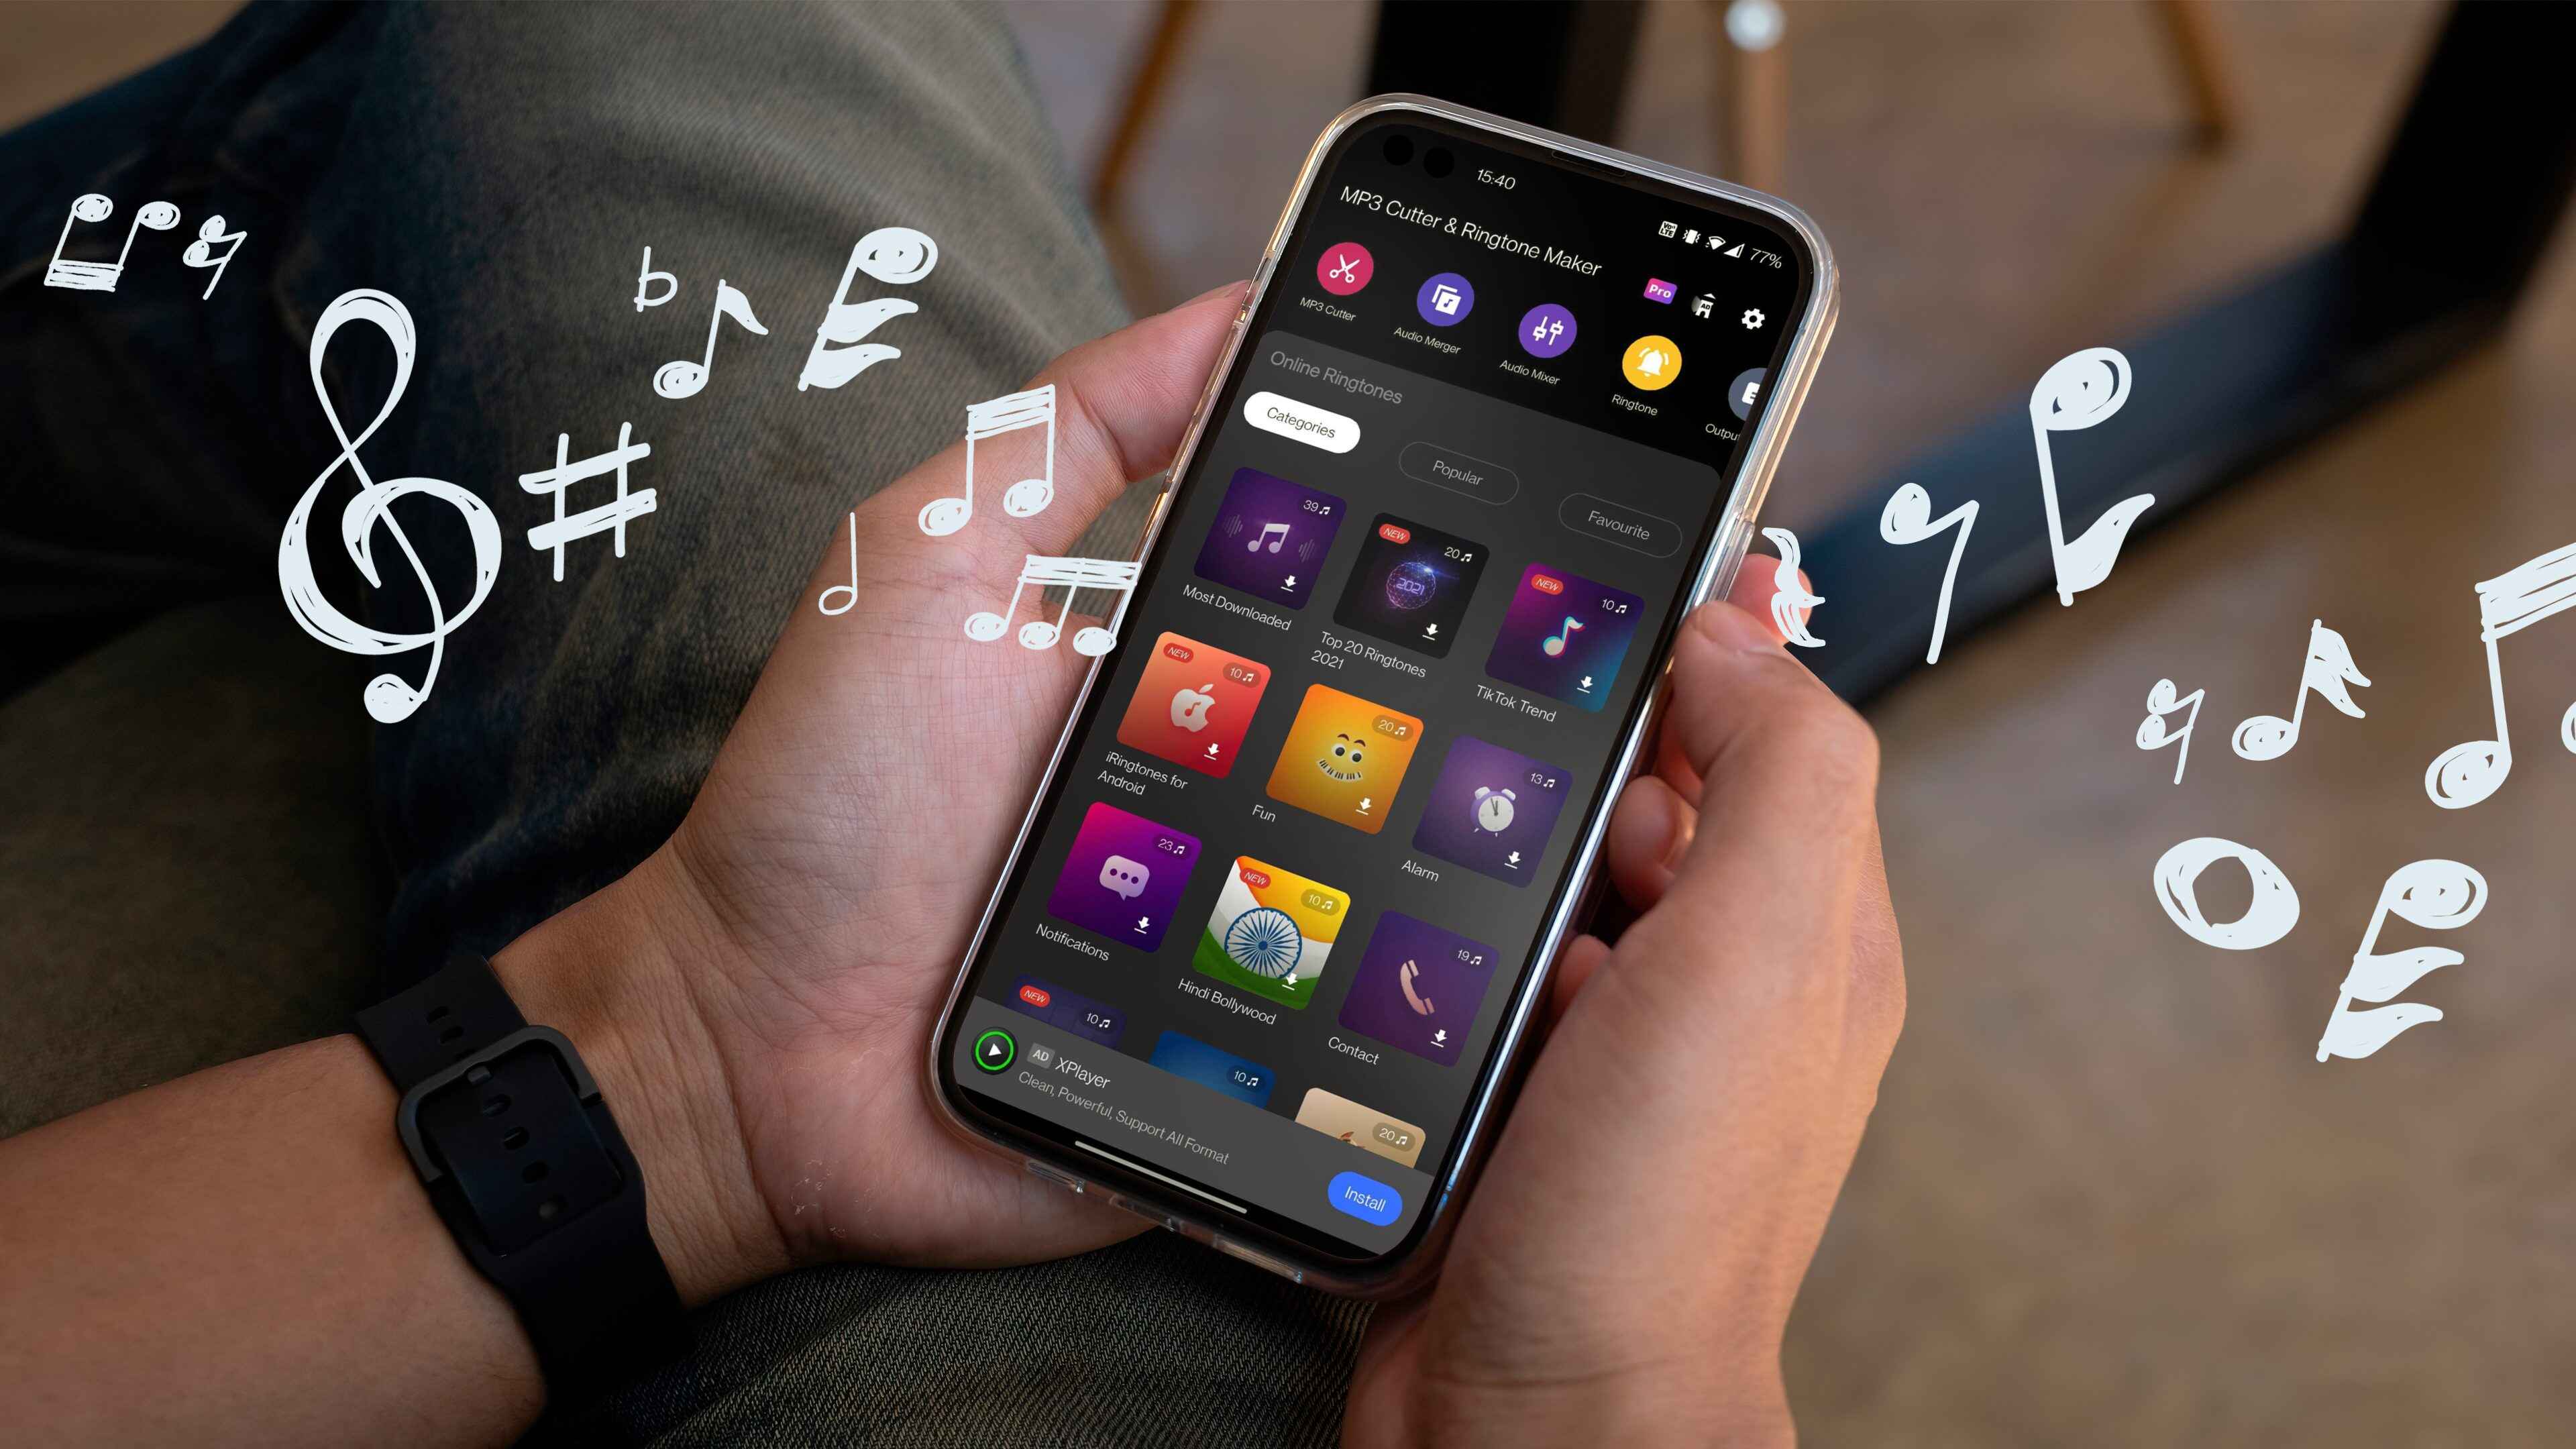
Step 1: Find a Reliable Website or App
The first step in downloading a song as a ringtone is to find a reliable website or app that offers a wide selection of songs and allows you to download them. There are several websites and apps available, each with its own features and offerings. Here are a few popular options to consider:
- 1. Online Music Platforms: Websites like SoundCloud, Bandcamp, and YouTube Music provide a vast library of songs that you can explore and download. Some of these platforms may offer direct options to convert the downloaded song into a ringtone.
- 2. Ringtone Maker Apps: There are dedicated apps available that allow you to download and create custom ringtones. Apps like Zedge, Audiko, and Ringtone Maker offer a seamless experience with user-friendly interfaces.
- 3. Official Music Stores: Many official music stores, such as iTunes and Google Play Music, offer the option to purchase and download individual songs. These songs can then be edited to create personalized ringtones.
When choosing a website or app, be sure to consider factors such as the song collection, user reviews, and any additional features offered. Make sure the platform is reliable, safe to use, and supports the file format required for creating ringtones. It’s also a good idea to check if the website or app has a search feature, allowing you to easily find the song you want without scrolling through a long list.
Once you’ve narrowed down your options, go ahead and visit the chosen website or download the app from a trusted source. Install the app or open the website in your browser, and you’re ready to move on to the next step: selecting the song that you want to use as your ringtone.
Step 2: Select the Song
After finding a reliable website or app, the next step is to select the song that you want to use as your ringtone. This is where you can showcase your personal taste and choose a melody that resonates with you. Here’s how you can go about selecting the perfect song:
- Browsing: If you have a specific song in mind, you can use the search function provided by the website or app to quickly find it. Alternatively, you can explore the various categories, genres, or playlists to discover new songs that catch your attention.
- Popular Choices: Many websites and apps have a section dedicated to popular or trending songs. This can be a great place to find songs that are currently popular among other users.
- Featured Playlists: Some platforms curate playlists based on different themes, moods, or genres. Browse through these playlists to discover songs that fit your desired ringtone style.
- Artist Radio: If you have a favorite artist, some websites or apps offer artist radio features that play songs related to that artist. This can be a great way to find similar songs or explore the artist’s discography for potential ringtones.
- User Recommendations: Certain platforms allow users to recommend songs or create their own playlists. Take advantage of these user-generated recommendations to discover new songs that you may not have come across otherwise.
Take your time to explore and listen to different songs until you find the perfect one. Consider factors such as the song’s melody, lyrics, and overall vibe. Remember, your ringtone should reflect your personal style and preferences, so choose a song that you will enjoy hearing every time your phone rings.
Once you’ve selected the song, take note of the title and artist to make it easier for the next steps. Now it’s time to move on to editing and cutting the song to create your customized ringtone.
Step 3: Edit and Cut the Song
Now that you’ve chosen the perfect song for your ringtone, it’s time to edit and cut it to create a customized clip that will play when someone calls you. Here’s how you can edit and cut the song to fit your preference:
- Open the Song: On the website or app you’re using, locate the selected song in your library or search for it again if necessary. Once you’ve found it, open the song in the editing or cutting tool provided.
- Set the Start and End Points: Most editing tools allow you to set the start and end points of the clip that you want to use as your ringtone. Listen to the song and identify the part you want to use. It could be the catchy chorus, an instrumental section, or any other segment that you find appealing.
- Trim and Adjust: Use the editing tools to trim the song and adjust the start and end points accordingly. Some platforms offer a visual waveform representation of the song, making it easier to identify specific sections. Ensure that the clip is not too short or too long; aim for a duration of around 20-30 seconds for a standard ringtone.
- Preview and Fine-tune: Once you’re satisfied with the selected clip, preview it to make sure it sounds good. Listen for any abrupt transitions or awkward cuts. If needed, make further adjustments to fine-tune the clip until it sounds seamless and fits your desired ringtone.
- Save the Edited Clip: After finalizing the edits, save the edited clip as a separate file. Some platforms may offer a “Save As” or “Export” option, allowing you to save the edited clip in a ringtone-compatible format.
It’s important to note that some platforms may have limitations or restrictions on the length of the ringtone or the type of file format that can be used. Make sure to familiarize yourself with these requirements to ensure your edited clip meets the necessary criteria.
With the song now edited and trimmed to perfection, you’re one step closer to having your customized ringtone. The next step is to convert the song into the required format that your phone supports.
Step 4: Convert the Song to the Required Format
Now that you have the edited clip of your chosen song, it’s time to convert it to the required format that your phone supports. Different devices and operating systems have specific file format requirements for ringtones. Follow these steps to convert the song to the appropriate format:
- Check Your Device’s Supported Formats: Before proceeding, it’s essential to know the supported audio file formats for your phone. Common formats include MP3, M4R, and OGG. Consult your device’s user manual or do a quick online search to determine the compatible formats.
- Use Online Converters: If the editing tool you used doesn’t offer the option to save the clip in the required format, you can use online audio converters. There are various websites available that allow you to upload your edited clip and convert it to different audio formats. Select the desired format, such as MP3, and initiate the conversion process. Once converted, download the file to your computer.
- Convert Using Audio Editing Software: If you’re familiar with audio editing software like Audacity, you can import the edited clip and export it in the appropriate format. These software tools offer more advanced editing options and allow for precise customization of the output file.
- Transfer the Converted File: Once you have the converted file in the required format, transfer it to your phone by connecting your device to your computer via USB or using file-sharing apps like Google Drive or Dropbox. Locate the folder on your phone where ringtones are stored, such as “Ringtones” or “Media,” and copy the converted file into that folder.
Remember to have a backup of your original edited clip in case you need to make further changes or want to use it as a ringtone on a different device. Additionally, make sure to name the file properly and keep it organized for easy identification when setting it as your ringtone.
With the converted file now transferred to your phone, you’re almost ready to set it as your personalized ringtone. The final step is to transfer the ringtone to your device’s ringtone folder and make it your default ringtone.
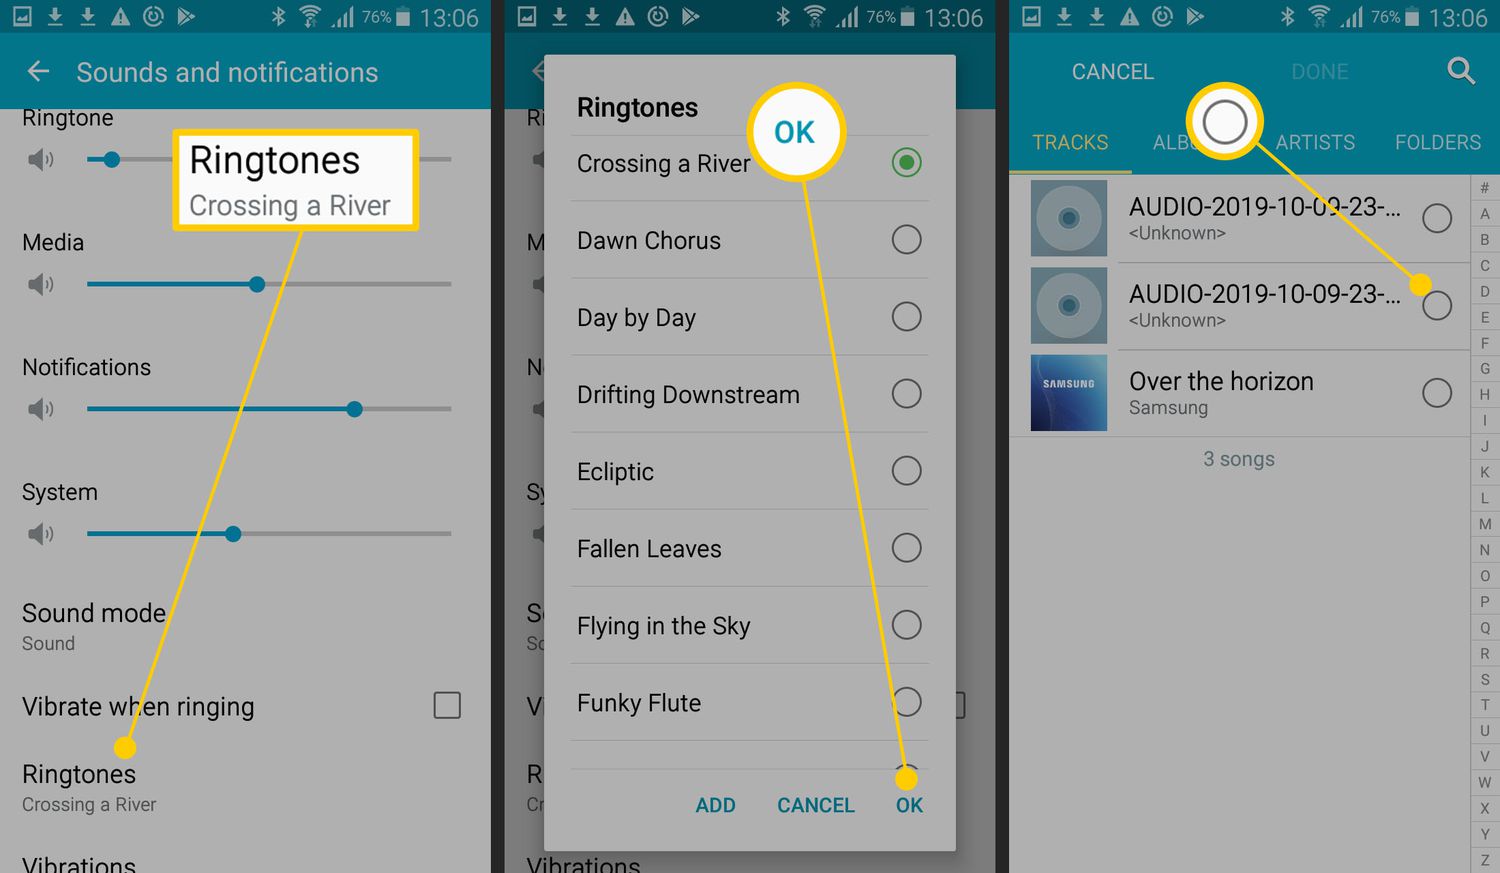
Step 5: Transfer the Ringtone to Your Phone
Now that you have successfully converted the song into the required format, it’s time to transfer the ringtone to your phone and set it as your default ringtone. Follow these steps to complete the process:
- Connect Your Phone to Your Computer: Use a USB cable to connect your phone to your computer. Ensure that your phone is properly recognized and connected as a media device.
- Locate the Ringtone Folder: Open your phone’s storage or internal memory on your computer. Navigate to the folder where the ringtones are stored. This folder is typically named “Ringtones” or “Media.”
- Copy and Paste the Ringtone: Locate the converted ringtone file on your computer, and then copy and paste it into the ringtone folder on your phone. If prompted, choose to replace any existing file with the same name.
- Disconnect Your Phone: Safely eject or disconnect your phone from your computer after the file transfer is complete.
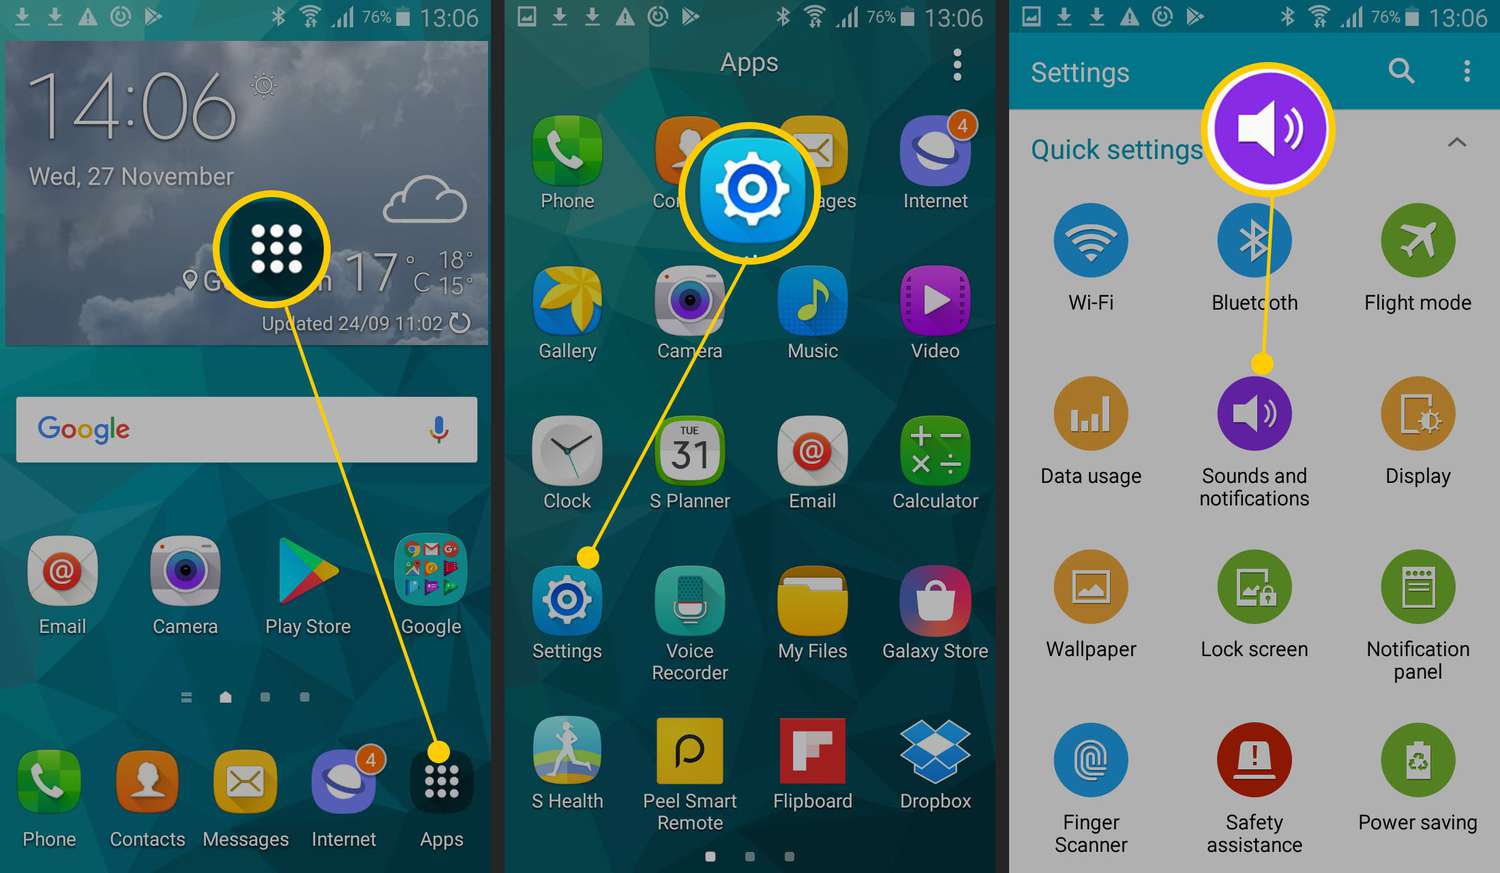
- Set the Ringtone on Your Phone: On your phone, go to the Settings menu and locate the Sound or Sound & Vibration settings. Look for the option to select a default ringtone or set a custom ringtone. You should now see the transferred ringtone in the list of available ringtones. Select the desired ringtone and save your changes.
Once you’ve completed these steps, your customized ringtone is now set on your phone. Test it by calling your phone from another device and enjoy hearing your favorite song play whenever someone calls you.
Remember that the process may vary slightly depending on the device and operating system you’re using. If you encounter any issues or difficulties during the transfer and setting process, consult your device’s user manual or search for instructions specific to your phone model or operating system online.
Congratulations! You have successfully downloaded a song and transformed it into your personalized ringtone. Now, every time your phone rings, you’ll be greeted with a melody that reflects your unique taste and style!
Conclusion
Customizing your phone’s ringtone with a song of your choice adds a personal touch to your device and makes receiving calls more enjoyable. By following the steps outlined in this guide, you can easily download a song and convert it into a ringtone that reflects your unique style and preferences. Let’s recap the steps:
- Find a reliable website or app with a wide selection of songs.
- Select the song that you want to use as your ringtone.
- Edit and cut the song to create a customized clip.
- Convert the edited clip to the required format for your phone.
- Transfer the ringtone to your phone and set it as your default ringtone.
Remember to consider the supported file formats, explore different platforms for song selection, and use editing tools to fine-tune your ringtone. By following these steps, you can personalize your phone and make it truly yours.
Keep in mind that the process may slightly vary based on your device and operating system. Always refer to your device’s user manual or search for specific instructions if needed.
Now that you have the knowledge to create custom ringtones, why settle for generic sounds? Take the opportunity to express your individuality and enjoy a unique ringtone that puts a smile on your face every time your phone rings.
So, what are you waiting for? Let the world hear your favorite song whenever your phone rings, and make the incoming calls an experience that reflects your personality!