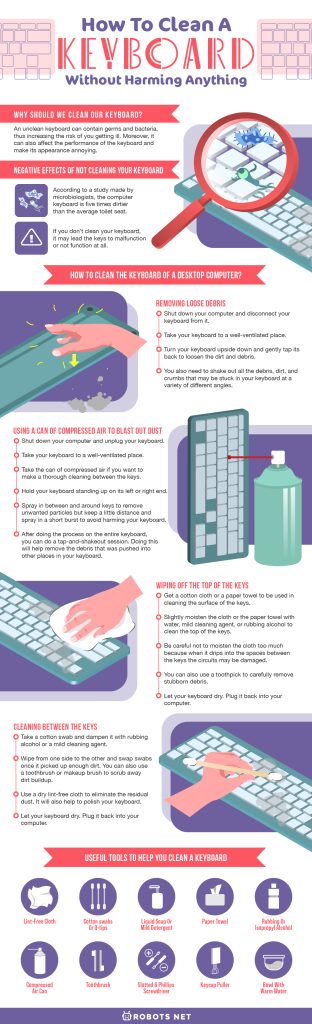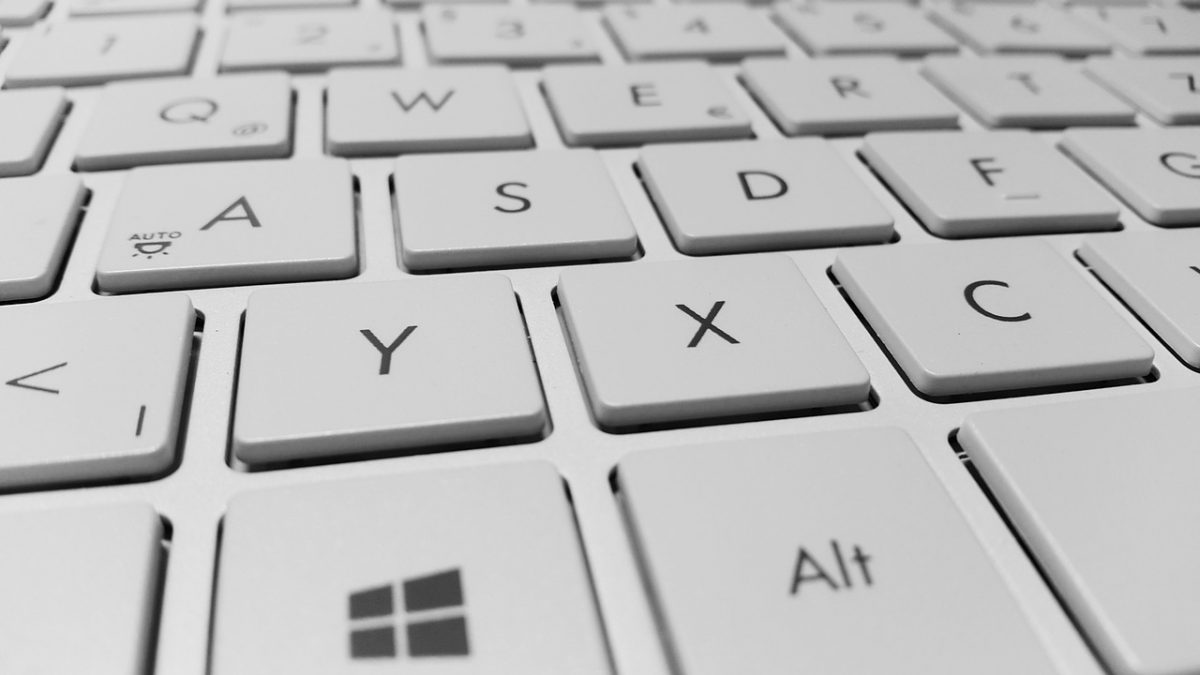
Our computer’s keyboard is prone to dust, dirt, spills, and any food particles, which is why it is considered as one of the most germ-infested devices that we use. And since our keyboard can easily attract these particles, we must look after our keyboard and clean it regularly more particularly if we are not the only one who is using it. In addition to this, knowing how to clean a keyboard will not only benefit us but can also improve its performance. Moreover, cleaning our keyboard extends its lifespan and protects us from different diseases that can be brought up by the buildup of bacteria.
In this article, we will discuss the importance of knowing how to clean a keyboard and the different tools that we can use to do the cleaning process.
Why Should We Clean Our Keyboard?

There are countless reasons as why you should know how to clean a keyboard. An unclean keyboard can contain germs and bacteria, thus increasing the risk of you getting ill. Moreover, it can also affect the performance of the keyboard and make its appearance annoying.
A clean keyboard represents a tidy user and adds to a safe and appealing working environment. It can also prevent the keys from being clogged and sticky. The possibility of malfunctions or even overheating can also be avoided.
Negative Effects of Not Cleaning Your Keyboard

According to a study made by microbiologists, the computer keyboard is five times dirtier than the average toilet seat. That said, when you do not clean your keyboard, bacteria can be transferred to your hands when you use it. It’s a gross analogy, but it’s almost like touching poop. Imagine touching your uncleaned, filthy keyboard and then touching your face or putting food into your mouth. Bacteria can easily enter your body. Not only is that nasty, but it’s also bad for your health and others too. You can make other people sick by letting them use your poorly maintained keyboard.
In addition to this, if you don’t clean your keyboard, it may lead the keys to malfunction or not function at all. If you’re wondering why your laptop keyboard is not working, it might be because dirt and dust are trapped in your keyboard or causing it to overheat. Keeping your keyboard clean is not only a way to care for your health but also the health of your keyboard itself.
Before you start looking for new work or gaming keyboards, make sure you check your keyboard first—it may only need a good cleaning. Now, if you’re ready to start cleaning or fixing your keyboard, it would be good to know how to remove keyboard keys safely first.
How to Clean the Keyboard of a Desktop Computer?
Here are the processes you can go through in order to thoroughly clean your desktop keyboard.
Removing Loose Debris
- You need to shut down your computer and disconnect your keyboard from it.
- Take your keyboard to a well-ventilated place. You can choose a place that it can be easily cleaned and nothing can bother you.
- Turn your keyboard upside down and gently tap its back to loosen the dirt and debris.
- You also need to shake out all the debris, dirt, and crumbs that may be stuck in your keyboard at a variety of different angles.
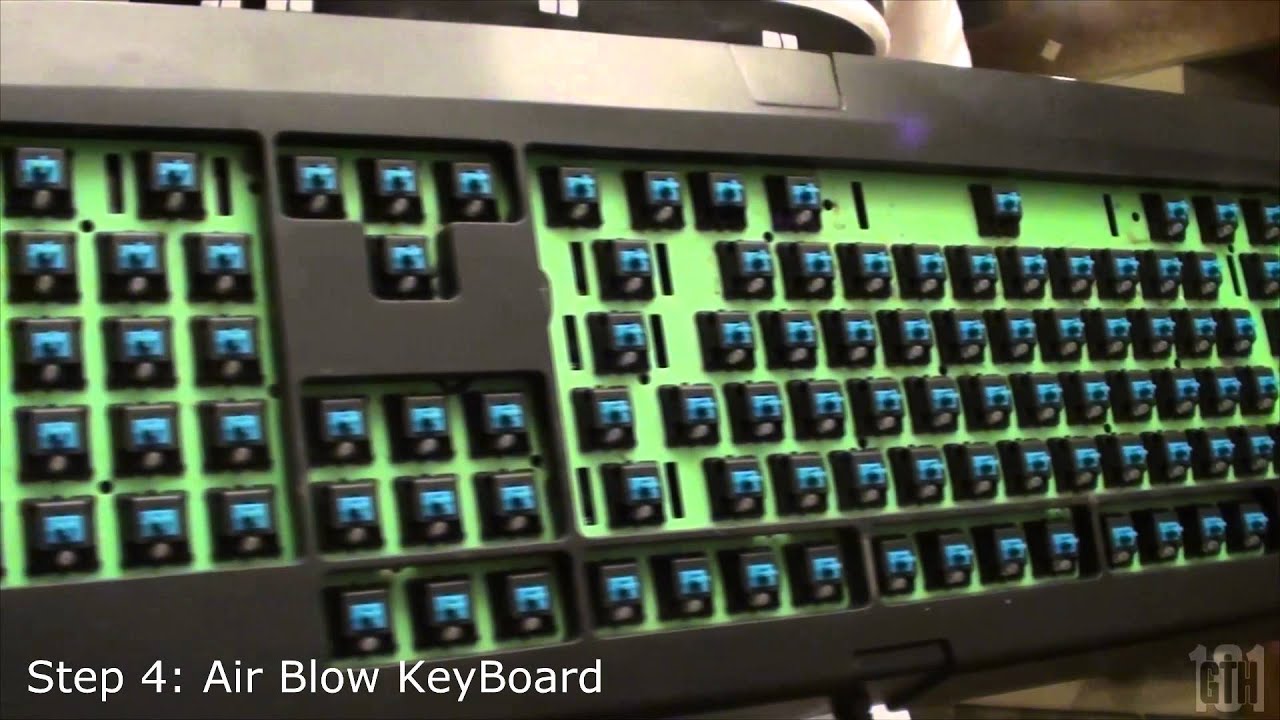
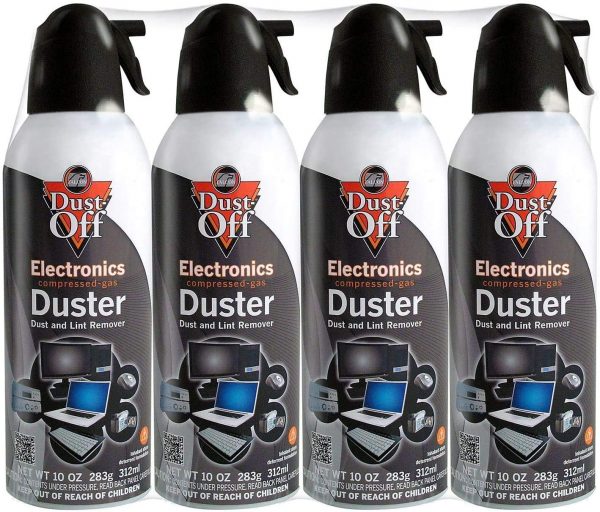
Using a Can of Compressed Air to Blast Out Dust
- Shut down your computer.
- Unplug your keyboard.
- Take your keyboard to a well-ventilated place. It will be better if it is a place that it can be cleaned easily and nothing will bother you.
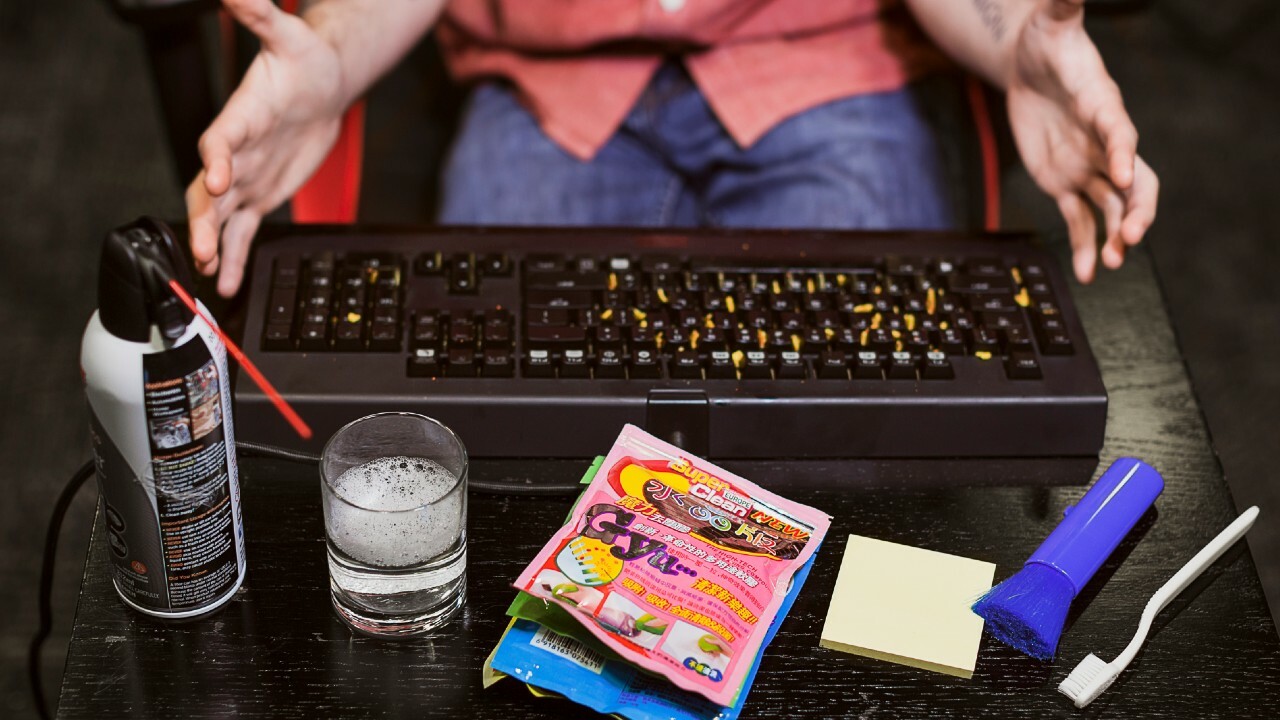
- Take the can of compressed air if you want to make a thorough cleaning between the keys. A compressed can of air blows a lot of dust out from your keys without you giving so much effort.
- Insert the straw-like plastic hose to the nozzle of the can.
- Hold your keyboard standing up on its left or right end.
- Spray in between and around keys to remove unwanted particles but keep a little distance and spray in a short burst to avoid harming your keyboard.
- Do the spraying with each row between the keys.
- After doing the process on the entire keyboard, you can do a tap-and-shakeout session. Doing this will help remove the debris that was pushed into other places in your keyboard.
Wiping Off the Top of the Keys
- After blasting off your keyboard, you need to clean up the surface of your keyboard.
- Get a cotton cloth or a paper towel to be used in cleaning the surface of the keys.
- Slightly moisten the cloth or the paper towel with water, mild cleaning agent, or rubbing alcohol to clean the top of the keys.
- Be careful not to moisten the cloth too much because when it drips into the spaces between the keys the circuits may be damaged.
- If you will be using abrasive alcohol wipes, be extra cautious as they could stain the plastic. Sometimes, they can cause the lettering on your keyboard keys to wear off.
- You can also use a toothpick to carefully remove stubborn debris.
- Let your keyboard dry.
- Plug it back into your computer.
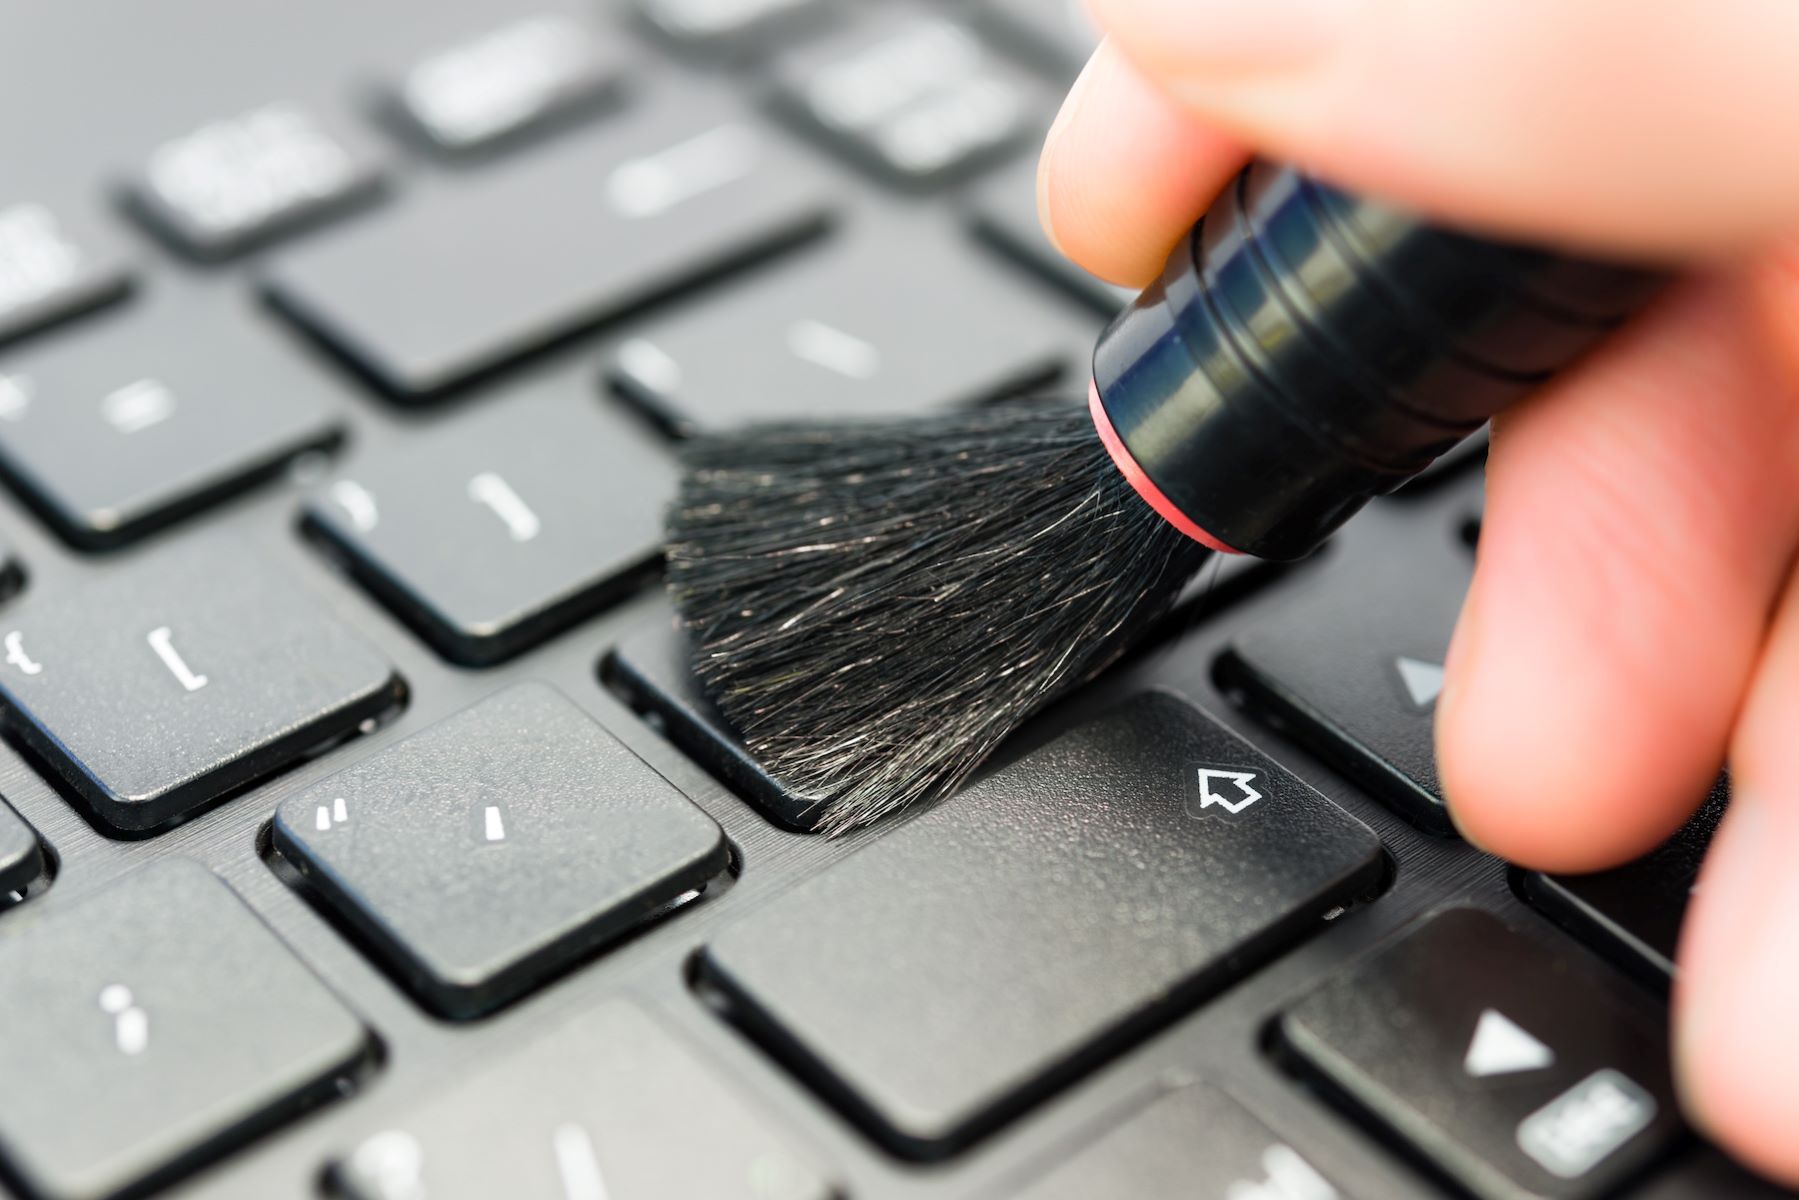
Cleaning Between the Keys
After wiping off the keys, it is now time to clean between the keys. The best way to do this is by using a cotton swab, a toothbrush, or a makeup brush.
- Take a cotton swab and dampen it with rubbing alcohol or a mild cleaning agent.
- Be extra cautious because the cotton swab should not be dripping as it may damage the circuits.
- Use the moistened cotton swab to wipe between the keys.
- Wipe from one side to the other and swap swabs once it picked up enough dirt. You can also use a toothbrush or makeup brush to scrub away dirt buildup. Be extra cautious so as not to damage your keyboard keys.
- You may need a lot of cotton swabs to finish cleaning your entire keyboard.
- Use a dry lint-free cloth to eliminate the residual dust. It will also help to polish your keyboard.
- Let your keyboard dry.
- Plug it back into your computer.
Handling Liquid Spills
Spills can damage not only the keyboard’s keycaps but also the circuitry. If you accidentally spill liquid on your keyboard, these are the things that you need to do:
- Disconnect your keyboard quickly, and let it dry for a while.
- Turn your keyboard upside down and get rid of as much liquid out of your keyboard.
- After that, get a paper towel or a cloth moistened with water and wipe off the top of the keyboard.
- Remember to do this while the keyboard is turned upside down.
- Let it sit upside down overnight to easily dry it off.
- You can also use a blow-dryer to help dry the keyboard quickly.
Deep Cleaning by Disassembling and Washing Keycaps
For Membrane Keyboard
- Unplug your keyboard from your computer.
- Take a photo of your keyboard. This will serve as your reference to the position of the keys once you are done.
- Turn your keyboard upside down.
- Grab your screwdriver to loosen and remove all the screws at the back.
- Insert a flat screwdriver between the top and the bottom part of the keyboard and try to open it up.
- When you hear a snap, it means that it’s opened. You can now detach the top part from the bottom part.
- Be extra cautious when handling the bottom part since it contains the circuitry.
- You can use a flathead screwdriver or a plastic butter knife to remove the keys.
- Use the flat end of the slotted screwdriver to push the little foot of the keys.
- Bigger keys have a metal rod, and the “Enter” key has two metal rods. These rods make them hard to put them back on so just leave them.
- After removing all the keys, put them all into the sink or bowl.
- Let them soak in soapy water. Use a toothbrush to remove the dirty spots on the surface of the keys.
- When you are sure that the keys are clean, rinse them thoroughly under running water and make sure that there is no soap residue.
- You can put the keys on a clean towel to help dry them up. Also, you need to find a well-ventilated place where you can leave the keys for drying.
- For the top piece, put it under the running water while brushing it with a toothbrush.
- Rinse thoroughly, and let them dry by placing on a well-ventilated place.
- When the keys and the top piece are already dry, you can now rebuild the keyboard.
- Place the keys in their right position. After that, press the top of the keys.
- Close the keyboard afterward. You can do that by putting the top and bottom pieces together.
- Press the sides gently. When you hear a snap, that means the parts are already attached.
- Bring back the screws at the back of your keyboard using the Phillips screwdriver.
- Connect the keyboard to your computer and check if all the keys are working by typing.
For Mechanical Keyboards
- Detach your keyboard from your computer.
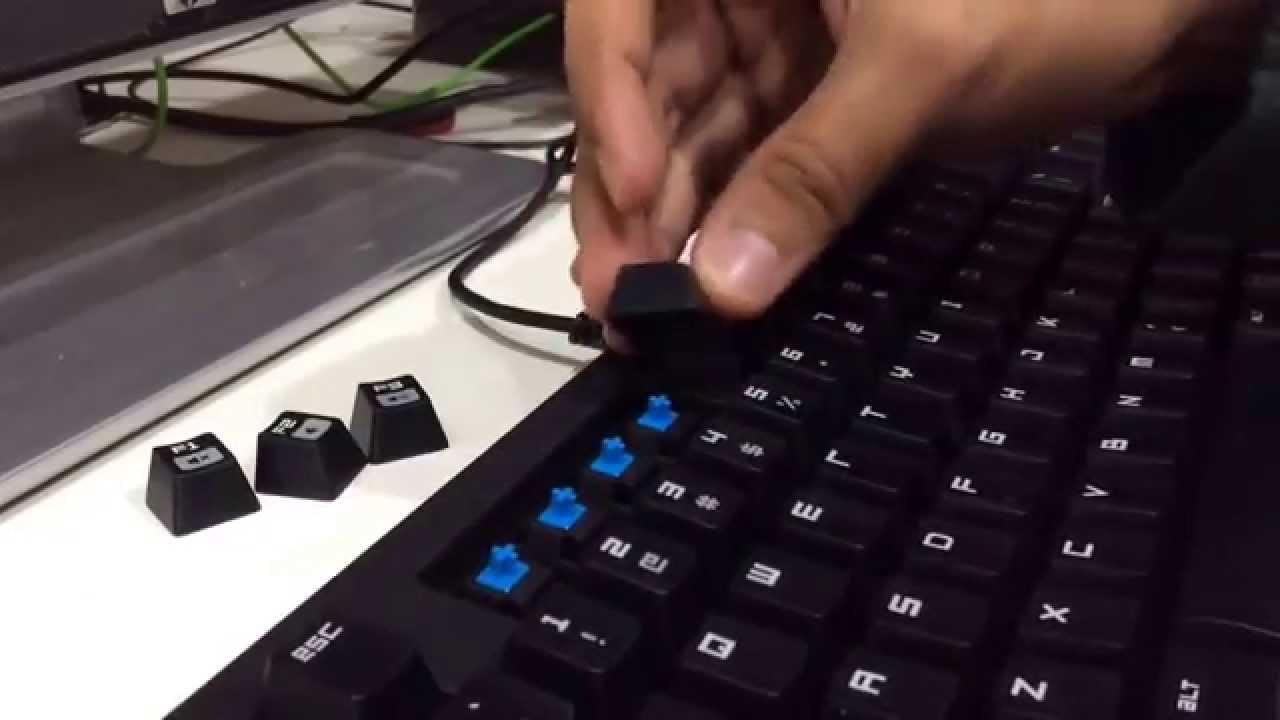
- With the aid of a keycap puller, disassemble all the keycaps from your keyboard. The keycap can be removed by simply pushing down the keycap puller on each keycap and then pulling it back.
- Remember that bigger keys have a metal stabilizer. This makes them tricky to remove. If you are not confident in removing these keys, just leave them alone and wipe them with a slightly damp, clean cloth.
- You should keep the keycaps from the right in one bowl and the keycaps from the left on another bowl. This way, you will not find it hard to grab the keys for reassembling.
- Put all the keycaps in a bowl. Add some warm water and dish soap. However, instead of dish soap, you should use two denture tablets. This is because denture tablets are ideal in removing oil and leave the keycaps with almost no residue. Denture tablets also help in sterilizing the keycaps.
- Leave them for at least six hours. After that, rinse the keycaps thoroughly.
- Let the keycaps dry completely.
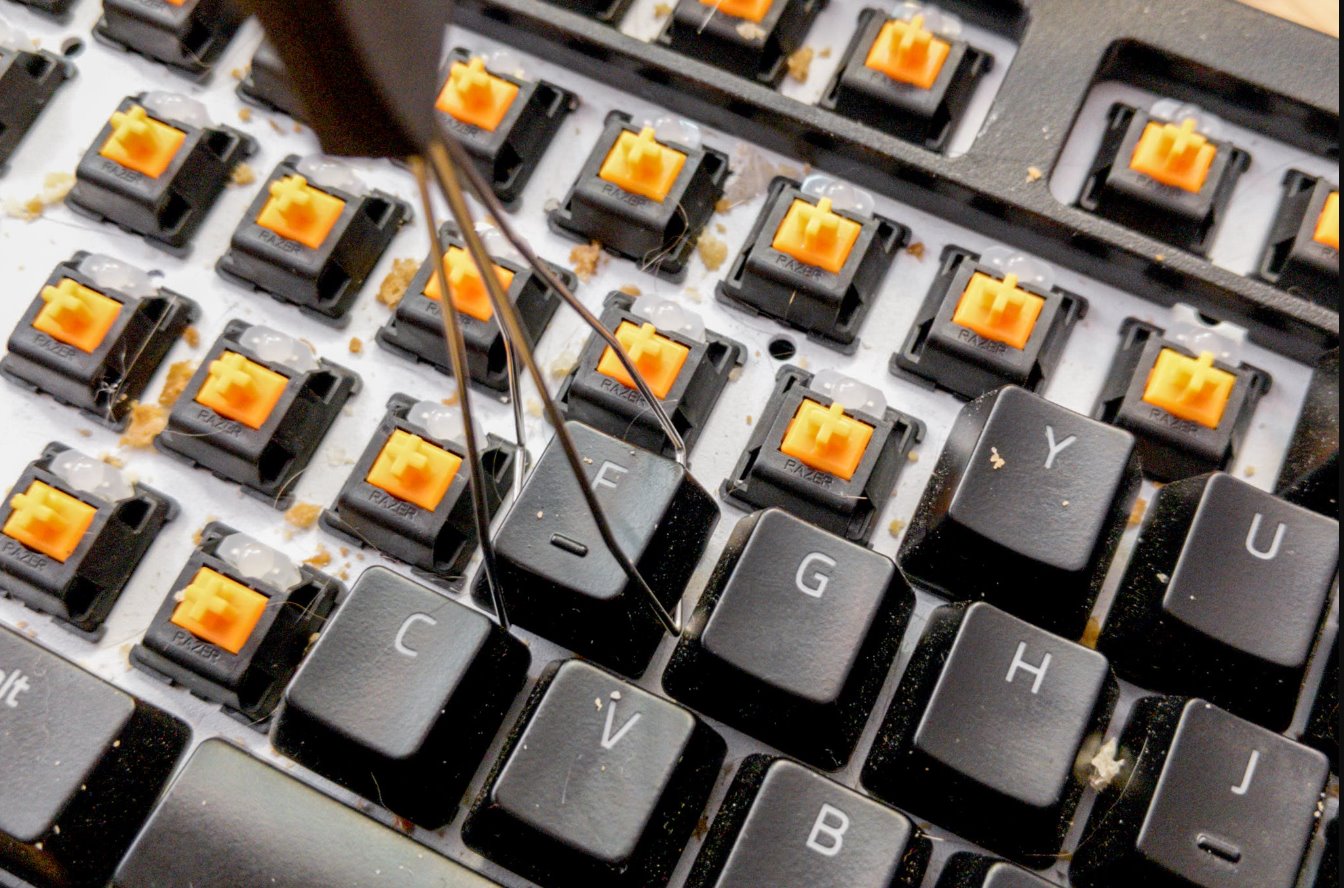
- Use a small brush or a dry Q-tip to loosen the dirt on the plate. Be extra cautious for the brush bristles to get near the switches for they might push deep the dust.
- You can also use a small computer vacuum to loosen and remove dirt and dust on the switches.
- For the spaces between the keys, use a cotton swab.
- After that, turn your keyboard upside down to make sure that there will be no debris left behind.
- After making sure that the keyboard is already clean and the keycaps are completely dried, it is now time to reassemble your keyboard. You just need to snap the keycaps on their proper position until all of the are in place.
How to Clean Laptop Keyboards?

Eliminating Dirt, Dust, and Debris
- Turn off the power of your laptop.
- Disconnect it from the power source and remove the power cord. If your laptop has a removable battery, you need to remove it. Also, you need to remove the peripherals.
- Turn your laptop upside-down. This will let any loose debris to fall out of your keyboard.
- You may also need to gently tap or shake your laptop to dislodge the debris, dust, or dirt that is hiding in your keyboard keys.
- Use a can of compressed air to help loosen the debris and dirt. You need to attach the straw to the can before you use it.
- Turn your laptop to one side and spray between the keys of your keyboard going to the other side, so as not to miss any areas. The trapped debris between and beneath your keyboard keys will loosen.
- Turn your keyboard to a different angle. Rework with the mentioned process. Make sure that you successfully sprayed all the four sides of each key.
- You can also use sticky tape or a cleaning slime to attract the debris.
- Grab a damp microfiber cloth or disinfecting wipes. These will aid in eliminating the dirt and cleaning the surface of your keyboard keys. Wipe lightly over the keys to remove some of the grime. Moisten the microfiber cloth. You need to squeeze it and make sure that it is not dripping for it can damage the circuitry.
- To eliminate stubborn stains or grimes, you can use a cotton swab moistened with isopropyl alcohol. If your keys are oily, the moistened cotton swab can also get rid of them. Shove it over the sides of the keys.
- For the final touch, use a dry cloth to remove the remaining dust and debris. It can also help in polishing your keyboard.
- Allow your laptop keyboard to dry before plugging it back or turning it on.
Dealing With Liquid Spills
If you accidentally spill liquid on your laptop keyboard, these are the things that you should do:
- Disconnect the power cord immediately.
- Make sure to turn off your laptop. If it has a removable battery, make sure that you remove it before proceeding to the process.
- Grab any dry cloth immediately to deal with the spilled liquid. However, using a lint-free and microfiber cloth is more advisable. This is because paper towels and regular towels can leave small particles that can be trapped in your laptop keyboard.
- After that, turn your laptop facing down over a clean, dry towel or any absorbent material.
- Let your laptop dry. This may take one to two days to be sure that your laptop keyboard already dried up.
- Don’t use a hairdryer to dry your keyboard. This may cause a dust buildup inside your laptop.
- Once your laptop dried up completely, you can put back the battery.
- Turn your laptop on.
- Check if your laptop is functioning well. If not, consider giving another day for your laptop to dry completely. However, if you already spent enough time drying it and it doesn’t work, you will need to use a USB keyboard.
Cleaning by Removing the Keys
Before proceeding in removing the keys of your laptop, you need to do understand and be sure about how to remove your laptop keys. This is because there are different types of laptop keyboards and ways on how to remove the keys.
- Turn off your laptop.
- Disconnect all the peripherals.
- You may need to take a photo of your keyboard to serve as your reference to the right position of the keys when you’re done with the process.
- Use a small, flat tool to help you remove the keys. You can choose among slotted screwdrivers, a plastic kitchen knife, a guitar pick, or a credit card.
- Carefully place your fingernail or the end of a flathead screwdriver or plastic butter knife under the corner of any of the letter or number and gently pry it up.
- The key will snap easily. If it doesn’t, use your fingernail and carefully remove the key.
- Place your keys in a bowl so you won’t lose them. Moreover, you can easily grab them when you are going to reassemble your keyboard.
- A microfiber cloth or a cotton swab moistened with isopropyl alcohol will help clean below the keys. Make sure that the cotton swab is not dripping with alcohol to avoid damaging the circuitry.
- Reassemble the keys. Put the key in its proper position. You can refer to the photo of the keyboard that you took before removing the caps.
- Align the sides of the keys and gently press it. When you hear a snap, it means that it is properly attached.
- After assembling all the keys, you can use a damp microfiber cloth or a cotton swab to clean the surface and between the keys.
How to Clean a Mac Keyboard?

Eliminating Dirt, Oil, Grime, and Debris
- Detach the keyboard from its power source. You will need to turn off your laptop if your keyboard is attached to it. If not, you will need to disconnect your keyboard from your Mac. If your keyboard is wireless, you have to turn it off and then remove the battery.
- Disconnect or remove any cables or peripherals connected to the computer.
- Bring your Mac notebook over a sink, tub, or a trash can or somewhere that can be easily cleaned.
- Turn your keyboard or Mac notebook with the key side down. Gently shake it to loosen and remove any debris between the keys.
- Hold your Mac notebook upright, at a 75-degree angle, with the keys slightly facing the ceiling and not the floor.
- Use compressed air along the keys spraying consistently from left to right or right to left and from the upper rows to the lower rows.
- After spraying the whole keyboard, get to another side. Make sure that you are consistently spraying all the keys from left to right. After that, try on another angle until you are sure that you have sprayed the whole keyboard.
- Moisten a small area of a lint-free cloth or paper towel with clean, lukewarm water.
- Run it over the surface of the keyboard to remove the surface dirt, dust, and oils. Make sure that nothing drips in between the keys. Also, you need to turn the cloth or paper towel to ensure that you remove the dirt rather than moving it around.
- Get an alcohol-moistened cotton swab to loosen and eliminate sticky debris or stubborn stains.
- Let your Mac notebook to fully dry after the cleaning process before you turn it on.
Deep Cleaning by Disassembling the Keys
- Turn off your Mac notebook and remove the batteries. If you have a separate keyboard, disconnect it from your Mac notebook.
- Take pictures of the keyboard for you to have a reference on reassembling the keys after you finish the cleaning process.
- Remove the keys by sliding the tip of your fingernail beneath a key.
- Gently pull the key up so it will be disintegrated from the keyboard. Do not put too much force in pulling as you may break the clip under the key.
- Put the keys on a bowl of warm water with mild soap.
- Clean the keys.
- Make sure that you rinse the keys thoroughly.
- You can use a clean absorbent towel to dry up all the keys or let them air dry.
- While waiting for the keys to dry up, moisten a clean cloth to clean the surface of the keyboard.
- Make sure that the keyboard and the keys are all dry before reassembling the keyboard.
- To assemble, put the keys in their proper position.
- Gently press down the key. Wait until you hear a snap or a click.
- Press each key to make sure that the keys are properly attached to the keyboard.
Useful Tools to Help You Clean a Keyboard
- Lint-free cloth
- Cotton swabs or Q-tips
- Camera
- Liquid soap or mild detergent
- Paper towel
- Rubbing or isopropyl alcohol
- A clean microfiber cloth
- Compressed air can
- Disinfecting wipes
- Toothbrush
- Slotted and Phillips screwdriver
- Bowl with warm water
- Clear tape or cleaning slime
- Denture tablets
- Keycap puller
- Small computer vacuum (optional)
- Hairdryer (optional)
If you’re looking for these, check out Amazon for compressed air cans and others and start cleaning your keyboard today.
Pros and Cons of Cleaning Your Keyboard
Pros
- Health and hygiene benefits
- Retains its near-new appearance
- Prevents keyboard breakdown
- Fewer repairs
- Prevents overheating
- Contributes to productivity
- Environment-friendly process, rather than disposing of the keyboard
- Helps lengthen the keyboard’s lifespan
- Less maintenance
- Avoids visits to the repair shop
Cons
- The circuitry may be damaged.
- You can’t be sure if you can put the keys back.
- The letterings may be erased or tampered.
- It may damage the keys.
Final Word on How to Clean a Keyboard
We all encounter problems with our computer and laptop keyboard. However, some of us are not looking for ways on how to handle these problems. Some of us tend to just wipe the dirt off without taking into consideration the circuitry and the keycaps. If the keyboard is not working, some will just dispose of their keyboard and buy a new one.
We need to be practical nowadays, so we have to find ways in everything just like in cleaning our keyboard. Research everything and apply what you read. Just follow the process, be cautious, and patient, and everything will work out well with our keyboard if you care for it consciously.