Introduction
Removing a spacebar from a mechanical keyboard may seem like a daunting task, but with the right tools and a methodical approach, it can be a straightforward process. Whether you're dealing with a sticky or unresponsive spacebar, or simply want to give your keyboard a thorough cleaning, understanding how to safely remove and reassemble this essential key is invaluable knowledge for any mechanical keyboard enthusiast.
The spacebar is one of the most frequently used keys on a keyboard, making it susceptible to accumulating dust, debris, and even spills over time. This can lead to a variety of issues, including a mushy feel, unresponsiveness, or an unpleasant sound when pressed. By learning how to remove the spacebar and clean the underlying components, you can maintain your keyboard's performance and prolong its lifespan.
In this guide, we'll walk you through the step-by-step process of removing the spacebar from your mechanical keyboard. We'll cover the tools and materials you'll need, the method for removing the keycap, the process for accessing and removing the stabilizer, how to clean the spacebar area, and finally, how to reassemble the keyboard to ensure everything is back in working order. Whether you're a casual user looking to address a specific issue or a keyboard enthusiast eager to customize and maintain your beloved input device, this guide will equip you with the knowledge and confidence to tackle this task with ease.
So, gather your tools, prepare your workspace, and let's delve into the intricacies of removing and cleaning the spacebar on your mechanical keyboard. With a bit of patience and attention to detail, you'll soon have your keyboard looking and feeling as good as new.
Tools and Materials Needed
Before embarking on the process of removing the spacebar from your mechanical keyboard, it’s essential to gather the necessary tools and materials to ensure a smooth and efficient operation. Here’s a list of items you’ll need:
- Keycap Puller: This tool is specifically designed to safely remove keycaps from mechanical keyboards without causing damage to the switches or keycap itself. Keycap pullers come in various designs, including wire pullers and plastic ring pullers, and are readily available from online retailers and computer accessory stores.
- Tweezers or Small Flathead Screwdriver: These tools can be used to remove stabilizers or to assist in lifting the spacebar from its mounting points. Tweezers are particularly useful for handling small components and ensuring precision during the disassembly process.
- Isopropyl Alcohol: A high-percentage isopropyl alcohol solution (70% or higher) is ideal for cleaning the spacebar and its surrounding components. This will help to effectively dissolve and remove any grime, oils, or residue that may have accumulated over time.
- Clean Cloth or Microfiber Towel: A lint-free cloth or microfiber towel is essential for wiping down the spacebar and other keyboard components after cleaning. This will help to ensure a thorough and streak-free cleaning process.
- Cotton Swabs: These are useful for reaching tight spaces and applying isopropyl alcohol to specific areas, allowing for detailed cleaning around the spacebar mounting points and stabilizers.
- Compressed Air: Using compressed air can help dislodge and remove any loose debris or dust from the keyboard’s internal components, including the spacebar area and surrounding switches.
- Workspace Preparation: Ensure you have a clean and well-lit workspace to carry out the keyboard disassembly and cleaning process. A flat, stable surface with ample room to lay out the keyboard and its components will facilitate a methodical and organized approach.
By having these tools and materials at your disposal, you’ll be well-equipped to tackle the task of removing and cleaning the spacebar on your mechanical keyboard with precision and care, ensuring that your keyboard remains in optimal condition.
Removing the Keycap
Removing the keycap is the initial step in accessing the spacebar and its underlying components. It’s important to approach this process with caution and precision to avoid damaging the keycap or the keyboard switches. Here’s a step-by-step guide on how to safely remove the keycap from your mechanical keyboard:
- Position the Keyboard: Place the keyboard on a flat and stable surface, ensuring that it is secure and won’t shift during the keycap removal process.
- Use the Keycap Puller: If you’re using a wire keycap puller, position the wires on each side of the spacebar keycap, ensuring that they are securely hooked under the keycap’s sides. If you have a plastic ring keycap puller, position it over the keycap and gently squeeze to grip the keycap securely.
- Apply Even Pressure: With the keycap puller in place, apply even pressure upwards, ensuring that you’re pulling directly upwards and not at an angle. This will prevent any undue stress on the keycap or the keyboard switches.
- Pop Off the Keycap: As you apply upward pressure, the keycap should pop off the switch stem. Be gentle and steady in your movements to avoid any sudden or forceful actions that could potentially damage the keycap or the switch mechanism.
- Set Aside the Keycap: Once the keycap is removed, set it aside in a safe and clean location to prevent it from getting lost or damaged during the cleaning and reassembly process.
It’s important to note that some keycaps, particularly on customized or specialty keyboards, may have alternative mounting mechanisms. In such cases, refer to the keyboard’s manual or online resources for specific instructions on removing the keycap without causing damage.
By following these steps and exercising care during the keycap removal process, you’ll successfully gain access to the spacebar and be ready to proceed with the next stages of cleaning and maintenance for your mechanical keyboard.
Removing the Stabilizer
Once the keycap has been safely removed, the next crucial step in accessing the spacebar on a mechanical keyboard is removing the stabilizer. Stabilizers are essential components that ensure the smooth and consistent movement of larger keys, such as the spacebar, and they play a key role in the overall typing experience. Here’s a detailed guide on how to remove the stabilizer from your mechanical keyboard:
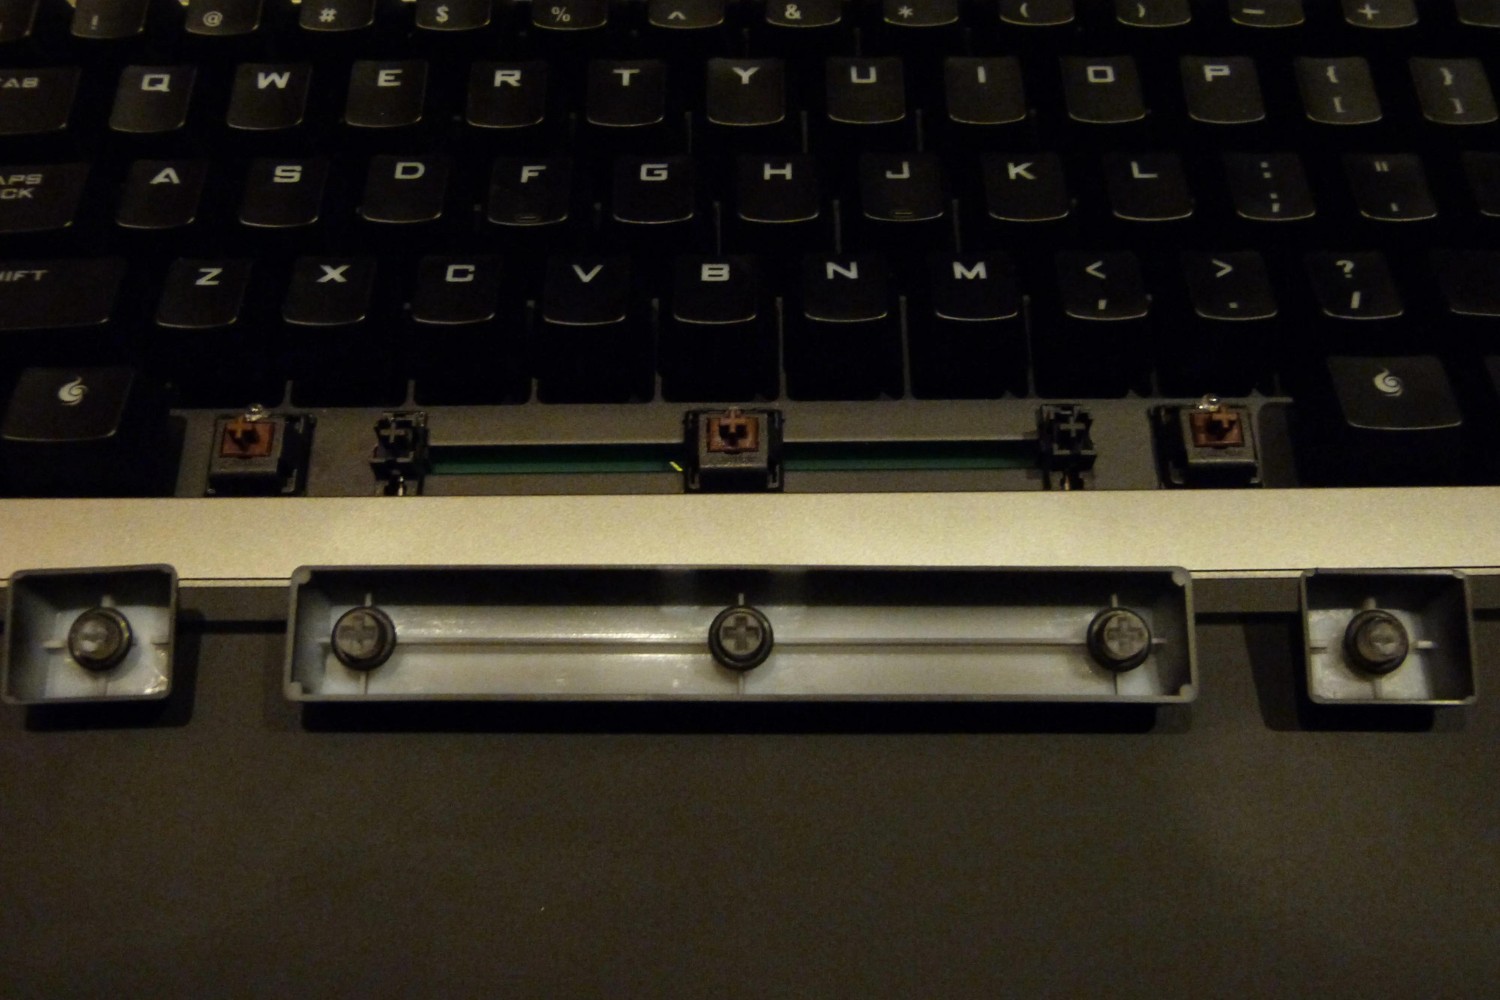
- Identify the Stabilizer Mechanism: Take note of the type of stabilizer used for the spacebar. Mechanical keyboards typically utilize either Cherry-style stabilizers or Costar-style stabilizers, each with its own method of removal. Cherry-style stabilizers have a small, centered wire that needs to be unclipped, while Costar-style stabilizers have two separate insert points that need to be carefully detached.
- Use Tweezers or Small Flathead Screwdriver: Depending on the type of stabilizer, carefully use tweezers or a small flathead screwdriver to unclip or detach the stabilizer from its mounting points. Exercise caution to avoid bending or damaging the stabilizer wire or insert points during this process.
- Remove the Stabilizer: Once the stabilizer is unclipped or detached, gently lift it out of its housing, ensuring that no excessive force is applied. Set the stabilizer aside in a secure location, taking care to keep it free from dust or debris that may affect its performance.
- Inspect the Stabilizer Components: While the stabilizer is removed, take the opportunity to inspect its components for any signs of wear, damage, or accumulation of foreign particles. This is also an ideal time to clean the stabilizer components if necessary.
It’s important to note that the process of removing stabilizers may vary slightly depending on the specific model of the mechanical keyboard. Therefore, consulting the keyboard’s manual or online resources for model-specific instructions can provide valuable insights into the precise method of stabilizer removal for your keyboard.
By successfully removing the stabilizer, you’ve now gained access to the spacebar’s mounting points and the underlying keyboard structure, setting the stage for thorough cleaning and maintenance to ensure optimal performance.
Cleaning the Spacebar Area
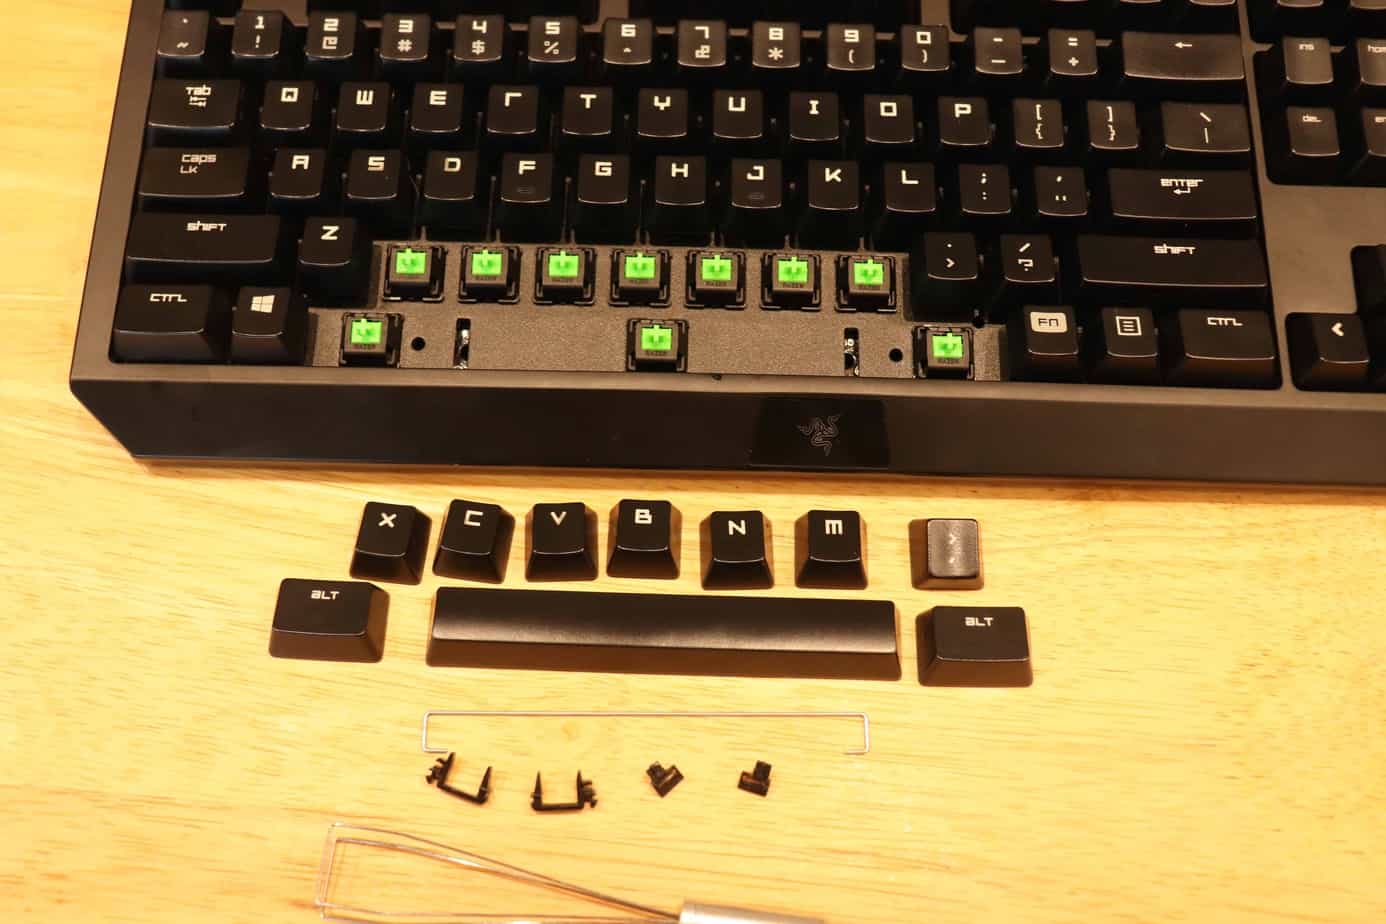
Once the keycap and stabilizer have been removed, it’s time to focus on cleaning the spacebar area and its surrounding components. Over time, dust, debris, and oils can accumulate in this critical region, affecting the feel and performance of the spacebar and adjacent keys. Here’s a detailed guide on how to effectively clean the spacebar area of your mechanical keyboard:
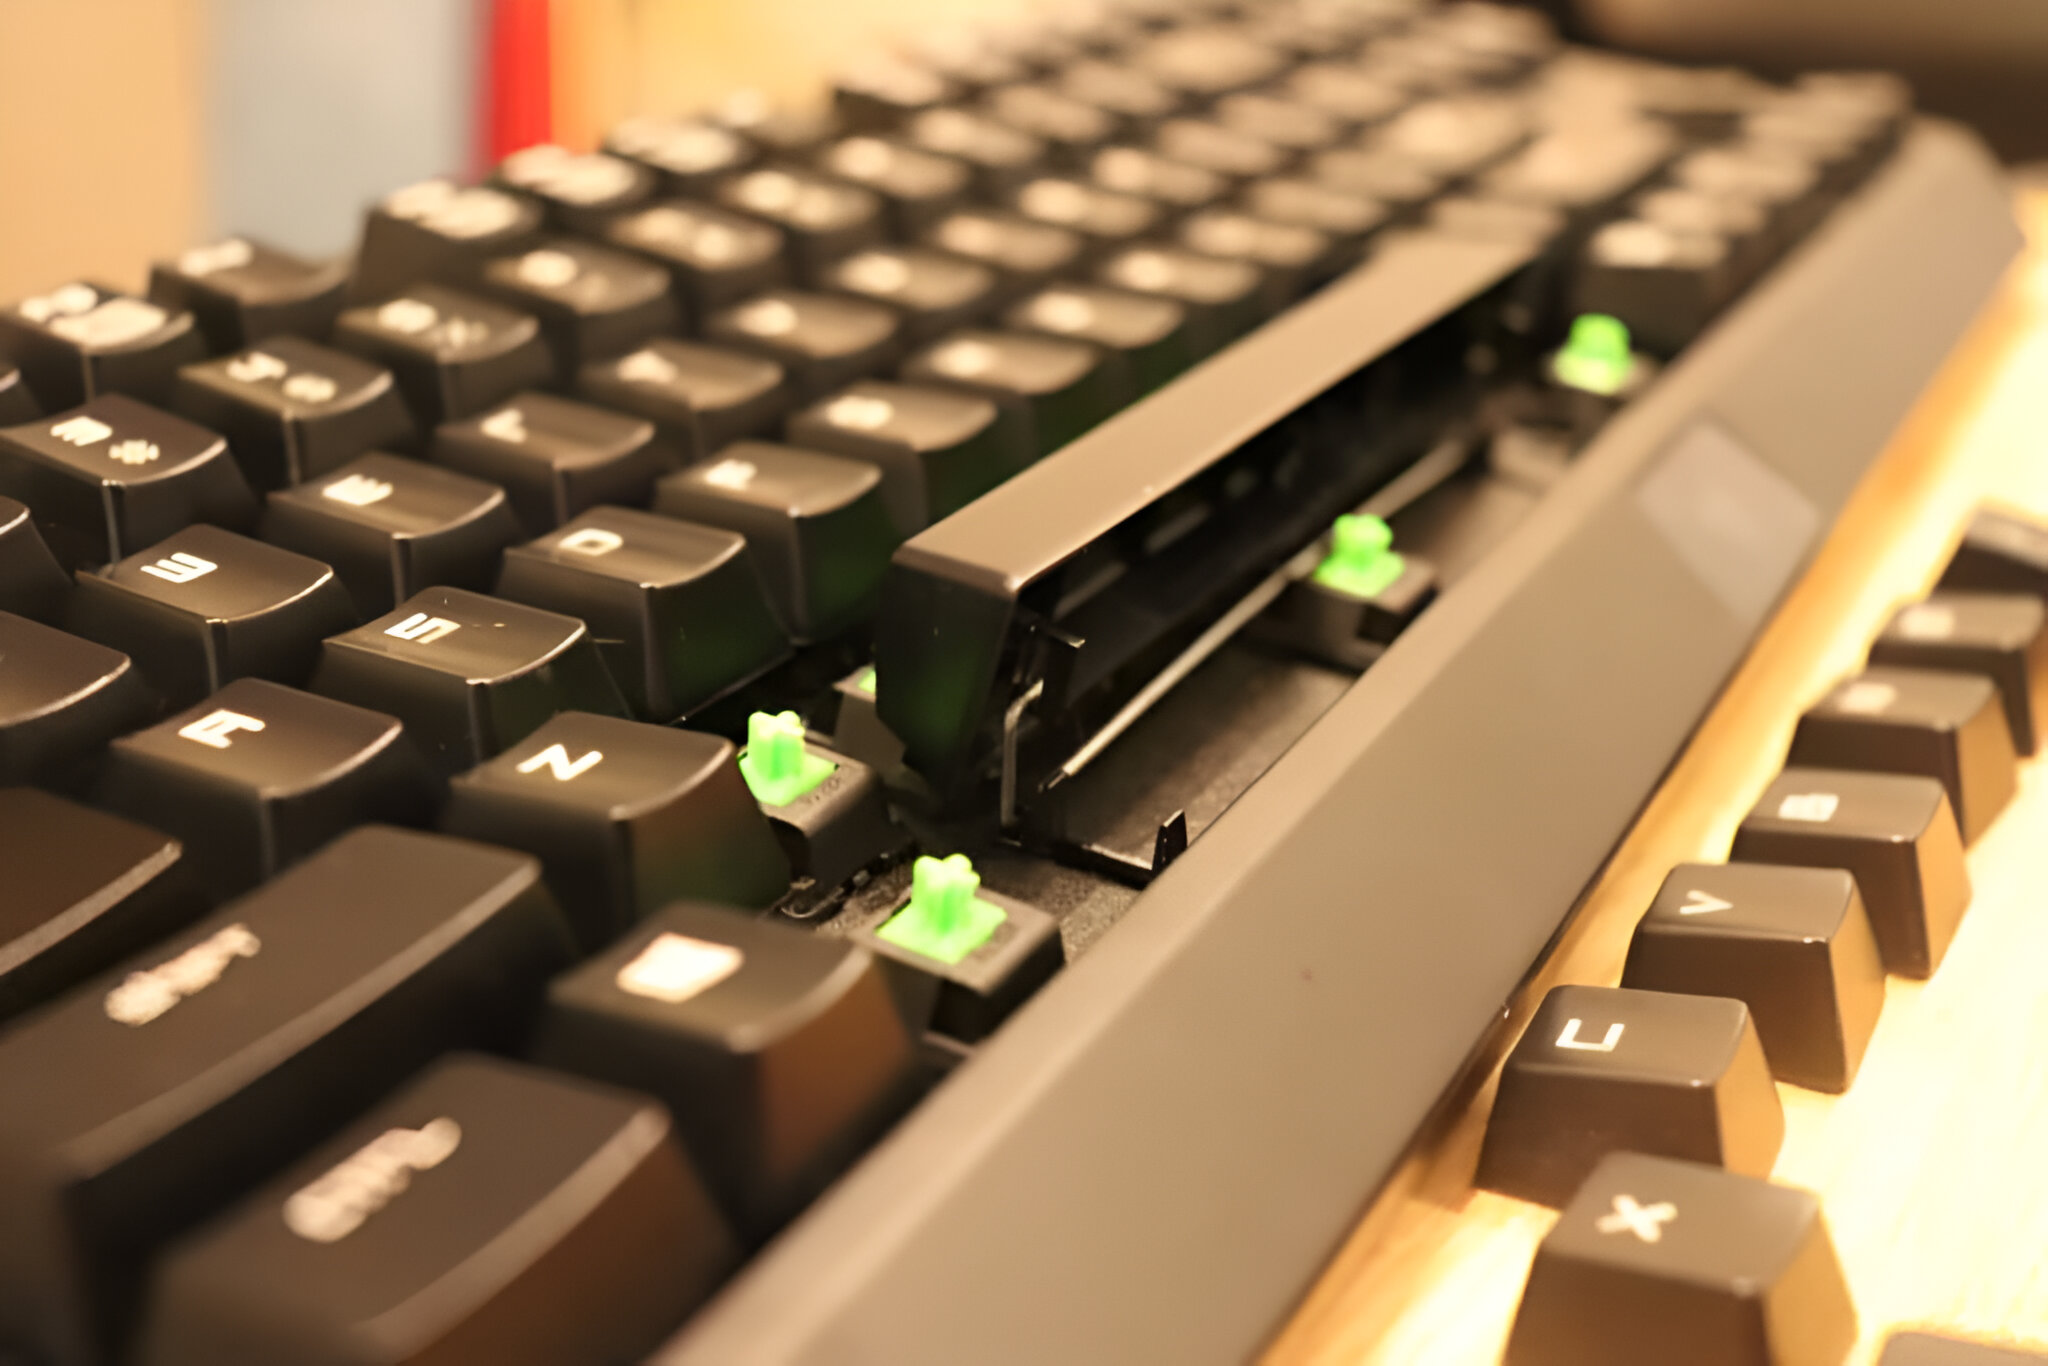
- Inspect the Spacebar Mounting Points: Take a close look at the mounting points where the spacebar connects to the keyboard. Check for any visible debris, dust, or foreign particles that may be affecting the key’s movement or responsiveness.
- Use Compressed Air: With the keyboard placed in a stable position, utilize compressed air to blow away any loose debris or dust from the spacebar area. Direct the airflow carefully to dislodge and remove particles without causing damage to the keyboard switches or internal components.
- Clean with Isopropyl Alcohol: Dampen a clean cloth or cotton swab with isopropyl alcohol and carefully wipe the spacebar mounting points, as well as the surrounding area. This will help to dissolve and remove any stubborn grime or residue that may have accumulated over time, restoring the cleanliness of the spacebar area.
- Inspect and Clean the Stabilizer Components: While the stabilizer is removed, take the opportunity to inspect its components, such as the wire or insert points, for any signs of dirt, debris, or wear. Use isopropyl alcohol and a clean cloth to gently wipe the stabilizer components, ensuring that they are free from any contaminants that could affect their performance.
- Allow for Drying: After cleaning the spacebar area and the stabilizer components, allow them to air dry completely before proceeding with the reassembly process. This will ensure that no moisture is present when the keyboard is put back together.
By meticulously cleaning the spacebar area and its associated components, you’ll not only restore the visual appeal of your mechanical keyboard but also enhance its functionality and longevity. With this critical maintenance step completed, you’re now ready to reassemble the keyboard and enjoy a refreshed typing experience.
Reassembling the Keyboard
After successfully cleaning the spacebar area and its associated components, the final step in the process is reassembling the keyboard. This stage requires care and attention to detail to ensure that all components are correctly positioned and secured, allowing for the smooth and reliable operation of the spacebar and the entire keyboard. Here’s a comprehensive guide on how to reassemble your mechanical keyboard:
- Prepare the Keycap and Stabilizer: Retrieve the cleaned spacebar keycap and the inspected and cleaned stabilizer components, ensuring that they are free from any residual moisture or debris.
- Position the Stabilizer: If the stabilizer was removed, carefully reposition it in its designated location, taking care to align the stabilizer wire or insert points correctly with the keyboard’s structure. Ensure that the stabilizer is securely seated and that no components are misaligned or obstructed.
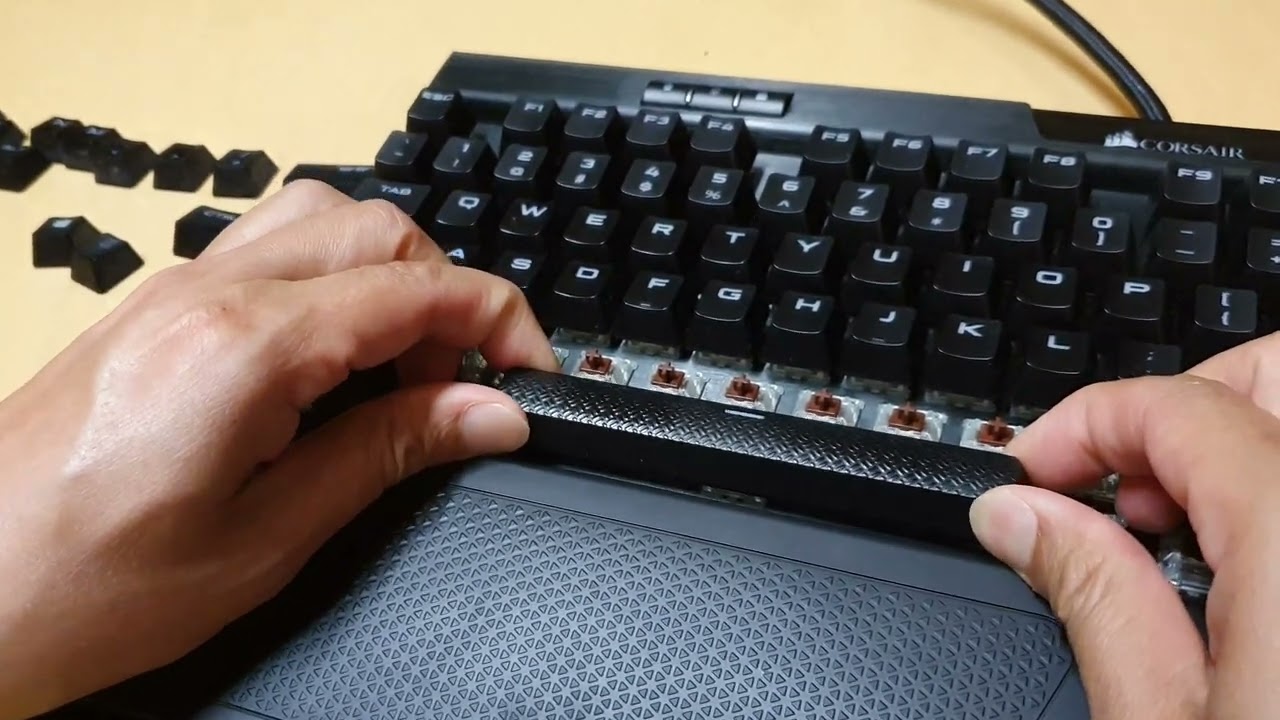
- Attach the Spacebar Keycap: Align the spacebar keycap over the switch stem, ensuring that it is positioned correctly and evenly. Apply gentle pressure to the keycap, pressing it down until it snaps securely onto the switch stem. Take care to avoid excessive force that could damage the keycap or the switch mechanism.
- Test the Spacebar: With the keycap reattached, test the spacebar to ensure that it moves smoothly and registers key presses accurately. Press the spacebar several times to verify that it functions as expected and that the stabilizer provides the necessary support and consistency.
- Secure the Keyboard Components: If the keyboard required disassembly for the cleaning process, reattach any panels, covers, or screws that were removed, ensuring that the keyboard’s structural integrity is restored. This step is crucial for maintaining the stability and functionality of the keyboard.
By methodically reassembling the keyboard and verifying the proper functioning of the spacebar, you’ll conclude the maintenance process with the satisfaction of knowing that your mechanical keyboard has been revitalized and is ready for continued use. With a refreshed spacebar and a clean, well-maintained keyboard, you can once again enjoy a satisfying typing experience with optimal performance and reliability.