Introduction
Welcome to the world of Chase First Banking App, where managing your finances has never been easier. With the Chase First Banking App, you can take control of your money, track your expenses, and save for the future, all from the convenience of your smartphone.
Whether you’re a teenager starting to manage your first paycheck or a parent teaching your child about money management, Chase First Banking App is designed to provide a user-friendly and secure platform for financial transactions.
In this comprehensive guide, we’ll walk you through the process of downloading, installing, and setting up your Chase First Banking App account. We’ll also explore the various features and functionalities of the app to help you make the most of your banking experience.
From creating your account to understanding spending limits and notifications, this guide will cover everything you need to know to effectively manage your finances with the Chase First Banking App.
So, without further ado, let’s dive into the world of Chase First Banking App and unlock a world of financial convenience and control.
Downloading and Installing Chase First Banking App
Getting started with Chase First Banking App is as easy as downloading and installing the app on your smartphone. Follow the steps below to get started:
- Visit the App Store or Google Play Store on your smartphone.
- Search for “Chase First Banking App” in the search bar.
- Tap on the app icon when it appears in the search results.
- Click on the “Install” button to begin the installation process.
- Wait for the app to download and install on your device.
- Once the installation is complete, open the Chase First Banking App.
It’s important to note that you will need to have a compatible smartphone device and a stable internet connection to download and install the app. The Chase First Banking App is compatible with iOS and Android devices.
After successfully installing the app, you will be prompted to sign in or create a new account. If you’re a new user, proceed to the next section to learn how to create your Chase First Banking account.
Don’t worry if you encounter any issues during the download and installation process. You can visit the Chase website or contact their customer support for assistance. They are always available to help you with any technical difficulties you may face.
Creating Your Chase First Banking Account
To start using the Chase First Banking App, you will need to create an account. Follow the steps below to set up your account:
- Open the Chase First Banking App on your smartphone.
- Tap on the “Sign Up” or “Create Account” button.
- Enter your personal information, including your name, date of birth, and Social Security Number (SSN).
- Create a unique username and password for your account.
- Read and accept the terms and conditions of the app.
- Set up security questions for additional protection.
- Review your information and tap on the “Submit” button.
Once you have completed these steps, your Chase First Banking account will be created, and you will be ready to explore the features and functionalities of the app.
It’s important to note that if you are under the age of 18, you will need a parent or guardian to co-manage and approve your account. They will have the ability to oversee your transactions and set spending limits to ensure responsible money management.
Chase First Banking App prioritizes security and privacy. They have implemented robust security measures to safeguard your personal and financial information. Rest assured that your data is protected as you navigate through the app.
Now that you have successfully created your Chase First Banking account, it’s time to verify your identity to ensure the security of your account. Let’s move on to the next section to learn how to complete the verification process.
Verifying Your Identity
To ensure the security of your Chase First Banking account, you will need to verify your identity. Follow the steps below to complete the verification process:
- Open the Chase First Banking App on your smartphone.
- Log in to your account using your username and password.
- Tap on the “Verify Identity” or similar option in the app’s menu.
- Follow the instructions provided on the screen to complete the verification process.
- You may be required to provide additional information or documentation, such as a valid ID or proof of address.
- Submit the necessary details and wait for the verification process to be completed.
It is important to note that the verification process may vary depending on your location and age. Chase First Banking is committed to complying with regulations to ensure a safe and secure banking experience for all users.
Once your identity verification is successfully completed, you will have full access to all the features and functionalities of the Chase First Banking App. You can start managing your finances, track your spending, and explore the various tools available to help you achieve your financial goals.
If you encounter any issues or have questions during the identity verification process, you can reach out to Chase First Banking customer support for assistance. They are available to guide you through the necessary steps and address any concerns you may have.
Now that you have verified your identity, it’s time to add funds to your Chase First Banking account. Let’s move on to the next section to learn how to conveniently deposit money into your account.
Adding Funds to Your Chase First Banking Account
Now that you have set up your Chase First Banking account and verified your identity, it’s time to add funds to your account. There are several convenient methods to deposit money into your Chase First Banking account:
- Direct Deposit: Setting up direct deposit is one of the quickest and most efficient ways to add funds to your account. Provide your employer or benefit provider with your Chase First Banking account and routing number, and they will deposit your funds directly into your account.
- Mobile Check Deposit: If you receive paper checks, you can use the Chase First Banking App’s mobile check deposit feature. Simply take a photo of the front and back of the check using your smartphone’s camera, and the funds will be deposited into your account.
- Cash Deposits: Visit a Chase bank branch or a participating ATM to make cash deposits to your Chase First Banking account. You can use the Chase ATM locator on their website or within the app to find a convenient location.
It’s important to note that some methods may have fees associated with them, such as a fee for using non-Chase ATMs. Be sure to review the terms and conditions to understand any applicable fees.
Chase First Banking provides you with flexibility and convenience when it comes to adding funds to your account. Choose the method that suits your needs and preferences to ensure a seamless banking experience.
Now that you have successfully added funds to your Chase First Banking account, it’s time to explore the various features and functionalities of the app. Let’s move on to the next section to discover how you can make the most of your banking experience.
Exploring the Features of Chase First Banking App
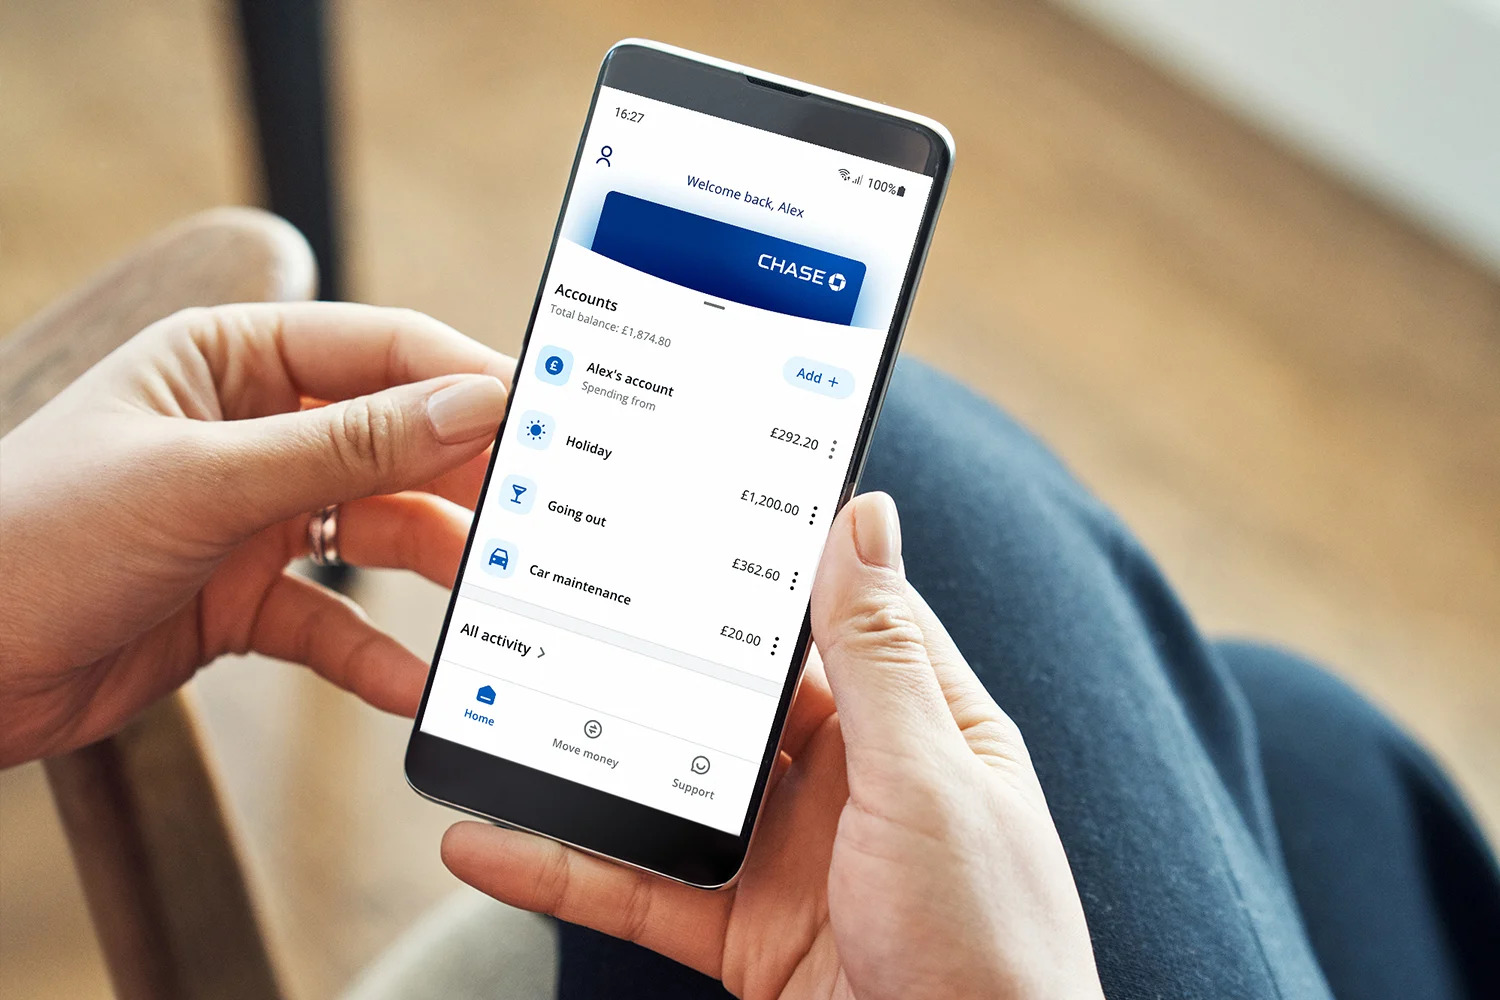
The Chase First Banking App is packed with a wide range of features and functionalities designed to make managing your finances easy and convenient. Let’s take a closer look at some of the key features:
- Account Balance and Transactions: View your account balance and track your transactions in real-time. This feature allows you to stay up-to-date with your spending and ensure you have a clear understanding of your available funds.
- Budgeting Tools: Set budgeting goals and track your spending with the help of intuitive budgeting tools. These tools provide insights into your spending habits and help you manage your money more effectively.
- Savings Goals: Set savings goals within the app and track your progress. Whether it’s saving for a special purchase or building an emergency fund, the savings goals feature helps you stay motivated and on track.
- Spending Notifications: Receive instant notifications on your smartphone for every transaction made with your Chase First Banking account. This feature helps you stay informed about your spending and identify any unauthorized transactions.
- Parental Controls: If you’re a parent managing your child’s Chase First Banking account, you can utilize the parental controls feature to monitor and manage their spending. Set spending limits and receive alerts when their account is used.
- ATM and Branch Locator: Easily locate nearby Chase ATMs and branches, ensuring convenient access to your funds and in-person assistance when needed.
The Chase First Banking App is continuously being enhanced with new features and updates to provide users with the best banking experience. Be sure to explore the app thoroughly to discover all the tools and options available to you.
With these powerful features at your fingertips, you’ll have the tools needed to manage your finances effectively and make informed financial decisions.
Now that you have a good understanding of the key features of the Chase First Banking App, it’s time to explore some additional features and functionalities. Let’s move on to the next section to learn how to set up direct deposit for your account.
Setting Up Direct Deposit
Setting up direct deposit with your Chase First Banking account is a convenient and secure way to receive recurring payments, such as your paycheck or government benefits, directly into your account. Follow these steps to set up direct deposit:
- Contact your employer or benefits provider. Let them know that you would like to set up direct deposit and provide them with your Chase First Banking account and routing numbers. You can find this information within the app or by logging into your account on the Chase website.
- Complete any necessary forms or paperwork provided by your employer or benefits provider. This may include providing additional information, such as your Social Security Number or a voided check.
- Confirm with your employer or benefits provider the expected date when direct deposits will be initiated to your Chase First Banking account. It usually takes one to two pay cycles for direct deposit to be fully set up and activated.
Once you have set up direct deposit, you can enjoy several benefits. First, your funds will be deposited directly into your account, eliminating the need to visit a bank or cash a check. This provides a seamless and convenient way to access your money. Second, direct deposit ensures that your funds are deposited securely and in a timely manner, reducing the risk of lost or stolen checks.
If you have any questions or encounter any issues during the direct deposit setup process, be sure to reach out to your employer’s payroll department or benefits provider for assistance. They are there to help you navigate the process and ensure a smooth transition to direct deposit.
Now that you have successfully set up direct deposit, you can enjoy the convenience of having your funds automatically deposited into your Chase First Banking account. Let’s move on to the next section to learn more about managing your finances with the Chase First Banking App.
Managing Your Finances with Chase First Banking App
The Chase First Banking App offers a range of tools and features to help you effectively manage your finances. Here are some key ways you can take control of your money:
- Track Your Spending: The app provides a clear overview of your transactions, allowing you to monitor your spending habits. Take advantage of this feature to identify areas where you can cut back and make better financial decisions.
- Create a Budget: Set budget goals within the app to help you stay on track and manage your expenses. Categorize your spending and receive alerts when you approach or exceed your budget limits.
- Monitor Account Balances: Easily check your account balances to ensure you have sufficient funds for planned expenses or bills. This feature provides real-time updates, giving you a clear picture of your available resources.
- Set Savings Goals: Utilize the savings goals feature to set aside money for specific milestones or future expenses. Track your progress and stay motivated as you work towards achieving your financial goals.
- Receive Alerts and Notifications: Stay informed about your account activity through customizable alerts and notifications. This can include low balance alerts, transaction notifications, or reminders to pay bills.
- Transfer Funds: Easily move money between your Chase First Banking account and other accounts, whether they are Chase accounts or external bank accounts. This flexibility allows you to seamlessly manage your finances across different accounts.
The Chase First Banking App prioritizes security, ensuring the safety of your personal and financial information. The app utilizes advanced encryption technology and multi-factor authentication to protect your account from unauthorized access.
Remember, managing your finances effectively requires discipline and regular monitoring. The Chase First Banking App provides you with the tools you need to make informed financial decisions and take control of your money.
Now that you have an overview of the various features available to manage your finances with the Chase First Banking App, let’s explore how you can make payments conveniently using the app in the next section.
Making Payments with Chase First Banking App
The Chase First Banking App offers a seamless and convenient way to make payments for your expenses. Here are the key methods through which you can make payments using the app:
- Bill Payments: You can easily pay your bills directly from your Chase First Banking account. Set up payees for recurring bills, such as utilities or subscriptions, and schedule automatic payments to ensure your bills are paid on time.
- Peer-to-Peer Transfers: With Chase QuickPay®, you can easily send money to friends or family who also have Chase accounts. Simply enter their email address or mobile number, and the funds will be transferred directly to their account. This feature is especially useful for splitting expenses or repaying borrowed money.
- Online Shopping: Use your Chase First Banking account for online purchases. Many online merchants accept Chase as a payment method, allowing you to securely make purchases without the need for a physical credit or debit card.
- Mobile Wallet: If you prefer using contactless payment methods, you can add your Chase First Banking account to popular mobile wallets such as Apple Pay, Google Pay, or Samsung Pay. This allows you to make payments at supporting retailers using your smartphone or other compatible devices.
- Automatic Payments: Take advantage of the automatic payment feature to schedule recurring payments for bills or services. This ensures that your payments are made on time, without the need for manual intervention.
Making payments with the Chase First Banking App is not only convenient but also secure. The app uses industry-standard security measures to protect your financial information and transactions, giving you peace of mind while conducting your financial activities.
It’s important to regularly review your payment history within the app to ensure accuracy and avoid any unauthorized transactions. If you notice any discrepancies or have any concerns, reach out to Chase First Banking customer support for immediate assistance.
Now that you have an understanding of the various payment methods available through the Chase First Banking App, let’s dive into the next section to learn about spending limits and notifications.
Understanding Spending Limits and Notifications
The Chase First Banking App provides features that help you manage your spending and stay informed about your account activity. Here’s what you need to know about spending limits and notifications:
Spending Limits: Chase First Banking allows you to set spending limits for individual transactions or daily spending. This feature helps you stay within your budget and ensures responsible money management. If you have a parent or guardian co-managing your account, they can also set spending limits to guide your financial decisions.
Transaction Notifications: The app sends real-time notifications for every transaction made with your Chase First Banking account. This includes purchases, bill payments, deposits, and withdrawals. These notifications allow you to stay on top of your account activity and quickly identify any unauthorized transactions or discrepancies.
Low Balance Alerts: To help you avoid overdrafts or reaching a low balance, you can set up low balance alerts within the app. This feature notifies you when your account balance falls below a specified threshold, giving you ample time to take necessary actions, such as adding funds or adjusting your spending.
Purchase Notifications: You can enable purchase notifications that provide details of every transaction, including the merchant’s name, amount, and date. This feature allows you to track your spending and easily review past transactions.
It’s crucial to regularly review your transaction history and monitor your spending to identify any discrepancies or potential issues. If you notice any unauthorized transactions or suspicious activity, report it immediately to Chase First Banking customer support for prompt assistance.
By utilizing spending limits and notifications, you can maintain control over your finances and detect any unusual account activity. These features provide peace of mind and enable you to stay informed and engaged in the management of your Chase First Banking account.
Now that you understand spending limits and notifications, let’s explore another beneficial feature of the Chase First Banking App – the Savings Goals feature – in the next section.
Using the Savings Goals Feature
The Savings Goals feature in the Chase First Banking App is a powerful tool to help you save and achieve your financial aspirations. Here’s how you can make the most of this feature:
Setting Up Savings Goals: Start by defining your savings goals within the app. Whether you’re saving for a vacation, a new gadget, or building an emergency fund, the Savings Goals feature allows you to allocate funds specifically towards those goals.
Tracking Progress: The app visually displays your progress towards each savings goal. You can easily see how much you’ve saved and how close you are to reaching your target. This visual representation serves as motivation and allows you to celebrate milestones along the way.
Automatic Contributions: Make saving effortless by setting up automatic contributions towards your goals. You can choose to contribute a fixed amount or a percentage of your deposits on a regular basis. This enables consistent savings without the need for manual intervention.
Adjusting Goals: If your financial situation changes or you need to modify your savings goals, the app allows you to adjust the target amount and contribution frequency accordingly. This flexibility ensures that your savings strategy remains aligned with your evolving needs and priorities.
Tracking Other Financial Goals: Apart from savings goals, you can also use this feature to track other financial objectives, such as paying off a debt or saving for a specific expense. Simply create a goal and allocate funds towards it to stay focused on achieving each milestone.
The Savings Goals feature helps you develop good saving habits and provides a structured approach to reaching your financial goals. By setting clear objectives, monitoring progress, and automating contributions, you’ll have a better chance of achieving financial success.
Remember to review your goals regularly and make adjustments as needed. Life circumstances and priorities can change, and it’s essential to keep your savings strategy aligned with your current situation.
Now that you understand the benefits of the Savings Goals feature, let’s address some frequently asked questions about the Chase First Banking App in the next section.
Frequently Asked Questions
Here are some common questions and answers about the Chase First Banking App:
Q: Is the Chase First Banking App free to download and use?
A: Yes, the app is free to download and use. However, note that certain services, such as using non-Chase ATMs, may have associated fees. Review the app’s terms and conditions for more information.
Q: Can I use the Chase First Banking App if I am under 18 years old?
A: Yes, the app is specifically designed for teens and children aged 13-17. However, a parent or guardian will need to co-manage the account and provide consent for certain transactions.
Q: What if I have technical issues or need assistance with the app?
A: If you encounter any technical difficulties, you can visit the Chase website or contact their customer support. They will be able to assist you and provide guidance in resolving any issues you may face.
Q: Is my personal and financial information secure on the Chase First Banking App?
A: Yes, Chase prioritizes the security of your data. The app uses industry-standard encryption and other security measures to protect your personal and financial information.
Q: Can I link my Chase First Banking account to other bank accounts?
A: Yes, you can link your Chase First Banking account to other bank accounts, whether they are Chase accounts or accounts from other banks. This allows you to easily transfer funds between different accounts.
Q: Can I set up direct deposit with my Chase First Banking account?
A: Yes, you can set up direct deposit with your Chase First Banking account. Provide your employer or benefits provider with your account and routing numbers, and they can deposit funds directly into your account.
Q: Can I access my Chase First Banking account through the website as well?
A: Yes, you can access your Chase First Banking account via the Chase website as well as through the mobile app. This provides flexibility and convenience in managing your finances.
For further questions or specific inquiries, it is recommended to visit the Chase website or reach out to their customer support for more accurate and up-to-date information.
Now that we have addressed some frequently asked questions, let’s wrap up this guide on managing your finances with the Chase First Banking App.
Conclusion
Managing your finances has never been easier and more accessible with the Chase First Banking App. From downloading and installing the app to creating your account, verifying your identity, and exploring its numerous features, you now have the tools and knowledge to take control of your money.
With the Chase First Banking App, you can easily track your spending, set budgeting goals, and save for the future with the Savings Goals feature. The app allows you to make payments, set up direct deposit, and receive real-time notifications to stay informed about your account activity.
Remember to regularly review your transactions, monitor your spending, and adjust your goals as needed. The app is designed to promote responsible financial management, enabling you to develop good saving habits and make informed financial decisions.
Whether you’re a teenager discovering the world of personal finance or a parent guiding your child’s financial journey, the Chase First Banking App provides a user-friendly and secure platform to empower individuals with financial literacy and independence.
If you have any further questions or encounter any issues, don’t hesitate to reach out to Chase First Banking customer support. They are dedicated to providing assistance and ensuring a seamless banking experience.
Download the Chase First Banking App today and embark on a journey towards financial well-being and success. Take advantage of its features and functionalities to track your spending, achieve your savings goals, and make confident and responsible financial decisions.
Empower yourself with the Chase First Banking App and unlock a world of financial convenience and control right at your fingertips.