Introduction
Splitwise is a popular expense-sharing platform that helps users manage and split expenses with friends, family, or colleagues. However, there may come a time when you no longer need the service and want to delete your Splitwise account. Whether you have found an alternative platform or have simply decided to stop using expense-sharing apps altogether, deleting your account is a straightforward process.
In this article, we will guide you through the steps to delete your Splitwise account. We will provide a detailed explanation of each step to ensure a smooth and hassle-free experience. It is important to follow these steps carefully to avoid any unintended consequences, such as losing access to important expense records or shared balances.
In the following sections, we will walk you through the account deletion process, from signing in to navigating the account settings. We will provide screenshots and detailed instructions to make the process as clear as possible. Additionally, we will highlight important points to keep in mind and address any potential concerns you may have.
Please note that once you delete your Splitwise account, your data will be permanently removed from the platform. This includes all your expense history, group balances, and account information. Therefore, it is essential to ensure that you have backed up any important data before proceeding with the deletion.
Without further ado, let’s dive into the step-by-step process of deleting your Splitwise account and say goodbye to the expense-sharing platform.
Step 1: Go to the Splitwise website
In order to delete your Splitwise account, you need to start by accessing the Splitwise website. Open your preferred web browser and type in “www.splitwise.com” in the address bar. Alternatively, you can directly click on this link to visit the Splitwise website.
Once you have reached the Splitwise homepage, you will see the login screen. If you are already logged in to your account, you will need to log out first. Look for the “Log Out” option in the top-right corner of the webpage and click on it to log out of your account. If you are not logged in, proceed to the next step.
If you don’t have an existing Splitwise account, you will need to sign up for one before proceeding with the deletion process. To create an account, click on the “Sign Up” option on the Splitwise homepage. Follow the instructions to provide the necessary details and create your account.
It is important to note that you will need access to the email associated with your Splitwise account during the deletion process. Ensure that you can log in to this email address before starting the account deletion process.
After logging out if you were already logged in or signing up if you don’t have an account, you are now ready to proceed to the next step of deleting your Splitwise account.
Step 2: Sign in to your account
Now that you have accessed the Splitwise website, it’s time to sign in to your account. Look for the “Log In” option on the homepage and click on it. You will be directed to the login page where you need to enter your credentials.
If you have previously created a Splitwise account, enter your registered email address and password in the respective fields. Double-check the accuracy of the information to ensure a successful login. If you have forgotten your password, click on the “Forgot Your Password?” link and follow the steps to reset it.
If you have been using the Splitwise mobile app and want to delete your account from there, sign in using the same credentials you use for the app. The login process is the same whether you are accessing Splitwise from a web browser or the mobile app.
Once you have entered your login credentials correctly, click on the “Log in” button to proceed. Splitwise will verify your account information and, if everything matches, you will be successfully logged in to your account.
It is crucial to ensure that you are logging in to the correct account before proceeding with the deletion process. Double-check your account information and ensure that you are accessing the correct Splitwise account that you wish to delete.
After successfully signing in to your account, you are now ready to navigate to the account settings and proceed with the next step of deleting your Splitwise account.
Step 3: Navigate to “Account Settings”
After logging in to your Splitwise account, the next step is to navigate to the “Account Settings” section. This is where you can find the option to delete your account.
To access the account settings, look for your profile picture or initials in the top-right corner of the Splitwise webpage. Click on it to open a dropdown menu. From the dropdown menu, select the “Settings” or “Account Settings” option.
Alternatively, if you are using the Splitwise mobile app, you can find the account settings by tapping on the menu icon (usually represented by three horizontal lines) in the top-left or top-right corner of the screen. Look for the “Settings” or “Account Settings” option within the menu.
Once you have located the account settings option, click on it to proceed. You will be taken to the settings page where you can manage various aspects of your Splitwise account.
In the account settings page, you may find different tabs or sections related to profile, notifications, privacy, etc. Look for the tab or section labeled “Account” or “Account Information”. This is usually where the account deletion option is located.
Take your time to familiarize yourself with the account settings page, as it provides valuable information about your account and customization options. Ensure that you are accessing the correct settings page and proceed to the next step to delete your Splitwise account.
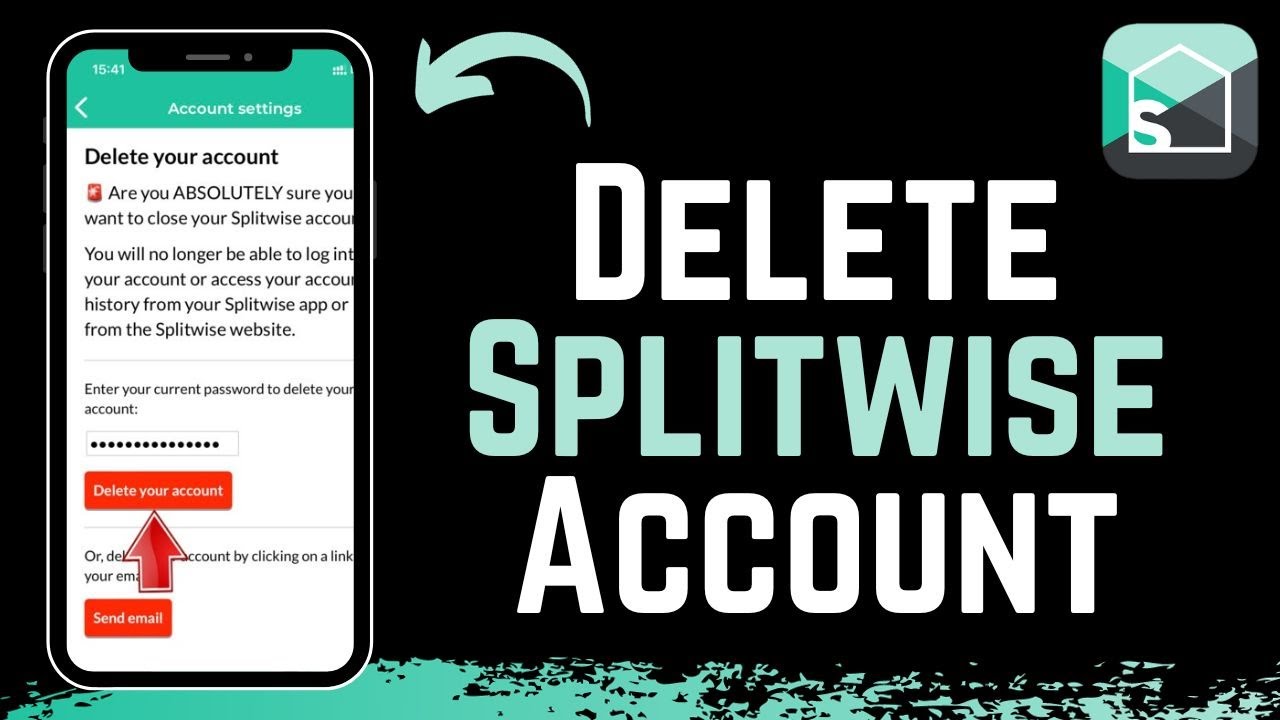
Step 4: Click on “Delete Account”
Once you have accessed the account settings page, it’s time to locate the option to delete your Splitwise account. Look for a section or tab that is specifically related to account management or deletion.
In most cases, you will find the option to delete your account under the “Account” or “Account Information” tab. Scroll through the settings page until you find this tab and click on it.
Within the account management section, you should see a list of different options related to your account. Look for the option that says “Delete Account” or something similar. This option is usually located towards the bottom of the page.
When you have identified the “Delete Account” option, click on it to initiate the deletion process. You may receive a prompt or a pop-up asking for confirmation before proceeding. Read the prompt carefully to ensure that you understand the consequences of deleting your account.
It is important to note that once you delete your account, all your data will be permanently removed from Splitwise. This includes your personal information, expense history, shared balances, and any other data associated with your account. Take a moment to consider this before proceeding with the deletion.
If you are sure about deleting your account, confirm your decision by following the instructions provided on the screen. This may involve clicking on another confirmation button or entering your account password as an additional security measure.
After confirming your decision to delete the account, Splitwise will begin the account deletion process. This process may take a few moments to complete, so please be patient and refrain from closing the browser or navigating away from the page.
Once the deletion process is complete, you will no longer have access to your Splitwise account. All your data will be permanently deleted from the platform. Make sure that you have backed up any important information before proceeding with the account deletion.
Now that you have clicked on “Delete Account” and confirmed your decision, you are one step closer to completely deleting your Splitwise account. The next step involves providing a reason for deleting your account, which we will cover in the next section.
Step 5: Provide a reason for deleting your account
After initiating the account deletion process, Splitwise may ask you to provide a reason for deleting your account. This is an optional step but providing feedback can be valuable for the Splitwise team to improve their services.
When prompted, take a moment to reflect on your decision and select the reason that best aligns with your motivation for deleting your account. The reasons may vary from individual preferences to technical issues or any other specific concerns you may have encountered while using the platform.
The options for providing a reason may vary depending on the region or platform you are accessing Splitwise from. Some common reasons may include:
- Found an alternative expense-sharing platform
- No longer need the service
- Privacy concerns
- Difficulty using the platform
- Not satisfied with the features or functionality
Choose the reason that best matches your situation or select the closest option available. If you don’t feel comfortable specifying a reason, you may have the option to select a generic option like “Other” or “Prefer not to say”.
Keep in mind that providing a reason is not mandatory, and you can skip this step if you prefer. However, if you have constructive feedback or specific issues to share, it may be helpful to include it here.
Once you have selected your reason or skipped this step, proceed to the next step of confirming the account deletion.
Step 6: Confirm the account deletion
After providing a reason for deleting your Splitwise account, the next step is to confirm the account deletion. This is an important step to ensure that the deletion is intentional and irreversible.
Once you have provided the reason, you may be prompted with a final confirmation message or pop-up. This message will typically summarize the consequences of deleting your account and ask you to confirm your decision.
Take a moment to review the information presented in the confirmation message. Double-check that you are certain about deleting your account and understand the impact that this decision will have. It is crucial to be aware that deleting your account is permanent and cannot be undone.
If you are confident about proceeding with the deletion, click on the confirmation button or option provided. This action confirms your intent to delete the account and initiates the final step of the deletion process.
It is important to note that once you confirm the deletion, you will no longer have access to your Splitwise account. All your data, including expense history, shared balances, and account information, will be permanently deleted from the platform.
Make sure to save any important information or backup your data before confirming the deletion to avoid any unintended loss of data.
After confirming the account deletion, Splitwise will begin the final process of deleting your account and associated data. This may take a few moments to complete, depending on the volume of data associated with your account.
Please be patient during this process and avoid closing the browser or navigating away from the page. Once the deletion is complete, you will receive a confirmation message or email to verify the successful deletion of your Splitwise account.
Now that you have confirmed the account deletion, you are almost done with the process. The final step involves verifying the deletion through an email, which we will discuss in the next section.
Step 7: Verify the deletion through email
After confirming the deletion of your Splitwise account, the final step is to verify the deletion through an email sent by Splitwise. This is done as an additional security measure to ensure that the deletion was authorized by the account owner.
Once the account deletion process is complete, Splitwise will send an email to the address associated with your account. This email will contain a verification link or a confirmation message asking you to verify the deletion.
Open your email client and locate the email from Splitwise. Make sure to check your inbox, as well as the spam/junk folder, in case the email landed there. The subject line of the email may include keywords like “Account Deletion Confirmation” or similar terms.
Click on the verification link provided in the email or follow the instructions provided to complete the verification process. This step is crucial to ensure that the deletion of your Splitwise account is finalized.
By verifying the deletion through email, you confirm that you are the rightful owner of the account and that the deletion was intended.
It is important to note that the verification link may expire after a certain period of time. If you don’t verify the deletion within the specified time frame, you may need to repeat the account deletion process from the beginning.
After successfully verifying the account deletion, you will receive a confirmation message or be redirected to a confirmation page. This indicates that your Splitwise account has been permanently deleted.
Congratulations! You have now completed the process of deleting your Splitwise account. Remember that once the account is deleted, you will no longer have access to any of your data, including expense history and shared balances.
If at any time you wish to use Splitwise again in the future, you would need to create a new account and start afresh.
Thank you for following this step-by-step guide. We hope this article has helped you successfully delete your Splitwise account.
Conclusion
Deleting your Splitwise account may be a decision influenced by various factors, such as finding an alternative platform, no longer needing the service, privacy concerns, or dissatisfaction with the features. Regardless of the reason, this step-by-step guide has provided you with a clear and detailed walkthrough of how to delete your Splitwise account.
Remember to carefully follow each step to ensure a smooth and successful account deletion process. Prior to initiating the deletion, make sure to backup any important data or information associated with your account to avoid any unintended loss. Take note that deleting your account is irreversible and all your data will be permanently removed.
We recommend checking your email after confirming the account deletion to verify the process. This additional email verification step ensures the security and authenticity of the deletion.
If you ever need to use Splitwise in the future, you would need to create a new account. Before proceeding, make sure to carefully evaluate your options and understand that a new account will not have any of your previous expenses or shared balances.
Thank you for following this guide to delete your Splitwise account. We hope this article has been helpful and that you have successfully completed the account deletion process. If you have any further questions or require any assistance, don’t hesitate to reach out to the Splitwise support team.
Wishing you the best in your future expense-sharing endeavors!