Introduction
Welcome to this guide on how to change your WePay account. WePay is a popular online payment processor that allows individuals and businesses to accept payments securely and conveniently. Whether you’ve recently switched from a personal to a business account, need to update your banking information, or simply want to change your email address, this tutorial will walk you through the process step-by-step to ensure a smooth transition.
By making these updates, you can ensure that your WePay account remains accurate and up to date, ensuring that you can continue to receive payments without any disruptions. So, without further ado, let’s dive into the various steps involved in changing your WePay account details.
Throughout this guide, we will cover everything you need to know about accessing and modifying your account information, including updating your email address, changing your banking details, modifying your security settings, and even closing your WePay account if needed. So, whether you’re a small business owner, a freelancer, or an individual looking to manage your finances online, this guide has got you covered.
It’s important to note that some changes may require additional verification or approval from WePay, depending on the nature of the modification. This is in place to ensure the security and integrity of your account. However, the steps outlined in this guide will provide you with the necessary information to submit the requested changes and successfully update your WePay account.
Now, let’s move on to the first step: accessing your WePay account and understanding the dashboard interface.
Step 1: Accessing your WePay Account
The first step in changing your WePay account is to access it by logging into your account. Follow these simple steps to navigate to your WePay dashboard:
- Open your preferred web browser and navigate to the WePay website.
- Click on the “Log In” button located at the top right corner of the homepage.
- Enter your WePay account credentials, including your email address and password.
- Click “Log In” to access your account.
Once you successfully log in, you will be directed to your WePay dashboard. The dashboard provides an overview of your account activity, including the balance, recent transactions, and other pertinent details. Take a moment to review the information displayed on the dashboard and familiarize yourself with the navigation menu on the left side of the screen.
From the dashboard, you can easily navigate to different areas of your WePay account to make the necessary changes. Whether you want to update your personal information, modify your banking details, or adjust security settings, all the options can be accessed from the dashboard. The intuitive user interface makes it simple to navigate and make changes to your account as needed.
It’s important to note that you should always access your WePay account from a secure and trusted device. Avoid using public computers or unsecured networks to prevent unauthorized access to your account. Additionally, ensure that your password is strong and unique to further enhance the security of your account.
Now that you’ve successfully logged into your WePay account and familiarized yourself with the dashboard interface, you’re ready to proceed to the next step: editing your account details. Let’s move on to Step 2.
Step 2: Editing Your Account Details
Once you have accessed your WePay account and are on the dashboard, you can easily edit your account details by following these steps:
- On the left side of the dashboard, locate and click on the “Settings” tab. This will open a dropdown menu with various options.
- Select “Account Settings” from the dropdown menu. This will take you to the account settings page.
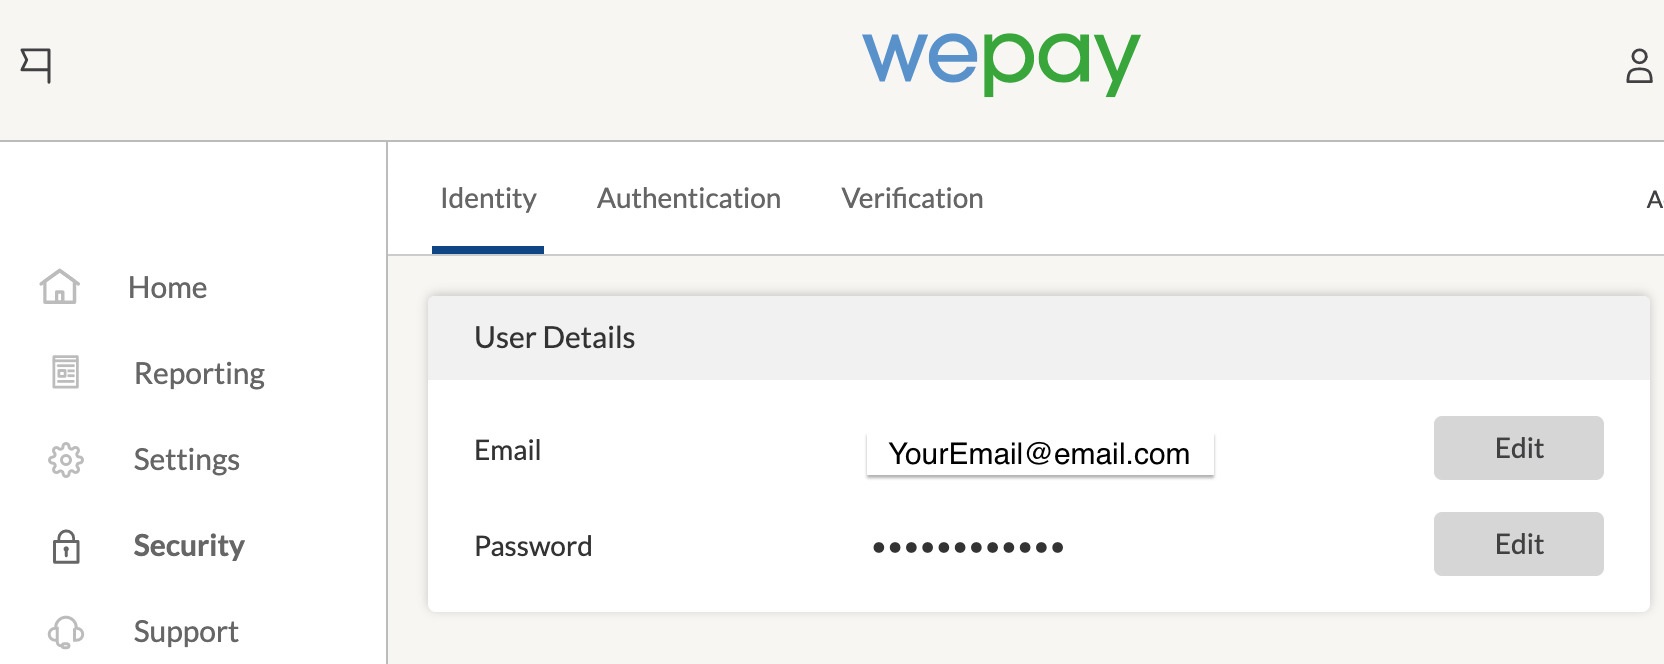
- On the account settings page, you will see a list of information associated with your WePay account, such as your name, email address, and profile picture. Edit the fields that require updating by clicking on them.
- Make the necessary changes to the fields you wish to update, such as your name or profile picture. Ensure that the information is accurate and up to date.
- Once you have made the desired changes, click on the “Save” or “Update” button to save the updated account details.
It’s important to review the changes you made before saving them to ensure accuracy. Double-check your email address, profile picture, and any other information that you have modified to make sure it is correct.
If you have changed your business name or other important details, it is advisable to review WePay’s terms and conditions to ensure compliance. Additionally, certain changes may require verification or additional documentation as per WePay’s guidelines. In such cases, you will be prompted to provide the necessary information during the editing process.
Editing your account details is straightforward and can be done quickly on the WePay platform. Once you have saved the changes, the updated information will be reflected in your account details. Now, proceed to Step 3, where we will explore how to change your email address associated with your WePay account.
Step 3: Changing Your Email Address
If you need to change the email address associated with your WePay account, follow these steps:
- From the WePay dashboard, click on the “Settings” tab located on the left side of the screen.
- From the dropdown menu, select “Account Settings.”
- Locate the “Email Address” field and click on it to edit your current email address.
- Enter the new email address that you wish to associate with your WePay account.
- Verify that the new email address is correct, and then select the “Save” or “Update” button to save the changes.
Once you’ve saved the changes, WePay will send a confirmation email to the new email address you provided. You will need to verify the email address by clicking on the verification link in the email. This step is crucial to ensure the security and integrity of your WePay account.
If you do not receive the verification email, be sure to check your spam or junk folder. If you still cannot locate it, contact WePay’s customer support for further assistance.
It’s important to note that changing your email address will not affect your account balance or any existing transactions. Your funds and transaction history will remain intact.
Remember, using a valid and active email address is essential for receiving important notifications, updates, and payment confirmations from WePay. Having an accurate email address ensures that you stay informed about your account activity and enables smooth communication between WePay and you as the account holder.
Now that you know how to change your email address on WePay, let’s move on to Step 4, where we will discuss how to update your banking information.
Step 4: Updating Your Banking Information
If you need to update your banking information, such as your bank account number or routing number, on WePay, follow these steps:
- Access your WePay account by logging in and navigating to the dashboard.
- Click on the “Settings” tab located on the left side of the screen.
- Select “Banking” or “Payments” from the dropdown menu.
- On the banking or payments page, you will find the option to update your banking information. Click on it.
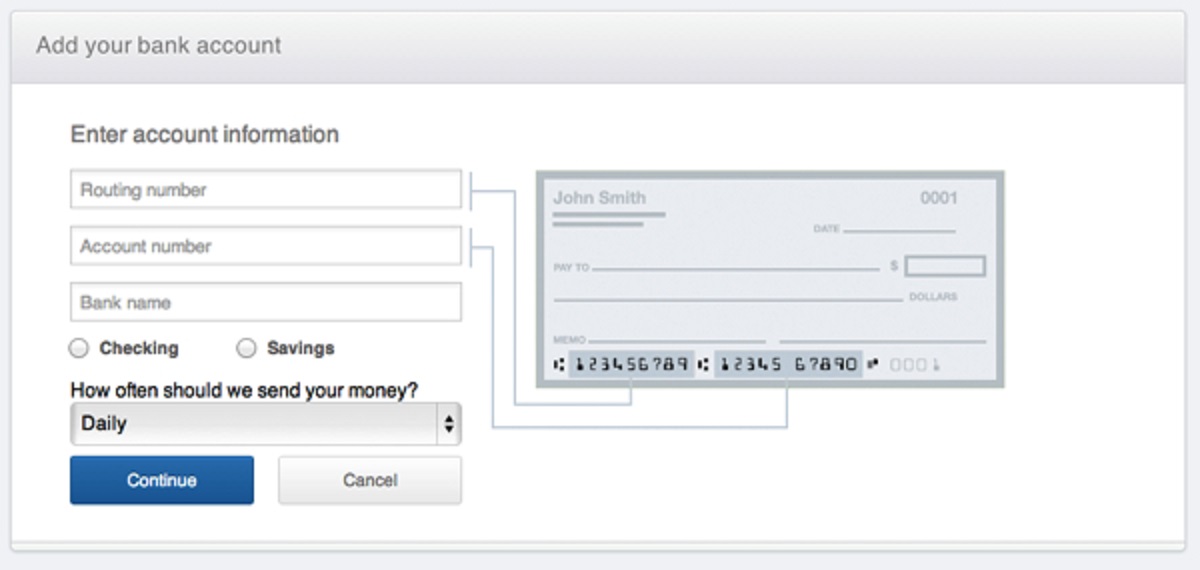
- Enter the new banking details, including your bank account number and routing number.
- Double-check the accuracy of the information you entered, as any errors could lead to payment issues.
- Once you have reviewed and verified the changes, click on the “Save” or “Update” button to save the updated banking information.
It’s important to note that, in some cases, WePay may require additional verification or documentation to update your banking information. This could include providing a voided check or a bank statement to ensure the validity of the new details.
Updating your banking information promptly is essential to ensure the smooth processing of payments and to avoid any disruptions. Always verify the accuracy of the new banking details before saving them to prevent any delays or issues with receiving payments.
If you encounter any difficulties or have any questions while updating your banking information on WePay, contact their customer support for assistance. They will be able to guide you through the process and address any concerns you may have.
Now that you’ve successfully updated your banking information on WePay, let’s move on to Step 5, where we will discuss how to modify your security settings.
Step 5: Modifying Security Settings
Ensuring the security of your WePay account is crucial to protect your sensitive information and prevent unauthorized access. If you need to modify your security settings, follow these steps:
- Log in to your WePay account and navigate to the dashboard.
- Click on the “Settings” tab located on the left side of the screen.
- From the dropdown menu, select “Security.”
- On the security settings page, you will find various options to enhance the security of your account.
- Review each setting and make changes as needed.
- Here are some common security settings you may consider modifying:
- Password: Click on the option to change your password. Ensure you choose a strong, unique password that is not easily guessable.
- Two-Factor Authentication: Enable two-factor authentication for an extra layer of security. This will require a verification code in addition to your password when logging in.
- Notification Preferences: Adjust your notification preferences to receive alerts for any suspicious or unauthorized activities on your account.
- Authorized Applications: Review and manage the list of authorized applications that have access to your WePay account. Remove any applications that you no longer use or recognize.
- Once you have made the desired changes to your security settings, click on the “Save” or “Update” button to save the modifications.
Regularly reviewing and modifying your security settings is essential to safeguard your WePay account and personal information. By implementing strong password practices, enabling two-factor authentication, and staying vigilant with notification alerts, you can enhance the security of your account and minimize the risk of unauthorized access.
If you encounter any challenges or have questions regarding your security settings on WePay, reach out to their customer support for assistance. They will provide guidance and address any concerns you may have.
Now that you’ve modified your security settings on WePay, let’s move on to Step 6, where we will discuss how to switch between a personal and business account.
Step 6: Switching Between Personal and Business Account
If you want to switch between a personal and a business account on WePay, you can easily do so by following these steps:
- Log in to your WePay account and navigate to the dashboard.
- Click on the “Settings” tab located on the left side of the screen.
- From the dropdown menu, select “Account Settings.”
- On the account settings page, you will find an option to switch between personal and business accounts.
- Click on the option to switch account types.
- Follow the prompts and guidance provided by WePay to complete the account type transition.
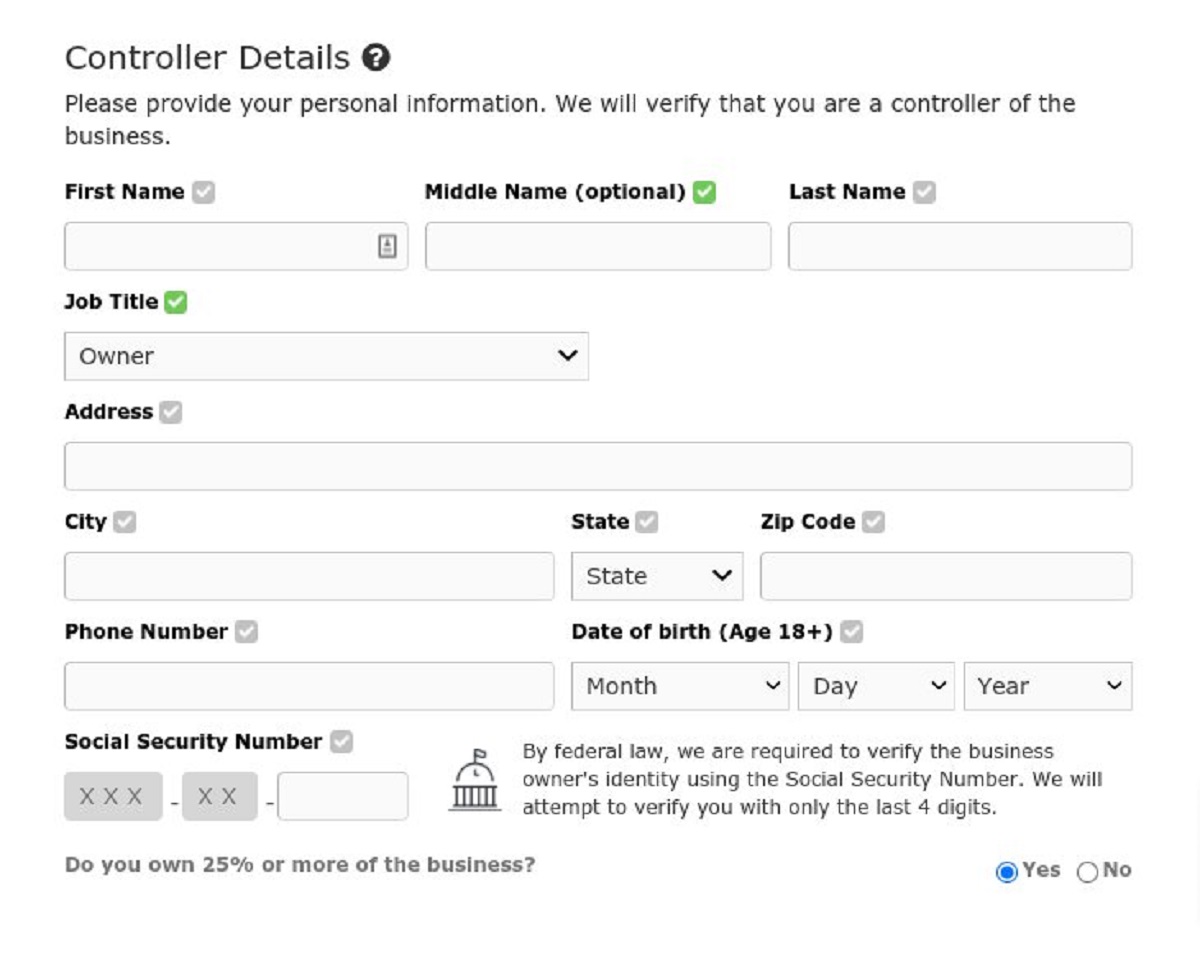
- During the process, you may be required to provide additional information and documentation to verify your business account, such as a business name, tax identification number, or proof of business ownership.
- Ensure that you carefully review and comply with WePay’s guidelines and requirements for transitioning between personal and business accounts.
- Once you have provided the necessary information, click on the “Save” or “Update” button to save the account type change.
Switching between a personal and business account can have various implications, such as different fee structures, transaction limits, and reporting requirements. Take the time to understand these differences to ensure you make the right decision based on your specific needs and circumstances.
Should you encounter any difficulties or have questions while switching between personal and business accounts on WePay, it’s recommended to contact their customer support. They can guide you through the process and provide any necessary assistance or clarification.
Now that you know how to switch between personal and business accounts on WePay, let’s move on to Step 7, where we will discuss the process of closing your WePay account if needed.
Step 7: Closing Your WePay Account
If you have decided to close your WePay account, follow these steps to initiate the account closure process:
- Login to your WePay account and navigate to the dashboard.
- Click on the “Settings” tab located on the left side of the screen.
- From the dropdown menu, select “Account Settings.”
- Scroll down to find the option to close your WePay account.
- Click on the option to begin the account closure process.
- WePay may prompt you to provide feedback or reasons for closing your account. Fill in the requested information.
- Review the closure terms and any potential implications of closing your account, such as the loss of transaction history or funds.
- If you are sure about closing your account, follow the instructions provided by WePay to complete the closure process.
- It’s important to note that once your WePay account is closed, it cannot be undone. Ensure that you have retrieved any necessary information or data before proceeding with the closure.
By closing your WePay account, you will discontinue all activity associated with that account, including the ability to send or receive payments. WePay may provide additional instructions or requirements during the closure process, such as confirming the closure via email or providing any outstanding information or documentation.
If you have any questions or concerns during the account closure process, it is advisable to contact WePay’s customer support for assistance. They will be able to guide you through the closure process and address any queries you may have.
Now that you are familiar with the process of closing your WePay account, you have successfully completed all the steps necessary to change or modify your WePay account according to your requirements and preferences.
Conclusion
Congratulations! You have reached the end of this guide on how to change your WePay account. By following the step-by-step instructions provided, you now have the knowledge and confidence to make necessary updates to your account, ensuring that it remains accurate and up to date.
We covered various aspects of managing your WePay account, including accessing your account, editing account details, changing email addresses, updating banking information, modifying security settings, switching between personal and business accounts, and closing your account if needed.
Remember, as you make changes to your account, always verify the accuracy of the information you provide. Double-check the details before saving them to prevent any issues with payments or disruptions to your account activity. Additionally, it’s important to review WePay’s terms and guidelines to ensure compliance with their policies.
If you encounter any difficulties or have questions while making changes to your WePay account, don’t hesitate to reach out to WePay’s dedicated customer support. They are available to assist you and provide further guidance if needed.
Managing your WePay account effectively allows you to continue accepting payments securely and efficiently. By keeping your account up to date, you can provide a seamless experience for your customers or clients, ensuring smooth transactions and maintaining trust in your business or personal financial management.
Thank you for following this guide, and we hope it has been helpful in navigating the process of changing your WePay account. Make sure to refer back to this guide whenever you need to make updates or modifications in the future.
Happy WePaying!