Introduction
Introduction
If you're a music producer or enthusiast using FL Studio 12, you may have experienced the challenge of manually inputting notes from your MIDI keyboard into the software. This process can be time-consuming and disrupt the creative flow. However, with the right setup, you can seamlessly auto-sync notes from your MIDI keyboard to FL Studio 12, streamlining your workflow and allowing for a more intuitive music creation process.
In this guide, we will walk through the steps to set up your MIDI keyboard in FL Studio 12 and enable MIDI input for note syncing. You'll also learn how to map MIDI notes to specific instruments in FL Studio 12 and, most importantly, how to auto-sync notes from your MIDI keyboard to the software. By the end of this tutorial, you'll have a solid understanding of how to integrate your MIDI keyboard with FL Studio 12, empowering you to create music more efficiently and creatively.
Whether you're a seasoned music producer or just starting with FL Studio 12, mastering the art of auto-syncing notes from your MIDI keyboard will undoubtedly elevate your music production experience. Let's dive into the process of seamlessly integrating your MIDI keyboard with FL Studio 12, unlocking a world of possibilities for your musical endeavors.
Setting up your MIDI keyboard in FL Studio 12
Setting up your MIDI keyboard in FL Studio 12
Before you can start auto-syncing notes from your MIDI keyboard to FL Studio 12, you need to ensure that your MIDI keyboard is properly set up within the software. Follow these steps to configure your MIDI keyboard:
-
Connect your MIDI keyboard: Begin by connecting your MIDI keyboard to your computer using a USB cable or MIDI interface. Ensure that the keyboard is powered on and recognized by your computer.
-
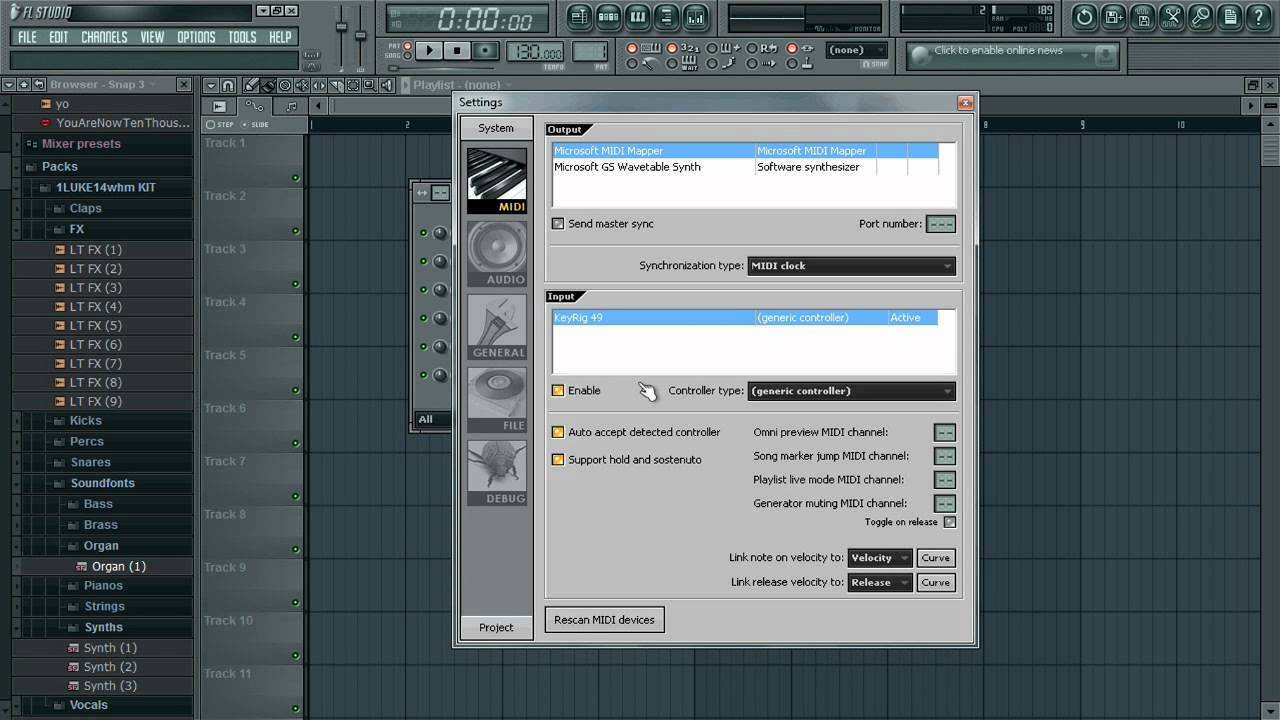
Launch FL Studio 12: Open FL Studio 12 on your computer. Once the software is running, navigate to the "Options" menu and select "MIDI Settings."
-
Enable your MIDI keyboard: In the "MIDI Settings" window, locate your MIDI keyboard from the list of Input devices. Click on the keyboard's name to enable it for input in FL Studio 12.
-
Configure MIDI settings: You may need to adjust additional MIDI settings based on your keyboard's specific features. Check the user manual for your MIDI keyboard for any additional configuration requirements.
Once you've completed these steps, your MIDI keyboard should be successfully set up within FL Studio 12, allowing for seamless communication between the keyboard and the software. With the physical connection established, you're now ready to move on to enabling MIDI input for note syncing.
Enabling the MIDI input for note syncing
Enabling the MIDI input for note syncing
Once your MIDI keyboard is set up in FL Studio 12, the next step is to enable MIDI input for seamless note syncing. Follow these steps to configure the MIDI input settings:
-
Access the MIDI settings: In FL Studio 12, navigate to the "Options" menu and select "MIDI Settings." This will open the MIDI Settings window, where you can manage MIDI input and output configurations.
-
Enable MIDI input: Within the MIDI Settings window, locate your MIDI keyboard in the list of Input devices. Ensure that the "Enable" box next to your keyboard's name is checked. This action allows FL Studio 12 to receive MIDI input from your keyboard.
-
Configure input channels: If your MIDI keyboard supports multiple input channels, you can specify the channel to be used for note syncing. FL Studio 12 allows you to assign specific MIDI channels to different instruments and tracks, providing flexibility in your music production workflow.
By enabling MIDI input for note syncing, you establish a direct line of communication between your MIDI keyboard and FL Studio 12, paving the way for a seamless integration of live input with the software. With MIDI input enabled, you can now proceed to map MIDI notes to specific instruments within FL Studio 12.
Mapping MIDI notes to specific instruments in FL Studio 12
Mapping MIDI notes to specific instruments in FL Studio 12
Mapping MIDI notes to specific instruments in FL Studio 12 allows you to define which sounds or instruments will be triggered by the notes played on your MIDI keyboard. This process is essential for creating a cohesive and organized music production environment. Follow these steps to map MIDI notes to specific instruments:
-
Open the Piano Roll: Within FL Studio 12, open the Piano Roll for the instrument or track to which you want to assign MIDI notes. The Piano Roll is a visual interface that allows you to sequence and edit MIDI notes for a specific instrument.
-
Select the MIDI input: In the Piano Roll window, locate the "MIDI Input" section. Here, you can specify the MIDI input port and channel that will be used to receive notes from your MIDI keyboard. Ensure that the correct input settings are selected to establish the connection between your keyboard and the instrument in FL Studio 12.
-
Assign notes to instruments: Using the Piano Roll, you can now assign specific MIDI notes to trigger different sounds or instruments within FL Studio 12. Click on the desired note position in the Piano Roll and place it on the grid to create a sequence of notes that correspond to the instrument's sound.
-
Customize note properties: You can further customize the properties of each MIDI note, including its duration, velocity, and pitch, to achieve the desired musical expression. This level of control allows you to fine-tune the performance of each note played on your MIDI keyboard.
By mapping MIDI notes to specific instruments in FL Studio 12, you establish a direct correlation between the input from your MIDI keyboard and the output of individual instruments within the software. This mapping process forms the foundation for auto-syncing notes from your MIDI keyboard, as it defines how the incoming MIDI data will interact with the instruments in your music project.
Auto syncing notes from your MIDI keyboard to FL Studio 12
Auto syncing notes from your MIDI keyboard to FL Studio 12
Auto-syncing notes from your MIDI keyboard to FL Studio 12 streamlines the process of capturing your musical ideas and performances directly into the software. This feature allows for real-time recording and playback of MIDI notes, enhancing the fluidity and spontaneity of music creation. Follow these steps to enable auto-syncing of notes from your MIDI keyboard:
-
Activate recording mode: In FL Studio 12, ensure that the recording mode is enabled for the instrument or track to which you want to capture MIDI input from your keyboard. This allows the software to receive and record MIDI data in real time as you play on your keyboard.
-
Set the recording parameters: Configure the recording settings, such as the input port, channel, and recording duration, to align with your MIDI keyboard and performance preferences. These parameters determine how FL Studio 12 captures and interprets the incoming MIDI notes.
-
Initiate the recording: Once the recording mode and parameters are set, start playing your MIDI keyboard to input notes into FL Studio 12. The software will capture and sync the notes in real time, allowing you to focus on your musical expression without interruption.
-
Review and edit the recorded notes: After recording, you can review and edit the captured MIDI notes in the Piano Roll or MIDI editor within FL Studio 12. This step enables you to refine the recorded performance, adjust note properties, and fine-tune the musical arrangement based on your creative vision.
By auto-syncing notes from your MIDI keyboard to FL Studio 12, you bridge the gap between live musical expression and digital recording, empowering you to seamlessly capture your creative ideas within the software. This integration of real-time input and recording capabilities enhances the spontaneity and authenticity of your music production process, ultimately contributing to the richness and depth of your musical compositions.
Conclusion
Conclusion
Mastering the art of auto-syncing notes from your MIDI keyboard to FL Studio 12 opens up a world of creative possibilities for music producers and enthusiasts. By seamlessly integrating your MIDI keyboard with the software, you can streamline your workflow, capture spontaneous musical ideas, and enhance the overall music production experience.
Throughout this guide, you’ve learned the essential steps to set up your MIDI keyboard in FL Studio 12, enable MIDI input for note syncing, map MIDI notes to specific instruments, and auto-sync notes from your keyboard to the software. These foundational processes lay the groundwork for a seamless and intuitive interaction between your physical instrument and the digital environment of FL Studio 12.
With the ability to auto-sync notes, you can capture the nuances of your live performances, infuse your compositions with authentic expression, and expedite the music creation process. The real-time recording and playback capabilities offered by auto-syncing empower you to focus on musical creativity without being encumbered by manual input tasks.
As you continue to explore the integration of your MIDI keyboard with FL Studio 12, remember that practice and experimentation are key to harnessing the full potential of this powerful combination. Embrace the flexibility and fluidity that auto-syncing notes bring to your music production journey, and leverage this feature to express your artistic vision with precision and spontaneity.
By mastering the art of auto-syncing notes from your MIDI keyboard to FL Studio 12, you embark on a musical odyssey where the boundaries between live performance and digital production blur, allowing your creativity to flourish in a harmonious fusion of analog and digital realms.


