Introduction
So, you've got your MIDI keyboard and FL Studio fired up, and you're ready to start creating some musical magic. Recording MIDI keyboard in FL Studio opens up a world of possibilities for music production, allowing you to capture your performances, experiment with different sounds, and fine-tune your compositions. Whether you're a seasoned producer or just starting out, understanding how to harness the power of MIDI recording in FL Studio is essential for bringing your musical ideas to life.
In this guide, we'll walk through the process of recording MIDI keyboard in FL Studio, from setting up your MIDI keyboard to editing and mixing your recorded MIDI notes. By the end of this tutorial, you'll have the knowledge and confidence to seamlessly integrate your MIDI keyboard into your music production workflow, unleashing your creativity and taking your tracks to the next level.
Recording MIDI keyboard in FL Studio isn't just about capturing notes – it's about capturing emotion, expression, and the unique nuances of your performance. With the right techniques and tools at your disposal, you can transform a simple melody into a rich, dynamic arrangement that resonates with your audience. Whether you're laying down a catchy hook, crafting intricate chord progressions, or improvising a soulful solo, FL Studio provides the flexibility and precision you need to translate your musical vision into reality.
Throughout this tutorial, we'll explore the fundamental steps of recording MIDI keyboard in FL Studio, covering everything from initial setup to post-production techniques. By understanding the intricacies of MIDI recording and leveraging FL Studio's robust features, you'll be empowered to capture, refine, and embellish your musical ideas with unparalleled creativity and control.
So, grab your MIDI keyboard, fire up FL Studio, and let's dive into the exciting world of recording MIDI keyboard in FL Studio – where inspiration meets innovation, and every keystroke becomes a catalyst for sonic excellence.
Setting up your MIDI keyboard in FL Studio
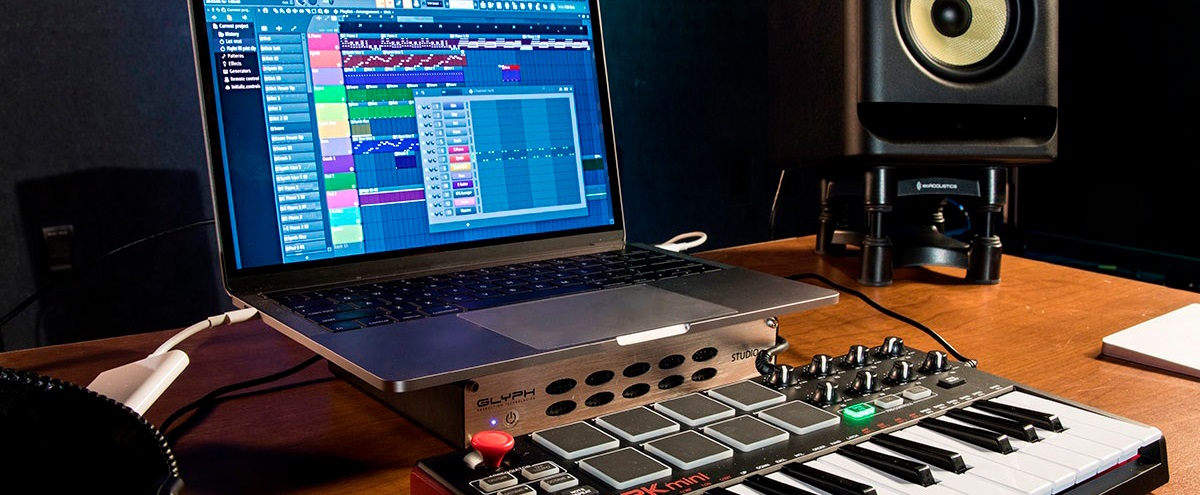
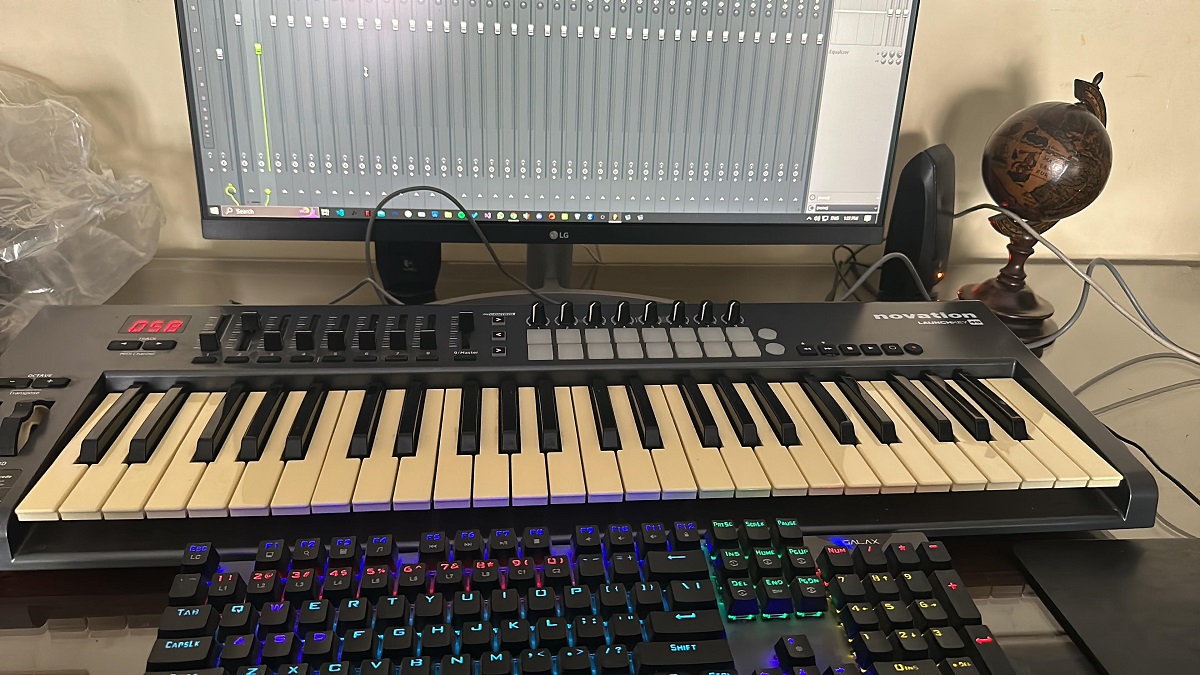
Before you can start recording MIDI keyboard in FL Studio, it’s crucial to ensure that your MIDI keyboard is properly set up and recognized by the software. This initial step lays the foundation for seamless communication between your MIDI controller and FL Studio, allowing you to harness the full potential of your keyboard during the recording process.
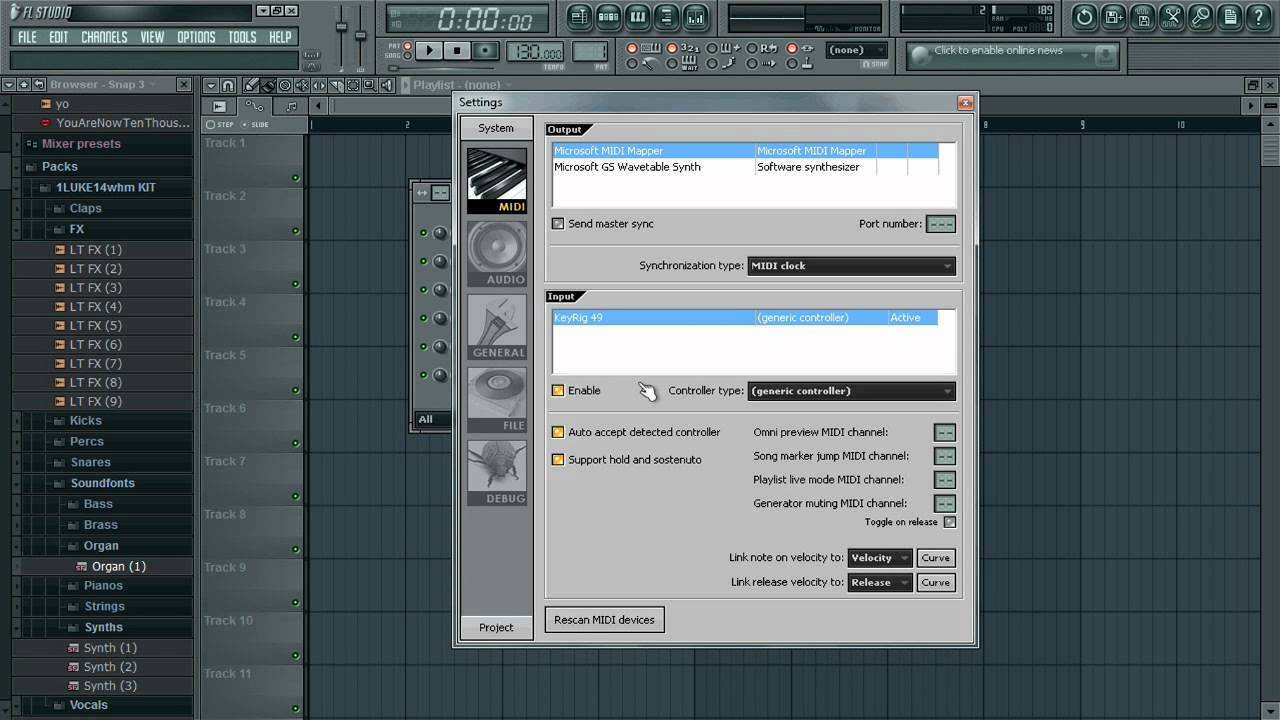
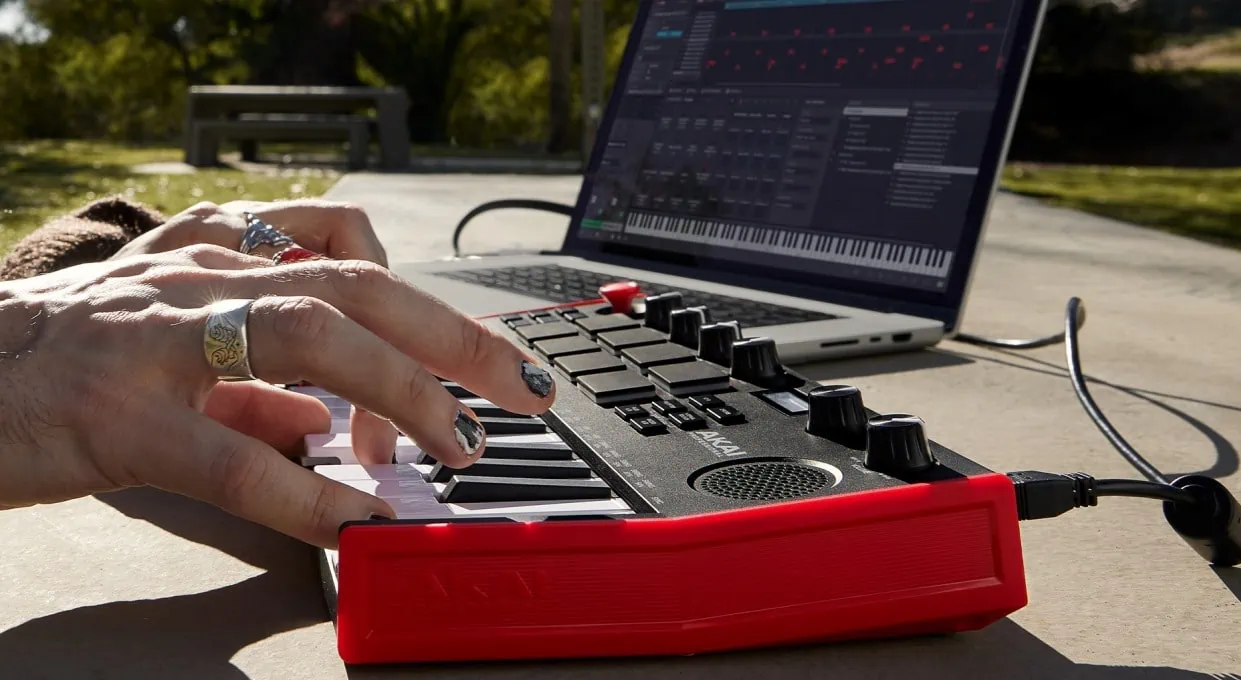
First, connect your MIDI keyboard to your computer using a USB cable or MIDI interface, depending on the connectivity options available on your specific keyboard model. Once the physical connection is established, launch FL Studio and navigate to the “Options” menu. From there, select “MIDI Settings” to access the MIDI configuration panel.
Within the MIDI settings, you’ll be able to identify and select your MIDI keyboard from the list of available input devices. FL Studio should automatically detect your connected MIDI controller, displaying it as an option for MIDI input. If your keyboard doesn’t appear in the list, ensure that the necessary drivers are installed and that the device is properly recognized by your computer’s operating system.
After selecting your MIDI keyboard as the input device, you can proceed to configure additional settings such as MIDI channels, velocity sensitivity, and other parameters that align with your preferred playing style and workflow. These settings can significantly impact the way FL Studio interprets and responds to the MIDI data transmitted by your keyboard, so it’s essential to tailor them to your specific requirements.
Once you’ve configured the MIDI settings to accommodate your MIDI keyboard, you’re ready to verify the connection by playing a few notes on your keyboard. If FL Studio successfully receives the MIDI input, you should see the corresponding notes triggering within the software, indicating that your MIDI keyboard is now integrated and responsive within the FL Studio environment.
By ensuring that your MIDI keyboard is correctly set up in FL Studio, you pave the way for a productive and gratifying MIDI recording experience, where your musical ideas seamlessly translate from your fingertips to the digital realm. With the technical groundwork established, you can now focus on the creative aspects of recording MIDI keyboard in FL Studio, leveraging the full potential of your keyboard to craft compelling musical compositions.
Configuring MIDI settings in FL Studio
Once your MIDI keyboard is physically connected to your computer and recognized by FL Studio, it’s essential to configure the MIDI settings within the software to optimize the communication between your keyboard and the digital workspace. These settings not only ensure accurate interpretation of your playing dynamics but also provide customization options to tailor the MIDI recording process to your specific preferences and creative workflow.
Within FL Studio’s MIDI settings, you’ll find a range of parameters that can be adjusted to refine the behavior of your MIDI keyboard. One crucial setting is the MIDI channel assignment, which determines the channel through which MIDI data is transmitted from your keyboard to FL Studio. By assigning specific MIDI channels to different instruments or tracks within FL Studio, you can orchestrate a cohesive and organized MIDI recording setup, enabling independent control over various sound sources.
Velocity sensitivity, another vital MIDI setting, influences the responsiveness of virtual instruments to the force with which keys are struck on your MIDI keyboard. Adjusting velocity sensitivity allows you to imbue your MIDI recordings with nuanced dynamics, articulations, and expressiveness, mimicking the natural variations in touch and intensity characteristic of acoustic instruments.
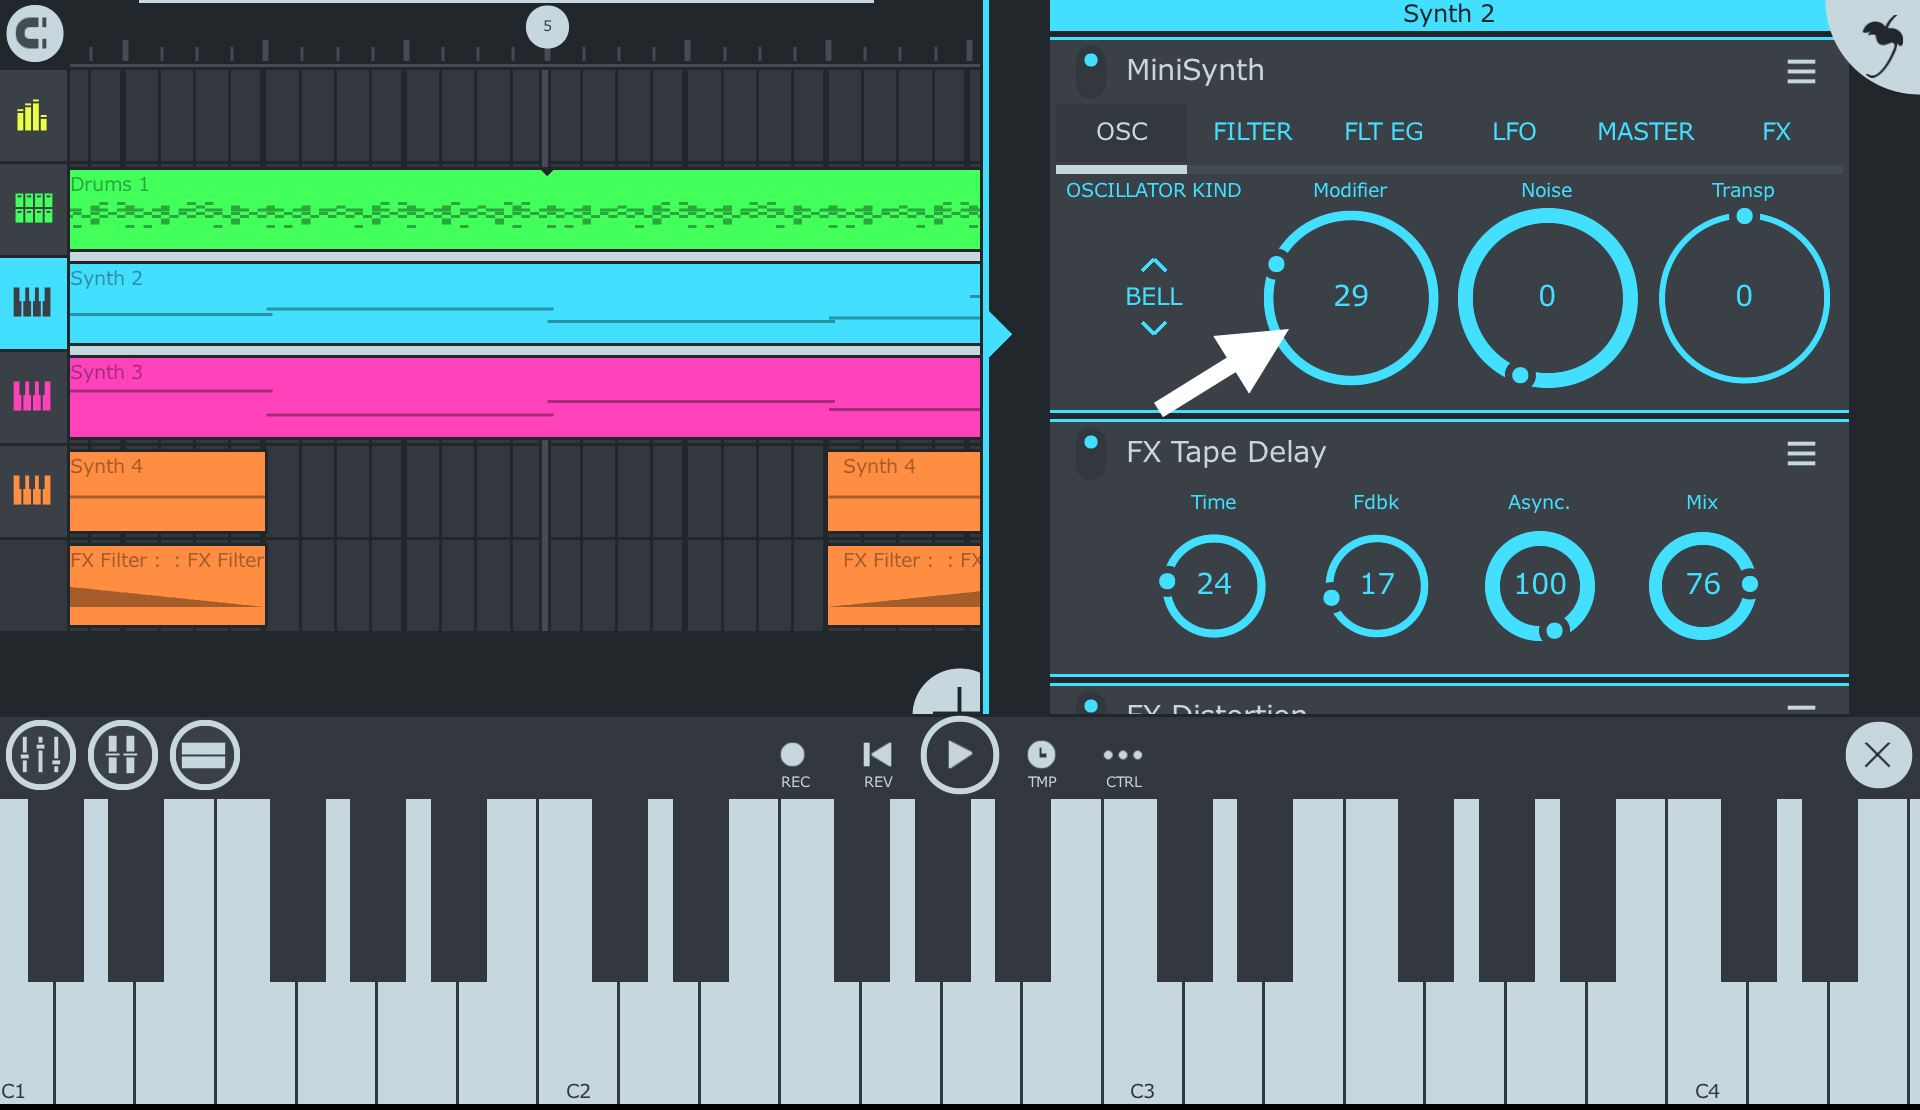
Furthermore, FL Studio offers options to map MIDI controllers, such as knobs, sliders, and modulation wheels on your MIDI keyboard, to specific parameters within the software. This mapping capability empowers you to manipulate virtual instrument parameters, mixer controls, and effect parameters in real-time, fostering a hands-on and interactive approach to MIDI recording and performance.
While configuring MIDI settings in FL Studio, it’s beneficial to explore additional options related to pitch bend, sustain pedal behavior, and aftertouch sensitivity, if applicable to your MIDI keyboard. These settings contribute to the comprehensive customization of your MIDI recording environment, aligning the software’s response to your playing nuances and preferences.
By meticulously configuring MIDI settings in FL Studio, you optimize the interaction between your MIDI keyboard and the software, establishing a tailored and responsive platform for capturing your musical ideas. These settings not only enhance the accuracy and expressiveness of your MIDI recordings but also empower you to infuse your performances with authenticity, emotion, and a personalized touch, elevating your compositions to new heights of artistic excellence.
Choosing the right MIDI input
When recording MIDI keyboard in FL Studio, selecting the appropriate MIDI input is a pivotal decision that directly influences the quality, versatility, and creative potential of your recording setup. FL Studio offers various MIDI input options, each serving distinct purposes and catering to different production scenarios, thereby empowering you to make informed choices based on your specific musical objectives and workflow requirements.
One of the primary considerations when choosing the right MIDI input in FL Studio is the selection of the MIDI channel through which your keyboard communicates with the software. MIDI channels enable the segregation of MIDI data, allowing you to designate different channels for individual instruments or tracks within FL Studio. This channelization facilitates multi-timbral capabilities, enabling you to control and record multiple virtual instruments simultaneously, each responding to distinct MIDI channels from your keyboard.
Moreover, FL Studio provides the flexibility to route MIDI input from your keyboard to specific tracks or instruments within the software, granting you granular control over the destination of MIDI data. This feature empowers you to direct MIDI input from your keyboard to the desired virtual instrument or sampler, facilitating seamless integration and precise recording of MIDI performances onto the designated track.
Additionally, when utilizing external MIDI hardware, such as synthesizers or drum machines, as part of your music production setup, FL Studio allows you to select these devices as MIDI inputs, expanding the scope of your creative possibilities and enabling the incorporation of external sound sources into your MIDI recording and production processes.
Furthermore, FL Studio supports MIDI input from multiple devices simultaneously, affording you the freedom to incorporate multiple MIDI keyboards, controllers, or external hardware units into your recording environment. This capability fosters collaborative performances, intricate layering of musical elements, and comprehensive control over diverse sound sources, enriching the depth and complexity of your MIDI recordings.
By carefully choosing the right MIDI input options in FL Studio, you orchestrate a tailored and adaptable MIDI recording setup that harmonizes with your creative vision and technical requirements. This strategic selection empowers you to harness the full potential of your MIDI keyboard and external MIDI devices, amplifying your capacity to capture, manipulate, and sculpt musical expressions with precision and artistry.
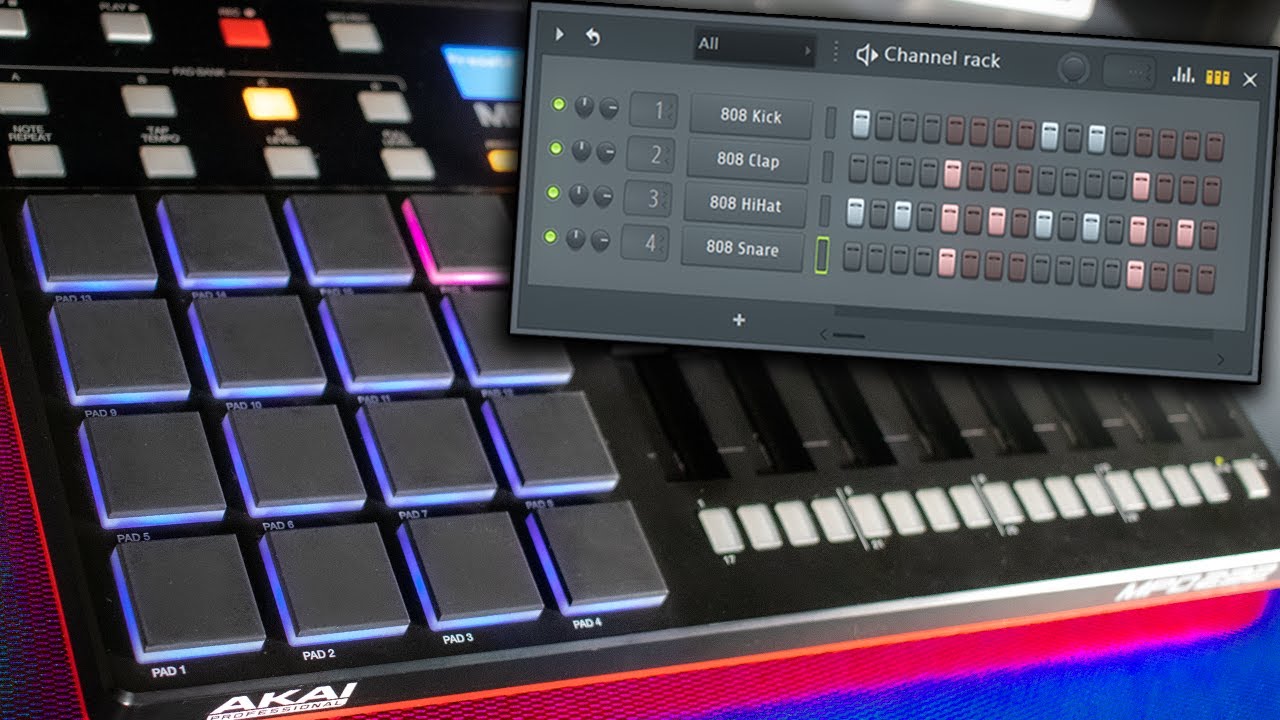
Setting up a new MIDI track
Creating a new MIDI track in FL Studio is a fundamental step in preparing for the recording and arrangement of MIDI keyboard performances. This process involves configuring the track parameters, selecting virtual instruments, and establishing the routing and settings necessary to capture and manipulate MIDI data effectively. By setting up a new MIDI track with precision and foresight, you lay a solid foundation for translating your musical ideas into compelling compositions within the FL Studio environment.
To initiate the creation of a new MIDI track, navigate to the FL Studio playlist or channel rack and right-click to access the context menu. From the menu, select the option to add a new MIDI track, which prompts the generation of a blank canvas for capturing MIDI data. Subsequently, you can assign a virtual instrument or sampler to the newly created MIDI track, providing a sonic palette for translating MIDI input from your keyboard into audible, expressive sounds.
Upon selecting a virtual instrument for the MIDI track, you can fine-tune the instrument’s parameters, such as articulations, timbre, and effects, to align with the creative vision and sonic characteristics you intend to convey through your MIDI keyboard performances. This customization process empowers you to tailor the virtual instrument’s response to MIDI input, ensuring that your recorded performances resonate with the desired tonal qualities and expressive nuances.
Furthermore, setting up a new MIDI track involves configuring the routing of MIDI input from your keyboard to the designated track within FL Studio. By establishing this connection, you enable the seamless transmission of MIDI data from your keyboard to the virtual instrument, facilitating real-time recording and playback of your performances without impedance or latency.
FL Studio also offers the flexibility to layer multiple virtual instruments within a single MIDI track, enabling the creation of rich, textured arrangements that showcase the versatility and depth of your musical compositions. This layering capability empowers you to orchestrate intricate soundscapes, blend diverse timbres, and craft dynamic performances that transcend the limitations of a singular virtual instrument.
By adeptly setting up a new MIDI track in FL Studio, you construct a dynamic and responsive framework for capturing, sculpting, and refining MIDI keyboard performances. This process not only streamlines the recording and arrangement of musical ideas but also empowers you to unleash your creativity, experiment with diverse sounds, and breathe life into your compositions with unwavering precision and artistic integrity.
Recording MIDI notes
Recording MIDI notes in FL Studio is a pivotal stage in capturing the essence of your musical ideas and performances. This process entails the real-time translation of your keyboard’s keystrokes into digital MIDI data, which forms the foundation of your compositions and serves as a canvas for further refinement and embellishment. By mastering the art of recording MIDI notes in FL Studio, you unlock the potential to immortalize your musical expressions with precision and creativity.
To initiate the recording of MIDI notes, ensure that the MIDI track designated for recording is armed and ready to receive input from your keyboard. Once armed, pressing the record button within FL Studio’s interface initiates the recording process, capturing the MIDI data generated by your keyboard as you perform. As you play, each keystroke is translated into MIDI notes, forming a sequence of musical events that encapsulate the nuances and dynamics of your performance.
FL Studio provides the option to record MIDI notes in both a linear arrangement and a loop-based workflow, granting you the flexibility to capture performances in a manner that aligns with your creative process. Whether you prefer to record a continuous, uninterrupted take or iterate on specific sections within a looping framework, FL Studio accommodates diverse recording methodologies, empowering you to realize your musical vision with fluidity and adaptability.
During the recording process, FL Studio captures not only the pitch and duration of the MIDI notes but also the velocity and modulation data, preserving the subtleties of your playing dynamics and articulations. This comprehensive recording capability ensures that your MIDI performances retain their expressive qualities, enabling you to infuse your compositions with the emotive nuances and intricacies inherent in live musical performances.
FL Studio’s piano roll editor serves as a versatile canvas for visualizing and editing the recorded MIDI notes, offering a comprehensive suite of tools for refining the timing, pitch, and attributes of the captured performances. This post-recording editing phase empowers you to fine-tune your MIDI notes, correct imperfections, and embellish your compositions with meticulous attention to detail, ultimately refining your musical ideas to perfection.
By adeptly recording MIDI notes in FL Studio, you preserve the essence of your musicality and transform fleeting moments of inspiration into enduring compositions. This process not only captures the raw energy and creativity of your performances but also provides a platform for refining and shaping your musical ideas into polished, evocative works that resonate with depth, emotion, and artistic integrity.
Editing MIDI notes
Once MIDI notes are recorded in FL Studio, the editing phase becomes a crucial juncture in refining and perfecting the captured performances. This stage empowers you to manipulate the timing, pitch, velocity, and other attributes of the MIDI notes, sculpting your compositions with precision and artistry. By mastering the art of editing MIDI notes in FL Studio, you gain the ability to transform raw recordings into polished, expressive musical expressions.
The piano roll editor in FL Studio serves as the primary interface for editing MIDI notes, offering a comprehensive array of tools and functionalities for precise manipulation of the recorded performances. Within the piano roll, you can visually assess the timing and pitch of each MIDI note, facilitating surgical adjustments to ensure that your compositions align with your creative vision and musical standards.
One of the fundamental editing capabilities in FL Studio’s piano roll is the quantization feature, which enables you to align MIDI notes to a grid based on rhythmic subdivisions. This function enhances the rhythmic accuracy of your performances, ensuring that notes are precisely synchronized and adhere to the desired rhythmic feel, thereby refining the overall groove and coherence of your compositions.
Moreover, the piano roll editor allows you to adjust the velocity of individual MIDI notes, influencing the dynamics and intensity of the musical phrases. By modulating the velocity values, you can imbue your performances with nuanced expressiveness, accentuating certain notes and fostering a dynamic range that mirrors the subtleties of live instrumental performances.
FL Studio’s piano roll also facilitates the manipulation of pitch and note attributes, enabling you to transpose, stretch, or manipulate MIDI notes to achieve specific melodic or harmonic alterations. This capability empowers you to explore creative variations, experiment with musical motifs, and refine the melodic contours of your compositions with finesse and ingenuity.
Furthermore, the piano roll editor provides tools for modifying the duration and articulations of MIDI notes, allowing you to refine the phrasing and musical gestures within your performances. By adjusting note lengths, adding articulations, and shaping the contours of musical phrases, you can imbue your compositions with a sense of fluidity, expression, and musicality that resonates with authenticity and emotive depth.
By adeptly editing MIDI notes in FL Studio, you elevate your compositions from raw recordings to polished, emotive works of art. This process not only refines the technical precision of your performances but also empowers you to infuse your compositions with a personalized touch, expressive nuances, and a level of detail that captivates listeners and resonates with artistic integrity.
Adding effects and plugins
Once MIDI notes are recorded and edited in FL Studio, the integration of effects and plugins enriches the sonic landscape, elevating the quality and character of your compositions. By strategically incorporating effects and plugins, you can sculpt the tonal palette, enhance the spatial depth, and imbue your music with captivating textures and atmospheres, fostering a captivating sonic identity that captivates and engages your audience.
FL Studio offers a vast array of built-in effects and plugins, ranging from dynamic processors and equalizers to reverbs, delays, and modulation effects. These tools empower you to shape the sonic characteristics of your MIDI recordings, infusing them with depth, dimension, and sonic embellishments that transcend the boundaries of conventional instrumentation.
One of the primary categories of effects commonly applied to MIDI recordings is dynamic processing, which includes compressors, limiters, and expanders. These tools enable you to regulate the dynamic range of your performances, ensuring that the sonic elements are balanced, controlled, and cohesive, thereby enhancing the clarity and impact of your compositions.
Moreover, the integration of equalization (EQ) allows you to sculpt the frequency balance of your MIDI recordings, refining the tonal characteristics and spectral balance to achieve clarity, warmth, and sonic coherence. By strategically applying EQ, you can accentuate the sonic strengths, attenuate resonant frequencies, and shape the tonal contours of your compositions with precision and finesse.
Reverb and delay effects play a pivotal role in creating spatial depth and ambiance within MIDI recordings, infusing them with a sense of space, dimension, and immersive resonance. These effects simulate acoustic environments, imparting a sense of realism, depth, and spatial immersion that transcends the confines of digital production, fostering a captivating sonic experience for the listener.
Furthermore, the integration of modulation effects such as chorus, flanger, and phaser introduces captivating textures, movement, and timbral variations to MIDI recordings, enriching them with expressive nuances and captivating sonic flourishes. These effects imbue your compositions with a sense of motion, vitality, and sonic intrigue, elevating the musical narrative and engaging the listener with immersive sonic tapestries.
By adeptly adding effects and plugins in FL Studio, you transform your MIDI recordings into immersive, evocative sonic experiences that transcend the boundaries of traditional instrumentation. This process not only enhances the sonic fidelity and expressiveness of your compositions but also empowers you to craft captivating, emotive musical narratives that resonate with depth, authenticity, and artistic ingenuity.
Mixing and mastering your MIDI recording
Once your MIDI recording is captured, edited, and enhanced with effects in FL Studio, the pivotal stages of mixing and mastering elevate the sonic quality and cohesiveness of your compositions, ensuring that they resonate with clarity, balance, and professional polish. Through adept mixing and mastering, you harmonize the sonic elements, refine the tonal balance, and optimize the overall sonic presentation, culminating in a refined, captivating musical production that captivates and resonates with your audience.
Mixing involves the art of balancing and blending the individual tracks and elements within your MIDI recording, ensuring that each component occupies its rightful place within the sonic landscape. FL Studio provides a comprehensive mixer interface, empowering you to adjust levels, pan positions, and spatial attributes, fostering a cohesive, balanced sonic canvas that unfolds with clarity and depth.
Within the mixing phase, you can apply additional processing, such as EQ, compression, and spatial effects, to refine the sonic characteristics of individual tracks and achieve a harmonious, balanced sonic ensemble. By sculpting the frequency balance, dynamics, and spatial positioning of each element, you cultivate a sonic environment that resonates with clarity, depth, and expressive coherence.
After achieving a balanced mix, the mastering phase refines the overall sonic presentation, ensuring that the MIDI recording translates optimally across diverse playback systems and environments. FL Studio offers mastering tools and processors that enable you to enhance the overall loudness, spectral balance, and dynamic range of your compositions, fostering a polished, professional sonic identity that captivates and engages the listener.
During mastering, you can apply multiband compression, limiting, and equalization to refine the tonal characteristics and dynamic balance of the entire mix, ensuring that it translates with impact, clarity, and sonic fidelity across various playback platforms. These mastering tools empower you to achieve a cohesive, polished sonic presentation that competes with commercial releases, elevating your MIDI recording to professional standards of sonic excellence.
Moreover, the mastering phase encompasses the final adjustments to the stereo imaging, spatial depth, and overall tonal balance, ensuring that your MIDI recording exudes a captivating, immersive sonic presence that captivates and resonates with listeners. By leveraging mastering tools within FL Studio, you refine the sonic nuances, spatial coherence, and overall sonic impact of your compositions, fostering a captivating, polished musical narrative that transcends the boundaries of traditional MIDI recordings.
By adeptly mixing and mastering your MIDI recording in FL Studio, you refine the sonic qualities, balance, and presentation of your compositions, ensuring that they resonate with clarity, depth, and professional polish. This meticulous process not only enhances the sonic fidelity and expressive coherence of your MIDI recording but also empowers you to craft captivating, polished musical narratives that captivate and engage your audience with depth, authenticity, and sonic excellence.