Introduction
Cleaning your gaming headset is an essential yet often overlooked task that can significantly enhance your gaming experience. Over time, dirt, sweat, and oil can accumulate on the ear pads, headband, and microphone, leading to discomfort, unpleasant odors, and diminished sound quality. By regularly cleaning your gaming headset, you can maintain its performance, extend its lifespan, and ensure a more hygienic gaming environment.
A clean gaming headset not only feels more comfortable but also delivers better sound quality, allowing you to fully immerse yourself in your favorite games. Additionally, proper cleaning can help prevent the buildup of bacteria and germs, promoting better overall hygiene, especially if you share your headset with others. Whether you're a casual gamer or a dedicated enthusiast, taking the time to clean your gaming headset is a small yet impactful way to enhance your gaming setup.
In this comprehensive guide, you will learn the step-by-step process for cleaning your gaming headset effectively. From gathering the necessary supplies to cleaning the ear pads, microphone, and headband, each step is crucial in ensuring that your headset remains in optimal condition. By following these simple yet effective cleaning methods, you can maintain the quality and hygiene of your gaming headset, allowing you to enjoy a more immersive and comfortable gaming experience. So, let's dive in and discover the best practices for cleaning your gaming headset!
Step 1: Gather Your Supplies
Before embarking on the cleaning process, it’s essential to gather the necessary supplies to ensure a thorough and effective cleaning of your gaming headset. Here’s what you’ll need:
- Mild Soap or Detergent: Choose a gentle, non-abrasive soap or detergent to clean the surfaces of your headset. Avoid harsh chemicals that could damage the materials.
- Microfiber Cloth: This soft, lint-free cloth is ideal for wiping down the surfaces of the headset without leaving behind any residue or scratches.
- Cotton Swabs: These are perfect for reaching small crevices and cleaning the nooks and crannies of the headset, such as around the ear pads and microphone.
- Isopropyl Alcohol: Use a small amount of isopropyl alcohol for disinfecting and sanitizing the surfaces of the headset, especially the ear pads and headband.
- Warm Water: Prepare a bowl of warm water for diluting the soap or detergent and moistening the microfiber cloth.
- Optional: Replacement Ear Pads: If your ear pads are worn out or damaged, consider having replacement ear pads on hand for a complete headset refresh.
By having these supplies ready, you’ll be well-equipped to tackle the cleaning process efficiently and effectively. With the right tools at your disposal, you can ensure that your gaming headset receives the care it needs to maintain its performance and comfort.
Step 2: Remove Ear Pads and Wipe Down Headset
Begin the cleaning process by carefully removing the ear pads from your gaming headset. Depending on the model, the ear pads may be attached using clips, adhesive, or a twist-and-lock mechanism. Refer to the manufacturer’s instructions for guidance on safely detaching the ear pads without causing any damage.
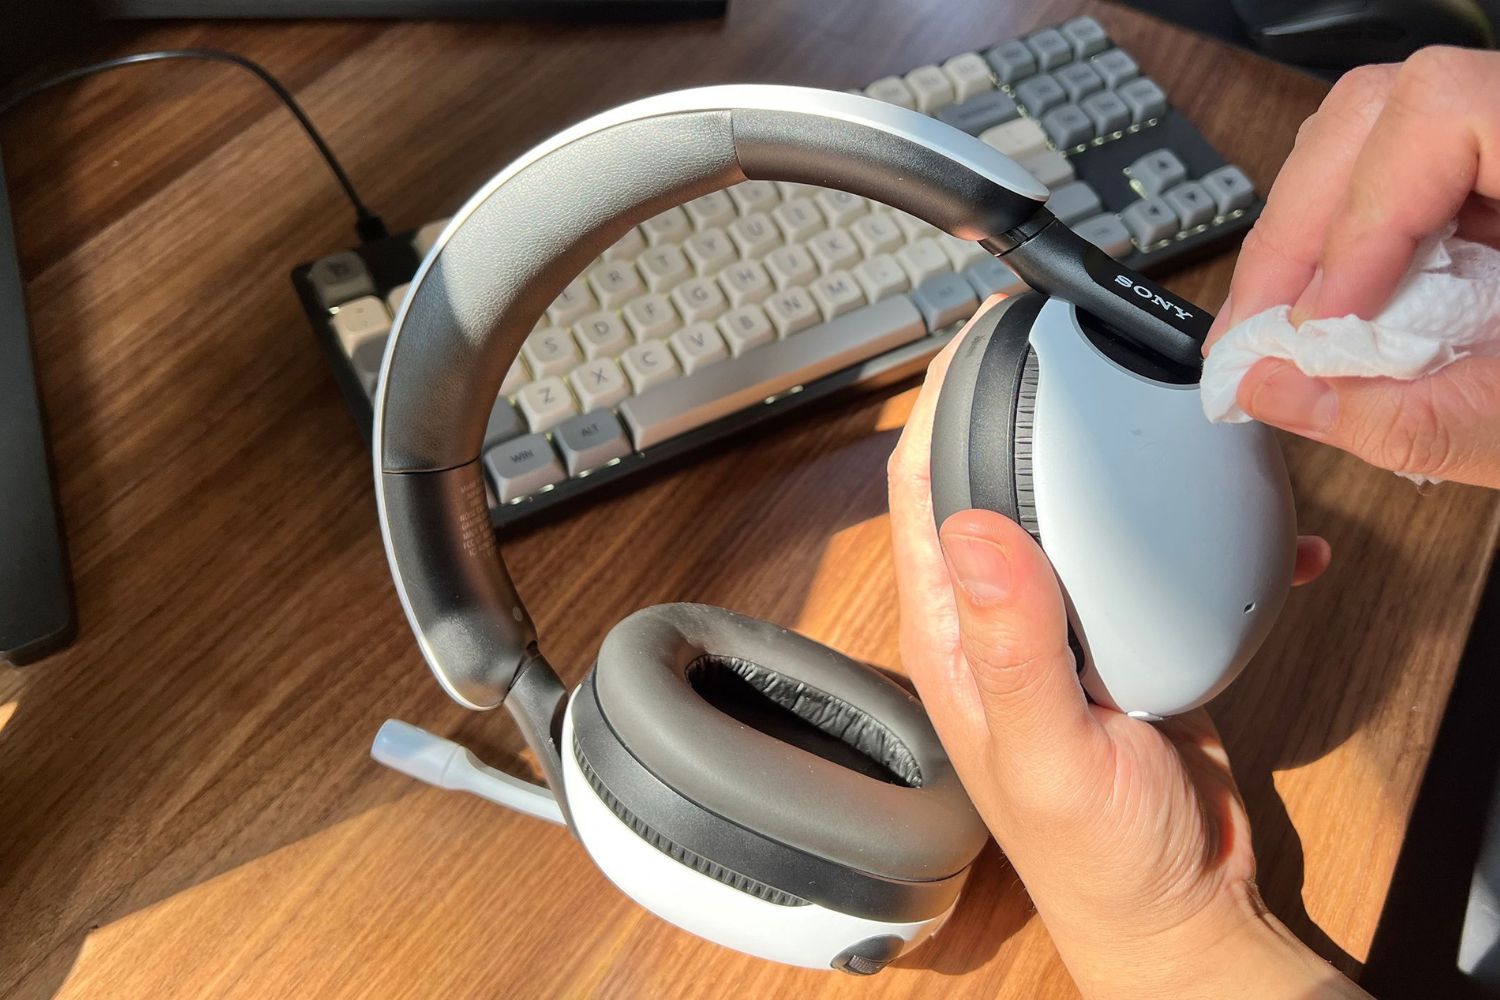
Once the ear pads are removed, take a moment to inspect the headset for any visible dirt, dust, or grime. Use a dry microfiber cloth to gently wipe down the surfaces, removing any loose particles and preparing the headset for a more thorough cleaning. Pay close attention to the areas around the ear cup hinges, as these areas can accumulate debris over time.
If the headset is equipped with a detachable microphone, carefully remove it as well. Wipe down the microphone with a slightly damp microfiber cloth to remove any smudges or dirt. Be cautious not to apply excessive moisture to the microphone’s sensitive components.
Next, dampen a microfiber cloth with a small amount of mild soap or detergent diluted in warm water. Wipe down the exterior surfaces of the headset, including the headband, ear cups, and any exposed wires or connectors. Take care to avoid saturating the cloth, as excessive moisture can seep into the headset’s internal components.
After wiping down the headset, use a dry microfiber cloth to remove any remaining soap residue and ensure that the surfaces are thoroughly dried. This step is crucial in preventing water damage and maintaining the integrity of the headset’s materials.
By removing the ear pads and wiping down the headset, you’ve laid the foundation for a comprehensive cleaning process that will help restore your gaming headset to its optimal condition.
Step 3: Clean Ear Pads
The ear pads of your gaming headset are in constant contact with your skin and hair, making them susceptible to the buildup of oils, sweat, and dirt. Properly cleaning the ear pads is essential not only for hygiene but also for maintaining their comfort and extending their lifespan.
To clean the ear pads, start by gently removing them from the headset. If the ear pads are detachable, follow the manufacturer’s instructions for safe removal. For non-detachable ear pads, take care to avoid putting excessive strain on the attachment points as you clean them.
Once removed, assess the condition of the ear pads. If they are visibly soiled or have accumulated grime over time, you can begin by lightly brushing them with a soft-bristled brush to dislodge any surface debris. This initial step helps prepare the ear pads for a more thorough cleaning process.
Next, dampen a microfiber cloth with a mild soap or detergent diluted in warm water. Gently wipe down the ear pads, taking care to remove any stains, oils, or residue that may have accumulated. Avoid using excessive moisture, as saturating the ear pads can lead to prolonged drying times and potential damage to the materials.
For stubborn stains or ingrained dirt, consider using a small amount of isopropyl alcohol on a cotton swab to target specific areas. This can help break down and lift tough stains without compromising the integrity of the ear pads. However, it’s important to test a small, inconspicuous area of the ear pads first to ensure that the alcohol does not cause any adverse effects.
After cleaning the ear pads, allow them to air dry completely before reattaching them to the headset. Avoid using heat sources or direct sunlight to expedite the drying process, as excessive heat can damage the materials. Once dry, ensure that the ear pads are securely reattached to the headset, following the manufacturer’s guidelines if necessary.
By giving attention to the cleaning of the ear pads, you can ensure that they remain comfortable, hygienic, and free from the accumulation of dirt and oils, contributing to a more enjoyable gaming experience.
Step 4: Clean Microphone
The microphone of your gaming headset plays a crucial role in facilitating clear communication with teammates and enhancing the overall gaming experience. Over time, the microphone can become susceptible to the buildup of dust, debris, and oils from skin contact, potentially affecting its performance. Therefore, regular cleaning is essential to maintain the microphone’s functionality and ensure clear, distortion-free communication.
To begin cleaning the microphone, carefully detach it from the headset, following the manufacturer’s instructions if necessary. Once removed, visually inspect the microphone for any visible debris or smudges. Use a dry, soft-bristled brush to gently dislodge any loose particles that may have accumulated on the microphone’s surface.
Next, dampen a microfiber cloth with a small amount of isopropyl alcohol. Wipe down the exterior of the microphone, taking care to remove any smudges, oils, or residual buildup. Isopropyl alcohol is effective in disinfecting and sanitizing the microphone, helping to eliminate germs and bacteria that may have accumulated over time.
For the microphone grille, where dust and debris can gather, use a cotton swab lightly moistened with isopropyl alcohol to carefully clean the individual perforations. Ensure that excess moisture does not seep into the internal components of the microphone, as this can potentially compromise its functionality.
If the microphone includes a foam windscreen or pop filter, remove it and gently wash it with mild soap and water. Allow the windscreen to air dry completely before reattaching it to the microphone. This step helps maintain the cleanliness and effectiveness of the microphone’s accessories, ensuring optimal performance during voice communication.
After cleaning, allow the microphone and any accompanying accessories to air dry thoroughly before reattaching it to the headset. Take care to follow the manufacturer’s guidelines for reassembly to avoid any potential damage to the microphone or headset components.
By incorporating regular cleaning of the microphone into your headset maintenance routine, you can ensure that it remains free from dirt, oils, and germs, allowing for clear and uninterrupted communication during your gaming sessions.
Step 5: Clean Headband
The headband of your gaming headset provides crucial support and comfort during extended gaming sessions. However, due to its proximity to the scalp and hair, the headband is susceptible to the accumulation of oils, sweat, and dirt over time. Regular cleaning of the headband is essential not only for hygiene but also for maintaining its comfort and extending its longevity.
To clean the headband, start by examining the material it is made of, whether it’s leather, fabric, or another type of material. Different materials may require specific cleaning methods to ensure that they are effectively and safely cleaned.
For leather headbands, begin by using a dry, soft-bristled brush to gently remove any surface dust or debris. Next, dampen a microfiber cloth with a small amount of leather cleaner or mild soap diluted in warm water. Wipe down the leather headband, taking care to remove any oils or residues that may have accumulated. Avoid using excessive moisture, as this can potentially damage the leather. After cleaning, use a dry microfiber cloth to remove any remaining moisture and allow the headband to air dry completely.
If the headband is made of fabric or mesh, start by using a lint roller or adhesive tape to remove any loose particles and debris. Next, dampen a microfiber cloth with mild soap or detergent diluted in warm water. Gently wipe down the fabric headband, paying attention to any areas with visible stains or buildup. After cleaning, use a clean, damp cloth to remove any soap residue, and allow the headband to air dry thoroughly.
For adjustable headbands with moving parts, use a cotton swab lightly moistened with isopropyl alcohol to clean the individual components, ensuring that any dirt or grime is effectively removed. Take care to avoid excessive moisture around any adjustable mechanisms to prevent potential damage.
After cleaning, ensure that the headband is completely dry before reattaching it to the headset. Avoid using heat sources or direct sunlight to expedite the drying process, as excessive heat can damage the materials. By regularly cleaning the headband, you can maintain its comfort, hygiene, and overall condition, contributing to a more enjoyable and comfortable gaming experience.
Step 6: Reassemble Headset
After completing the cleaning process for the individual components of your gaming headset, it’s time to reassemble the headset to ensure that it is fully restored to its optimal condition. Proper reassembly is crucial for maintaining the functionality, comfort, and overall integrity of the headset.
Begin by reattaching the clean ear pads to the ear cups of the headset. Depending on the design of the ear pads, follow the manufacturer’s instructions to securely reattach them, ensuring that they are properly aligned and seated. Take care to avoid applying excessive force when reattaching the ear pads to prevent any damage to the attachment points.
If the headset features a detachable microphone, carefully reattach it to the designated port or slot, ensuring a secure connection without causing strain on the microphone or the headset’s connectors. Follow any specific guidelines provided by the manufacturer to ensure that the microphone is correctly aligned and fastened.
Next, if the headband was removed during the cleaning process, reattach it to the headset, ensuring that it is securely positioned and aligned with the ear cups. Take care to follow any adjustable mechanisms or guidelines for aligning and securing the headband to maintain proper fit and comfort.
Once all components are reattached, visually inspect the headset to ensure that everything is properly aligned and secured. Check for any signs of damage or misalignment that may have occurred during the cleaning process, and make any necessary adjustments to ensure that the headset is in optimal condition.
Finally, test the headset to ensure that all components, including the ear pads, microphone, and headband, are functioning as expected. Verify that the microphone is capturing clear audio, the ear pads are providing a comfortable seal, and the headband is providing adequate support without any discomfort.
By meticulously reassembling the headset, you can ensure that it is fully restored to its original condition, ready to deliver an immersive and comfortable gaming experience. Proper reassembly is the final step in the cleaning process, ensuring that your gaming headset is primed for optimal performance and comfort.
Conclusion
Cleaning your gaming headset is a vital aspect of maintaining its performance, comfort, and overall hygiene. By following the step-by-step cleaning process outlined in this guide, you have taken proactive measures to ensure that your gaming headset remains in optimal condition, providing an immersive and enjoyable gaming experience.
Through the meticulous cleaning of the ear pads, microphone, and headband, you have not only removed dirt, oils, and debris but also contributed to the overall hygiene and comfort of your headset. Regular cleaning helps to prevent the accumulation of germs and bacteria, ensuring a more hygienic gaming environment, especially if you share your headset with others.
Furthermore, the cleaning process aids in maintaining the longevity of your gaming headset, preserving its materials and components for long-term use. By incorporating cleaning into your regular headset maintenance routine, you can extend its lifespan and ensure that it continues to deliver exceptional sound quality and comfort.
As you reassemble your headset, take pride in the care and attention you’ve given to each component, ensuring that the headset is fully restored to its optimal condition. The thorough cleaning process has not only enhanced the functionality and hygiene of your headset but also contributed to a more comfortable and enjoyable gaming experience.
By prioritizing the cleaning and maintenance of your gaming headset, you have demonstrated a commitment to preserving its quality and ensuring that it remains a reliable companion during your gaming endeavors. With a clean and well-maintained headset, you can fully immerse yourself in your favorite games, enjoying clear communication, exceptional sound, and uncompromised comfort.
Remember to incorporate regular cleaning into your headset care routine, ensuring that your gaming headset continues to provide an immersive and hygienic gaming experience for years to come.