Common Reasons Why a Laptop Won’t Connect to WiFi
Having your laptop unable to connect to WiFi can be frustrating, especially when you rely on the internet for work or entertainment. Before you throw your laptop out the window in frustration, take a deep breath and consider some common reasons why this may be happening. By identifying the issue, you’ll be able to troubleshoot and fix the problem in no time.
1. Outdated or Incompatible WiFi Driver:
One common reason why your laptop may not be connecting to WiFi is an outdated or incompatible WiFi driver. The WiFi driver is responsible for enabling communication between your laptop’s hardware and the wireless network. To fix this issue, visit the manufacturer’s website and download the latest driver specific to your laptop’s make and model.
2. WiFi Adapter Turned Off or Disabled:
Another possibility is that your laptop’s WiFi adapter may be turned off or disabled. On most laptops, there is a physical switch or a keyboard combination (often using the function key) to toggle the WiFi adapter on or off. Check if the WiFi indicator light is on or off, and if needed, enable the WiFi adapter through the settings or control panel.
3. Network Settings Mismatches:
Network settings mismatches can occur if you recently changed your router or made modifications to your network configuration. Double-check that your laptop’s network settings, such as the IP address, subnet mask, and default gateway, are correctly configured to match your network settings. Consult your router’s manual or contact your internet service provider for the correct settings.
4. Problem with the Router or Modem:
If multiple devices are unable to connect to the WiFi network, the issue may lie with your router or modem. Restart the router and modem by unplugging them from the power source for a few seconds, then plug them back in and allow them to fully restart. If the issue persists, contact your internet service provider for further assistance.
5. Signal Interference or Weak WiFi Signal:
Signal interference from other electronic devices or physical barriers like walls can weaken your WiFi signal, leading to connection issues. Try moving closer to the router or moving electronic devices away from it. If necessary, consider using a WiFi extender or repositioning the router to improve signal strength.
6. Incorrect WiFi Password Entered:
Double-check that you have entered the correct WiFi password. WiFi passwords are case-sensitive, so ensure that you are using the correct capitalization and all characters are entered correctly. If you are uncertain about the password, you can log in to your router’s settings interface to retrieve or reset the password.
7. Operating System Issues:
Occasionally, problems with the operating system can prevent your laptop from connecting to WiFi. Ensure that your laptop has the latest system updates installed. If the issue persists, you may need to troubleshoot or reinstall the wireless networking components of your operating system.
8. Virus or Malware Infection Affecting Network Settings:
Viruses or malware infections can sometimes alter your network settings, causing connectivity issues. Run a thorough antivirus scan on your laptop to detect and remove any malicious software. Additionally, you can reset your network settings to default to ensure that any incorrect configurations are eliminated.
9. Hardware Problem with the Laptop’s WiFi Card:
If none of the above solutions work, there might be a hardware problem with your laptop’s WiFi card. In this case, contacting a professional technician or the laptop’s manufacturer may be necessary to repair or replace the WiFi hardware.
These are some of the common reasons why your laptop may not be connecting to WiFi. By identifying the root cause, you can effectively troubleshoot and resolve the issue, ensuring a stable and reliable internet connection for your laptop.
Outdated or Incompatible WiFi Driver
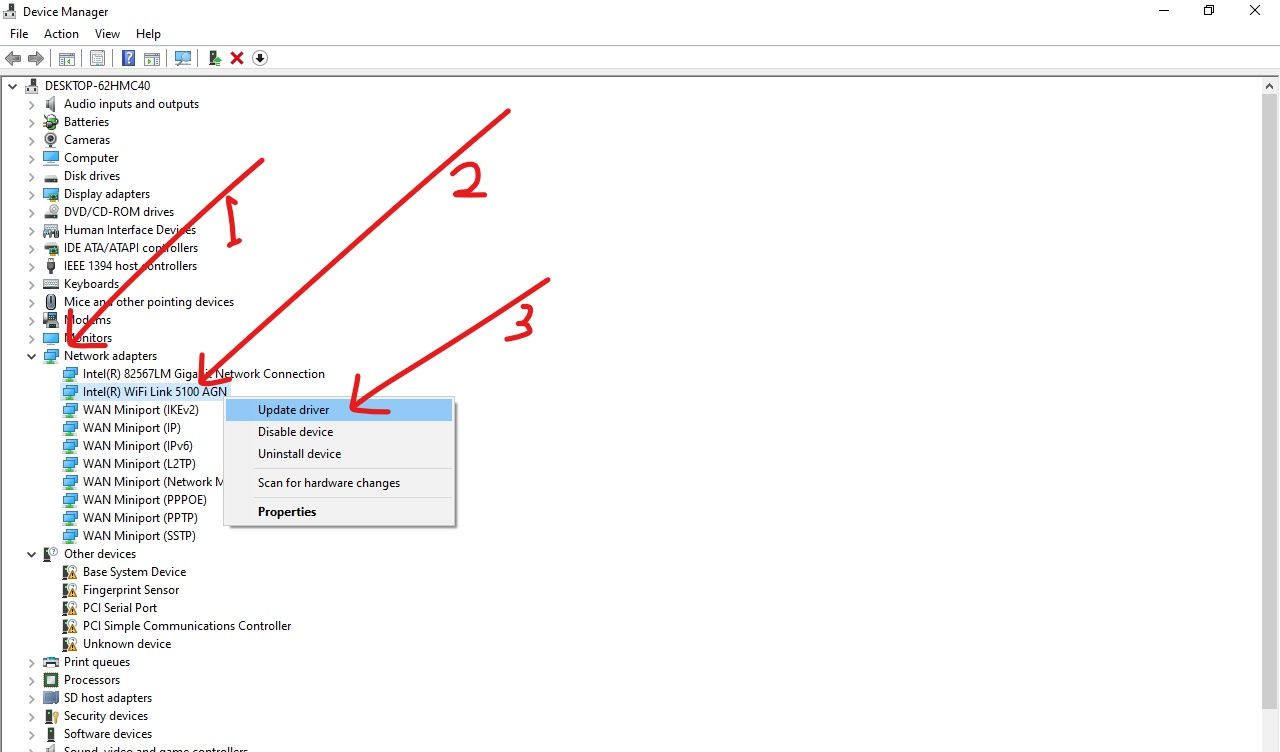
One common reason why your laptop may not be connecting to WiFi is due to an outdated or incompatible WiFi driver. Your WiFi driver is a software component that enables communication between your laptop’s hardware and the wireless network.
Over time, manufacturers release driver updates to address bugs, improve performance, and ensure compatibility with the latest WiFi standards. If you have not updated your WiFi driver for a while, it may no longer be compatible with your operating system or the current WiFi network you are trying to connect to.
To resolve this issue, you will need to download and install the latest WiFi driver specific to your laptop’s make and model. Here are the steps to update your WiFi driver:
- Determine your laptop’s make and model. You can usually find this information on a sticker on the bottom of your laptop or in the system settings.
- Visit the manufacturer’s website. Go to the support or drivers section of the manufacturer’s website.
- Locate the WiFi driver. Look for the driver that corresponds to your laptop’s make and model, as well as the operating system you are using.
- Download the driver. Click on the download link for the latest version of the WiFi driver.
- Install the driver. Once the download is complete, run the installer and follow the on-screen instructions to install the driver.
- Restart your laptop. After the installation is complete, restart your laptop to apply the changes.
If you encounter any issues during the installation process, such as the driver file being blocked or incompatible, try downloading the driver directly from the chipset manufacturer’s website. For example, if you have an Intel WiFi adapter, visit Intel’s website to download the driver directly from them.
Updating the WiFi driver can often resolve connectivity issues and improve the overall performance of your laptop’s wireless connection. It is recommended to check for driver updates periodically to ensure that you have the latest version installed.
Remember, an outdated or incompatible WiFi driver can prevent your laptop from connecting to WiFi networks, so keeping it up to date is crucial for a seamless and reliable internet experience.
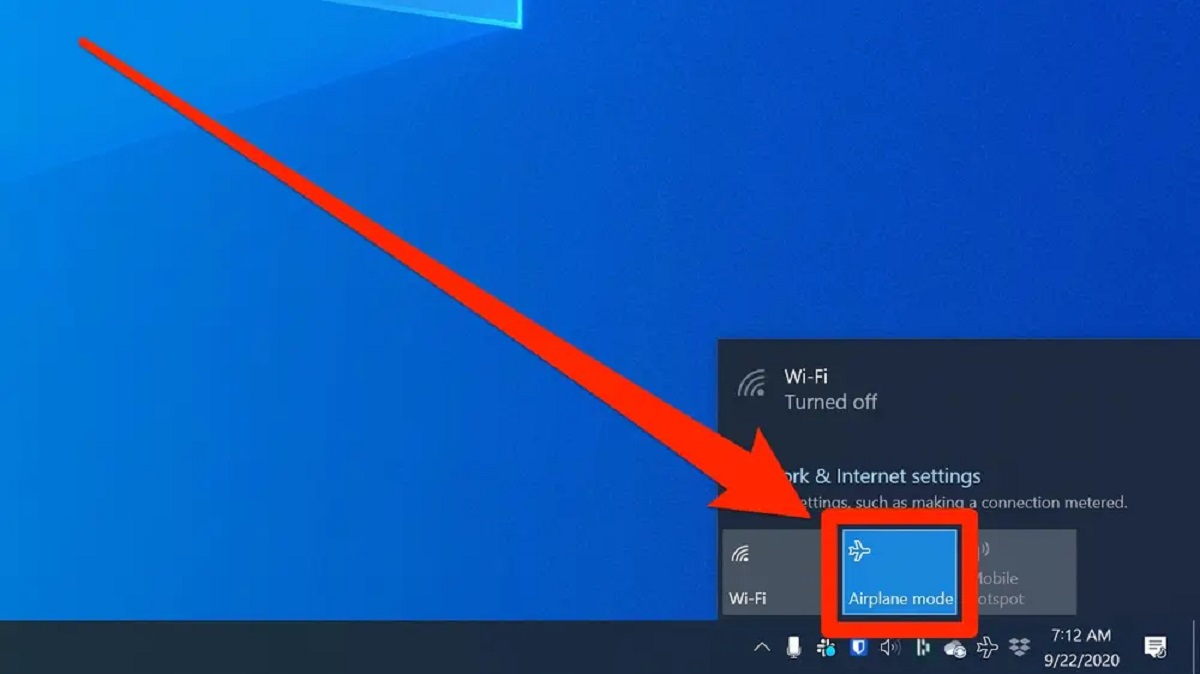
WiFi Adapter Turned Off or Disabled
Another common reason why your laptop may not be connecting to WiFi is that the WiFi adapter has been turned off or disabled. The WiFi adapter is the hardware component that allows your laptop to connect to wireless networks.
On most laptops, there is a physical switch or a keyboard combination that can toggle the WiFi adapter on or off. The switch may be located on the side or front of your laptop, or it may be a function key (usually F2, F3, or a dedicated WiFi button) that you need to press in combination with the Fn key.
If you suspect that the WiFi adapter has been turned off or disabled, follow these steps to enable it:
- Check for a physical switch or button: Look for a physical switch or button on your laptop. It may have a WiFi symbol or an antenna icon. Make sure the switch is in the “On” position.
- Use the keyboard shortcut: If you don’t see a physical switch, look for a function key (usually F2, F3, or a dedicated WiFi button) on your keyboard. Press the Fn key (usually located near the bottom-left corner of the keyboard) in combination with the WiFi function key to enable the WiFi adapter.
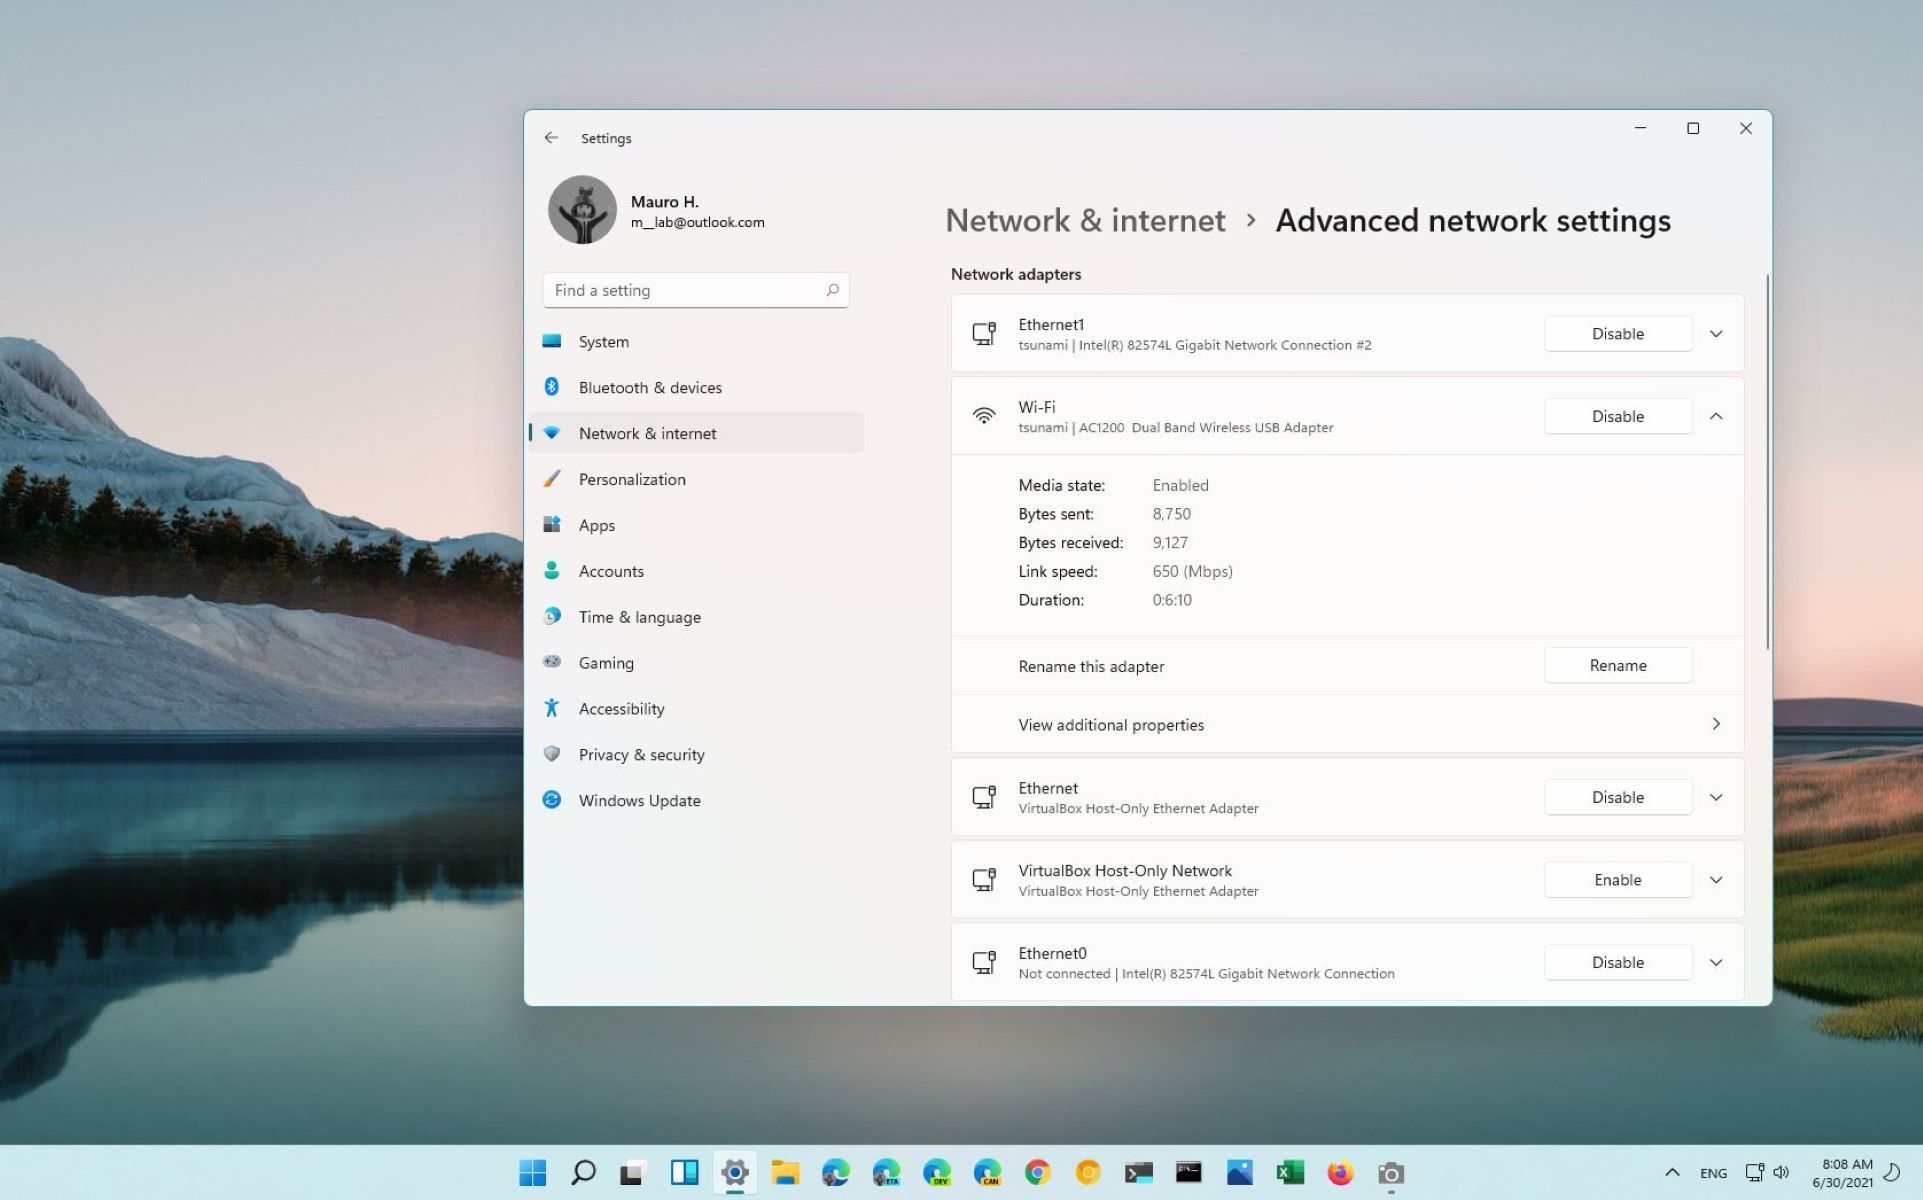
- Enable the WiFi adapter through settings: If neither of the above options works, you can also enable the WiFi adapter through the operating system settings. Go to the “Network & Internet” or “Wireless Network” section in your system settings and locate the WiFi adapter. Ensure that it is enabled and not set to airplane mode or disabled.
After enabling the WiFi adapter, wait for a few seconds to allow your laptop to detect and connect to nearby WiFi networks. If the issue persists, try restarting your laptop to apply the changes and attempt to connect to the WiFi network again.
If none of the above steps work, there may be an issue with the WiFi adapter itself. In this case, you can try reinstalling the WiFi driver or contacting the laptop manufacturer’s support for further assistance.
Remember to check the state of your WiFi adapter whenever you are experiencing connectivity issues. Sometimes a simple switch or button can be the solution to getting your laptop back online and connected to the WiFi network.
Network Settings Mismatches
Network settings mismatches can often be the culprit when your laptop is unable to connect to WiFi. These mismatches occur when the network settings on your laptop do not match the settings of the WiFi network you are trying to connect to.
Here are some possible scenarios where network settings mismatches can cause connectivity issues:
- You recently changed your router: If you recently replaced your router or made modifications to your network configuration, such as changing the network name (SSID) or password, your laptop may still be trying to connect to the previous network and using outdated settings.
- You are connecting to a different network: If you are in a different location and trying to connect to a new WiFi network, your laptop’s network settings may still be configured for a different network, causing a mismatch with the current one.
To address network settings mismatches, follow these steps:
- Verify your network settings: Double-check that your laptop’s network settings, such as the IP address, subnet mask, and default gateway, are correctly configured to match the network settings of the WiFi network you are trying to connect to. These settings can usually be found in the network or WiFi settings of your operating system.
- Check the network name (SSID): Ensure that you are trying to connect to the correct network by checking the network name (SSID) displayed on your laptop. Sometimes, nearby WiFi networks may have similar names, and connecting to the wrong one can result in connection issues.
- Reset network settings: If you are uncertain about your laptop’s network settings or suspect that they are causing the connection problem, you can reset the network settings to their default values. This will remove any custom configurations and allow your laptop to automatically detect and configure the correct network settings.
If you are still experiencing connectivity issues after verifying and adjusting the network settings, you may want to restart your laptop or restart your WiFi router to eliminate any temporary glitches. If the problem persists, it may be necessary to contact your internet service provider or consult the router’s manual for further assistance.
By ensuring that your laptop’s network settings match the settings of the WiFi network you want to connect to, you can resolve network settings mismatches and establish a successful connection with ease.
Problem with the Router or Modem
If your laptop is unable to connect to WiFi, the issue may lie with the router or modem. The router and modem are essential components that allow your laptop to access the internet wirelessly. If there is a problem with either of them, it can result in connectivity issues.
Here are some potential issues related to the router or modem:
- Power cycle: Over time, routers and modems can encounter minor glitches that affect their performance. A simple power cycle can often resolve these issues. To do this, unplug the power cables from both the router and modem, wait for about 30 seconds, and then plug them back in. Allow them to fully restart before attempting to connect your laptop to the WiFi network.
- Internet service provider (ISP) issues: Sometimes, the problem may not be with your laptop or router, but with your internet service provider (ISP). Contact your ISP to check if there are any known outages or maintenance work being done in your area that may be affecting your connection.
- Router or modem configuration: Improper configuration of the router or modem settings can also cause connection issues. Log in to your router’s settings interface using a web browser and check if the settings are correctly configured. If you are unsure about the settings, consult the router’s manual or contact your ISP for assistance.
If the above steps do not resolve the issue, you can try the following troubleshooting steps:
- Check the connectivity status: Ensure that the router and modem have a stable and active internet connection. Look for indicator lights on both devices that show the connection status. If the lights indicate a problem, contact your ISP for further assistance.
- Reset the router: If the router is unresponsive or not functioning properly, you can try resetting it to its factory default settings. Keep in mind that this will erase any custom configurations, so you may need to set up the router again.
- Update router firmware: Outdated firmware on the router can sometimes cause connectivity issues. Check the manufacturer’s website for any firmware updates for your specific router model and follow the instructions to update it.
If none of the above steps resolves the problem, it may be necessary to contact your ISP or consult a professional for further assistance. They can help identify and resolve any specific issues with your router or modem.
Remember, problems with the router or modem can often be a cause of your laptop’s connectivity issues. By troubleshooting and addressing these issues, you can establish a stable and reliable WiFi connection for your laptop.
Signal Interference or Weak WiFi Signal
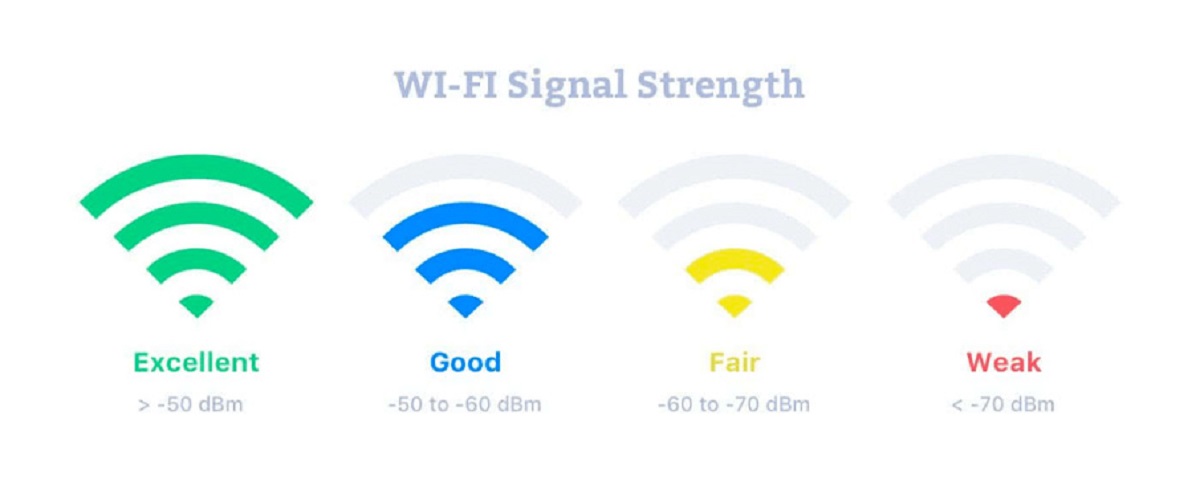
Another common reason why your laptop may not be connecting to WiFi is signal interference or a weak WiFi signal. This can happen due to various factors, including physical barriers, distance from the router, and interference from other electronic devices.
Here are some potential causes of signal interference or weak WiFi signal:
- Physical barriers: Thick walls, floors, or large objects between your laptop and the router can weaken the WiFi signal. The signal has to pass through these barriers, leading to reduced connectivity strength.
- Distance from the router: The farther you are from the WiFi router, the weaker the signal will be. This is especially true if the router is in another room or on a different floor of your home or office.
- Interference from other devices: Other electronic devices, such as cordless phones, microwave ovens, and Bluetooth devices, can interfere with the WiFi signal. These devices operate on similar frequencies and can disrupt the signal, causing intermittent or weak connections.
To address signal interference or weak WiFi signal issues, follow these steps:
- Reposition the router: Move the WiFi router to a more central location in your home or office. This can help optimize the signal coverage and reduce the impact of physical barriers.
- Clear the area around the router: Ensure that there are no obstructions or objects blocking the WiFi signal. Move any large objects or appliances away from the router to minimize interference.
- Adjust the router’s antennas: If your router has adjustable antennas, try repositioning them to different angles. Experiment with vertical and horizontal orientations to find the position that provides the strongest signal.
- Reduce interference from other devices: Keep WiFi routers away from other electronic devices that may interfere with the signal. Additionally, avoid placing the router near cordless phones, microwave ovens, and other sources of electromagnetic interference.
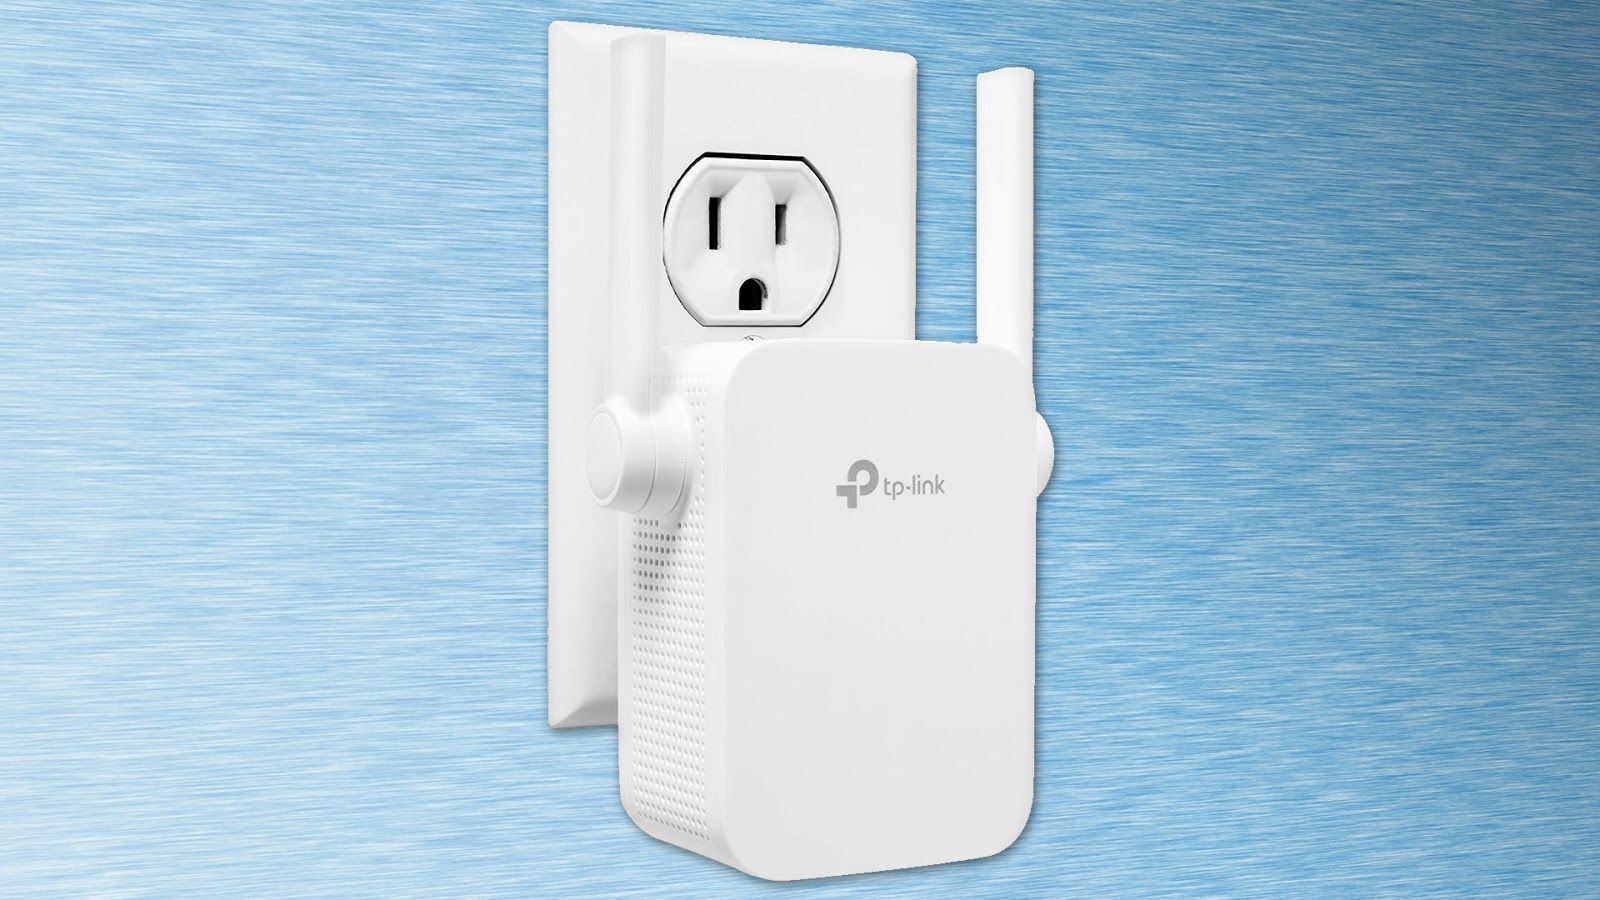
- Consider using a WiFi extender or repeater: If the signal strength is still weak in certain areas of your home or office, you can install WiFi extenders or repeaters. These devices amplify the WiFi signal and improve coverage in areas with weaker signals.
In some cases, you may need to upgrade your WiFi router to a newer model that supports the latest WiFi technology, such as Wi-Fi 6 (802.11ax), which provides better range and performance.
Remember, signal interference or weak WiFi signal can impact your laptop’s ability to connect to the WiFi network. By optimizing the signal strength and reducing interference, you can establish a more stable and reliable wireless connection for your laptop.
Incorrect WiFi Password Entered
One simple yet frequently overlooked reason why your laptop may not be connecting to WiFi is that you have entered an incorrect WiFi password. WiFi passwords are case-sensitive, meaning that uppercase and lowercase letters must be entered exactly as they are set.
If you have recently changed your WiFi password or are trying to connect to a new network, make sure to double-check that you have entered the password correctly. Even a small typo or incorrect capitalization can cause your laptop to fail to authenticate and connect to the WiFi network.
To troubleshoot this issue, follow these steps:
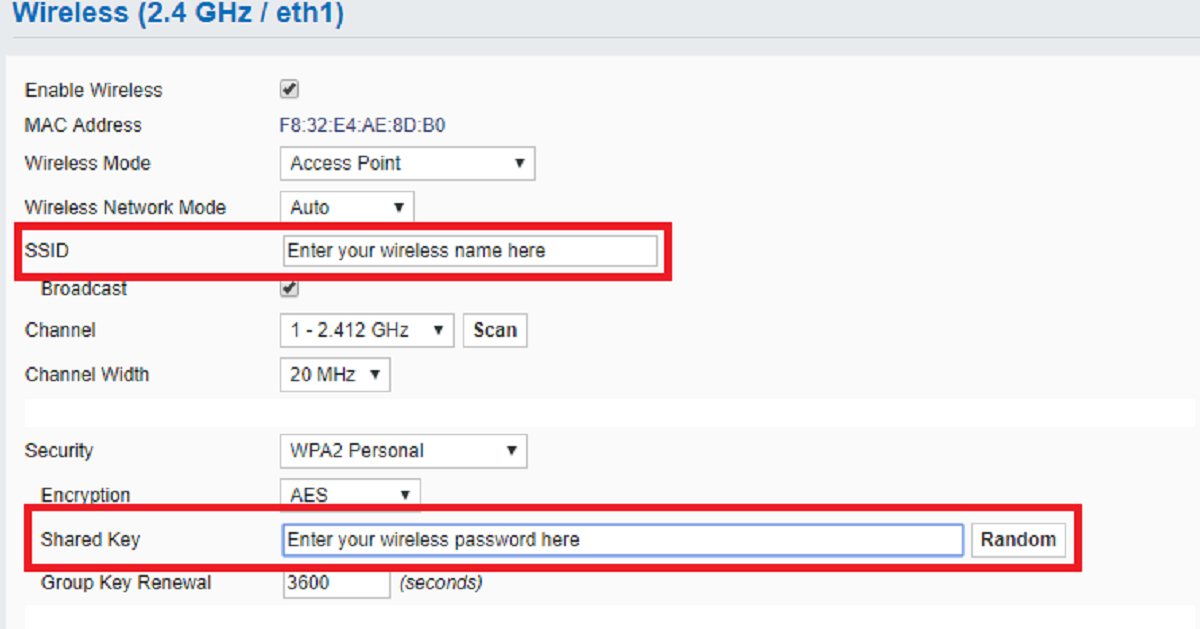
- Verify the password: Refer to the WiFi network settings or the router documentation to confirm the correct password. Sometimes, the password may be written on the router itself or provided by your internet service provider.
- Check the password capitalization: Pay attention to the capitalization of letters in the password. Ensure that you are entering uppercase letters exactly as they are set in the password.
- Retype the password: If you are unsure about the password, delete the current entry and retype it carefully. Take your time to ensure accuracy.
- Reset the WiFi password: If you are still unable to connect, you can try resetting the WiFi password. Access the router’s settings interface through a web browser and navigate to the wireless settings section. Create a new password and save the changes. Remember to update the password on all devices that connect to the WiFi network.
If you are unsure about the WiFi password or have forgotten it, you can log in to the router’s settings interface using a web browser and retrieve or reset the password. Consult the router’s manual or contact your internet service provider for guidance on how to access and manage the router’s settings.
Remember, entering an incorrect WiFi password is a common mistake that can prevent your laptop from connecting to the network. By ensuring that you have the correct password and paying attention to the capitalization of letters, you can successfully connect your laptop to the WiFi network.
Operating System Issues
Operating system issues can sometimes be the cause of your laptop’s inability to connect to WiFi. Problems with the operating system can manifest in various ways and affect the network settings and drivers required for WiFi connectivity.
Here are some common operating system issues that may interfere with your laptop’s WiFi connection:
- Outdated or incompatible network drivers: If you have not updated your network drivers or if your drivers are not compatible with the current version of your operating system, it can cause connectivity problems. It is crucial to keep your network drivers up to date to ensure optimal performance.
- Corrupted network settings: Incorrect or corrupted network settings can prevent your laptop from connecting to WiFi. This can happen due to a system error, software conflict, or malware infection.
- Third-party software conflicts: Certain third-party software, such as firewall or antivirus programs, can interfere with your laptop’s network connectivity. These programs may block the necessary network protocols or settings, preventing your laptop from connecting to WiFi.
To address operating system issues affecting WiFi connectivity, consider the following troubleshooting steps:
- Update network drivers: Check the manufacturer’s website for the latest network drivers compatible with your operating system. Download and install the appropriate driver update to ensure that your laptop’s network drivers are up to date.
- Reset network settings: Resetting the network settings can help resolve configuration issues. Go to the network settings of your operating system and look for the option to reset network settings. Keep in mind that this will remove all saved WiFi networks, so you will need to reconnect to them afterward.
- Disable conflicting software: Temporarily disable any firewall, antivirus, or third-party security software to see if they are causing the connectivity issue. If disabling the software allows your laptop to connect to WiFi, try configuring the software to allow network connections or consider using an alternative security solution.
- Scan for malware: Run a thorough scan of your laptop using reliable antivirus software. Malware infections can alter network settings and affect your ability to connect to WiFi. Remove any detected malware and reset your network settings to their default values.
- Reinstall network components: If all else fails, you may need to reinstall the network components of your operating system. This can be done by uninstalling the network drivers and then reinstalling them using the manufacturer’s provided drivers.
Remember to restart your laptop after making any changes or modifications to your operating system. This will allow the changes to take effect and potentially resolve any operating system-related issues.
Operating system issues can interfere with your laptop’s WiFi connection. By troubleshooting and resolving these issues, you can restore seamless and reliable connectivity to your WiFi network.
Virus or Malware Infection Affecting Network Settings
A virus or malware infection on your laptop can often lead to connectivity issues, including problems with your WiFi connection. These malicious programs can modify your network settings, block network protocols, and interfere with the communication between your laptop and the WiFi network.
Here are some signs that your laptop may be infected with a virus or malware:
- Unexpectedly slow internet connection speed
- Frequent disconnections from the WiFi network
- Inability to connect to any WiFi network
- Unusual network errors or pop-up messages
- Changes to network settings without your knowledge
To address a virus or malware infection affecting your network settings, follow these steps:
- Scan your laptop for malware: Use reputable antivirus or antimalware software to perform a thorough scan of your system. These programs can detect and remove any malicious software that may be causing the connectivity issues.
- Quarantine or remove detected malware: If the antivirus software detects any malware, follow the recommended actions to quarantine or remove it from your system. Be sure to carefully review the scan results before taking any action to avoid inadvertently deleting any essential files.
- Reset network settings to default: After removing the malware, it is advisable to reset your network settings to their default values. This step will undo any changes made to the network settings by the malware and ensure that your laptop can connect to WiFi networks properly.
- Update your security software: Make sure your antivirus or antimalware software is up to date. Regularly updating your security software will ensure that you have the most recent virus definitions and protection against the latest threats.
- Practice safe browsing habits: To prevent future infections, avoid clicking on suspicious links, downloading files from untrusted sources, and visiting potentially harmful websites. Be cautious when opening email attachments, as they can be a common source of malware infections.
Keep in mind that some severe malware infections may require the assistance of professional computer technicians or specialized malware removal tools. If you are unable to remove the malware on your own, it is recommended to seek professional help.
By promptly identifying and removing malware from your laptop, you can eliminate the factors that may be affecting your network settings and restore your ability to connect to WiFi networks without any disruptions.
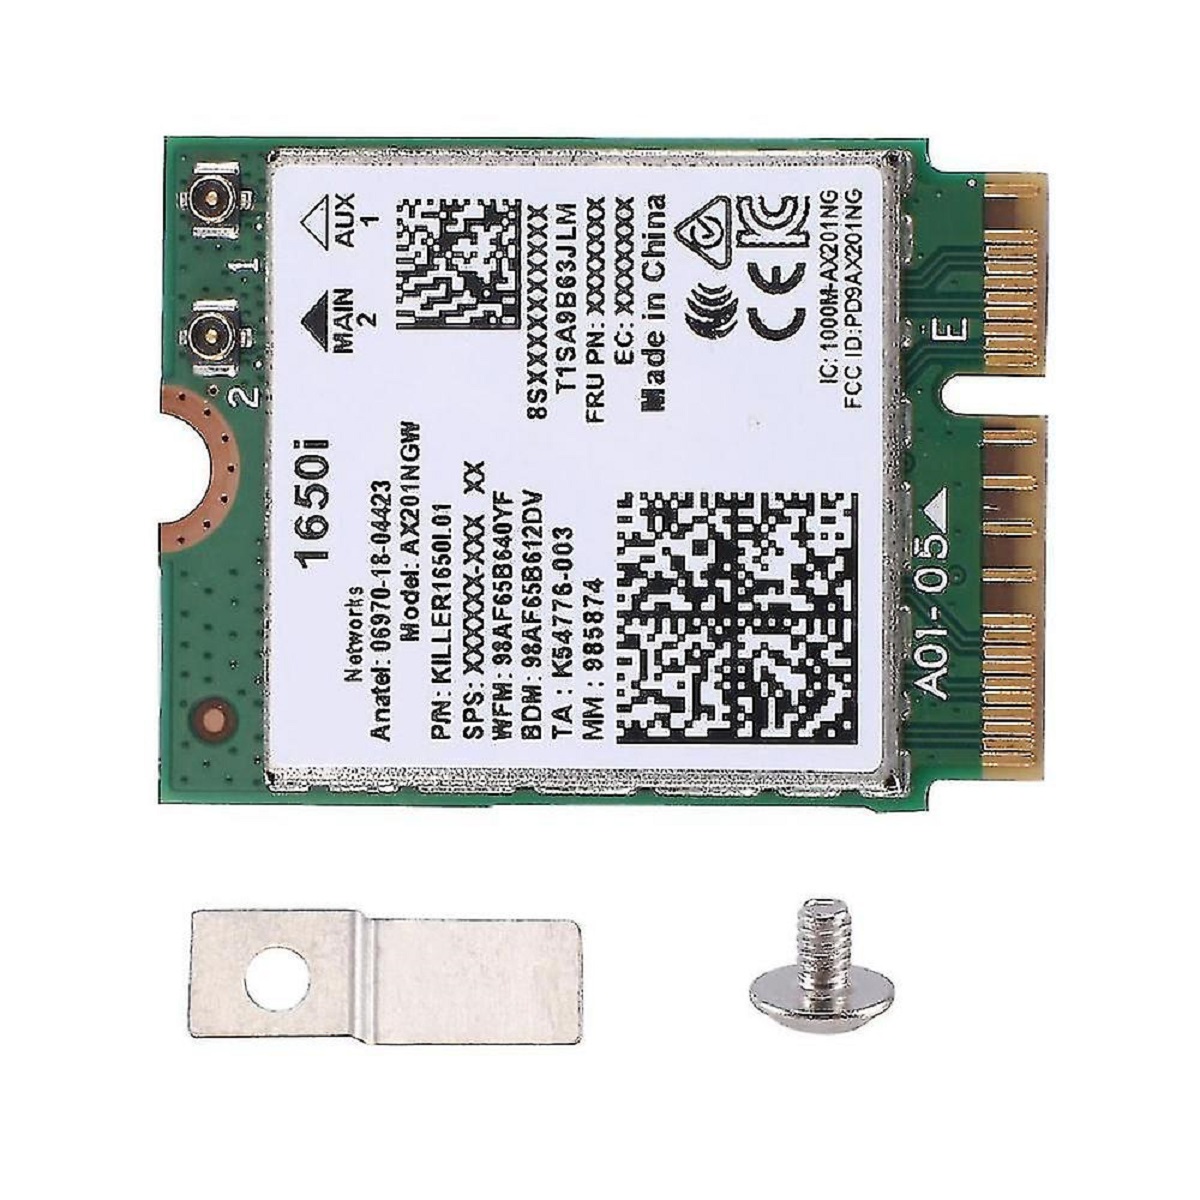
Hardware Problem with the Laptop’s WiFi Card
If all other troubleshooting steps have been exhausted and your laptop is still unable to connect to WiFi, there may be a hardware problem with the laptop’s WiFi card. The WiFi card, also known as the wireless network adapter, is responsible for transmitting and receiving wireless signals.
Here are some common signs that may indicate a hardware problem with the WiFi card:
- The laptop cannot detect any available WiFi networks
- Persistent connection drops or intermittent connectivity
- Other devices can connect to the WiFi network without issues
- System messages or error prompts related to the WiFi card
To diagnose and address a hardware problem with the laptop’s WiFi card, consider the following steps:
- Restart the laptop: Sometimes, a simple restart can resolve temporary hardware glitches. Restart the laptop and check if the WiFi connectivity problem persists.
- Check for physical damage: Inspect the WiFi card and its connections for any visible signs of damage, such as loose or broken connectors or wires. If you notice any physical damage, consult a professional technician for repairs or replacement.
- Update or reinstall WiFi drivers: Ensure that you have the latest WiFi drivers installed for your laptop. Visit the manufacturer’s website and download the appropriate drivers. If the issue is driver-related, updating or reinstalling them may resolve the problem.
- Use an external USB WiFi adapter: As a temporary workaround, you can use an external USB WiFi adapter to connect to WiFi networks. Plug the adapter into a USB port on your laptop and install any necessary drivers. This will bypass any issues with the internal WiFi card.
- Contact the laptop manufacturer or a professional technician: If the above steps do not resolve the issue, it is recommended to contact the laptop manufacturer’s support or consult a professional technician. They can perform advanced diagnostics and evaluate if the WiFi card needs repair or replacement.
Keep in mind that repairing or replacing the WiFi card may require technical expertise. It is advised to seek assistance from qualified professionals to avoid any further damage to your laptop.
A hardware problem with the laptop’s WiFi card can sometimes be the cause of connectivity issues. By following the appropriate steps and seeking professional help if needed, you can address the hardware problem and restore WiFi connectivity to your laptop.
Troubleshooting Steps to Fix a Laptop Not Connecting to WiFi
Experiencing difficulties with your laptop not connecting to WiFi can be frustrating, but there are several troubleshooting steps you can take to resolve the issue. Follow these steps to regain WiFi connectivity:
- Restart your laptop: Begin by restarting your laptop. This simple step can help resolve temporary glitches and refresh your system’s network settings.
- Check WiFi adapter and switch: Ensure that your laptop’s WiFi adapter is turned on and not disabled. Look for a physical switch or a function key that toggles the WiFi adapter. Make sure the WiFi indicator light is on.
- Verify the WiFi password: Double-check that you have entered the correct WiFi password. Ensure that it is case-sensitive and entered accurately. If unsure, log in to your router’s settings interface to retrieve or reset the password.
- Update WiFi driver: Visit the manufacturer’s website and download the latest WiFi driver for your laptop’s make and model. Outdated or incompatible drivers can cause connectivity issues. Install the driver and restart your laptop.
- Reset network settings: Reset your laptop’s network settings to their default values. This can eliminate any misconfigured settings that might be preventing WiFi connection. Locate the network settings in your operating system and choose the option to reset network settings.
- Check router and modem: Restart your WiFi router and modem by unplugging them from the power source for a few seconds. Then, plug them back in and allow them to fully restart. This can resolve any temporary issues or glitches with the network devices.
- Move closer to the router: If you are experiencing a weak WiFi signal or connection drops, try moving closer to the WiFi router. Physical barriers or distance can affect signal strength. Being in closer proximity can result in a stronger and more stable connection.
- Disable firewall or antivirus software: Temporarily disable any firewall or antivirus software on your laptop. Sometimes, these programs can interfere with the network connection. If the connection works after disabling the software, reconfigure it to allow network connections.
- Scan for malware: Run a comprehensive scan of your laptop for malware using reputable antivirus or antimalware software. Malware infections can impact network settings and disrupt WiFi connectivity. Remove any detected threats and reset network settings if necessary.
- Try a different network: If possible, try connecting to a different WiFi network. If your laptop can successfully connect to another network, it indicates an issue with your home network. In that case, contact your internet service provider for further assistance.
- Consult professional help: If none of the above steps resolve the issue, it may require professional assistance. Contact your laptop manufacturer’s support or consult a professional technician to diagnose and address any hardware-related problems.
By following these troubleshooting steps, you can often resolve the issue of a laptop not connecting to WiFi. Remember to be patient and thorough in your troubleshooting process, as it may take a combination of steps to identify and fix the underlying problem.