Introduction
Since their release, the AirPods Pro have revolutionized the way we listen to music and interact with our devices. These sleek and wireless earbuds offer a range of features and functionalities that make them truly exceptional. One of the standout features is the ability to control various functions simply by tapping on the earbuds themselves.
In this article, we will explore the different areas on the AirPods Pro that can be tapped to activate specific functions. Whether you’re looking to change tracks, adjust the volume, answer calls, or access Siri, knowing where to tap can make your AirPods Pro experience even more convenient and enjoyable.
By understanding these different touch controls and how to use them effectively, you can easily navigate through your favorite songs, manage your calls, and interact with Siri without having to reach for your phone or other devices.
So, whether you’re a proud owner of AirPods Pro or considering investing in a pair, get ready to tap your way to a seamless and immersive audio experience. Let’s dive in and discover the different areas on the AirPods Pro that you can tap to unlock their full potential.
Overview of AirPods Pro Controls
Before we delve into the specific tapping functions of the AirPods Pro, let’s first familiarize ourselves with the overall control layout.
The AirPods Pro feature a touch-sensitive stem on each earbud, along with a force sensor located on the stem. These controls allow you to interact with your AirPods Pro by tapping or pressing on different areas.
The stem on the AirPods Pro can be used for various functionalities, such as answering or ending calls, controlling music playback, activating Siri, and toggling between noise cancellation and transparency modes.
Additionally, the force sensor on the stem allows for more precise control. By squeezing the force sensor, you can access additional functions like skipping tracks or controlling the volume.
Understanding the layout and capabilities of these controls will help you navigate through your music, calls, and other functionalities effortlessly.
Now that we have a general idea of how the AirPods Pro controls work, let’s explore the specific tapping functions in the next section.
Double Tap Controls
One of the primary ways to interact with your AirPods Pro is through double-tap gestures. By double-tapping on the stem of either earbud, you can trigger different actions or functions.
Out of the box, the default setting for double-tap on the AirPods Pro is to switch between Active Noise Cancellation and Transparency mode. However, you can customize this setting based on your preferences.
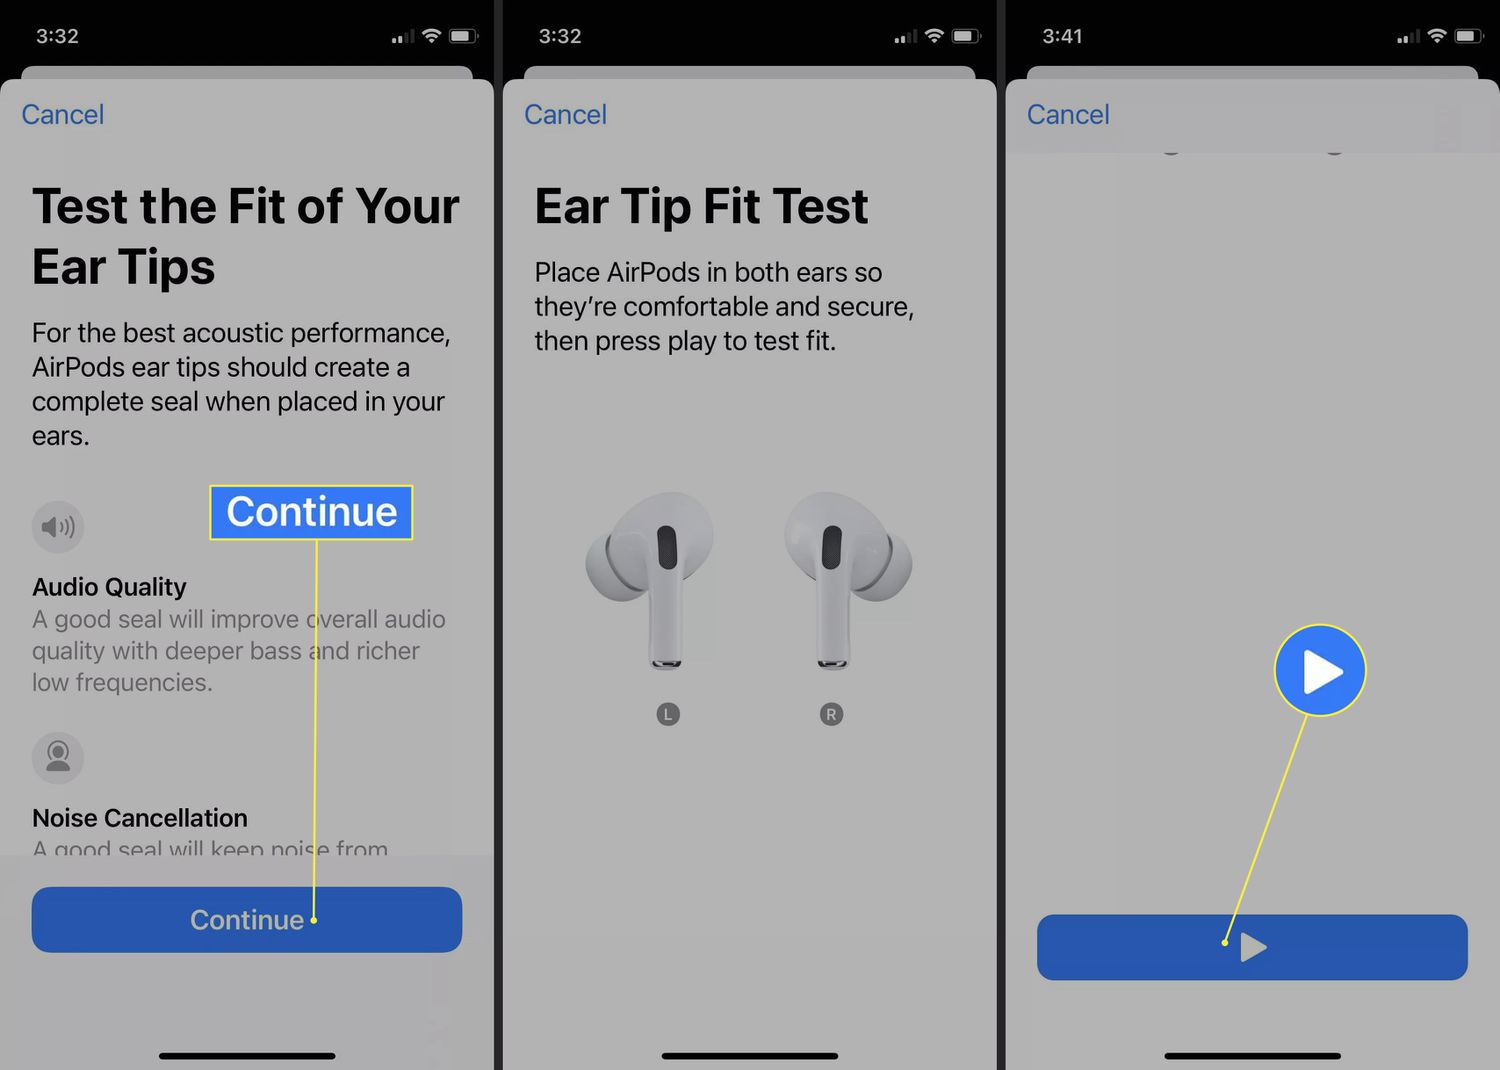
To access the double-tap control settings, follow these steps:
- Connect your AirPods Pro to your iOS device or Mac.
- Open the “Settings” app on your device.
- Select “Bluetooth” and find your AirPods Pro in the list of connected devices.
- Tap on the “i” icon next to your AirPods Pro.
- Under the “Double Tap on AirPods” section, you will see the available options for the left and right AirPods.
Here are the different actions you can assign to the double-tap gestures:
- Play/Pause: This option allows you to start or pause your music playback.
- Next Track: By choosing this option, you can skip to the next track in your playlist.
- Previous Track: Selecting this option enables you to go back to the previous track.
- Off: If you prefer not to assign any function to the double tap, you can turn off the gesture altogether.
Customizing the double-tap controls allows you to tailor your AirPods Pro experience to your liking and makes it easier to control your music playback without reaching for your device.
Now that you know how to customize the double-tap gestures, let’s explore how to use Siri with your AirPods Pro in the next section.
Changing Double Tap Settings
The AirPods Pro double tap gestures can be customized to suit your individual preferences. Whether you want to control playback, skip tracks, or activate Siri, changing the double tap settings is a straightforward process.
To change the double tap settings for your AirPods Pro, follow these steps:
- Make sure your AirPods Pro are connected to your iOS device or Mac.
- Open the “Settings” app on your device.
- Tap on “Bluetooth” and locate your AirPods Pro in the list of connected devices.
- Tap on the “i” icon beside your AirPods Pro to access the settings.
- Scroll down to the “Double Tap on AirPods” section.
- Choose the desired function for the left or right AirPod from the available options.
Once you’ve customized the double tap settings, the chosen function will be activated when you double tap on the corresponding AirPod.
Remember, changing the double tap settings applies to both AirPods, so if you prefer different functions for the left and right AirPods, you will need to assign the desired action accordingly.
Experiment with different functions to find the configuration that enhances your listening experience and makes controlling your AirPods Pro more intuitive.
Now that you know how to customize the double tap settings, let’s explore how to utilize Siri with your AirPods Pro in the next section.
Using Siri with AirPods Pro
One of the major advantages of the AirPods Pro is their integration with Siri, Apple’s virtual assistant. With just a few taps or voice commands, you can access Siri and perform a wide range of tasks without reaching for your iPhone or other devices.
To activate Siri using your AirPods Pro, you have a few options:
- Double Tap: By default, a double tap on either AirPod will activate Siri. However, you can customize this gesture to perform a different action if desired.
- Voice Command: If you prefer a hands-free approach, simply say “Hey Siri” to activate the voice assistant without having to touch your AirPods Pro.
Once Siri is activated, you can ask her to perform various tasks, such as playing a specific song, adjusting the volume, sending a message, making a phone call, or providing information on a wide range of topics.
With the AirPods Pro’s built-in microphones, Siri can hear your voice clearly and respond accurately, even in noisy environments. This allows for seamless and convenient interaction, whether you’re on a walk, at the gym, or in a crowded area.
Using Siri with your AirPods Pro not only enhances the hands-free experience but also provides a convenient way to access and control your iOS device’s functions and features.
Next, let’s discover how you can control the noise cancellation feature on your AirPods Pro.
Controlling Noise Cancellation
The AirPods Pro are renowned for their excellent noise cancellation capabilities, allowing you to immerse yourself in your music or podcasts without distractions from the outside world. The noise cancellation feature actively blocks out background noise, providing a more focused and immersive audio experience.
To control the noise cancellation on your AirPods Pro, you have a couple of options:
- Using the Force Sensor: Press and hold the force sensor on the stem of either AirPod until you hear a chime. This will toggle the noise cancellation on or off.
- Using Control Center: On your iOS device, swipe down from the top-right corner of the screen to open Control Center. Then, press and hold the volume slider, and you will see the option to switch between noise cancellation, transparency mode, or turn it off entirely.
The ability to control noise cancellation gives you the flexibility to adapt to different environments and preferences. Whether you need to focus in a noisy cafe, relax in a busy office, or hear your surroundings for safety reasons, the AirPods Pro provides the versatility to switch between noise cancellation and transparency mode effortlessly.
Next, let’s explore how you can switch between noise cancellation and transparency modes on your AirPods Pro.
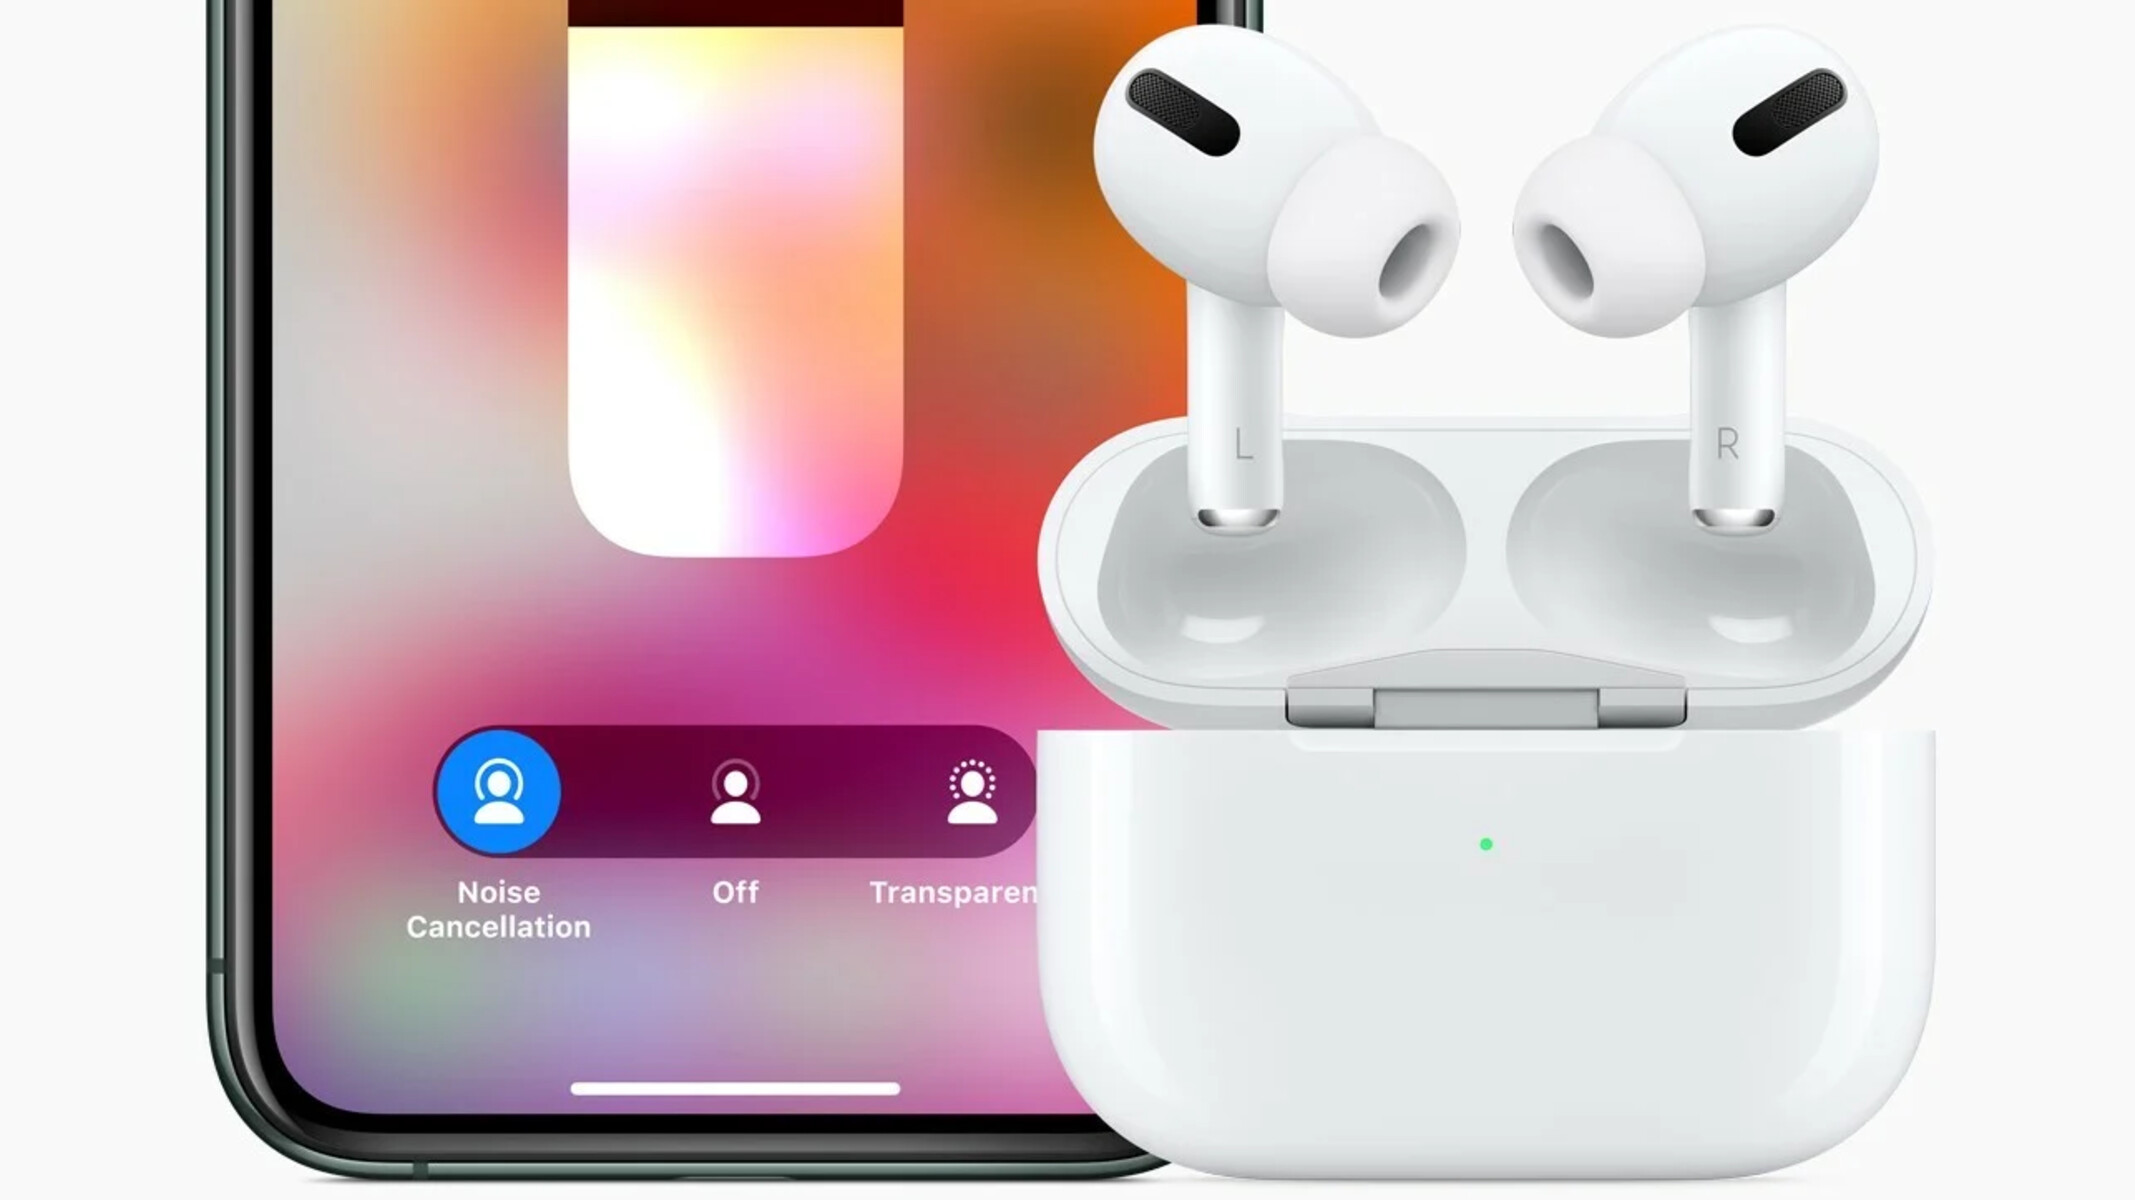
Switching between Noise Cancellation and Transparency Modes
The AirPods Pro offer two distinct modes: noise cancellation mode and transparency mode. These modes allow you to customize your listening experience based on your surroundings and preferences.
Noise cancellation mode is ideal for blocking out external sounds and immersing yourself in your music or podcasts. It’s perfect for creating a quiet and focused environment, whether you’re in a loud coffee shop, on a busy street, or traveling on a noisy plane.
On the other hand, transparency mode is designed to let the outside world in. It uses the AirPods Pro’s microphones to amplify external sounds, allowing you to stay aware of your environment even while wearing the earbuds. This is particularly useful when you need to hear announcements, have a conversation, or simply want to be more aware of your surroundings.
To switch between noise cancellation and transparency modes on your AirPods Pro, follow these steps:
- Using the Force Sensor: Press and hold the force sensor on either AirPod’s stem until you hear a chime. This will toggle between noise cancellation and transparency modes.
- Using Control Center: Open Control Center on your iOS device by swiping down from the top-right corner of the screen. Press and hold the volume slider, and you will see the option to switch between noise cancellation, transparency mode, or turn it off completely.
Switching between noise cancellation and transparency modes allows you to adapt to different situations and customize your listening experience. Whether you need to zone out and focus or stay connected to your surroundings, the AirPods Pro provides the flexibility to do so with ease.
Next, let’s explore how you can skip tracks and control the volume on your AirPods Pro.
Skipping Tracks and Controlling Volume
The AirPods Pro make it easy and convenient to skip tracks and adjust the volume directly from the earbuds themselves. This eliminates the need to reach for your phone or other devices when you want to change your music or adjust the volume.
To skip to the next track on your AirPods Pro, simply double-tap on the right earbud’s stem. This gesture allows you to seamlessly move from one song to another without interruptions.
If you want to go back to the previous track, you can double-tap on the left earbud’s stem. This feature is especially handy when you want to replay your favorite part of a podcast or revisit a song you love.
Controlling the volume on your AirPods Pro is just as simple. To increase the volume, press and hold the force sensor located on the right earbud’s stem. The volume will gradually increase until you release the sensor.
Similarly, to lower the volume, press and hold the force sensor on the left earbud’s stem. The volume will decrease until you release the sensor at your desired level.
These volume controls make it easy to fine-tune your listening experience without needing to reach for your device. Whether you want to enjoy your music at a higher volume or create a quieter ambiance for concentration, the AirPods Pro provide intuitive and responsive volume control.
Next, let’s explore how you can answer and end calls using your AirPods Pro.
Answering and Ending Calls
The AirPods Pro not only provide a seamless audio experience for music but also offer convenient call management features. You can effortlessly answer and end calls directly from the earbuds, allowing you to stay connected without reaching for your phone.
When you receive an incoming call, you can answer it by double-tapping on either AirPod’s stem. This action will pick up the call and allow you to start your conversation without delay. The built-in microphones on the AirPods Pro ensure clear and crisp audio during your calls.
To end a call, simply double-tap on either AirPod’s stem again. This action will hang up the call, allowing you to resume whatever you were doing without interruption.
These call management features make it convenient to stay in touch and handle phone calls seamlessly while on the go. Whether you’re in the middle of a workout, walking down the street, or working at your desk, the AirPods Pro provide a hassle-free way to manage your incoming and outgoing calls.
Next, let’s explore how you can use your AirPods Pro as a remote shutter button for capturing photos.
Using AirPods Pro as a Remote Shutter Button
Did you know that your AirPods Pro can also act as a remote shutter button for capturing photos on your iPhone? This handy feature allows you to take selfies and group photos without the need to set a timer or stretch your arm to reach the phone’s shutter button.
When your AirPods Pro are connected to your iPhone, you can use the force sensor on either earbud’s stem as a remote shutter button. Here’s how:
- Open the Camera app on your iPhone.
- Position your iPhone to capture the desired photo.
- Press and hold the force sensor on either AirPod’s stem to capture the photo.
By using your AirPods Pro as a remote shutter button, you can achieve more stable and natural-looking photos without any visible hand movements. This is especially useful when capturing selfies, group shots, or creative compositions.
With the AirPods Pro’s wireless connectivity and seamless integration with your iPhone’s camera, taking photos becomes even easier and more convenient.
Now that we’ve explored the different tapping functions and features of the AirPods Pro, let’s summarize what we’ve covered so far.
Conclusion
The AirPods Pro offer a range of touch controls that allow you to interact with your audio and devices seamlessly. By double-tapping the earbuds, you can activate various functions such as changing tracks, adjusting volume, answering calls, and accessing Siri.
Customizing the double tap settings gives you the flexibility to personalize your AirPods Pro experience, ensuring that the controls align with your preferences and usage habits. Additionally, the ability to switch between noise cancellation and transparency modes enables you to adapt to different environments and stay aware of your surroundings when needed.
With Siri integration, you can effortlessly access the virtual assistant by double-tapping or using voice commands, making it even more convenient to manage your music, calls, and device functions. The noise cancellation feature enhances your audio experience by blocking out external distractions, while the volume control and track skipping allow you to fine-tune your playback and navigate through your favorite content effortlessly.
Moreover, the AirPods Pro’s versatility extends beyond just audio. You can use them as a remote shutter button to capture photos on your iPhone, eliminating the need for timers or reaching for the device’s shutter button.
With all these features and functionalities, the AirPods Pro truly redefine the way we interact with our devices and audio. Whether you’re a music enthusiast, a frequent caller, or a photography enthusiast, the AirPods Pro offer a seamless and convenient experience to enhance your daily activities.
So, tap into the world of AirPods Pro and discover the power of touch!