Introduction
Welcome to our guide on how to check the CPU temperature in Windows 10! Monitoring the temperature of your CPU is essential to ensure its optimal performance and prevent overheating. Overheating can lead to reduced efficiency, system instability, and even permanent damage to your computer.
Thankfully, Windows 10 provides several methods to check the CPU temperature, ranging from built-in tools to third-party software. In this article, we will explore four different methods that you can use to monitor the CPU temperature in Windows 10. Whether you’re a casual user wanting to keep an eye on your computer’s temperature or a power user in need of detailed temperature data, we’ve got you covered.
Before we delve into the specific methods, it’s important to note that checking the CPU temperature is a relatively advanced task. If you’re not confident in your technical skills or unfamiliar with the inner workings of your computer, it may be best to consult a professional. Additionally, ensure that you exercise caution when monitoring the temperature to prevent accidental damage.
In the following sections, we will explore the built-in tools provided by Windows 10, as well as third-party software and command line options. Regardless of your level of expertise, there’s a method that will suit your needs and help you keep your CPU running at its best.
So, whether you’re a gamer, a content creator, or simply someone who spends hours on their computer, let’s get started and learn how to check the CPU temperature in Windows 10!
Method 1: Using Task Manager
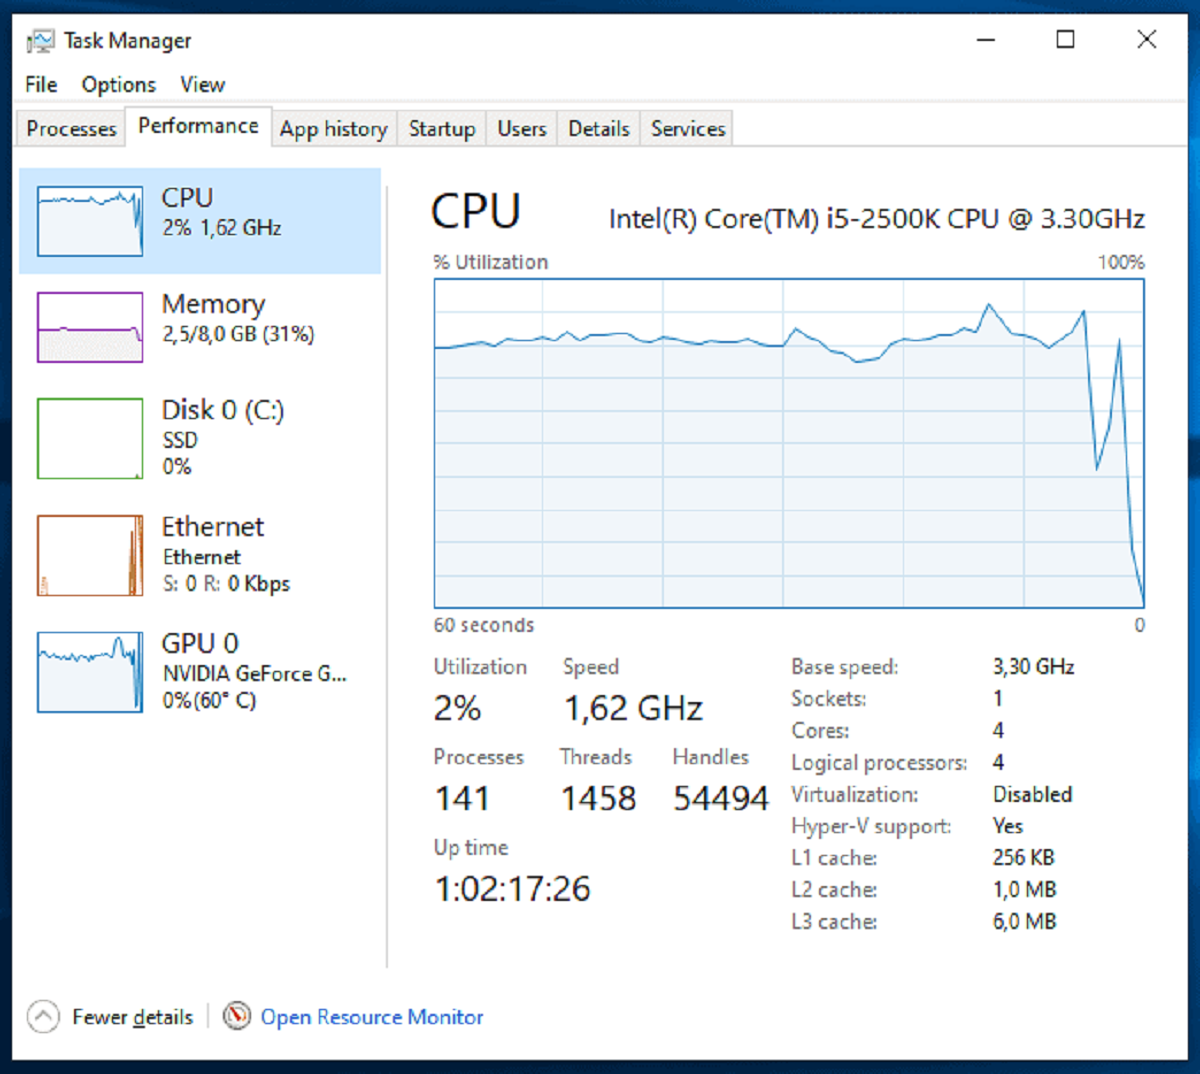
Windows 10’s built-in Task Manager offers a convenient way to monitor the CPU temperature. Here’s how you can do it:
1. Open Task Manager by right-clicking on the taskbar and selecting “Task Manager” from the context menu, or by pressing Ctrl + Shift + Esc on your keyboard.
2. Once Task Manager is open, click on the “Performance” tab at the top of the window.
3. In the Performance tab, you’ll see several categories listed on the left side. Click on “CPU” to view CPU-related performance details.
4. On the right side, you’ll find real-time information about your CPU, including the CPU usage graph and CPU temperature.
5. To view the CPU temperature in more detail, right-click on the CPU usage graph and select “Change graph to” – “Logical processors” or “Individual logical processors”. This will display the temperatures of each CPU core separately.
Task Manager provides a quick and easy way to check the CPU temperature in Windows 10. However, keep in mind that the temperature readings may not be as accurate as those obtained from specialized software.
Also, note that not all CPUs have built-in temperature sensors. If Task Manager doesn’t display the CPU temperature, it’s possible that your CPU doesn’t support temperature monitoring through this method. In such cases, you can explore other methods mentioned in this guide.
Now that you know how to use Task Manager to check the CPU temperature, let’s move on to the next method.
Method 2: Using BIOS/UEFI
Another method to check the CPU temperature in Windows 10 is by accessing the BIOS (Basic Input/Output System) or UEFI (Unified Extensible Firmware Interface) settings. Here’s how you can do it:
1. Restart your computer and enter the BIOS/UEFI settings. This can usually be done by pressing a specific key during the boot process, such as F2, Delete, or Esc. The specific key may vary depending on your motherboard manufacturer, so consult your manual or look for on-screen prompts.
2. Once in the BIOS/UEFI settings, navigate to the hardware or system monitoring section. The exact location and name may differ depending on your motherboard manufacturer.
3. Look for an option related to monitoring or displaying system temperatures. It may be labeled as “System Health,” “Hardware Monitor,” or something similar.
4. Within this section, you should see the temperature readings for various hardware components, including the CPU. The CPU temperature is often labeled as “CPU Temperature,” “CPU Temp,” or something similar.
5. Take note of the CPU temperature displayed in the BIOS/UEFI settings. You can usually navigate through the options using the arrow keys on your keyboard.
Using the BIOS/UEFI to check the CPU temperature provides a reliable and accurate reading. However, accessing the BIOS/UEFI settings requires restarting your computer and entering a different interface. It’s important to be familiar with your specific motherboard’s settings and consult the manual if needed.
Keep in mind that making changes in the BIOS/UEFI settings without proper knowledge can potentially cause issues with your computer. It’s recommended to avoid making any changes unless you are familiar with the consequences and understand what you’re doing. If in doubt, consult a professional or refer to the motherboard manufacturer’s documentation.
Now that you know how to check the CPU temperature using the BIOS/UEFI settings, let’s move on to the next method.
Method 3: Using Third-Party Software
If you’re looking for more advanced features and detailed CPU temperature monitoring, using third-party software is an excellent option. There are several reliable software applications available that can provide real-time temperature readings and additional features. Here’s how you can check the CPU temperature using third-party software:
1. Research and select a trusted third-party software that specializes in system monitoring and CPU temperature tracking. Examples of popular software include “HWMonitor,” “Core Temp,” and “CPU-Z.”
2. Download and install the chosen software from the official website or a trusted source. Make sure to select the version that is compatible with your operating system (Windows 10).
3. Launch the software after installation. The interface may vary depending on the software you choose.
4. Look for a section or tab related to CPU temperature or system monitoring.
5. Within this section, you should be able to view real-time CPU temperature readings, as well as other relevant statistics such as CPU usage, clock speed, and fan speed.
6. Some software also allows customization options, such as setting temperature thresholds and configuring alarms or notifications for high temperatures.
Using third-party software offers more advanced functionalities and options for monitoring the CPU temperature. These software solutions typically provide more accurate temperature readings and additional system information.
However, keep in mind that not all third-party software is created equal, and it’s essential to download from reputable sources to ensure the safety of your computer. Always verify the legitimacy of the software and read user reviews before downloading and installing any third-party applications.
Now that you know how to check the CPU temperature using third-party software, let’s move on to the final method.
Method 4: Using Command Prompt
If you prefer a command-line interface or want a basic method to check the CPU temperature without installing additional software, you can use the Command Prompt in Windows 10. Here’s how:
1. Open the Command Prompt by pressing the Windows key + R on your keyboard to open the Run dialog box. Type “cmd” and press Enter, or search for “Command Prompt” in the Start menu and click on it.
2. In the Command Prompt window, type the following command and press Enter: wmic /namespace:\\root\wmi PATH MSAcpi_ThermalZoneTemperature get CurrentTemperature
3. The Command Prompt will display the current temperature of the CPU in degrees Celsius (°C).
Please note that the temperature value provided by this command is in a raw format and may need further calculations or conversions to obtain the actual temperature in a user-friendly format.
Using the Command Prompt to check the CPU temperature is a quick and straightforward method for users who prefer a command-line interface. However, this method may not provide the same level of accuracy and detail as specialized software.
It’s important to understand that tweaking or making changes using the Command Prompt can potentially cause issues with your computer if not done correctly. Always exercise caution and follow specific instructions provided by trustworthy sources.
Now that you know how to check the CPU temperature using the Command Prompt, let’s wrap up this guide.
Conclusion
Monitoring the CPU temperature is crucial for maintaining the optimal performance and longevity of your computer. In Windows 10, there are various methods available to check the CPU temperature, catering to different user preferences and technical expertise.
Firstly, the built-in Task Manager provides a quick and easy way to monitor CPU temperature in real-time. It is a convenient option for casual users who need basic temperature readings without installing additional software.
For those who prefer a more detailed and accurate monitoring experience, accessing the BIOS/UEFI settings is a reliable method. It allows users to directly access the CPU temperature and other hardware-related information.
Alternatively, utilizing third-party software offers advanced features, customizable options, and precise CPU temperature readings. There are several trusted software applications available that cater to various user requirements.
Lastly, users who prefer a command-line interface can use the Command Prompt to check CPU temperature. While this method is basic and lacks detailed information, it can be a handy option for those who prefer a command-line approach.
Regardless of the method you choose, it is important to remember that monitoring the CPU temperature is just one aspect of maintaining a healthy and efficient computer. Proper airflow, cleanliness, and regular maintenance are also essential elements to consider.
By regularly monitoring the CPU temperature, you can detect potential issues early on, prevent overheating, and ensure the smooth operation of your computer. Choose the method that suits your needs and technical expertise, and enjoy a properly cooled and optimized computing experience!