Introduction
Welcome to this guide on how to clear RAM on Windows 10. Understanding how to manage and optimize your computer’s RAM is essential for maintaining its performance and ensuring smooth operation. RAM, or Random Access Memory, is a critical component of your computer that stores data and instructions that your system needs to access quickly. As you use your computer, the RAM gradually fills up with various applications, processes, and data, which can lead to a decrease in performance over time.
Clearing RAM on Windows 10 is a simple yet effective way to free up system resources, improve speed, and enhance overall performance. By clearing RAM, you can close unnecessary background applications and processes, making more memory available for your computer to use.
In this guide, we will walk you through several methods to clear RAM on Windows 10. These methods are easy to follow and require no technical expertise. Whether you are experiencing slow performance, want to optimize your computer’s RAM usage, or simply want to improve multitasking capabilities, these methods will help you achieve your goals.
Before we delve into the various methods, it is important to note that clearing RAM should be done with caution. While the steps outlined in this guide are safe and will not harm your computer, it is always recommended to save your work and close any important applications before proceeding.
So, if you’re ready to boost your computer’s performance and optimize its memory usage, let’s get started with the methods to clear RAM on Windows 10!
What is RAM?
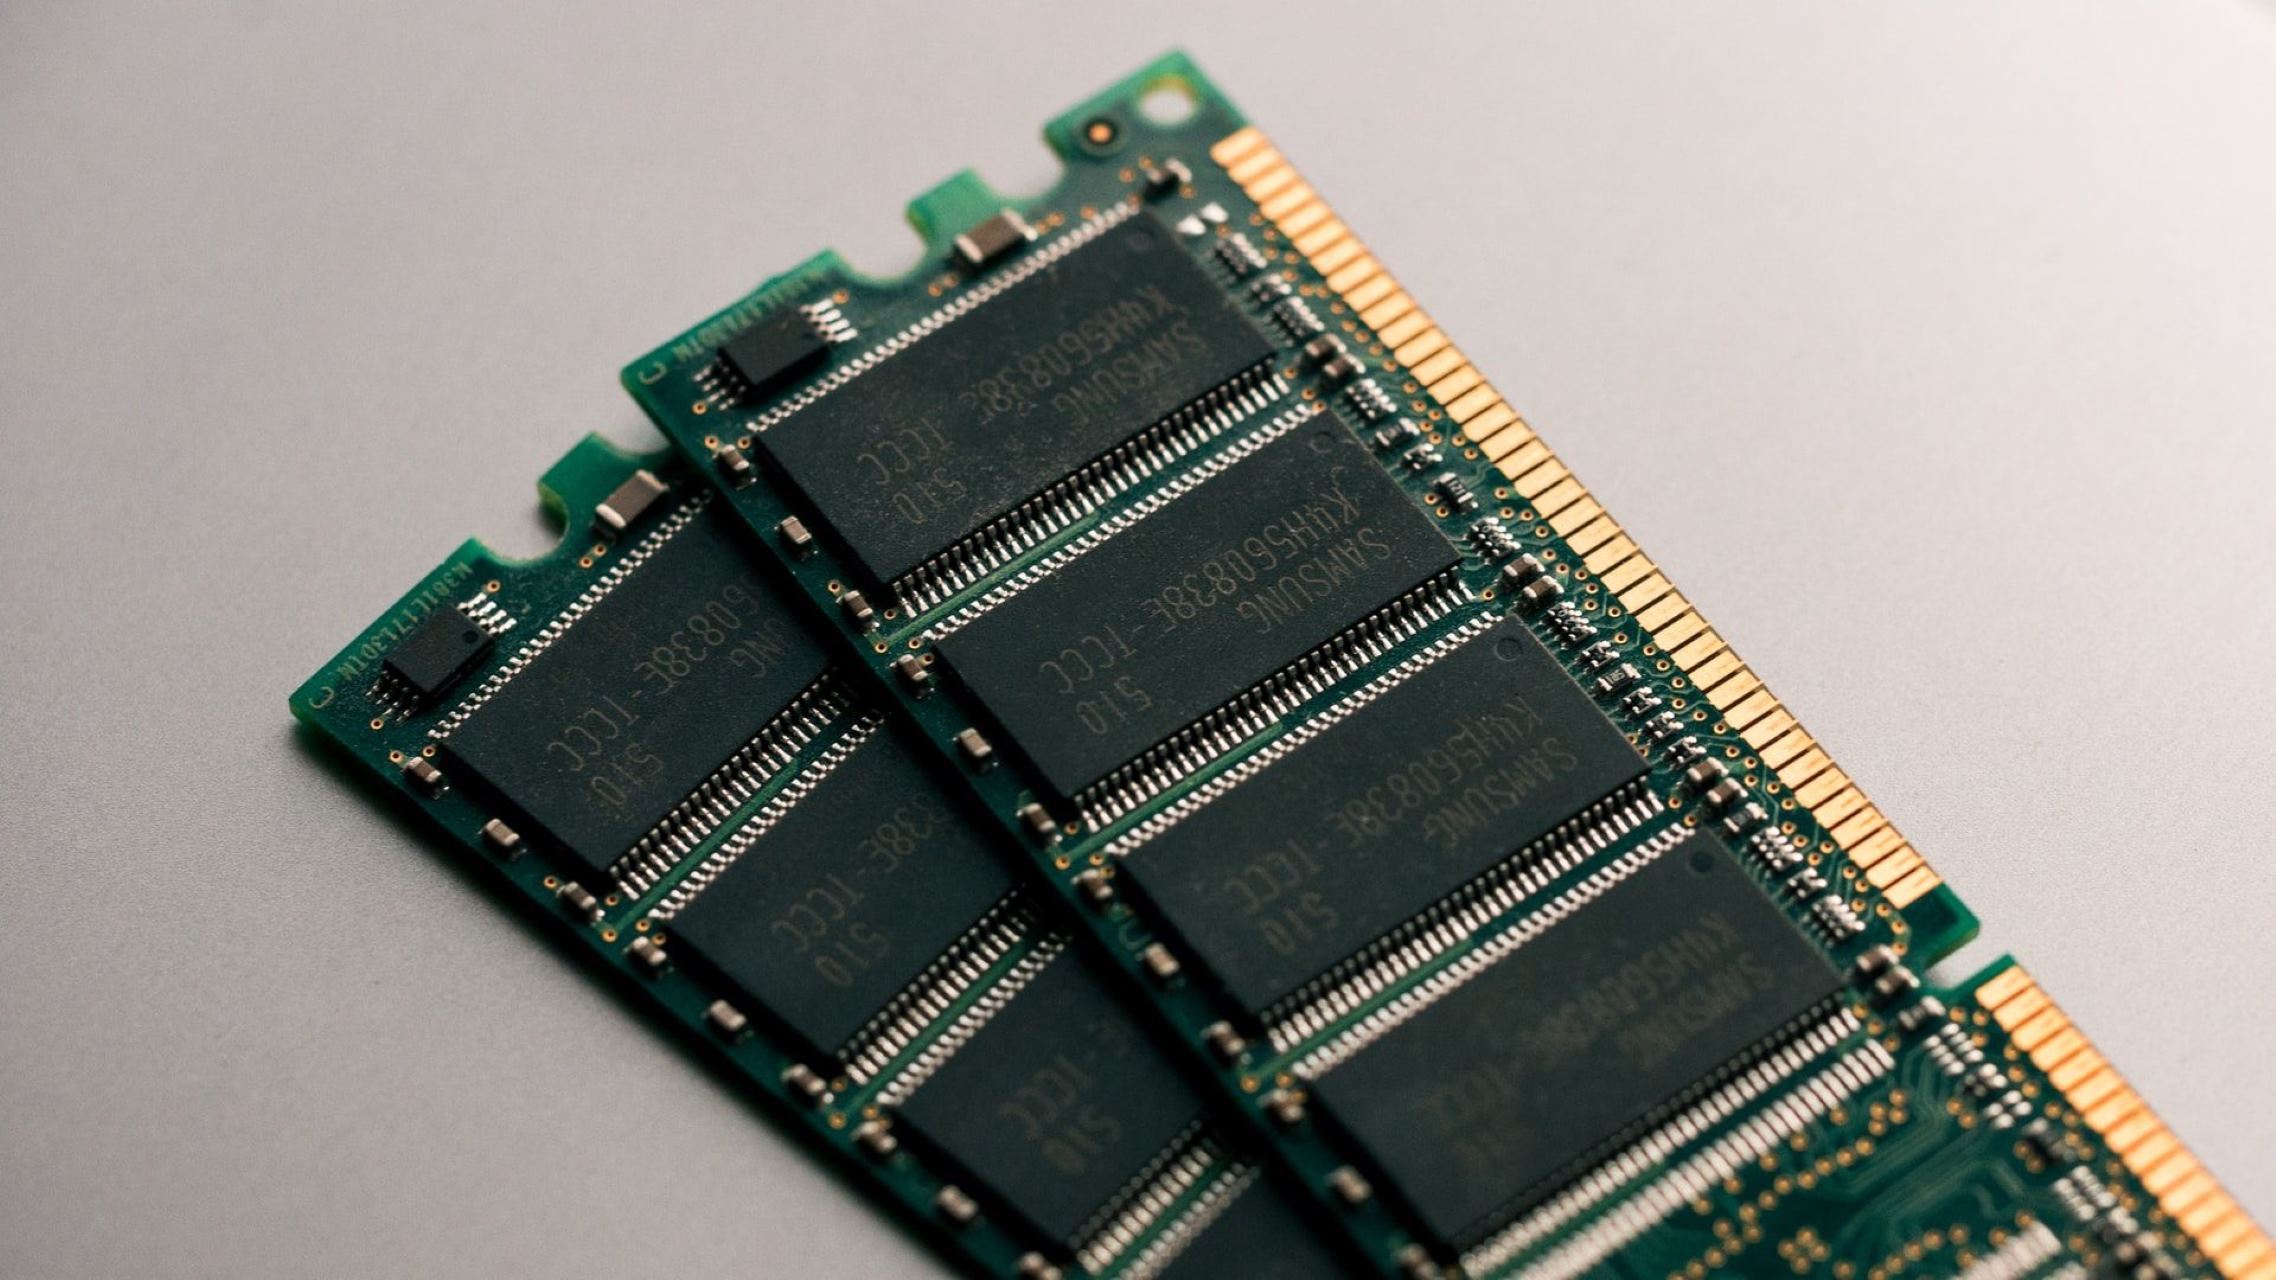
RAM, short for Random Access Memory, is a crucial component of any computer system. It is a form of volatile memory that allows your computer to store and quickly access data that is actively being used. Unlike permanent storage devices like hard drives or SSDs, RAM is temporary and the data stored in it is lost when the computer is powered off or restarted.
Think of RAM as a workspace for your computer. When you open an application or perform a task, the data related to that task is loaded into the RAM. This allows the computer to access and manipulate the data much faster than if it had to fetch it from a storage device. Essentially, RAM acts as a fast temporary storage area where the CPU (Central Processing Unit) can swiftly retrieve and process information.
The size of the RAM in your computer has a direct impact on its performance. More RAM means your computer can handle multiple tasks simultaneously and run more memory-intensive applications without slowing down. If your computer has insufficient RAM, it may struggle to keep up with demanding tasks, leading to sluggish performance, frequent program crashes, and overall frustration.
RAM operates at a much higher speed than traditional storage devices, making it essential for tasks that require quick data access, such as gaming, video editing, and multitasking. The more RAM you have, the more applications and files your computer can keep readily available for processing.
It’s important to note that while RAM is essential for optimal computer performance, it is just one component of a larger system. Other factors, such as the processor speed, storage capacity, and software optimizations, also contribute to the overall performance of your computer.
Now that we understand what RAM is and its role in a computer system, let’s explore why it is important to clear RAM and how it can benefit your Windows 10 device.
Why should you clear RAM?
Clearing RAM on your Windows 10 computer can bring several benefits and enhance your overall computing experience. Here are some reasons why you should consider clearing your RAM:
1. Improved performance: Over time, as you use your computer, the RAM can get filled up with various applications, background processes, and cached data. This can lead to a decrease in performance, causing sluggishness and lag. Clearing the RAM frees up system resources and allows your computer to run more smoothly, improving overall performance.
2. Enhanced multitasking: If you frequently work with multiple applications simultaneously, clearing the RAM can provide you with more available memory. This means your computer can handle running multiple programs more efficiently and without experiencing slowdowns or crashes.
3. Reduced program crashes: Insufficient available RAM can cause programs to crash or freeze when your computer runs out of memory. By clearing RAM, you increase the amount of free memory, reducing the likelihood of program crashes and improving the stability of your system.
4. Better gaming experience: Gamers often require significant amounts of RAM to run resource-intensive games smoothly. Clearing RAM before launching a game can help allocate more memory to the game, resulting in improved graphics, faster load times, and a smoother gaming experience.
5. Faster data processing: When your RAM is cluttered with unnecessary applications and background processes, it can slow down data access and processing speeds. Clearing RAM ensures that the data your computer needs to process is readily available, leading to faster execution of tasks and operations.
6. Optimized system resources: By clearing RAM, you optimize your computer’s resources and allocate memory to the applications and tasks that actively need it. This translates to better resource management and a more efficient use of your computer’s capabilities.
Remember, clearing RAM is not a permanent solution to improve the overall performance of your computer. It provides a temporary boost by freeing up memory for immediate use. If you find that you frequently need to clear RAM to maintain optimal performance, it may be worth considering upgrading your RAM capacity to meet your system’s requirements.
How to Clear RAM on Windows 10
Clearing RAM on Windows 10 is a relatively simple process that can be done using various methods. In this section, we will guide you through several effective methods to clear RAM on your Windows 10 computer:
Method 1: Using Task Manager
One of the easiest ways to clear RAM is by using the built-in Task Manager. Press Ctrl + Shift + Esc to open Task Manager or right-click on the taskbar and select “Task Manager.” In the Task Manager window, go to the “Processes” tab, sort the processes by memory usage, and close any unnecessary or resource-intensive applications running in the background.
Method 2: Running Windows Memory Diagnostic Tool
Windows 10 comes with a built-in tool called the Windows Memory Diagnostic, which can help identify and clear RAM-related issues. To access it, type “Windows Memory Diagnostic” in the Windows search bar and select the “Windows Memory Diagnostic” app. Choose whether to restart the computer and run the tool immediately or schedule it for the next restart. The tool will scan for memory problems and attempt to resolve them.
Method 3: Restarting Your Computer
One of the simplest and most effective ways to clear RAM is by restarting your computer. Restarting clears the RAM, closes background applications, and releases system resources. This can help improve overall performance and free up memory for new tasks.
Method 4: Enabling Fast Startup
Enabling the Fast Startup feature in Windows 10 can help reduce the time it takes for your computer to boot up. This feature saves certain system settings to a hibernation file, allowing your computer to start up faster. To enable Fast Startup, go to “Control Panel,” select “Power Options,” click on “Choose what the power buttons do,” and select “Change settings that are currently unavailable.” Finally, check the box next to “Turn on fast startup” and click “Save changes.”
Method 5: Adjusting Virtual Memory Settings
Virtual memory is a system-managed extension of the computer’s physical memory (RAM). By adjusting the virtual memory settings, you can allocate more or less space for virtual memory, which can help free up RAM. To adjust the virtual memory settings, go to “Control Panel,” select “System and Security,” click on “System,” choose “Advanced system settings,” go to the “Advanced” tab, click on “Settings” in the “Performance” section, select the “Advanced” tab again, and click on “Change” in the “Virtual memory” section. From there, you can adjust the virtual memory settings according to your preference.
Method 6: Updating Your Drivers
Outdated or incompatible device drivers can cause memory-related issues and impact system performance. Updating your drivers ensures that your hardware components work optimally. To update drivers, go to “Device Manager,” right-click on a device, select “Update driver,” and follow the on-screen instructions. Repeat this process for all devices with outdated drivers.
Method 7: Clearing Temporary Files
Temporary files accumulate over time and take up valuable disk space. Clearing these files can help free up memory and improve performance. To clear temporary files, type “%temp%” in the Windows search bar and press enter. This will open the Temp folder. Select all files and folders by pressing “Ctrl + A” and delete them permanently.
With these methods, you can easily clear RAM on your Windows 10 computer and optimize its performance. Remember to use these methods when necessary and choose the appropriate method based on your specific requirements and system conditions.
Method 1: Using Task Manager
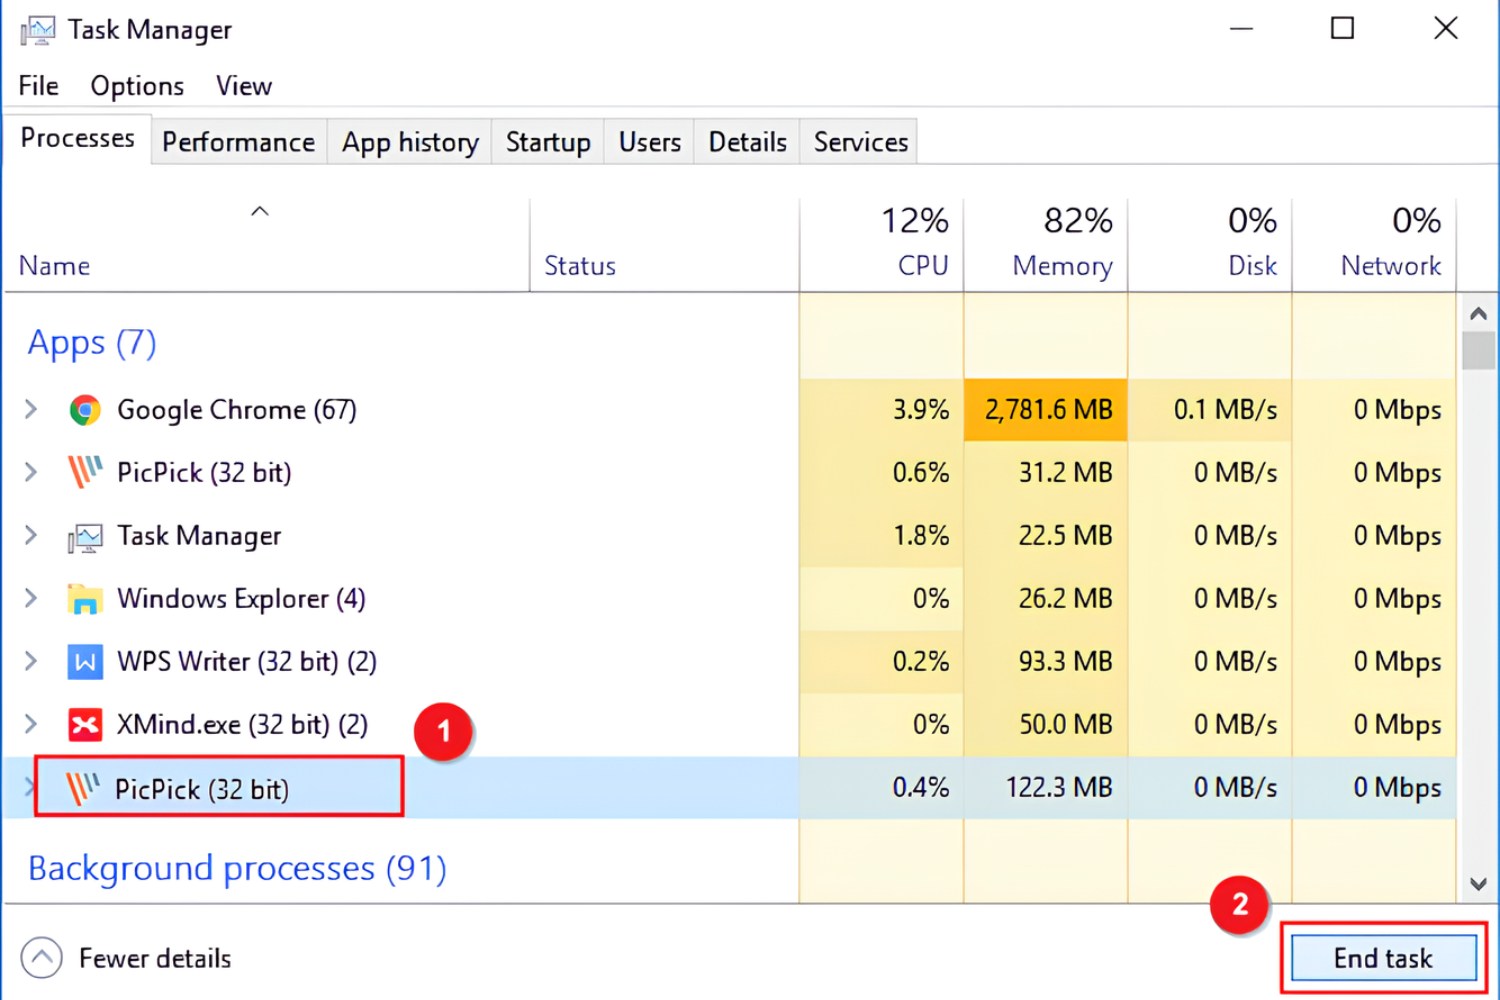
One of the simplest and most convenient ways to clear RAM on your Windows 10 computer is by using the built-in Task Manager. Task Manager allows you to monitor and manage the processes running on your computer, including those that consume a significant amount of memory.
To clear RAM using Task Manager, follow these steps:
- Right-click on the taskbar at the bottom of your screen and select “Task Manager” from the context menu. Alternatively, you can press Ctrl + Shift + Esc to directly open Task Manager.
- In the Task Manager window, you’ll see several tabs. Click on the “Processes” tab to view the list of active processes on your computer.
- By default, the processes are sorted by Name. To sort them by memory usage, click on the “Memory” column header. This will arrange the processes in descending order based on their memory consumption.
- Review the list of processes and identify any applications or background processes that are using a high amount of memory. Keep in mind that system processes and essential applications should not be terminated.
- Once you have identified a process that you want to close, right-click on it and select “End Task.” A confirmation prompt may appear, asking if you want to terminate the process. Click “End Process” to proceed.
- Repeat this process for any other unnecessary or memory-intensive processes that you wish to close.
By closing unnecessary processes, you free up memory and improve the overall performance of your computer. It’s important to exercise caution when ending processes in Task Manager, as terminating essential system processes can cause instability or crashes.
Using Task Manager to clear RAM is a quick and effective method, especially when you need an immediate boost in performance or want to close resource-hungry applications. However, keep in mind that this method does not permanently clear the RAM. As you continue to use your computer, memory usage will gradually increase again.
In the next section, we’ll explore another method that can help you diagnose and resolve memory-related issues on your Windows 10 computer.
Method 2: Running Windows Memory Diagnostic Tool
If you suspect that memory-related issues are causing performance problems on your Windows 10 computer, you can take advantage of the built-in Windows Memory Diagnostic tool. This tool helps identify and resolve potential problems with your computer’s RAM.
To run the Windows Memory Diagnostic tool, follow these steps:
- Press the Windows key on your keyboard to open the Start menu. Type “Windows Memory Diagnostic” and select the “Windows Memory Diagnostic” app from the search results.
- A pop-up window will appear with two options: “Restart now and check for problems” or “Check for problems the next time I start my computer.” Choose the option that suits your preference.
- If you select the first option, your computer will restart immediately, and the Memory Diagnostic tool will start running.
- If you choose the second option, the tool will be scheduled to run the next time you start your computer.
- During the restart process, Windows Memory Diagnostic will perform a series of tests to check for any memory-related problems. The tests might take some time to complete, so be patient.
- Once the tests are finished, your computer will boot back up, and a notification will appear on your screen with the test results.
- If the tool detects any memory issues, it will provide information about the problem and suggest possible solutions.
This method is especially useful if you suspect that faulty RAM modules are causing performance issues on your Windows 10 computer. Running the Windows Memory Diagnostic tool can help identify whether there are any problems with your RAM and guide you towards resolving them. Keep in mind that if the tool detects errors, it may indicate a hardware issue and it’s recommended to seek professional assistance to further diagnose and replace any faulty hardware.
Now that we’ve covered two methods for clearing RAM on Windows 10, let’s explore more ways to optimize your computer’s performance in the upcoming sections.
Method 3: Restarting your computer
One of the simplest and most effective ways to clear RAM on your Windows 10 computer is by restarting it. Restarting your computer can help clear the RAM, close background applications, and release system resources, ultimately improving overall performance.
To clear RAM by restarting your computer, follow these steps:
- Save any open work and close any important applications or documents.
- Click on the Start button in the bottom left corner of your screen.
- Select the Power icon, which is represented by a circle with a vertical line on the right side.
- A menu will appear. Click on the Restart option.
- Wait for your computer to shut down and restart. This may take a few moments.
- Once your computer has restarted, the RAM will be cleared, and system resources will be replenished.
Restarting your computer is particularly effective when you notice a decline in performance, experience program crashes, or encounter issues with memory-intensive tasks. By restarting, you give your computer a fresh start and reset the RAM, which can resolve certain temporary memory-related issues.
It’s important to note that restarting your computer is a temporary solution. As you continue to use your computer, open applications, and run processes, the RAM will gradually fill up again. If you find that you need to clear RAM frequently or experience persistent performance issues, you may want to explore other optimization methods or consider upgrading your RAM capacity.
In the following sections, we will explore more methods to clear RAM and optimize your Windows 10 computer’s performance.
Method 4: Enabling Fast Startup
Enabling Fast Startup is a Windows 10 feature that can help improve the boot-up time of your computer. By enabling this feature, certain system settings are saved to a hibernation file, allowing your computer to start up faster when you power it on or restart it.
To enable Fast Startup on your Windows 10 computer, follow these steps:
- Open the Control Panel by searching for it in the Windows search bar and selecting it from the search results.
- In the Control Panel, set the “View by” option to Small icons or Large icons to ensure you can see all the available options.
- Click on the Power Options icon.
- In the left-hand menu, select the option labeled Choose what the power buttons do.
- A new window will open. At the top, click on the link that says Change settings that are currently unavailable.
- In the “Shutdown settings” section, you will find a checkbox labeled Turn on fast startup. Check this box to enable Fast Startup.
- Click Save changes to apply the settings.
Once you have enabled Fast Startup, your computer will use the hibernation file to save certain system settings. This allows it to start up faster because it does not have to initialize all the system components from scratch. Instead, it can quickly load the saved settings and resume operation.
Enabling Fast Startup is especially beneficial if you frequently shut down and restart your computer. It can significantly reduce the time it takes for your computer to boot up, allowing you to get to work or play faster. However, it’s important to note that Fast Startup is not always recommended in certain scenarios, such as when you need to perform a full shutdown for system updates or hardware changes. In such cases, it’s best to disable Fast Startup temporarily.
In the following sections, we will explore more methods to clear RAM and optimize your Windows 10 computer’s performance.
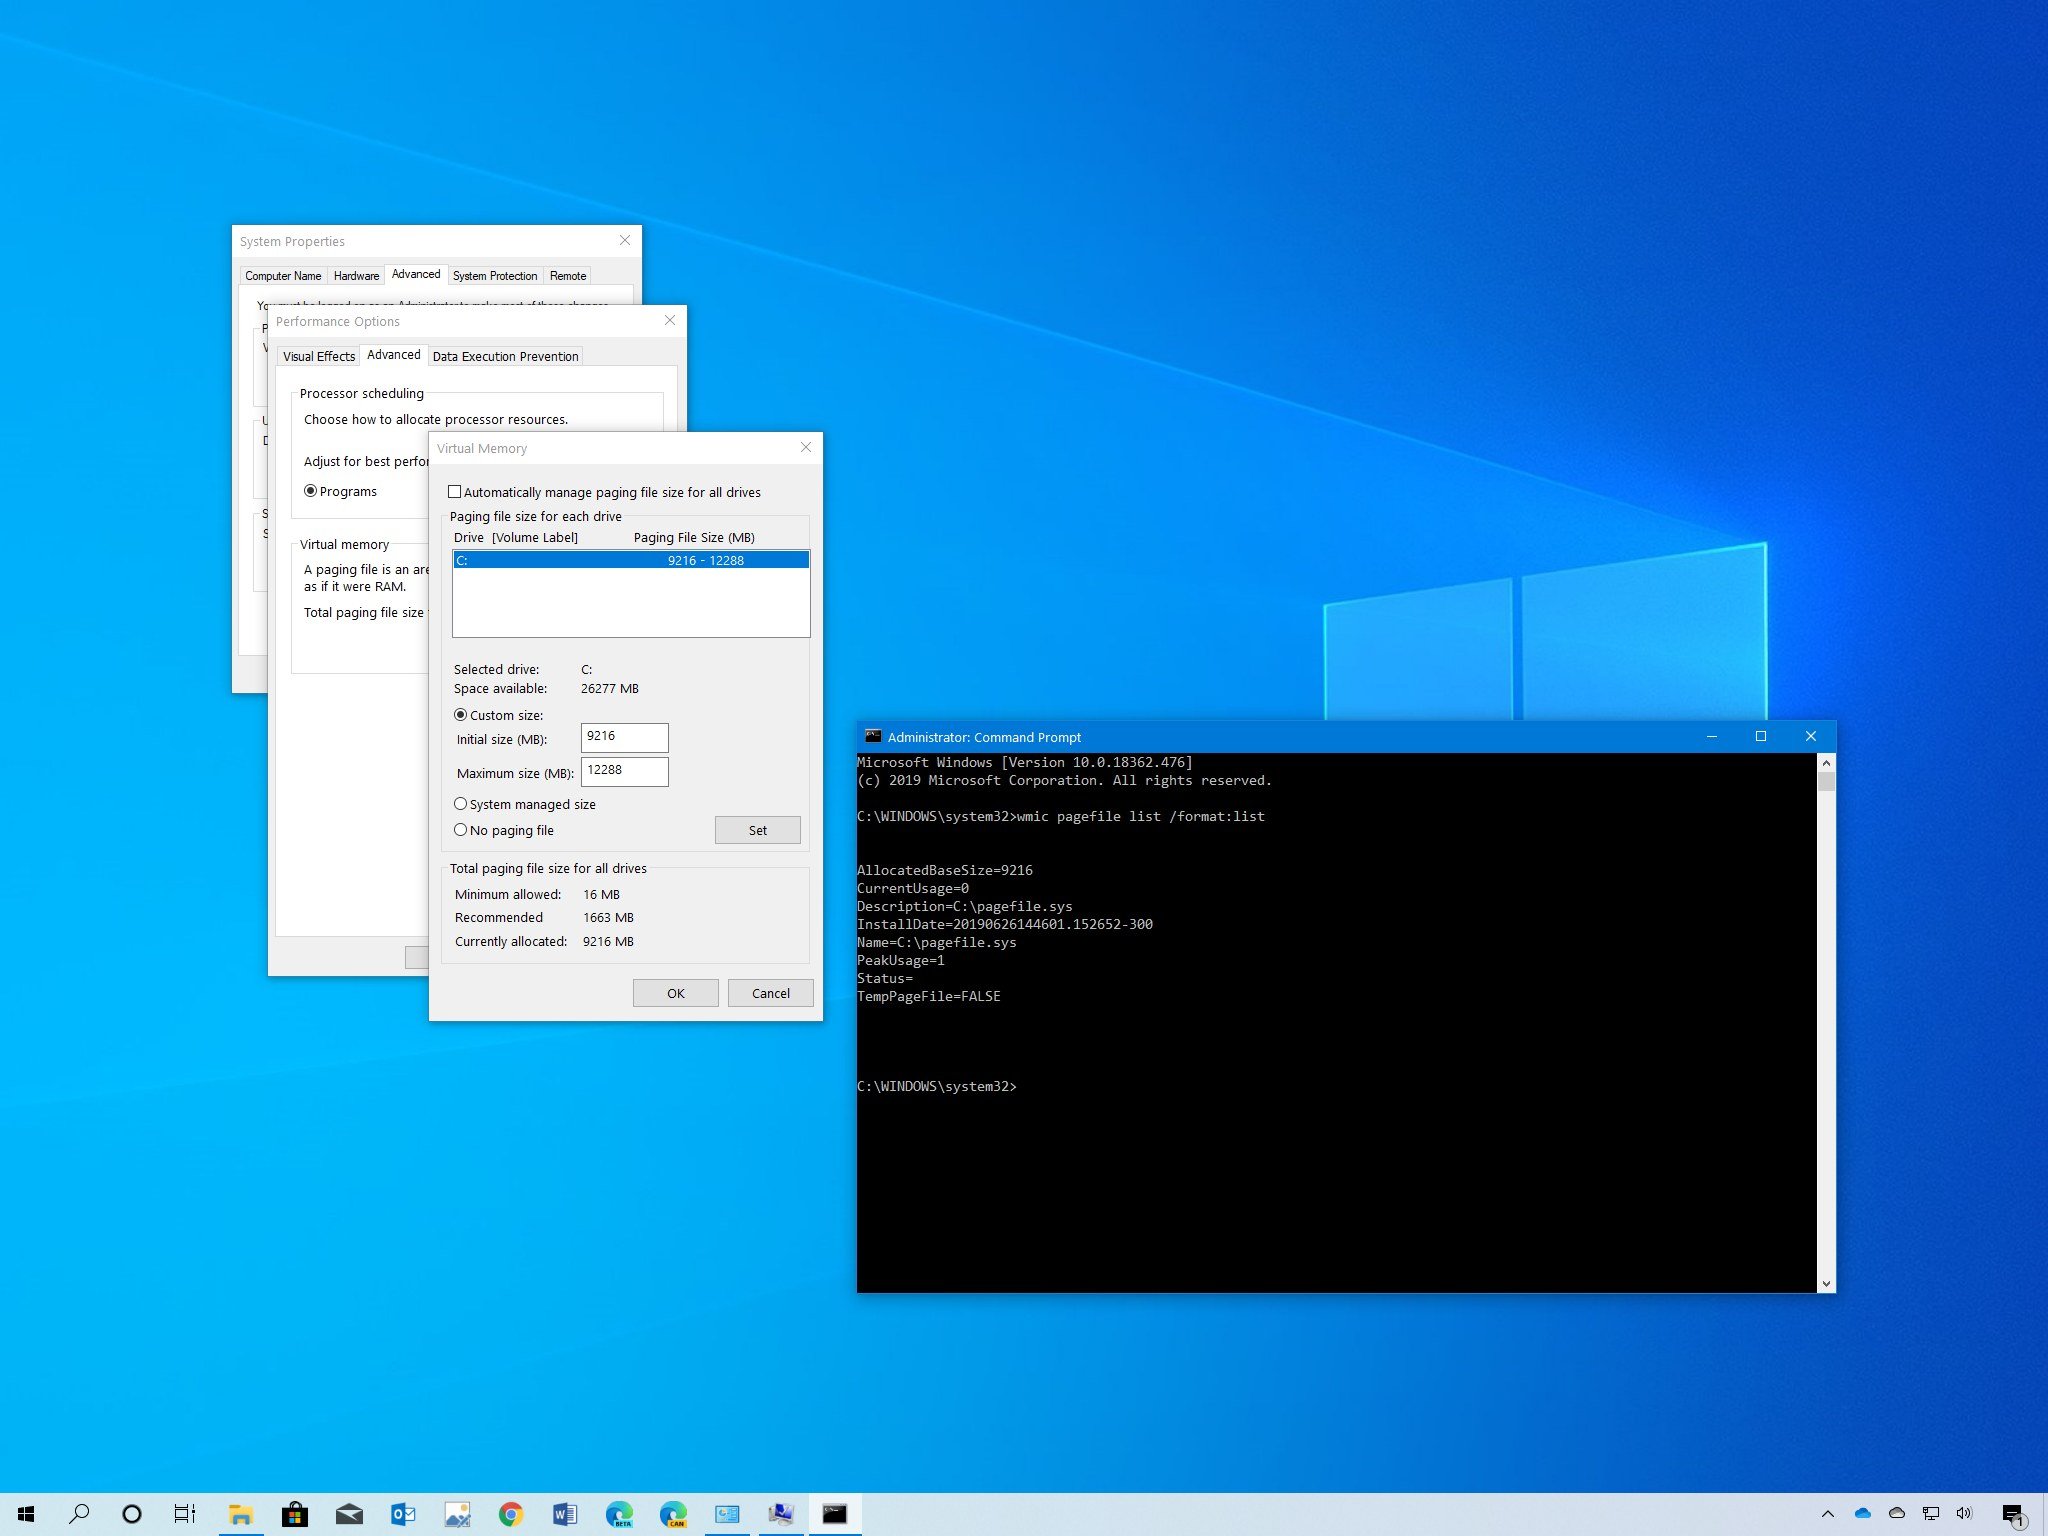
Method 5: Adjusting Virtual Memory Settings
Adjusting the virtual memory settings on your Windows 10 computer can help clear RAM and optimize the performance of your system. Virtual memory is a system-managed extension of your computer’s physical memory (RAM) and involves the use of a portion of your hard drive as temporary virtual memory.
Follow these steps to adjust the virtual memory settings:
- Open the Control Panel by searching for it in the Windows search bar and selecting it from the search results.
- Set the “View by” option to Small icons or Large icons to ensure you can see all the available options.
- Click on the System icon in the Control Panel to open the System settings.
- In the left-hand menu, click on the option labeled Advanced system settings.
- A new window will open. In the Performance section, click on the Settings button.
- Another window will open. Navigate to the Advanced tab and click on the Change button in the Virtual memory section.
- In the Virtual Memory window, uncheck the box next to “Automatically manage paging file size for all drives“.
- Select the Custom size option and adjust the Initial size and Maximum size values according to your preference. The values are measured in megabytes (MB).
- Click OK to apply the changes.
- Restart your computer to allow the new virtual memory settings to take effect.
By adjusting the virtual memory settings, you can allocate more or less space for virtual memory, thereby affecting the amount of RAM utilized by your system. Increasing the virtual memory size provides more space for temporary data storage, potentially reducing the strain on physical RAM.
It’s worth noting that excessive virtual memory usage can lead to slower performance, as the system may spend more time accessing the hard drive for data instead of utilizing fast-access RAM. Hence, it’s important to strike a balance when adjusting virtual memory settings and consider the available physical RAM and the specific requirements of your computer.
In the upcoming sections, we will explore additional methods to clear RAM and optimize the performance of your Windows 10 computer.
Method 6: Updating Your Drivers
Keeping your device drivers up to date is an essential step in optimizing your Windows 10 computer’s performance, including clearing RAM. Outdated or incompatible drivers can cause memory-related issues and impact overall system stability. By updating your drivers, you ensure that your hardware components work optimally.
To update your drivers on Windows 10, follow these steps:
- Press the Windows key + X on your keyboard and select Device Manager from the menu that appears.
- In the Device Manager window, you will see a list of hardware categories. Expand each category by clicking on the arrow next to it.
- Right-click on the device you want to update and select Update driver. Alternatively, you can double-click on the device to open its properties and access the driver update option from there.
- In the Update Driver Software window, select Search automatically for updated driver software. Windows will then search online for the latest driver updates for that device.
- If Windows finds a driver update, it will automatically download and install it. Follow the on-screen instructions, if any.
- If Windows does not find a driver update, or if you prefer to install a specific driver manually, you can visit the manufacturer’s website and download the latest driver for your device. Make sure to choose the driver that is compatible with your specific Windows 10 version and hardware model.
- Once you have downloaded the driver, open the downloaded file and follow the installation wizard’s instructions to install the updated driver.
- Repeat these steps for each device that you want to update.
Regularly updating your drivers can help resolve compatibility issues, improve performance, and mitigate memory-related problems. It is particularly crucial for critical hardware components such as graphics cards, network adapters, and chipsets.
Updating drivers should be part of your regular computer maintenance routine. It is worth noting that in addition to manual driver updates, Windows 10 also provides automatic driver updates through Windows Update. Enabling automatic updates can help ensure that your drivers stay up to date without manual intervention.
Now that we’ve covered updating drivers, let’s explore another method to clear RAM and optimize your Windows 10 computer’s performance.
Method 7: Clearing Temporary Files
Over time, temporary files can accumulate on your Windows 10 computer, taking up valuable disk space and potentially affecting system performance. Clearing these temporary files is an effective method to free up memory and improve the overall efficiency of your system.
To clear temporary files on Windows 10, follow these steps:
- Press the Windows key + R on your keyboard to open the Run dialog box.
- Type “%temp%” (without quotes) in the Run dialog box and press Enter. This will open the Temp folder on your computer.
- In the Temp folder, press Ctrl + A on your keyboard to select all the files and folders.
- Right-click on any selected file or folder and choose Delete. Alternatively, you can press the Delete key on your keyboard.
- If prompted, confirm the deletion by clicking Yes or OK.
- Some files may not be deleted if they are currently in use by running processes. In that case, you can skip those files and delete the rest.
Clearing temporary files not only frees up disk space but also removes unnecessary cache, temp files, and other remnants that can accumulate over time. By doing so, you can improve the responsiveness of your computer and reduce clutter.
In addition to manually clearing the Temp folder, you can also use built-in Windows tools like Disk Cleanup or third-party software designed to clean up temporary files and optimize system performance. These tools often provide additional options to clean up other types of temporary files, such as browser cache and system logs.
Regularly clearing temporary files helps maintain the performance and efficiency of your Windows 10 computer. Consider making it a part of your routine system maintenance.
Now that we’ve explored different methods to clear RAM and optimize your Windows 10 computer’s performance, let’s sum up the key points in the concluding section.
Conclusion
Clearing RAM on your Windows 10 computer is a straightforward process that can significantly improve performance and optimize system resources. By following the methods outlined in this guide, you can free up memory, close unnecessary processes, and enhance overall efficiency.
We began by understanding what RAM is and its importance in a computer system. RAM acts as a fast-temporary storage area that allows quick access to data and instructions. Insufficient RAM can lead to performance issues, program crashes, and decreased multitasking capabilities.
We then explored various methods to clear RAM on Windows 10:
- Using Task Manager to close memory-intensive processes and applications.
- Running the Windows Memory Diagnostic tool to identify and resolve potential RAM-related issues.
- Restarting the computer to clear the RAM and release system resources.
- Enabling Fast Startup for faster boot-up times.
- Adjusting virtual memory settings to optimize RAM usage.
- Updating device drivers to ensure hardware compatibility and performance.
- Clearing temporary files to free up disk space and improve system responsiveness.
Each method offers its unique benefits and can be employed based on specific needs and circumstances. It’s important to monitor your computer’s performance and employ the appropriate methods as necessary.
Optimizing your Windows 10 computer’s performance goes beyond just clearing RAM. Regular maintenance and keeping your system up to date with the latest software updates and security patches are equally crucial. Additionally, adopting good computer habits such as closing unnecessary programs, managing startup items, and organizing data can further enhance system performance.
By implementing these practices, you can ensure that your Windows 10 computer operates at its best, delivering smooth and efficient performance for all your tasks and activities.