Introduction
Welcome to our guide on how to optimize RAM usage in Windows 10! If you’re experiencing slowdowns or performance issues on your Windows 10 computer, optimizing your RAM usage can help improve overall system performance.
RAM (Random Access Memory) is a vital component of your computer’s hardware. It is responsible for temporarily storing data that your computer needs to access quickly. When you open a program or load a file, it gets transferred from your hard drive or solid-state drive (SSD) into RAM, allowing for faster processing.
However, if your computer has insufficient RAM or if your RAM is being used inefficiently, it can slow down your system and lead to lagging, freezing, and crashes. In this guide, we will explore some tips and tricks to optimize RAM usage in Windows 10, allowing your computer to perform at its best.
Understanding how RAM is used in Windows 10 is crucial for optimizing its usage. Windows 10 automatically manages the allocation of RAM to different programs and processes. It uses a combination of techniques, such as prefetching commonly used data, caching files and processes, and prioritizing active programs.
However, in some cases, Windows 10 may not allocate RAM efficiently, resulting in excessive RAM usage and performance degradation. This can happen due to factors like outdated drivers, memory leaks in applications, unnecessary background processes, or the presence of too many startup programs. By understanding and addressing these factors, you can optimize your RAM usage and ensure smooth performance on your Windows 10 system.
Before we dive into the optimization techniques, it’s important to check your current RAM usage. This will give you an idea of how much RAM is being utilized and help you identify any issues or areas for improvement. Let’s move on to the next section to learn how to check your RAM usage in Windows 10.
What is RAM and why is it important?
RAM (Random Access Memory) is a crucial component of a computer’s hardware, playing a vital role in its overall performance. It is a type of memory that provides temporary storage for data that your computer needs to access quickly. When you open a program or load a file, it gets transferred from your hard drive or SSD (Solid-State Drive) into RAM, allowing for faster processing and retrieval.
The importance of RAM lies in its ability to provide quick access to data, improving the speed and efficiency of your computer. When you have ample RAM, your computer can run multiple programs simultaneously without slowing down. This is particularly beneficial for tasks that require significant memory resources, such as running complex applications, editing multimedia files, gaming, or virtual machine operations.
RAM is essential for multitasking, as it allows your computer to store active processes and data from various programs in its memory. This enables seamless switching between applications and reduces the need for excessive data transfer between the hard drive and RAM, resulting in faster performance and improved responsiveness.
In addition to multitasking, RAM also plays a crucial role in enhancing system performance during intensive tasks like video editing or gaming. When you have sufficient RAM, it can store and process large amounts of data, reducing the reliance on slower storage devices like hard drives. This leads to smoother playback, faster rendering times, and an overall better user experience.
Insufficient RAM can lead to various performance issues, such as slow program loading times, frequent freezes, crashes, and lagging. When your computer runs out of available RAM, it starts using the hard drive or SSD as virtual memory (paging file), which is significantly slower. This can result in a noticeable performance decline, known as “swapping” or “thrashing.”
To ensure optimal performance, it’s important to have enough RAM for the tasks you regularly perform on your computer. The amount of RAM you need depends on several factors, including the type of applications you use, the size of files you work with, and your multitasking habits. Keeping your RAM usage optimized is crucial to prevent performance bottlenecks and to make the most of your computer’s capabilities.
Now that we understand the importance of RAM and its role in system performance, let’s move on to the next section, where we will explore how to check your current RAM usage in Windows 10.
Understanding RAM usage in Windows 10
When it comes to RAM usage in Windows 10, it’s important to have a clear understanding of how the operating system manages and allocates memory. Windows 10 employs various techniques to ensure efficient utilization of RAM resources, resulting in optimal performance. Let’s delve into the key aspects of RAM usage in Windows 10.
Windows 10 uses a technique known as prefetching to improve the responsiveness of commonly used applications. Prefetching analyzes your usage patterns and predicts which files and applications you are likely to access, loading them into RAM in advance. This reduces the time required to open frequently used programs and results in a smoother user experience.
Another technique Windows 10 utilizes is superfetch, which helps speed up program launches by loading frequently accessed data into RAM. Superfetch monitors your usage patterns and pre-fetches the necessary data based on your behavior, ensuring that the data is readily available when you need it. This optimization technique can significantly reduce program loading times, especially for applications you use frequently.
Windows 10 also implements a feature called RAM compression, which compresses unused data in RAM to free up memory resources. This can be particularly useful when your system is running low on available RAM, as it allows more applications and processes to be stored in memory. This compression technique helps avoid excessive paging to the hard drive, resulting in improved performance.
Moreover, Windows 10 employs a memory prioritization mechanism that determines which processes and applications should be given priority access to available RAM. Active programs and processes are granted more RAM resources, ensuring that they can run smoothly and without interruption. Background processes and less frequently accessed data are given lower priority, freeing up memory for more critical tasks.
Despite these optimizations, certain factors can lead to inefficient RAM usage in Windows 10. Outdated device drivers, memory leaks in applications, unnecessary background processes, or an excessive number of startup programs can cause excessive RAM usage or memory-related issues. Addressing these factors and optimizing RAM usage can help improve system performance and prevent potential bottlenecks.
In the next section, we will explore how to check your current RAM usage in Windows 10, allowing you to gauge how efficiently your system is utilizing its memory resources.
Checking your current RAM usage
Before optimizing your RAM usage in Windows 10, it’s essential to determine how much RAM is currently being used. This information will help you identify if your system is experiencing high RAM usage and if there is a need for optimization. Luckily, Windows 10 provides an easy way to check your current RAM usage. Here’s how:
- 1. Press the “Ctrl + Shift + Esc” keys on your keyboard to open the Task Manager. Alternatively, you can right-click on the taskbar and select “Task Manager” from the context menu.
- 2. In the Task Manager window, click on the “Performance” tab at the top.
- 3. In the left sidebar, click on “Memory” to view the memory-related details.
- 4. You will see the current RAM usage under the “In use (Compressed)” section. This shows the amount of RAM being actively used by your system.
- 5. Additionally, the “Committed” and “Cached” sections provide information on the total memory committed by processes and the amount of memory being used for caching, respectively.
By checking your current RAM usage, you can quickly determine if your system is utilizing too much RAM or if there is room for optimization. If you notice that a significant portion of your RAM is being used even when you’re not running memory-intensive tasks, it may indicate that some applications or processes are using more resources than necessary.
Identifying high RAM usage can be helpful in troubleshooting performance issues or identifying memory leaks in specific programs. If you notice that a particular application is consistently using a large amount of RAM, you may want to consider optimizing its settings or seeking an alternative program with lower resource requirements.
Remember that RAM usage can fluctuate depending on the applications and processes running on your system. It’s essential to monitor your RAM usage periodically, especially when you’re experiencing performance issues or when you want to ensure optimal system performance.
Now that you know how to check your current RAM usage, let’s move on to the next section, where we will explore tips and techniques to optimize your RAM usage in Windows 10.
Tips to optimize RAM usage in Windows 10
Optimizing your RAM usage in Windows 10 can significantly improve your system’s performance and responsiveness. Here are some tips and techniques to help you optimize your RAM usage:
- Close unnecessary programs and processes: Close any programs or processes that are running in the background but are not actively being used. This will free up valuable RAM resources and prevent unnecessary memory consumption.
- Disable startup programs: Some programs are set to launch automatically when you start your computer. Disable unnecessary startup programs to prevent them from using up valuable memory right from the beginning.
- Clear temporary and junk files: Temporary files and junk files can accumulate over time and take up unnecessary memory space. Use the built-in Disk Cleanup tool or third-party software to remove these files and free up memory.
- Adjust visual effects settings: Windows 10 offers various visual effects that enhance the look and feel of the operating system. However, these effects can consume considerable RAM. Adjusting or disabling visual effects can help save memory resources.
- Use the Windows built-in Performance Monitor: The Performance Monitor provides detailed information about how resources, including RAM, are being utilized by your system. Use it to identify resource-hungry applications and troubleshoot performance issues.
- Enable the “ReadyBoost” feature: ReadyBoost allows you to use external USB drives as additional cache memory. This can improve system performance by reducing the reliance on virtual memory and speeding up data access.
- Upgrade your RAM: If your system consistently runs low on memory and you’re experiencing performance issues, upgrading your RAM may be the best solution. Adding more RAM will provide your system with more memory resources, allowing for smoother multitasking and better overall performance.
By implementing these tips and techniques, you can optimize the usage of your RAM in Windows 10, resulting in improved system performance and responsiveness. Remember to periodically monitor your RAM usage and make necessary adjustments as required.
Now that you have learned various ways to optimize RAM usage in Windows 10, you can implement these techniques to ensure your system runs smoothly and efficiently. In the next section, we will conclude our guide on optimizing RAM usage in Windows 10.
Close unnecessary programs and processes
Closing unnecessary programs and processes is one of the simplest yet most effective ways to optimize your RAM usage in Windows 10. When you have multiple programs running simultaneously, they consume valuable memory resources, which can lead to high RAM usage and performance degradation. Closing these unnecessary programs and processes frees up RAM, allowing for smoother operation and better system performance.
To close unnecessary programs and processes, follow these steps:
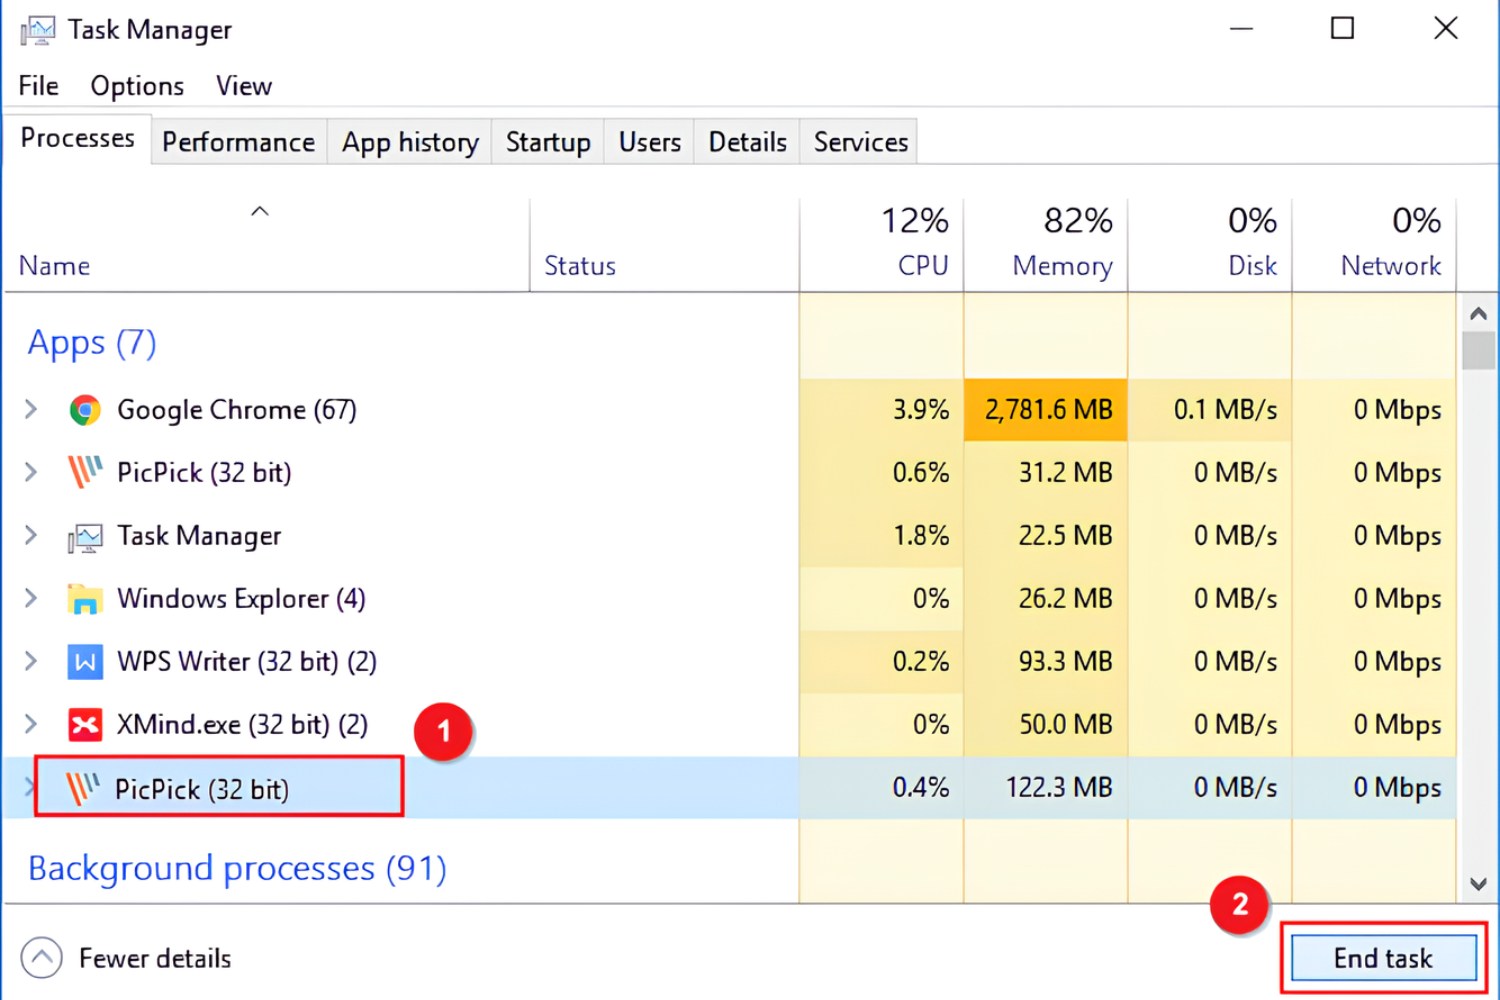
- Identify resource-hungry programs: Open the Task Manager by pressing “Ctrl + Shift + Esc” or by right-clicking the taskbar and selecting “Task Manager.” Switch to the “Processes” or “Details” tab (depending on your Windows version) to view the running processes and their corresponding resource usage.
- Sort processes by memory usage: Click on the “Memory” or “Memory Usage” column to sort the processes in descending order based on their memory usage. This will highlight the programs consuming the most memory.
- Close unnecessary programs: Identify programs that are not currently in use or that you can temporarily close. Right-click on the program and select “End Task” or “End Process” to close it. Exercise caution when closing processes, as terminating critical system processes can cause instability. Only close processes that you are familiar with or that are clearly unnecessary.
- Prevent programs from running in the background: Some programs continue to run in the background even after you close their windows. To prevent these programs from running automatically, open the settings or preferences of the respective program and disable any options related to background processes or automatic startup.
By closing unnecessary programs and processes, you can reclaim valuable memory resources, resulting in improved system performance and responsiveness. It’s a good practice to regularly check the Task Manager and close programs that you no longer need or that are using excessive memory.
Remember that some processes are essential for the operating system or specific applications to function correctly. Closing critical system processes or processes associated with important applications can cause errors or system instability. Exercise caution when terminating processes and ensure that they are unnecessary before closing them.
Now that you know how to close unnecessary programs and processes, you can take control of your RAM usage and optimize your Windows 10 system. In the next section, we will explore another technique to further optimize RAM usage by disabling startup programs.
Disable startup programs
Many programs are designed to launch automatically when you start your computer, running in the background and consuming valuable system resources, including RAM. Disabling unnecessary startup programs can free up memory and help optimize your RAM usage in Windows 10. By controlling which programs launch at startup, you can ensure that only essential applications are running, leading to faster boot times and improved system performance.
To disable startup programs, follow these steps:
- Open the Task Manager: Press “Ctrl + Shift + Esc” on your keyboard or right-click the taskbar and select “Task Manager.”
- Switch to the “Startup” tab: In the Task Manager window, click on the “Startup” tab. This will display a list of programs and their respective startup impact levels.
- Identify unnecessary startup programs: Review the list of programs and identify those that you don’t need to launch automatically at startup. Check the “Startup Impact” column to see how much impact each program has on your system’s startup time and resource usage.
- Disable unnecessary startup programs: Right-click on the program you want to disable and select “Disable.” This will prevent the program from launching automatically at startup. Repeat this step for all unnecessary programs.
It’s important to note that not all programs listed in the Startup tab are unnecessary. Some programs, such as antivirus software or essential system utilities, are crucial for the proper functioning of your computer. Exercise caution when disabling startup programs and ensure that you are familiar with the program and its purpose before disabling it.
Disabling unnecessary startup programs can not only free up memory but also improve your computer’s boot time. By reducing the number of programs that need to launch during startup, your system can start up faster and be ready for use more quickly.
It’s a good practice to periodically review your startup programs and disable any that are no longer needed or that have a high impact on system resources. This will help keep your system running efficiently and prevent unnecessary RAM usage.
Now that you know how to disable startup programs, you can take control of your system’s boot time and optimize your RAM usage. In the next section, we will explore another technique to optimize your RAM by clearing temporary and junk files.
Clear temporary and junk files
Temporary and junk files can accumulate on your computer over time and take up valuable disk space and memory. Clearing these files can help optimize your RAM usage in Windows 10 and improve system performance. By removing unnecessary files, you not only free up storage space but also ensure that your system operates more efficiently.
To clear temporary and junk files in Windows 10, you can follow these steps:
- Open the Disk Cleanup utility: Press the Windows key and type “Disk Cleanup” in the search bar. Click on the “Disk Cleanup” app from the search results.
- Select the drive to clean: In the Disk Cleanup utility, select the drive that you want to clean from the drop-down menu. Typically, this would be your system drive (usually labeled as “C:”).
- Scan and calculate disk space: Click on the “OK” button to start scanning the selected drive for temporary and junk files. The utility will calculate how much disk space can be freed.
- Select the files to delete: Once the scan is complete, you will see a list of files that can be deleted. Check the checkboxes next to the types of files you want to delete. These can include temporary files, system files, recycle bin files, and more.
- Start the cleanup process: Click on the “OK” or “Delete Files” button to start the cleanup process. The utility will delete the selected files, freeing up disk space and potentially improving system performance.
In addition to the Disk Cleanup utility, you can also use third-party software to clean temporary and junk files. These software solutions often provide more advanced cleaning options and additional features for optimizing system performance.
Regularly clearing temporary and junk files is essential to maintain a clean and efficient system. By removing unnecessary files, you can free up disk space and prevent them from using up valuable RAM resources. This can result in improved system performance, faster file access times, and a smoother overall user experience.
To ensure ongoing optimization, consider scheduling regular cleanups or using automation tools to perform these tasks automatically. This way, you can keep your system running smoothly without the buildup of unnecessary files impacting your RAM usage.
Now that you know how to clear temporary and junk files, you can optimize your RAM usage and improve your Windows 10 system’s performance. In the next section, we will explore how adjusting visual effects settings can further optimize your RAM usage.
Adjust visual effects settings
Adjusting visual effects settings in Windows 10 can have a significant impact on your system’s RAM usage and overall performance. Windows 10 offers various visual effects that enhance the appearance and functionality of the operating system, but these effects can consume valuable system resources, including RAM. By adjusting or disabling unnecessary visual effects, you can optimize your RAM usage and improve your system’s responsiveness.
Here’s how you can adjust visual effects settings in Windows 10:
- Open the System Properties: Right-click on the “This PC” or “My Computer” icon on your desktop and select “Properties.”
- Access the Performance Settings: In the System Properties window, click on the “Advanced system settings” link. This will open the System Properties dialog box.
- Access the Visual Effects settings: In the System Properties dialog box, click on the “Settings” button under the “Performance” section. This will open the Performance Options window.
- Choose visual effects options: In the Performance Options window, you can choose between different options for visual effects. You can either select “Adjust for best performance” to disable all visual effects or choose the “Custom” option to manually enable or disable specific effects.
- Customize visual effects: If you choose the “Custom” option, you can go through the list of visual effects and uncheck the ones you want to disable. You can disable effects such as animations, transparency, shadows, and more.
- Apply the changes: Once you have made your desired changes, click on the “Apply” button to save the settings. You will notice an immediate change in the appearance of your system if you disable certain visual effects.
By adjusting visual effects settings, you can reduce the demand on your system’s resources, including RAM. This can result in improved system performance, faster application response times, and smoother navigation. However, keep in mind that disabling visual effects may affect the aesthetics and certain functionalities of Windows 10. It’s a matter of finding the right balance between performance and visual appeal.
Experiment with different settings and monitor the impact on your system’s resource usage to find the configuration that suits your needs best. You can always revisit the visual effects settings to make further adjustments if necessary.
Now that you know how to adjust visual effects settings in Windows 10, you can optimize your RAM usage and improve your system’s performance. In the next section, we will explore how to utilize the Windows built-in Performance Monitor to fine-tune your system’s resource usage.
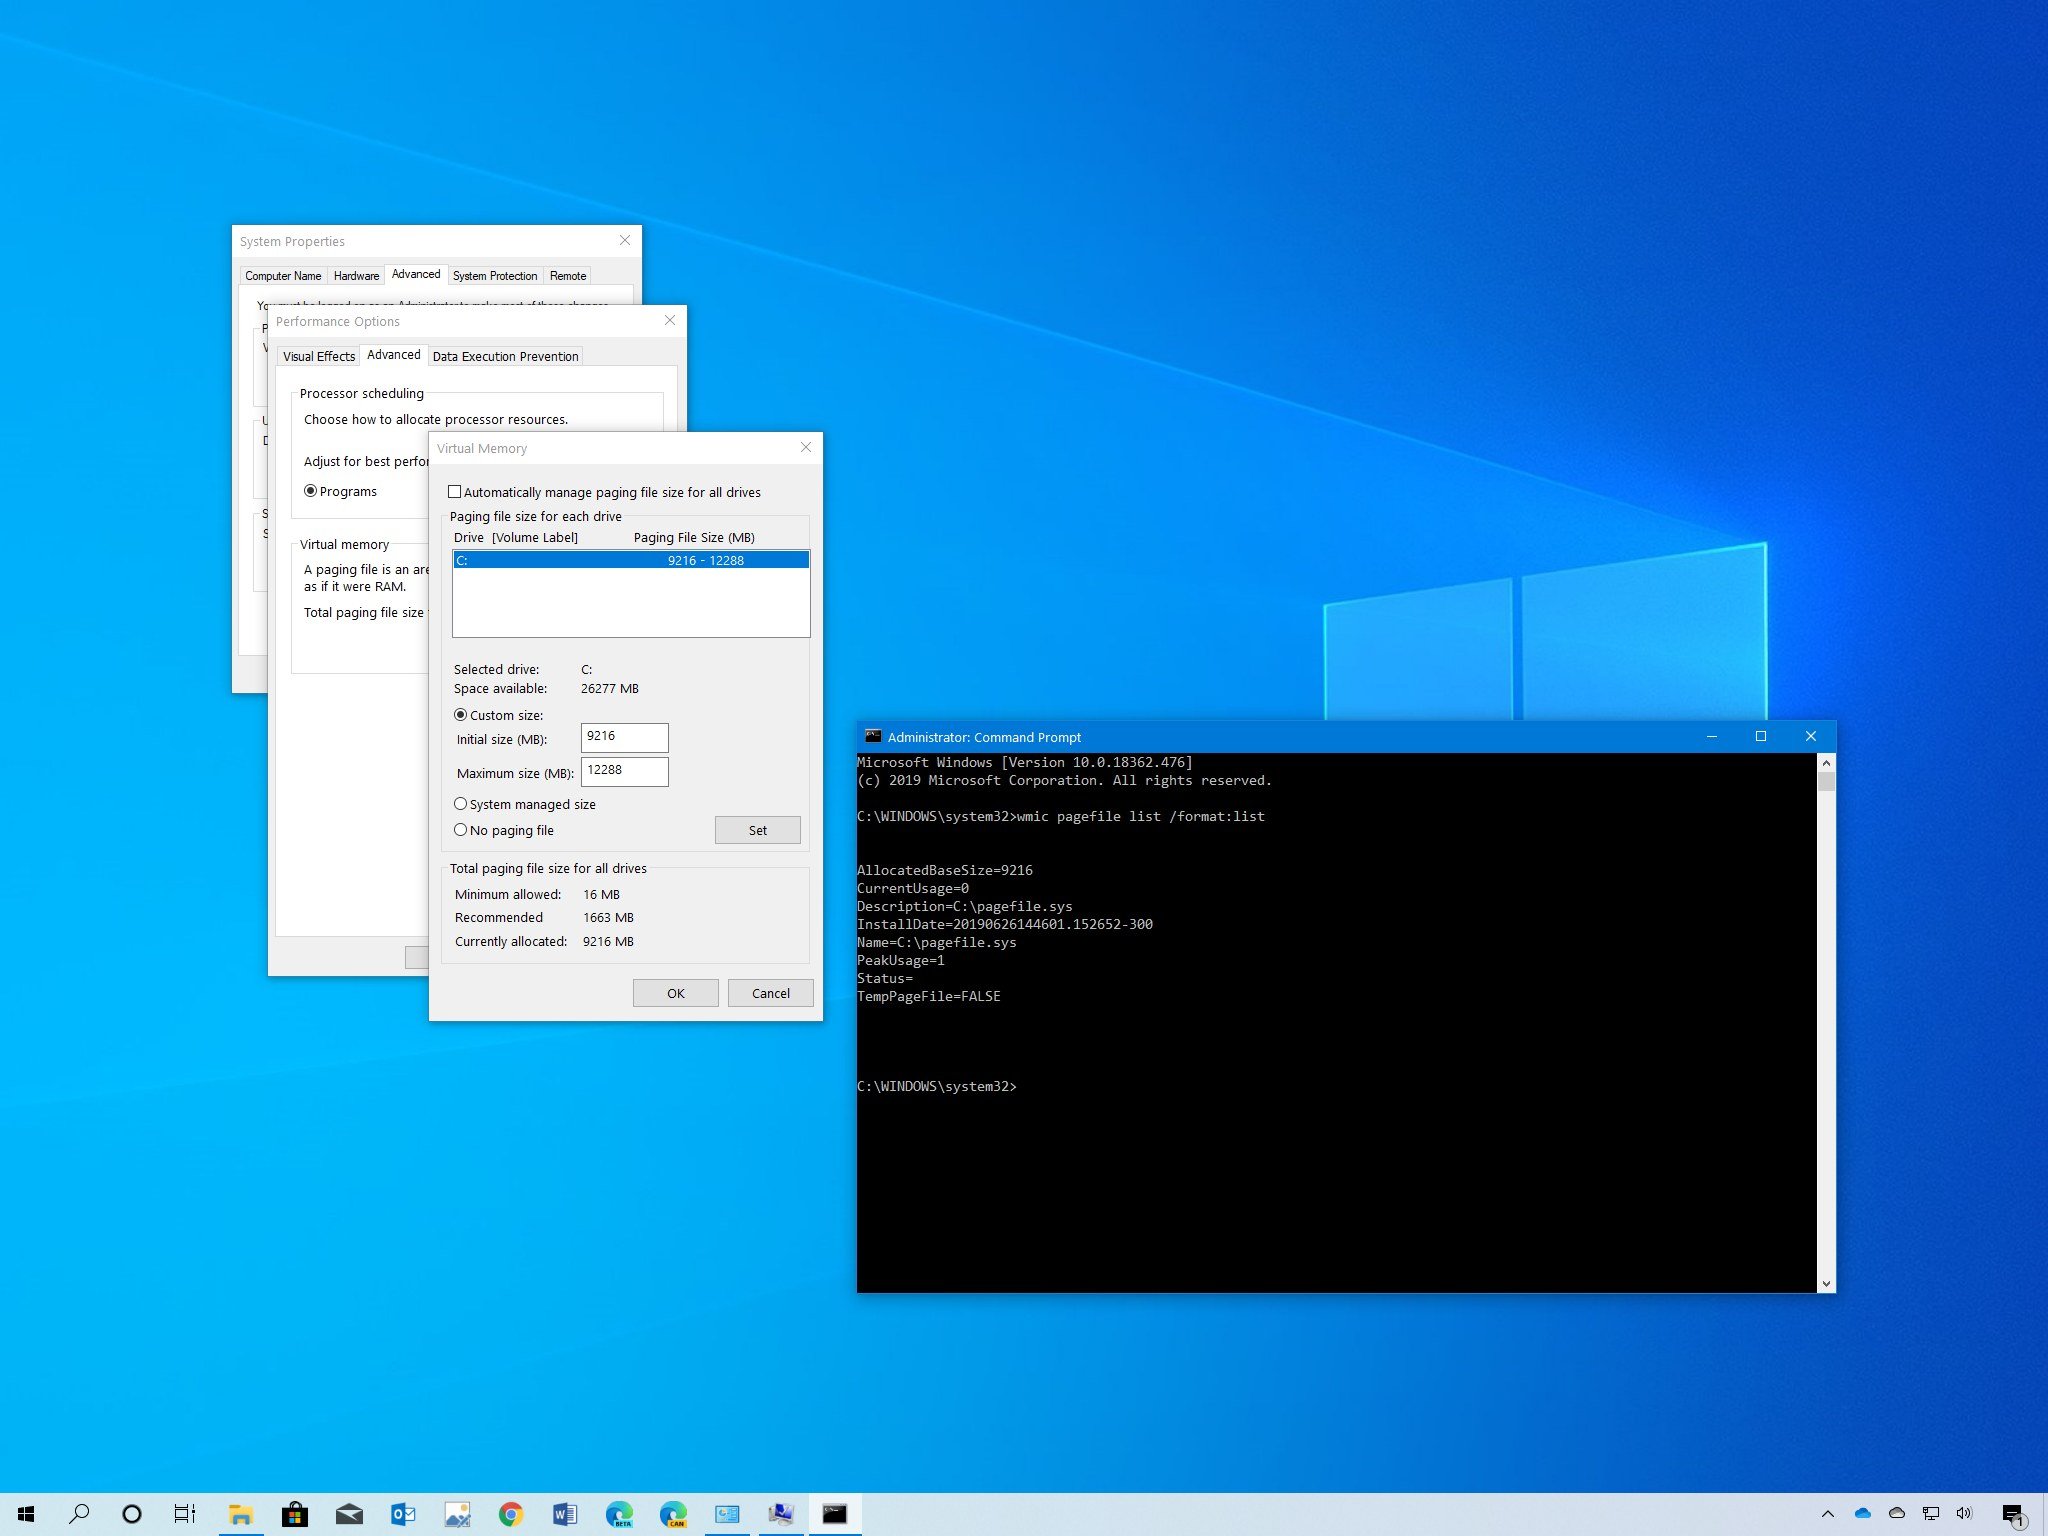
Use the Windows built-in Performance Monitor
The Windows built-in Performance Monitor is a powerful tool that provides detailed information about your system’s resource usage, including RAM. By utilizing the Performance Monitor, you can monitor and analyze your system’s performance, identify resource-hungry processes, and make informed decisions to optimize your RAM usage in Windows 10.
Here’s how you can use the Performance Monitor in Windows 10:
- Open the Performance Monitor: Press the Windows key and type “Performance Monitor” in the search bar. Click on the “Performance Monitor” app from the search results.
- View performance counters: In the Performance Monitor window, you will see a real-time graph displaying various performance counters. By default, it shows the overall system performance, but you can customize the counters to display specific information.
- Add performance counters: To add specific performance counters, click on the green “+” icon or right-click on the graph and select “Add Counters.” This will open the Add Counters window where you can choose the counters you want to monitor, such as “Available Memory,” “Pages/sec,” or “Page Faults/sec.”
- Analyze performance data: As you add performance counters, the graph will update to display the selected data. You can observe the trends, spikes, or drops in resource usage, including RAM usage, to identify any abnormal patterns or potential bottlenecks.
- Save and view performance logs: Performance Monitor allows you to save performance data as logs for future analysis. Click on the “Log Data” button to start logging the performance data. You can then view the saved logs by clicking on the “View Log Data” button.
By using the Performance Monitor, you can gain insights into your system’s resource usage and identify any processes or applications that are consuming excessive memory. With this information, you can make informed decisions to optimize your RAM usage, such as closing memory-hogging applications or adjusting system settings.
Taking the time to monitor and analyze performance data using the Performance Monitor can help you identify potential performance bottlenecks, troubleshoot issues, and fine-tune your system for optimal resource usage. Regularly checking the Performance Monitor and addressing any abnormalities can result in better system performance and improved RAM optimization.
Now that you know how to use the Windows built-in Performance Monitor, you can gain deeper insights into your system’s resource usage and make informed decisions to optimize your RAM usage. In the next section, we will discuss the “ReadyBoost” feature and how it can further enhance your system’s memory performance.
Enable the “ReadyBoost” feature
The “ReadyBoost” feature in Windows 10 allows you to utilize external USB drives or flash drives as additional cache memory, which can help improve system performance and reduce the reliance on virtual memory. By enabling ReadyBoost, you can optimize your RAM usage and enhance the overall memory performance of your Windows 10 system.
Here’s how you can enable the ReadyBoost feature:
- Connect your USB drive: Insert your USB drive into an available USB port on your computer. Make sure it has sufficient free space, ideally at least twice the size of your computer’s RAM.
- Open File Explorer: Press the Windows key and E together on your keyboard to open File Explorer.
- Right-click the USB drive: In File Explorer, right-click on the USB drive and select “Properties” from the context menu.
- Enable ReadyBoost: In the Properties window, go to the “ReadyBoost” tab. Check the option that says “Use this device,” and adjust the slider to allocate the desired amount of space on the USB drive for caching.
- Apply the changes: Once you’ve selected the desired space allocation, click on the “Apply” button and then “OK” to save the settings and enable ReadyBoost.
By enabling ReadyBoost and using an external USB drive as additional cache memory, your system can access frequently used data faster, reducing the need for excessive paging to the hard drive. This can lead to improved system performance, especially when you have limited RAM or are working with memory-intensive applications.
It’s important to note that ReadyBoost works best when you use a high-speed USB drive with sufficient free space. Moreover, the actual performance boost you experience will vary depending on factors like your system’s RAM size, CPU speed, and type of applications you use. ReadyBoost is most effective when you have limited physical RAM or are using a traditional hard drive rather than an SSD.
If you find that ReadyBoost doesn’t provide significant performance improvements or if you’re already using an SSD as your primary storage device, you may not see noticeable benefits from enabling ReadyBoost.
Now that you know how to enable the ReadyBoost feature in Windows 10, you can optimize your RAM usage by utilizing an external USB drive as additional cache memory. In the next section, we will discuss the option of upgrading your RAM to further enhance system performance.
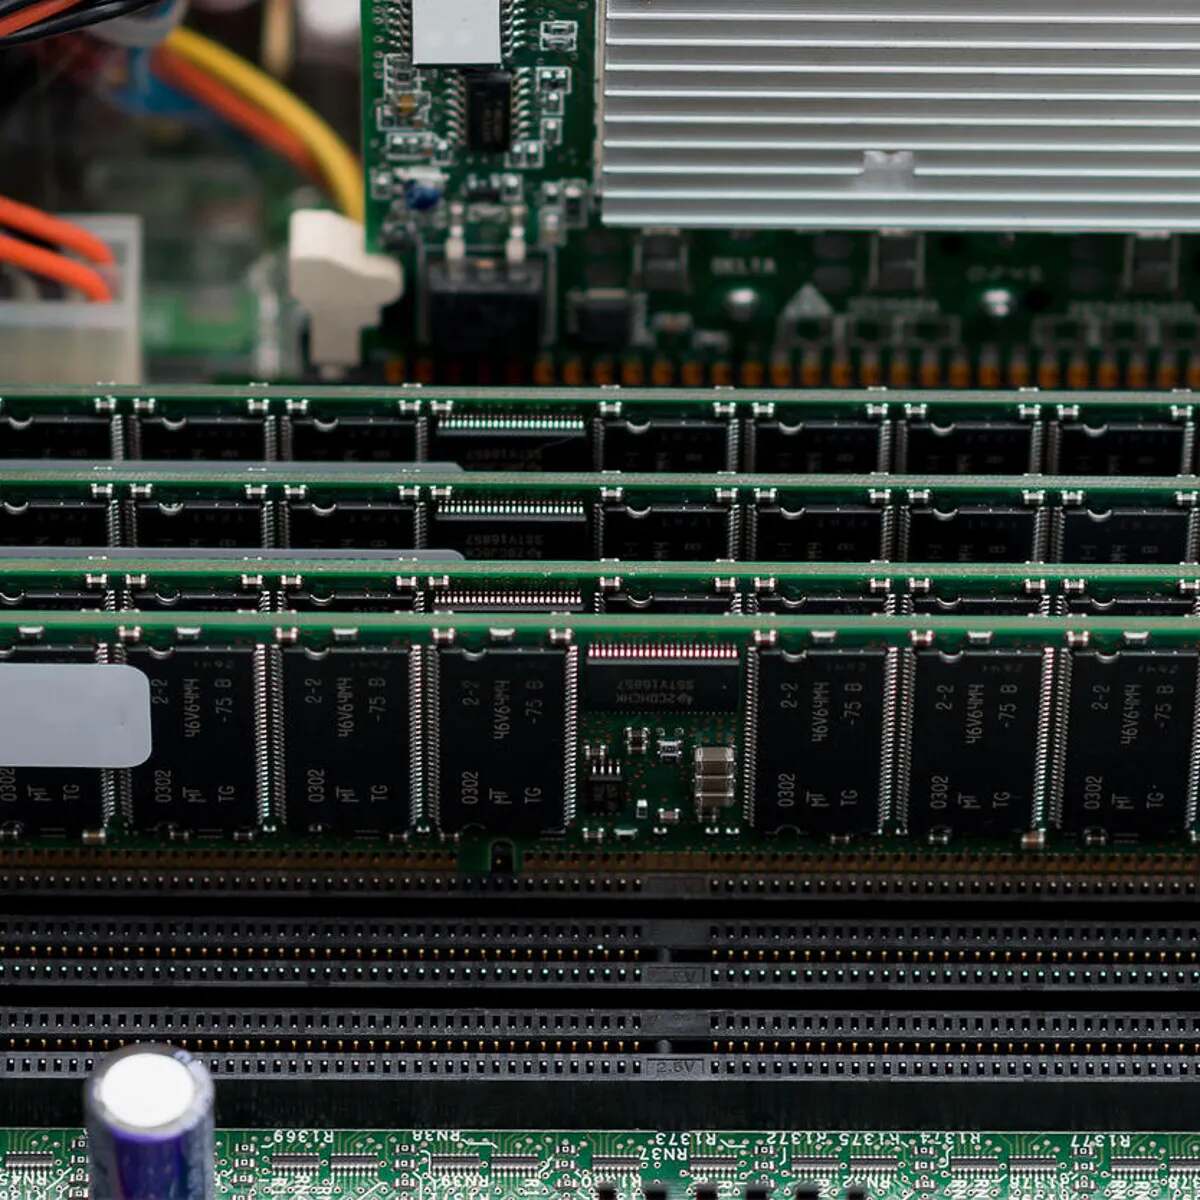
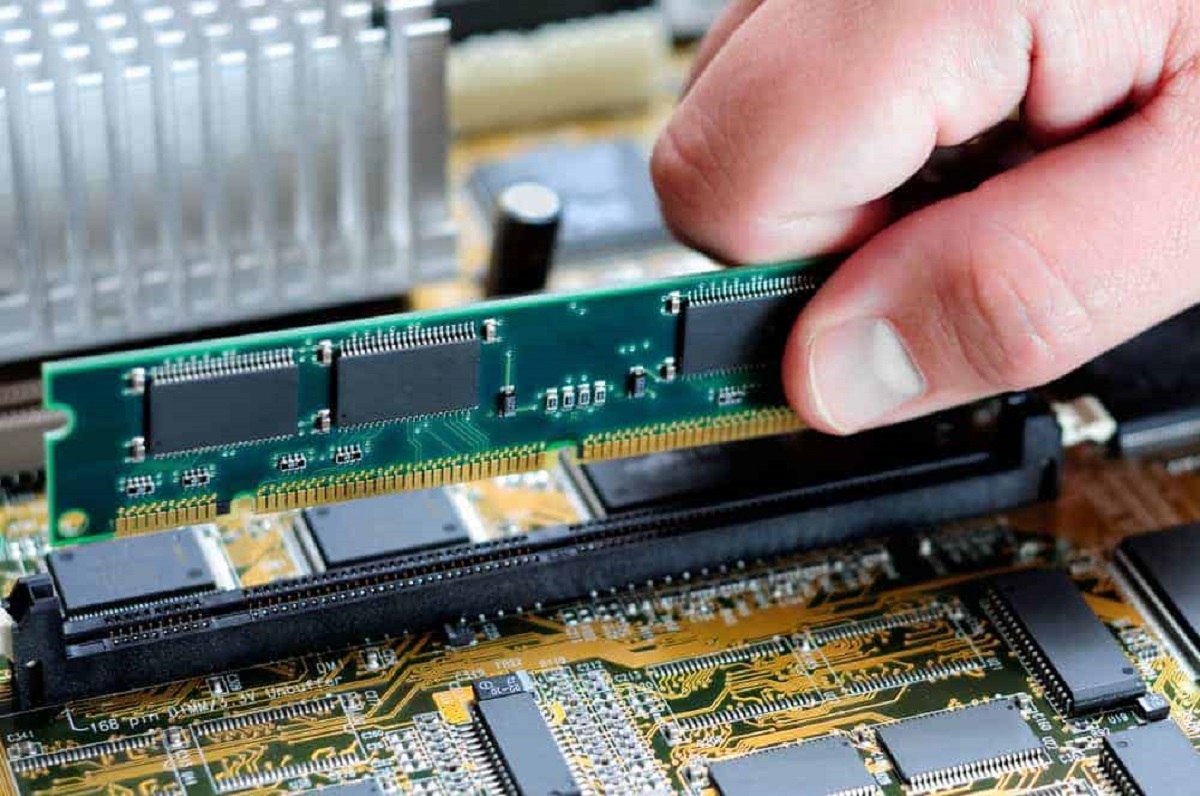
Upgrade your RAM
If you find that your system consistently runs low on memory and you’re experiencing performance issues, upgrading your RAM can be an effective solution. Adding more RAM to your computer allows it to handle a larger number of programs and processes simultaneously, resulting in improved multitasking capabilities, faster application response times, and smoother overall performance.
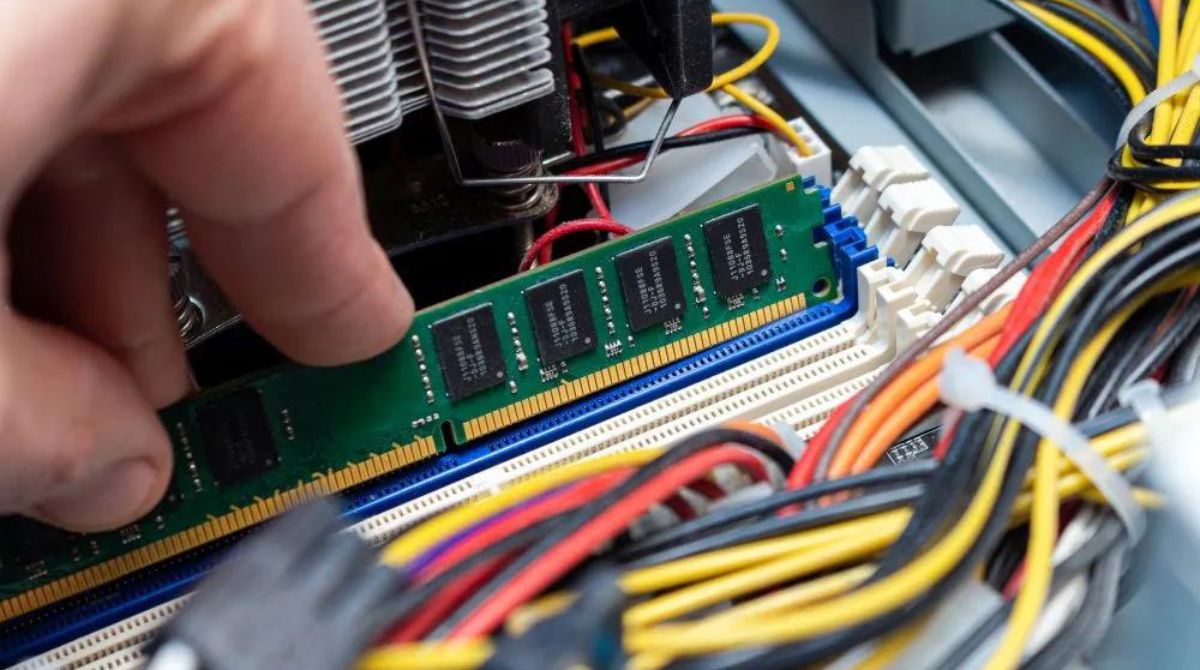
Here are the steps to upgrade your RAM:
- Determine the type and maximum capacity: Check your computer’s documentation or use system information tools to determine the type of RAM supported by your system and the maximum capacity it can handle.
- Purchase the appropriate RAM: Once you know the type and maximum capacity, purchase the suitable RAM modules from a reliable vendor. Consider factors like speed, capacity, and compatibility with your motherboard.
- Power off your computer and unplug it: Before installing the new RAM, ensure that your computer is turned off and disconnected from the power source.
- Locate the RAM slots: Open your computer case and locate the RAM slots on your motherboard. Depending on your system, you may have multiple slots.
- Insert the new RAM modules: Gently insert the new RAM modules into the matching slots on the motherboard. Make sure they are securely seated in the slots until they click into place.
- Power on your computer and verify the new RAM: Reassemble your computer, plug it back in, and power it on. Verify that the new RAM is recognized by your system by checking the system information or using diagnostic tools.
Upgrading your RAM can provide a substantial boost to your system’s performance, especially when you’re running memory-intensive applications or working with large files. It allows your computer to store more data in memory, reducing the reliance on slower storage devices like hard drives or SSDs for virtual memory.
Before purchasing new RAM modules, make sure to check compatibility with your system and consider your specific needs. If you’re unsure about the upgrade process or need assistance, consult the documentation provided with your computer or seek professional help.
Remember that upgrading your RAM is dependent on your system’s capabilities. Some devices, like certain laptops or compact computers, may have limited upgrade potential due to hardware or physical restrictions. In such cases, it may be worthwhile to consider other optimization techniques or consider upgrading to a more powerful system.
By upgrading your RAM, you can significantly enhance your system’s performance and optimize its RAM usage. It’s an investment that can help future-proof your computer and ensure it can handle demanding tasks and applications.
With the completion of this final section, you now have a comprehensive understanding of various techniques to optimize RAM usage in Windows 10. By following these tips and employing the appropriate optimizations, you can enjoy a smoother experience and maximize the performance of your system.
Conclusion
Optimizing RAM usage in Windows 10 is essential for achieving better performance and ensuring the smooth operation of your computer. RAM plays a vital role in storing and accessing data quickly, and inefficient RAM usage can lead to sluggishness, freezing, and crashes. By following the tips and techniques provided in this guide, you can effectively optimize your RAM usage and improve your system’s overall performance.
Throughout this guide, we have covered several key techniques to optimize RAM usage in Windows 10. We started by understanding the importance of RAM and its role in system performance. We then explored methods to check your current RAM usage, including identifying resource-hungry programs and processes. Next, we learned various tips, such as closing unnecessary programs, disabling startup programs, clearing temporary and junk files, adjusting visual effects settings, utilizing the Performance Monitor, enabling the ReadyBoost feature, and upgrading your RAM.
By implementing these techniques, you can free up valuable memory resources, reduce unnecessary CPU usage, and enhance your system’s responsiveness. With optimized RAM usage, you can enjoy faster program loading times, improved multitasking capabilities, and a smoother user experience.
It’s important to remember that optimizing RAM usage is just one part of overall system maintenance. Regularly updating your operating system, drivers, and applications, as well as performing routine maintenance tasks like disk defragmentation and malware scans, are also crucial for optimal performance.
In conclusion, optimizing RAM usage in Windows 10 can have a significant impact on your computer’s performance. By closing unnecessary programs, disabling startup programs, clearing temporary files, adjusting visual effects, utilizing performance monitoring tools, enabling ReadyBoost, and considering RAM upgrades, you can maximize your system’s resources and enjoy a fast and efficient computing experience.
We hope that this guide has provided you with valuable insights and practical techniques to optimize your RAM usage in Windows 10. By implementing these strategies, you can take control of your system’s performance and ensure that it operates at its best. Remember to regularly assess your RAM usage, make necessary adjustments, and stay proactive in maintaining a healthy, optimized system.