Introduction
Checking the RAM memory on your Windows 10 computer is essential for monitoring system performance and troubleshooting any related issues. RAM (Random Access Memory) plays a crucial role in ensuring smooth multitasking and efficient program execution. By understanding how much RAM is currently being used and available, you can make informed decisions about performance optimization and upgrading your system’s memory capacity if necessary.
In this article, we will explore different methods to check the RAM memory on your Windows 10 computer. Whether you prefer using built-in tools or third-party applications, there are various options available to suit your needs. By following these methods, you can easily access detailed information about your computer’s memory usage, including total capacity, speed, and usage statistics. Understanding these details will help you troubleshoot system slowdowns, identify memory-intensive applications, and make informed decisions about upgrading your RAM.
Now, let’s dive into the methods you can use to check the RAM memory on your Windows 10 computer. Whether you’re a novice or an experienced user, you’ll find these methods helpful in gaining insights into your computer’s memory usage and optimizing its performance.
Method 1: Using Task Manager
The Task Manager is a built-in tool in Windows 10 that allows you to monitor various aspects of your computer’s performance, including memory usage. Follow these steps to check the RAM memory using Task Manager:
- Open the Task Manager by right-clicking on the taskbar and selecting “Task Manager” from the menu that appears.
- Once the Task Manager window is open, click on the “Performance” tab located at the top of the window.
- In the Performance tab, you’ll see multiple categories listed on the left-hand side. Click on “Memory” to view detailed information about your RAM usage.
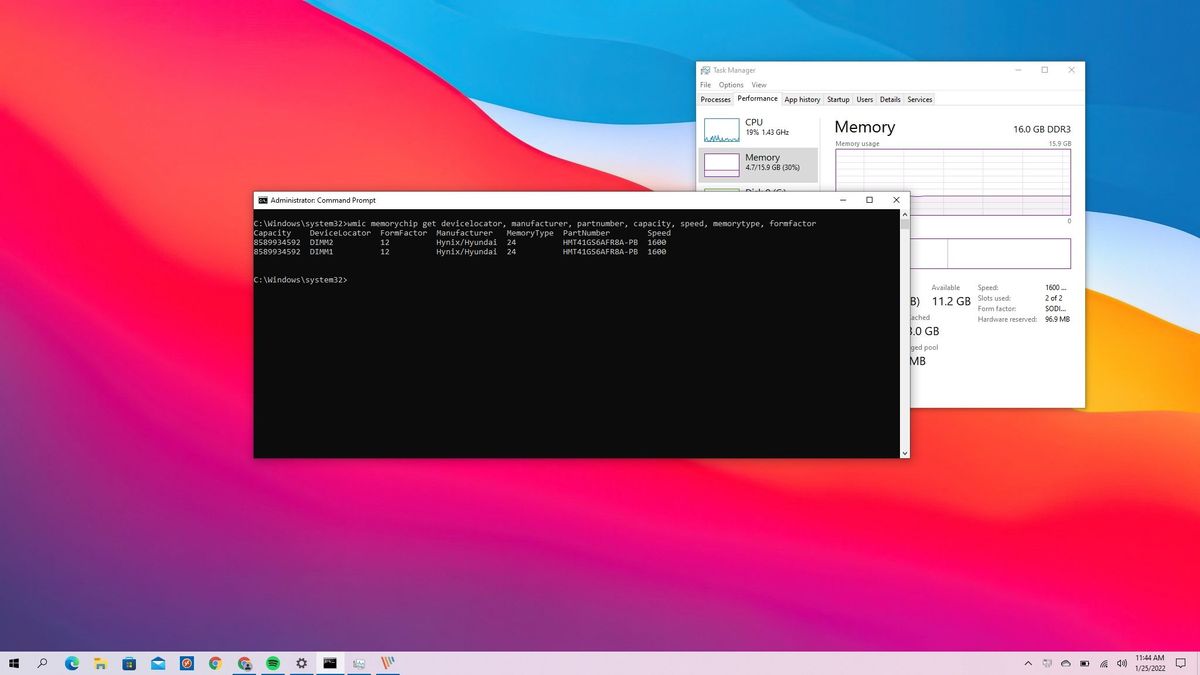
- Here, you can see the total amount of RAM installed on your system, as well as the amount currently in use, and the amount available. You can also view a graphical representation of the memory usage over time.
- If you want more detailed information, click on the “Open Resource Monitor” link at the bottom of the Task Manager window. This will open the Resource Monitor, which provides detailed insights into memory usage by individual processes and services.
Using Task Manager to check the RAM memory is quick and convenient. It provides a real-time snapshot of your computer’s memory usage, allowing you to identify any abnormal memory usage patterns. By monitoring the memory usage in Task Manager, you can also determine if any applications or processes are consuming excessive memory resources and take appropriate actions, such as closing unnecessary programs or upgrading your RAM capacity.
Method 2: Using System Information
Another method to check the RAM memory on your Windows 10 computer is by using the built-in System Information tool. This tool provides detailed information about your system’s hardware, including memory configuration. Follow these steps to access the System Information tool:
- Press the Windows key + R to open the Run dialog box. Type “msinfo32” and press Enter. This will launch the System Information tool.
- In the System Information window, you’ll see various categories listed on the left-hand side. Expand the “Components” category, and then click on “Memory” to view detailed information about your RAM.
- On the right-hand side, you’ll find information about the installed physical memory, including the total capacity, available capacity, and speed of the RAM modules. You can also find information about the system’s virtual memory settings.
- If you’re interested in more detailed information, you can explore other categories in the System Information tool to learn about other aspects of your computer’s hardware configuration.
The System Information tool is a comprehensive solution for checking not only your RAM memory but also other hardware components. It provides a detailed overview of your system’s configuration, allowing you to troubleshoot hardware-related issues and plan upgrades effectively.
Method 3: Using DirectX Diagnostic Tool
If you’re looking for a detailed overview of your system’s memory, including graphics memory, you can use the DirectX Diagnostic Tool. This tool is especially useful for gamers or users working with graphics-intensive applications. Here’s how you can check the RAM memory using the DirectX Diagnostic Tool:
- Press the Windows key + R to open the Run dialog box. Type “dxdiag” and press Enter. This will launch the DirectX Diagnostic Tool.
- In the DirectX Diagnostic Tool window, you’ll see several tabs at the top. Click on the “Display” tab to access information related to your graphics card and memory.
- Under the “Display” tab, you’ll find information about your system’s graphics card, including the total available memory and memory dedicated to graphics.
- To view information about your system’s RAM memory, click on the “System” tab. Here, you’ll find details about your RAM capacity, as well as the current usage.
- The DirectX Diagnostic Tool also provides additional tools and information related to audio, input devices, and more. You can explore these tabs to gain a comprehensive understanding of your system’s performance.
Using the DirectX Diagnostic Tool to check the RAM memory provides a more specialized view, particularly for users interested in gaming or graphic-intensive tasks. It allows you to monitor both graphics memory and system RAM, ensuring you have a complete picture of your computer’s memory resources.
Method 4: Using PowerShell
PowerShell is a powerful command-line tool in Windows 10 that allows you to perform various administrative tasks, including checking the RAM memory on your computer. Here’s how you can use PowerShell to check your RAM memory:
- Open PowerShell by pressing the Windows key + X and selecting “Windows PowerShell” or “Windows PowerShell (Admin)” from the menu.
- In the PowerShell window, type the following command and press Enter:
Get-CimInstance -ClassName Win32_PhysicalMemory | Measure-Object -Property Capacity -Sum - After running the command, you’ll see the total physical memory installed on your computer, expressed in bytes. You can easily convert the value to a more user-friendly format using online conversion tools or PowerShell commands.
- If you want a more detailed view of your memory, you can use the following command instead:
Get-WmiObject -Class Win32_PhysicalMemory | Select-Object BankLabel, Capacity, DeviceLocator, PartNumber, Speed - Running this command will provide information about each physical memory module, including the label, capacity, device locator, part number, and speed.
Using PowerShell to check the RAM memory gives you a flexible and powerful approach. It allows you to access detailed information about your memory modules, helping you make informed decisions about upgrading or troubleshooting any memory-related issues on your Windows 10 computer.
Conclusion
Checking the RAM memory on your Windows 10 computer is crucial for monitoring system performance and troubleshooting any related issues. By using the methods outlined in this article, you can easily access detailed information about your computer’s memory usage, including the total capacity, speed, and usage statistics. Understanding these details will help you make informed decisions about performance optimization and upgrading your system’s memory capacity if necessary.
The Task Manager provides a quick and convenient way to check the RAM memory, offering a real-time snapshot of your computer’s memory usage. The System Information tool offers a comprehensive solution, allowing you to access detailed hardware configuration information, including memory settings. The DirectX Diagnostic Tool provides a specialized view, particularly useful for gamers and users working with graphics-intensive applications, by offering information on both graphics memory and system RAM. Lastly, PowerShell offers a powerful and flexible command-line approach to checking the RAM memory, providing detailed information about memory modules.
By regularly checking your RAM memory, you can identify any abnormal memory usage patterns, troubleshoot system slowdowns, and make informed decisions about upgrading your RAM capacity if needed. A well-optimized and properly functioning RAM memory is essential for achieving optimal performance and a smooth user experience on your Windows 10 computer.