Introduction
Your computer’s RAM (Random Access Memory) plays a crucial role in the overall performance and speed of your system. It acts as the temporary storage for data and instructions that are actively being used by your computer’s processor. When it comes to checking the speed of your RAM on Windows 10, there are various methods that you can utilize to get accurate information.
By determining your RAM speed, you can better understand the capabilities of your system and optimize its performance accordingly. Whether you are a gamer looking to ensure maximum frame rates or a power user working with resource-intensive applications, knowing your RAM speed can help you make informed decisions.
In this article, we will explore three different methods to check your RAM speed on Windows 10. These methods include using Task Manager, Command Prompt, and System Information. Each method offers a unique approach to obtaining your RAM speed, allowing you to choose the one that suits your preferences.
By following the steps outlined in this article, you will be able to determine your RAM speed with ease. Whether you want to verify the default RAM speed or find out if any overclocking settings have been applied, these methods will provide you with the necessary information.
Without further ado, let’s dive into the different ways you can check your RAM speed on Windows 10!
Checking RAM Speed using Task Manager
Task Manager is a built-in utility in Windows 10 that provides a comprehensive overview of the processes and performance of your system. It also allows you to monitor the usage of various system resources, including your RAM. Here’s how you can check your RAM speed using Task Manager:
- Open Task Manager by right-clicking on the taskbar and selecting “Task Manager” from the context menu.
- Once Task Manager is open, click on the “Performance” tab at the top.
- In the left-hand sidebar, select “Memory” to view detailed information about your RAM.
- Look for the “Speed” indication under “Memory Composition.” This will display the speed of your RAM in megahertz (MHz).
Task Manager provides a quick and easy way to check your RAM speed without the need for any additional software. Keep in mind that the values displayed may vary depending on your specific hardware configuration.
Using this method, you can quickly determine the speed of your RAM and compare it to the advertised specifications. Additionally, you can use Task Manager to monitor the usage and performance of your RAM in real-time, allowing you to identify any potential issues or bottlenecks.
Now that you know how to check your RAM speed using Task Manager, let’s explore another method to gather this information using Command Prompt.
Checking RAM Speed using Command Prompt
Another method to check your RAM speed on Windows 10 is by using the Command Prompt. This method provides a detailed look at your system information, including your RAM speed. Follow these steps to check your RAM speed using Command Prompt:
- Open the Command Prompt by typing “cmd” into the Windows search bar and selecting “Command Prompt” from the results.
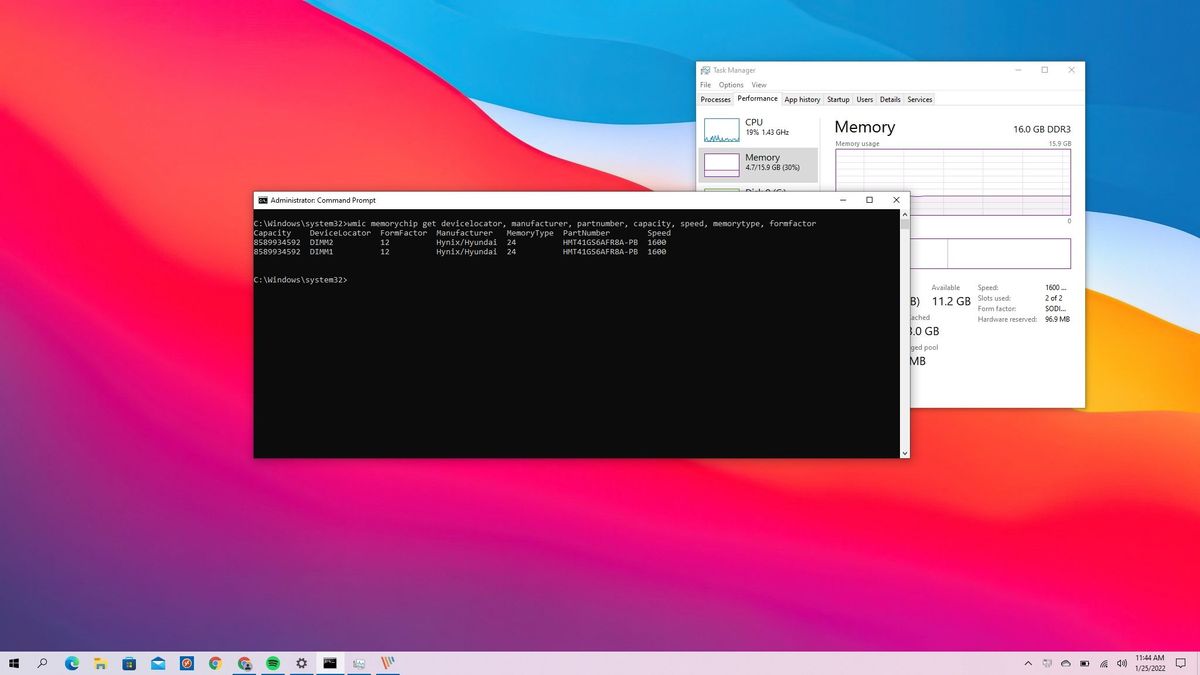
- Once the Command Prompt window is open, type the following command and press Enter:
wmic memorychip get speed - After executing the command, you will see a list of RAM modules installed on your system along with their respective speeds displayed in megahertz (MHz).
This command provides valuable information about your RAM modules, including their speeds. It allows you to check each module individually, making it useful if you have multiple RAM sticks installed in your computer.
By using the Command Prompt method, you can quickly access detailed information about your RAM speed without the need for any third-party tools. It provides a convenient way to verify the speed of your RAM and ensure that it is functioning at its optimal level.
Now that you are familiar with how to check your RAM speed using Command Prompt, let’s explore an additional method using the System Information utility.
Checking RAM Speed using System Information
The System Information utility in Windows provides a comprehensive view of your computer’s hardware and software configuration. It also allows you to check various system details, including your RAM speed. Follow these steps to check your RAM speed using System Information:
- Open the Start menu and search for “System Information”. Click on the corresponding search result to launch the utility.
- In the System Information window, navigate to the “System Summary” section in the left-hand sidebar.
- Scroll down the list of displayed information until you find the “Installed Physical Memory (RAM)” section.
- Next to the “Speed” entry, you will see the speed of your RAM modules displayed in megahertz (MHz).
The System Information utility provides a user-friendly interface to access detailed information about your computer’s hardware, including your RAM speed. This method allows you to quickly check the speed of your RAM without the need for command-line prompts or external tools.
By utilizing the System Information utility, you can gain valuable insights into your system’s RAM speed and ensure that it meets your requirements for optimal performance.
Now that you have learned how to check your RAM speed using System Information, you are well-equipped with multiple methods to gather this essential information on your Windows 10 device.
Conclusion
Checking your RAM speed on Windows 10 is a straightforward process that can be accomplished using various methods. By understanding the speed of your RAM, you can make informed decisions to optimize your system’s performance and ensure compatibility with resource-intensive applications.
In this article, we explored three different methods to check your RAM speed on Windows 10. The first method involved using Task Manager, a built-in utility that provides real-time performance monitoring and displays the RAM speed under the “Memory” section.
The second method utilized the Command Prompt, where executing the command “wmic memorychip get speed” allows you to access detailed information about each RAM module’s speed.
Lastly, we discussed using the System Information utility, which provides a user-friendly interface to access comprehensive information about your system’s hardware, including the RAM speed.
By incorporating these methods into your troubleshooting and optimization routines, you can effectively monitor and evaluate your RAM speed, ensuring that your system runs at its full potential.
Remember, understanding your RAM speed is crucial for tasks such as gaming, content creation, and running resource-intensive applications. By regularly checking your RAM speed, you can make educated decisions about potential upgrades or optimizations to enhance your computing experience.
Now that you are equipped with the knowledge of how to check your RAM speed on Windows 10, go ahead and try out these methods to gain valuable insights into your system’s performance. Whether you prefer using Task Manager, Command Prompt, or the System Information utility, each method offers a convenient way to access the information you need.
So, what are you waiting for? Start exploring the world of RAM speed and unlock the full potential of your Windows 10 system!