Introduction
Welcome to this guide on how to see CPU temperature in Windows 10. Monitoring your CPU’s temperature is crucial for optimizing performance, preventing overheating, and ensuring the longevity of your computer hardware. By knowing the temperature of your CPU, you can take appropriate actions such as adjusting fan speeds, upgrading cooling solutions, or identifying any issues that may be causing high temperatures.
In this article, we will explore various methods to effectively monitor and check the CPU temperature in Windows 10. Whether you prefer using built-in tools like Task Manager and PowerShell or opting for third-party software, we have you covered. Let’s dive into the different methods and find out which one works best for you.
Please note that the methods mentioned here are specifically for Windows 10. However, some of them may also work on older versions of Windows, albeit with slightly different steps. It’s always a good idea to keep an eye on your CPU temperature, especially if you frequently run resource-intensive tasks or experience performance issues.
If you’re ready, let’s start exploring the methods to monitor CPU temperature in Windows 10. Whether you’re an experienced user or a beginner, you’ll find the following steps straightforward and easy to follow. Let’s get started!
Method 1: Using Task Manager
One of the easiest ways to check the CPU temperature in Windows 10 is by using the built-in Task Manager. Task Manager provides valuable system information, including CPU usage and temperature. Here’s how you can use Task Manager to monitor your CPU temperature:
- Right-click on the taskbar and select “Task Manager” from the context menu.
- In the Task Manager window, click on the “Performance” tab.
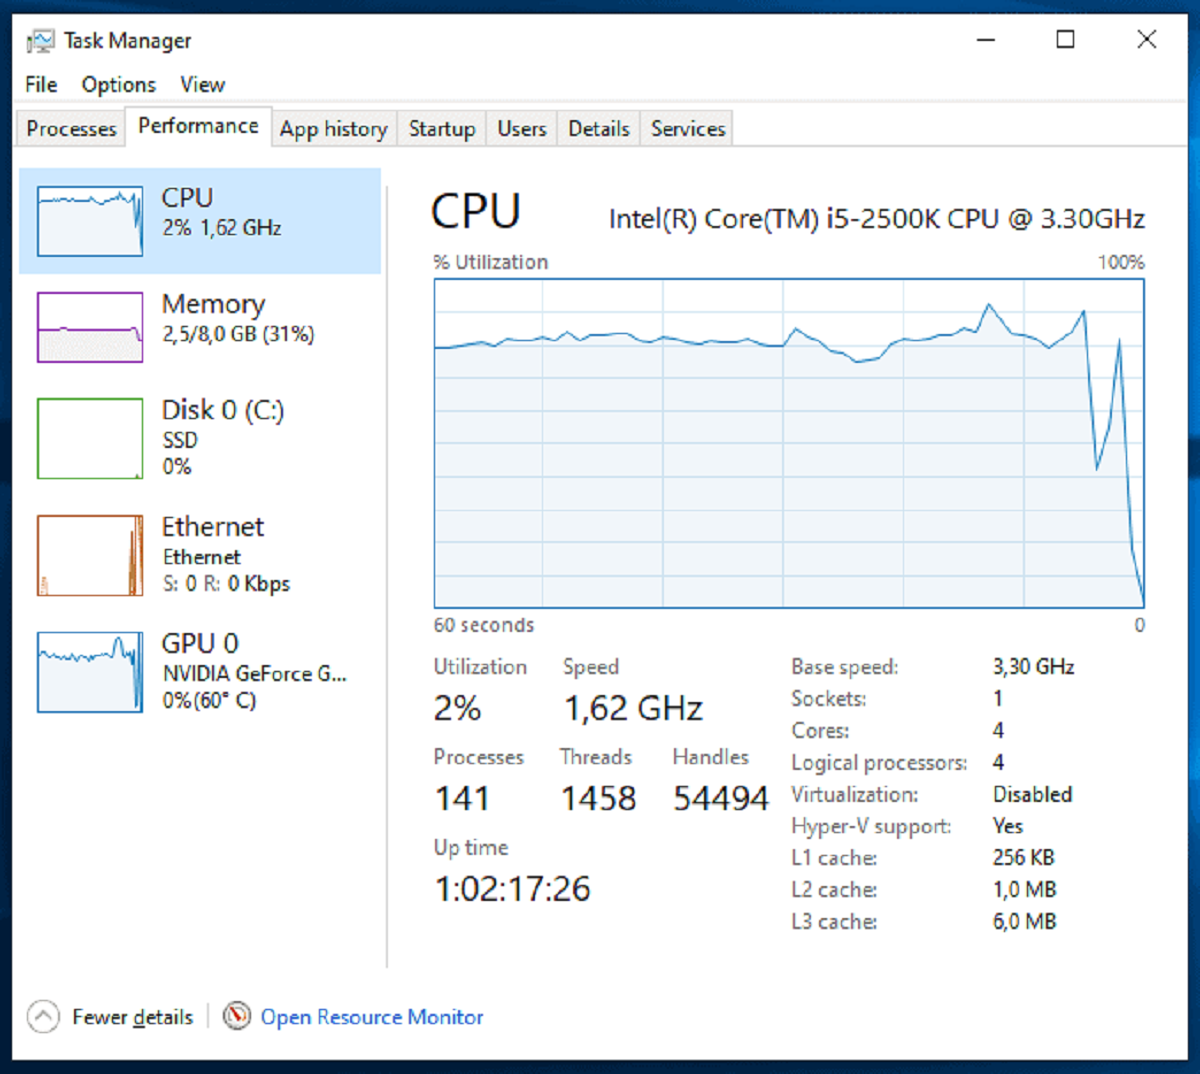
- Under the “Performance” tab, you will find various tabs such as CPU, Memory, Disk, and more. Click on the “CPU” tab.
- In the CPU tab, you will find real-time information about your CPU, including CPU usage and temperature. The temperature is displayed in Celsius (°C).
- If you want to monitor the CPU temperature continuously, you can keep the Task Manager window open while you use your computer. You can also resize the window or move it to a convenient location on your screen.
Task Manager provides a quick and easy way to monitor your CPU temperature without the need for any additional software. It is especially useful if you just want to check the temperature occasionally or if you prefer using native Windows tools. However, it’s worth noting that the temperature readings in Task Manager may not be as accurate as those obtained from specialized software.
Now that you know how to check the CPU temperature using Task Manager, let’s move on to the next method.
Method 2: Using BIOS
Another method to check the CPU temperature is by accessing the BIOS (Basic Input/Output System) settings of your computer. The BIOS provides low-level hardware control including temperature monitoring capabilities. Here’s how you can check the CPU temperature using the BIOS:
- Restart your computer.
- During the startup process, before the Windows logo appears, press a specific key (usually Del, F2, or Esc) to enter the BIOS settings. The key may vary depending on your computer’s manufacturer.
- Once you are in the BIOS settings, navigate using the arrow keys on your keyboard to find the “Hardware Monitor”, “PC Health”, or similar section.
- In this section, you should be able to see the current CPU temperature. The temperature is usually displayed in Celsius (°C).
- Take note of the temperature readings or any temperature thresholds set in the BIOS. This information can help you identify if your CPU is running at an optimal temperature or if it’s nearing critical levels.
- Exit the BIOS settings by following the on-screen instructions or pressing the corresponding key (usually Esc).
Checking the CPU temperature using the BIOS can provide more accurate readings compared to other methods. Since the BIOS provides direct access to the hardware, the temperature readings are reliable. However, accessing the BIOS may vary depending on your computer’s manufacturer and model, so it’s essential to consult the user manual or the manufacturer’s website for specific instructions.
Now that you have learned how to check the CPU temperature using the BIOS, let’s move on to the next method.
Method 3: Using Third-Party Software
If you want more advanced features and in-depth CPU temperature monitoring, you can turn to third-party software. There are several programs available that specialize in providing detailed information about your CPU, including temperature readings. Here’s how you can use third-party software to check CPU temperature:
- Research and choose a reputable third-party software for monitoring CPU temperature. Some popular options include HWMonitor, Core Temp, and SpeedFan.
- Download and install the software on your computer following the instructions provided by the software developer.
- Launch the software after installation. You should be presented with a user-friendly interface displaying various information about your CPU.
- Look for the CPU temperature or similar options within the software interface. The temperature is usually displayed in Celsius (°C).
- Take note of the temperature readings, and you may also be able to set custom temperature thresholds or receive alerts if the temperature goes beyond a certain limit.
- Depending on the software, you may have additional features available, such as monitoring other hardware components, adjusting fan speeds, and logging temperature history.
Using third-party software offers more advanced features and a comprehensive view of your CPU temperature. You can customize the software to your preferences and receive real-time updates on your CPU’s temperature. Additionally, some software can also provide additional information, such as voltage, clock speed, and utilization.
Remember to choose reputable software from trusted sources to ensure reliability and compatibility with your system. Reading user reviews and checking software compatibility with your specific hardware can help in making an informed decision.
Now that you have learned about using third-party software to check the CPU temperature, let’s move on to the next method.
Method 4: Using PowerShell
If you prefer a command-line approach and want to check the CPU temperature using native Windows tools, you can utilize PowerShell, a powerful scripting language built into Windows. Here’s how you can use PowerShell to check CPU temperature:
- Open the Start menu and search for “PowerShell”.
- Right-click on “Windows PowerShell” in the search results and select “Run as administrator”.
- If prompted for permission, click “Yes” to allow PowerShell to make changes to your computer.
- In the PowerShell window, type the following command and press Enter:
Get-WmiObject -Namespace "root\wmi" -Class "MSAcpi_ThermalZoneTemperature" | ForEach-Object {($_.CurrentTemperature / 10 - 273.15)} - After executing the command, PowerShell will display the CPU temperature in Celsius (°C).
- Take note of the temperature readings or use the output to monitor your CPU temperature.
PowerShell offers a quick and convenient way to check the CPU temperature without the need for third-party software. It leverages Windows Management Instrumentation (WMI) to obtain system information, including the CPU temperature. You can also incorporate PowerShell commands into scripts or automate temperature monitoring tasks.
It’s important to note that the above PowerShell command relies on the ACPI (Advanced Configuration and Power Interface) standard, which may not be supported by all systems. If the command doesn’t work or returns inaccurate data, you may need to explore alternative methods.
Now that you have learned how to check CPU temperature using PowerShell, it’s time to wrap up this guide and summarize what we have covered.
Conclusion
Monitoring your CPU temperature is essential for maintaining optimal performance and preventing potential hardware issues. In this guide, we explored four different methods for checking the CPU temperature in Windows 10.
We started with the simple and convenient option of using Task Manager to monitor CPU temperature. While it provides basic temperature information, it may not be as accurate as other methods. However, it is a viable option for occasional checks or for users who prefer native Windows tools.
Next, we discussed accessing the BIOS settings to check CPU temperature. This method offers more accurate readings since it provides direct access to the hardware. However, accessing the BIOS may vary depending on your computer’s manufacturer and model.
For those who prefer more advanced features and detailed information, we explored using third-party software. With a range of options available, these programs provide comprehensive insights into CPU temperature, as well as other hardware parameters. Choosing reputable software is vital to ensure reliability and compatibility.
Finally, we introduced using PowerShell, a command-line scripting language, to check CPU temperature. This method offers flexibility and can be incorporated into scripts or automated tasks, leveraging the power of Windows Management Instrumentation (WMI).
With all these methods at your disposal, you can effectively monitor your CPU temperature in Windows 10. Regularly checking and maintaining optimal operating temperatures can help prolong the lifespan of your hardware and ensure optimal system performance.
Remember to choose the method that best suits your needs and preferences. Whether you prefer simplicity or advanced features, any of these methods can help you keep an eye on your CPU temperature and take appropriate action if needed.
Thank you for following this guide, and we hope it has been helpful in your quest to monitor CPU temperature in Windows 10.