Introduction
When it comes to managing and organizing files, zipping them can be an efficient solution. Whether you want to compress files to save disk space or send a batch of files as an email attachment, zipping files is a quick and convenient way to bundle them together into a single compressed folder. If you’re using Windows 10, you’re in luck, as the operating system offers a built-in feature to easily zip your files.
In this guide, we will walk you through the step-by-step process of how to zip files in Windows 10. Whether you’re a beginner or an experienced user, you’ll find these instructions easy to follow, ensuring that you can quickly and effortlessly compress your files with just a few clicks.
Before we dive into the steps, it’s worth mentioning the benefits of zipping files. By compressing multiple files into a single zip folder, you can not only reduce the size of the files, but also simplify the process of sharing or transferring them. Zipping files also helps to keep them organized, preventing any accidental modifications or deletions while preserving the integrity of the original files.
So, let’s get started and learn how to zip files in Windows 10.
Step 1: Select the Files to Zip
The first step in zipping files in Windows 10 is to select the files you want to include in the zip folder. To do this, locate the files you wish to zip on your computer. You can choose multiple files by holding down the Ctrl key while clicking on each file. This allows you to select non-adjacent files. If you want to select all files in a specific folder, you can use the Ctrl + A shortcut to quickly select all files within that folder.
It’s important to note that you can zip not only individual files but also entire folders. Simply select the folder instead of individual files, and Windows will automatically compress everything within that folder. This is particularly useful when you have multiple files that are all related and need to be sent or archived together.
Once you have selected the files or folders you want to zip, you are ready to move on to the next step.
Step 2: Right-click on the Selected Files
After you have selected the files or folders you want to zip, the next step is to right-click on the selection. This will open a context menu with various options.
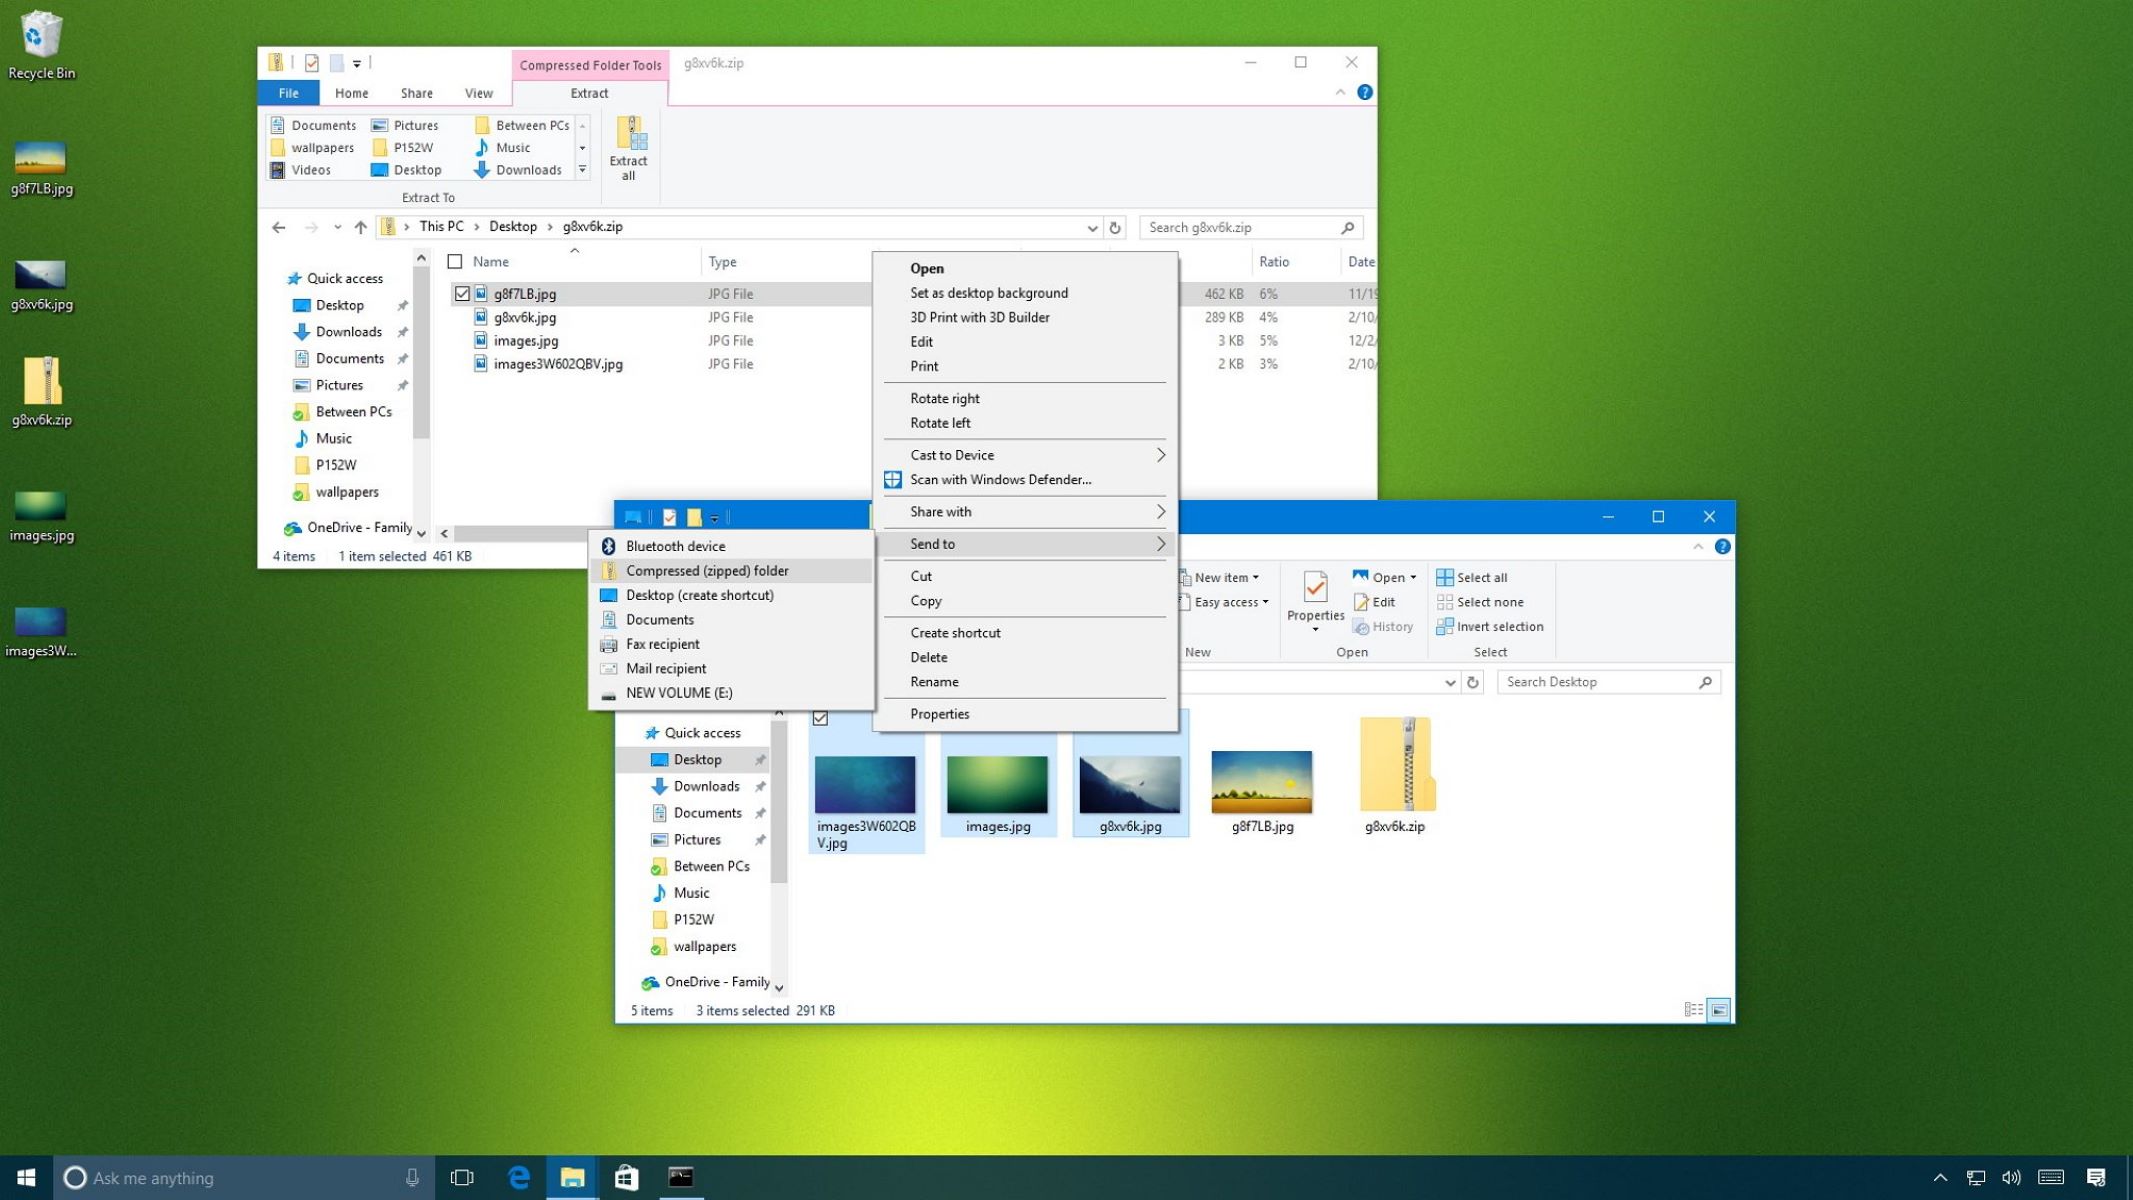
Locate your mouse pointer over one of the selected files or folders, then right-click. A drop-down menu will appear, displaying different options. Look for the option that says “Send to” and hover your mouse over it. Another menu will appear to the right, showing additional choices.
Among the options displayed, you should see one that says “Compressed (zipped) folder”. This option is specifically designed for creating a zip file. Clicking on it will initiate the zipping process.
Alternatively, if you prefer using your keyboard, you can press the “Shift” key and the right-click button simultaneously. This will bring up the same context menu with the “Send to” option available.
By right-clicking on the selected files or folders, you are now ready to move on to the next step and convert them into a compressed zip folder.
Step 3: Choose “Send to”
Once you have right-clicked on the selected files or folders, a context menu will appear. From this menu, you need to choose the option labeled “Send to”. Clicking on this option will reveal a sub-menu with various destinations to send the selected files or folders.
In the sub-menu, you’ll find a variety of options such as sending files to a specific program, a removable storage device, or even to the desktop. However, in this case, you want to select the option that says “Compressed (zipped) folder”. This option specifically creates a zip file from the selected items.
To proceed with zipping the files, simply click on the “Compressed (zipped) folder” option in the “Send to” sub-menu.
It’s important to note that the availability of the “Compressed (zipped) folder” option may vary depending on your system configuration. However, it is a common feature in Windows 10 and is likely to be available on most computers running this operating system.
After selecting the “Compressed (zipped) folder” option, Windows will begin the process of creating the zip file using the chosen destination.
Now that you have chosen the “Send to” option, you are ready to move on to the next step and give a name to your zip file.
Step 4: Select “Compressed (zipped) folder”
After choosing the “Send to” option in the previous step, a sub-menu will appear, showing various destinations to send the selected files or folders. In this step, you need to select the option that says “Compressed (zipped) folder”. This option is specifically designed to create a zip folder from the selected items.
Once you click on the “Compressed (zipped) folder” option, Windows will initiate the process of creating a compressed zip folder. It will gather the selected files or folders and compress them into a single file with the .zip extension.
Take note that the compression process may take a few seconds or longer, depending on the size and number of files being zipped. During this process, you may see a progress bar indicating the status of the compression.
After the compression is complete, you will find a new zip file in the same location as the selected files or folders. You can easily recognize it by the folder icon with a zipper on it, indicating that it is a compressed zip folder.
It’s important to remember that the original files or folders are still intact and have not been modified or deleted during the zipping process. The new zip folder is a separate entity that contains a compressed version of the original items.
Now that you have chosen the “Compressed (zipped) folder” option, you can proceed to the next step and rename the zip file to your preference.
Step 5: Rename the Zip File
After successfully creating a zip file in the previous step, it is important to give it a meaningful name that accurately reflects its contents. Renaming the zip file makes it easier to identify and locate in the future.
To rename the zip file, navigate to the location where the file is saved. Right-click on the zip file and select the “Rename” option from the context menu. Alternatively, you can select the zip file and press the “F2” key on your keyboard.
A text box will appear around the existing filename, allowing you to edit it. Enter the desired name for your zip file. You can be as descriptive as you like, providing a name that is concise yet informative.
It’s worth noting that you should avoid using special characters or spaces in the filename, as these might cause issues when sharing or extracting the zip file on different systems. Stick to alphanumeric characters and underscores to ensure compatibility.
Once you have entered the new name for your zip file, press the “Enter” key or click outside of the text box to save the changes. The zip file will now have the updated name.
Renaming the zip file helps you keep your files organized and makes it easier to locate specific files or folders in the future. It also ensures that you can quickly identify the contents of the zip file without the need to open it.
Now that you have renamed the zip file, you are ready to proceed to the final step and learn how to open and access the files within the zip folder.
Step 6: Open the Zip File
After successfully creating and renaming the zip file, you may want to access the files or folders within it. Windows 10 provides a simple and straightforward method to open and extract the contents of the zip file.
To open the zip file, navigate to the location where it is saved on your computer. Double-click on the zip file, and Windows will automatically open it using the default file compression utility.
Upon opening the zip file, you will see the compressed folder containing all the files or folders that were originally selected for zipping. You can view the contents of the zip file just like any other folder on your computer.
To extract a specific file or folder from the zip file, simply drag and drop it to the desired location on your computer. This will create a copy of the file or folder in the selected destination.
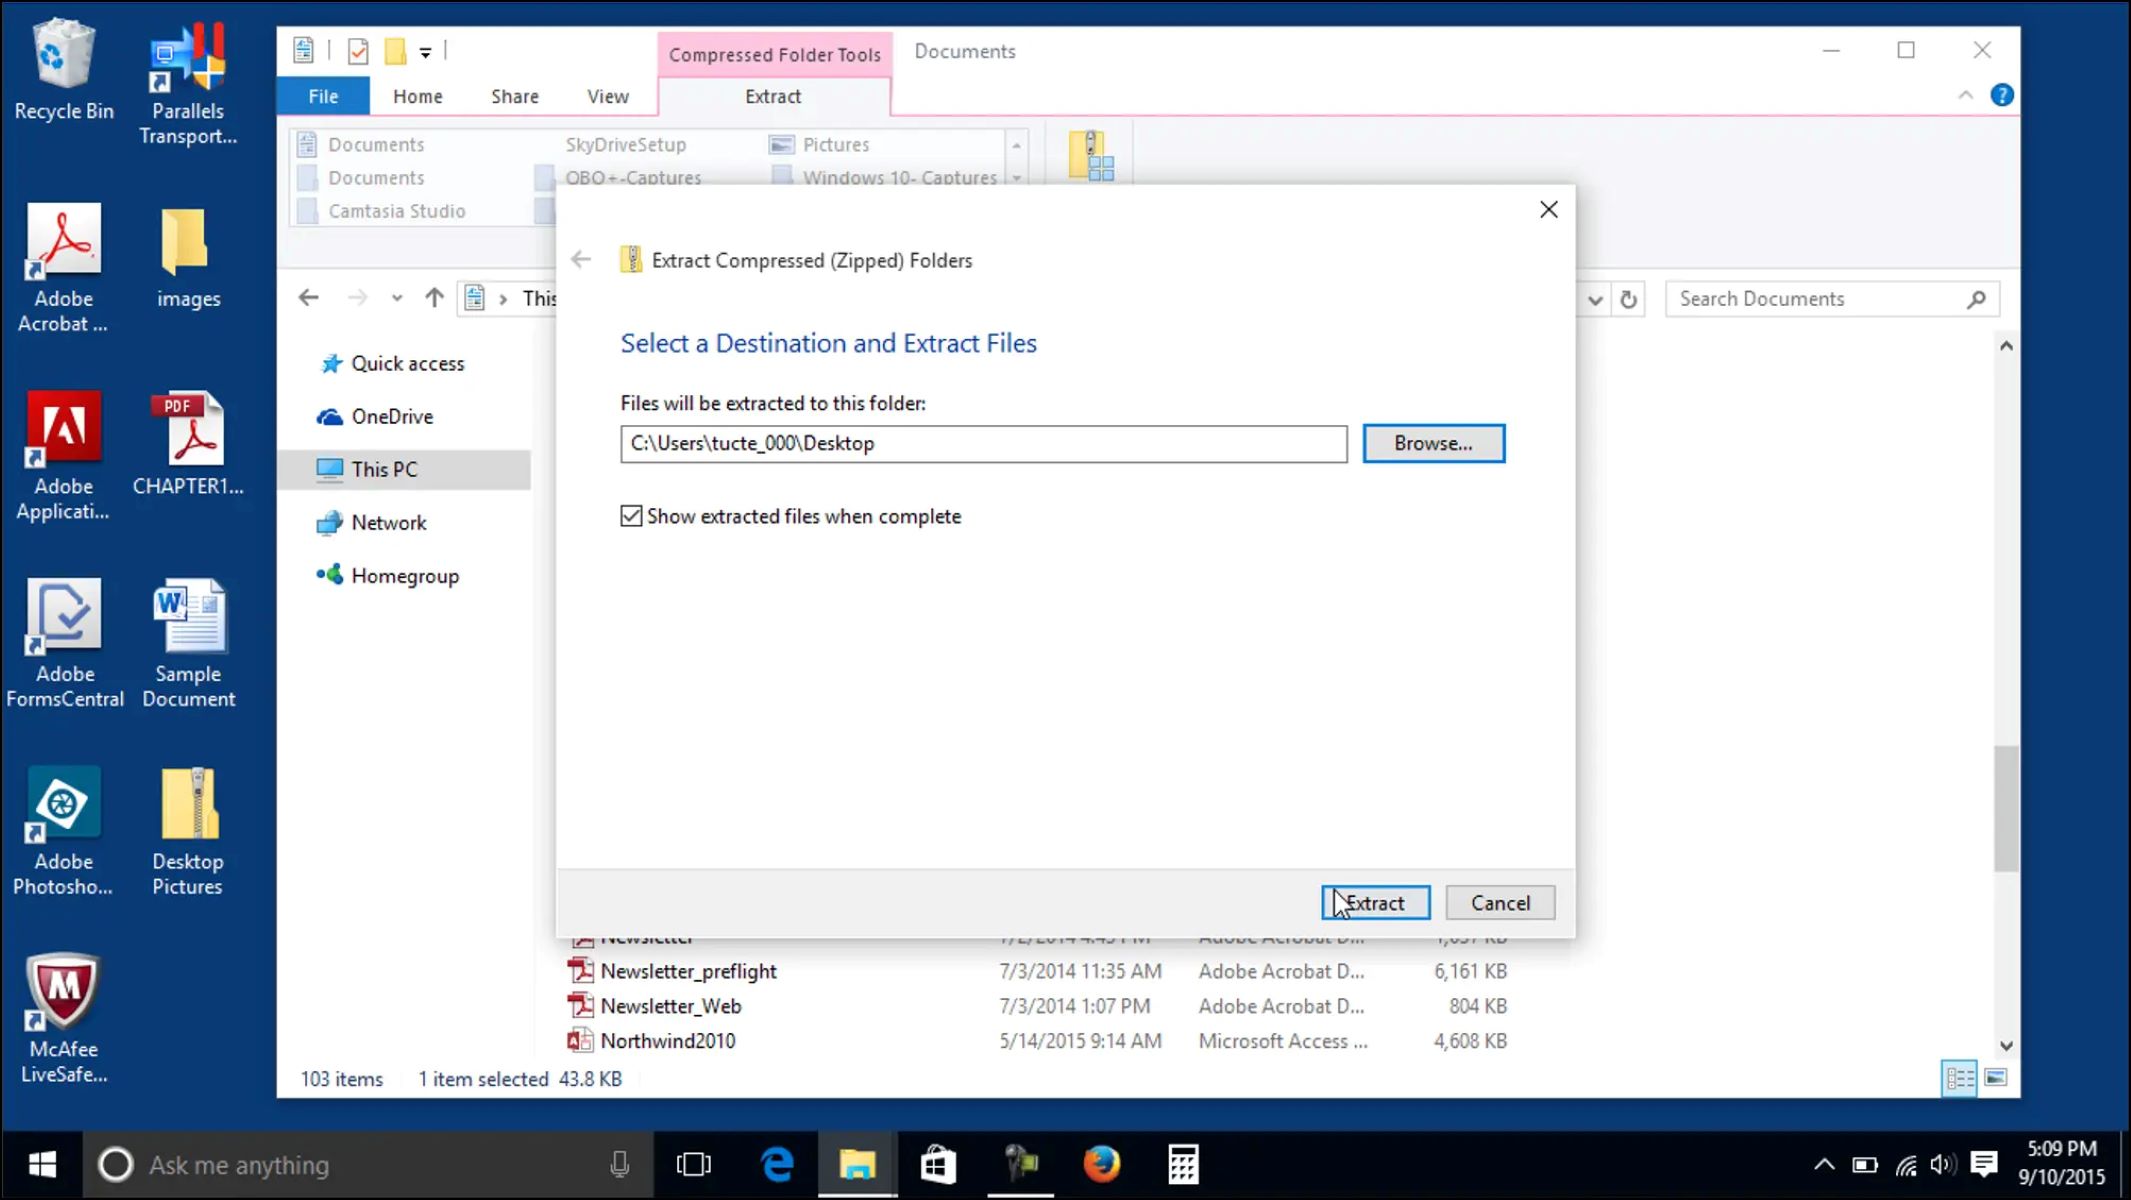
If you want to extract all the files and folders within the zip file, you can either select them all and drag them to the desired location or use the “Extract All” option in the toolbar at the top. This option will prompt you to choose a destination folder and extract all the files and folders from the zip file into that location.
After extracting the files or folders from the zip file, you can work with them as you would with any other file on your computer. You can open, edit, move, or delete them according to your needs.
Opening the zip file allows you to access and work with the original files or folders that were compressed. It is a straightforward process that lets you easily retrieve the individual items from the zip folder.
With this final step completed, you have successfully learned how to zip files in Windows 10, as well as how to open and extract the contents of a zip file.