Introduction
Welcome to the world of Virtual Machine Manager (VMM), a powerful tool for managing and operating virtual machines (VMs) in your computing environment. With VMM, you can easily create, configure, and control VMs, allowing you to efficiently utilize your resources and streamline your workflows.
Virtual machines have revolutionized the way we use computers. By creating multiple virtual instances on a single physical machine, we can run different operating systems, applications, and environments simultaneously without the need for separate hardware. This flexibility and scalability make VMs essential for a wide range of purposes, including software development, testing, server consolidation, and disaster recovery.
In this guide, we will explore the various features and functionalities of Virtual Machine Manager, taking you through the process of setting up VMM, creating virtual machines, configuring their settings, installing operating systems, managing resources, and troubleshooting issues that may arise. Whether you are a beginner looking to get started with virtualization or an experienced user seeking to enhance your VM management skills, this guide will provide you with the necessary knowledge to effectively utilize Virtual Machine Manager.
Throughout this article, we will dive into the different aspects of using VMM, including creating virtual machine templates, configuring networking for VMs, importing and exporting virtual machines, taking snapshots, and even cloning VMs. By the end of this guide, you will have a solid understanding of VMM’s capabilities and be able to confidently manage your virtual environment.
So, are you ready to embark on this virtual journey? Let’s get started with setting up Virtual Machine Manager and explore the incredible capabilities that await!
Setting Up Virtual Machine Manager
Before we can start creating and managing virtual machines, we need to set up Virtual Machine Manager (VMM) on our system. VMM can be installed on a physical server or as a virtual machine itself, depending on your requirements and available resources.
To begin the setup process, make sure your system meets the minimum hardware and software requirements for VMM. These include a compatible operating system, sufficient memory and storage, and a supported hypervisor. Once these prerequisites are in place, you can proceed with the following steps:
- Download Virtual Machine Manager from the official website or obtain it from your software provider. Ensure that you have the correct version for your operating system and architecture.
- Double-click on the installation file to launch the setup wizard. Follow the on-screen instructions to begin the installation process.
- Choose the desired installation location and configure any additional settings as required.
- Review the license agreement and accept it to proceed with the installation.
- Wait for the installation process to complete. This may take a few minutes, depending on your system’s performance.
- Once the installation is finished, launch Virtual Machine Manager from the Start menu or desktop shortcut.
- Upon launching VMM for the first time, you will be prompted to connect to a management server. If you already have a server set up, enter its IP address or hostname. Otherwise, choose the option to create a new server and follow the on-screen instructions.
- After connecting to the management server, you will be prompted to provide the necessary credentials for authentication. Enter the appropriate username and password to proceed.
- Once authenticated, you will have access to the Virtual Machine Manager interface, where you can begin creating and managing virtual machines.
Setting up Virtual Machine Manager is an essential step in harnessing the power of virtualization. By following these steps, you can easily install VMM and start leveraging its features to create, manage, and optimize your virtual machines. In the next section, we will explore the process of creating a virtual machine using VMM.
Creating a Virtual Machine
Now that you have Virtual Machine Manager set up, it’s time to create your first virtual machine (VM). VMM provides a user-friendly interface that simplifies the process and allows you to configure various settings according to your requirements. Follow the steps below to create a VM:
- Open Virtual Machine Manager and ensure that you are connected to the management server.
- Click on the “Create” button in the toolbar or right-click on the Virtual Machines folder and select “New Virtual Machine”.
- In the “New Virtual Machine Wizard” window, choose a name and location for your VM.
- Select the desired guest operating system and version compatibility for the VM.
- Specify the amount of memory and the number of virtual processors to allocate to the VM.
- Choose the virtual network switch to connect the VM to the network.
- Configure additional hardware settings if needed, such as storage, DVD drives, and network adapters.
- Define the virtual hard disk settings, including the size, format, and location of the disk file.
- Customize the installation options, such as setting up a bootable ISO file or attaching installation media.
- Review the summary of the VM configuration and click “Finish” to create the virtual machine.
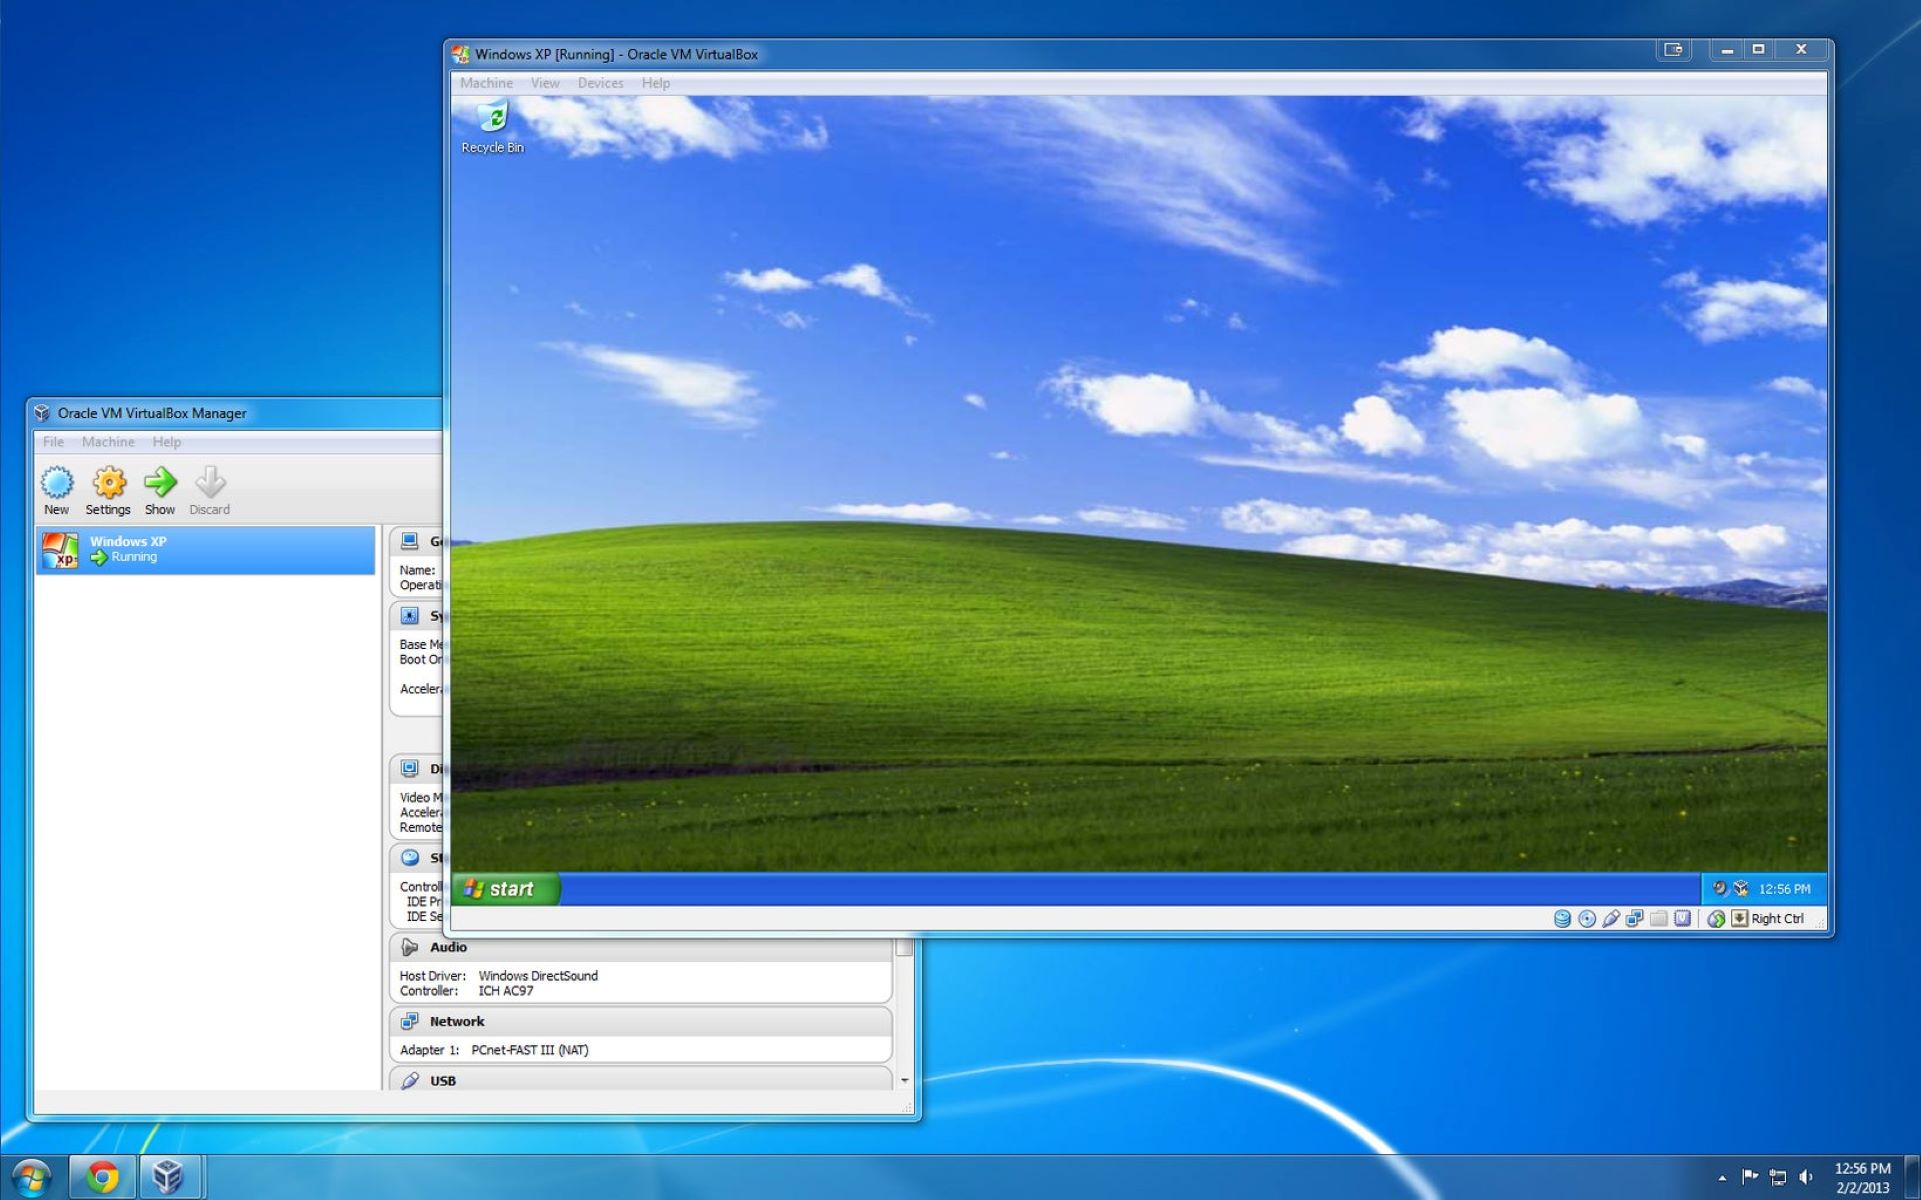
Once the VM is created, you can start it by selecting it in the Virtual Machines folder and clicking on the “Start” button. From there, you can interact with the VM by opening a console window or connecting to it remotely. Installing the operating system and configuring any necessary settings can then be done within the VM itself.
Creating a virtual machine using Virtual Machine Manager is a straightforward process that allows you to quickly provision and deploy VMs to meet your specific needs. Whether you’re setting up a development environment, testing software, or creating a production server, VMM provides the tools and flexibility required to effectively manage your virtual infrastructure.
In the next section, we will explore how to configure virtual machine settings to further customize and optimize the performance of your VMs.
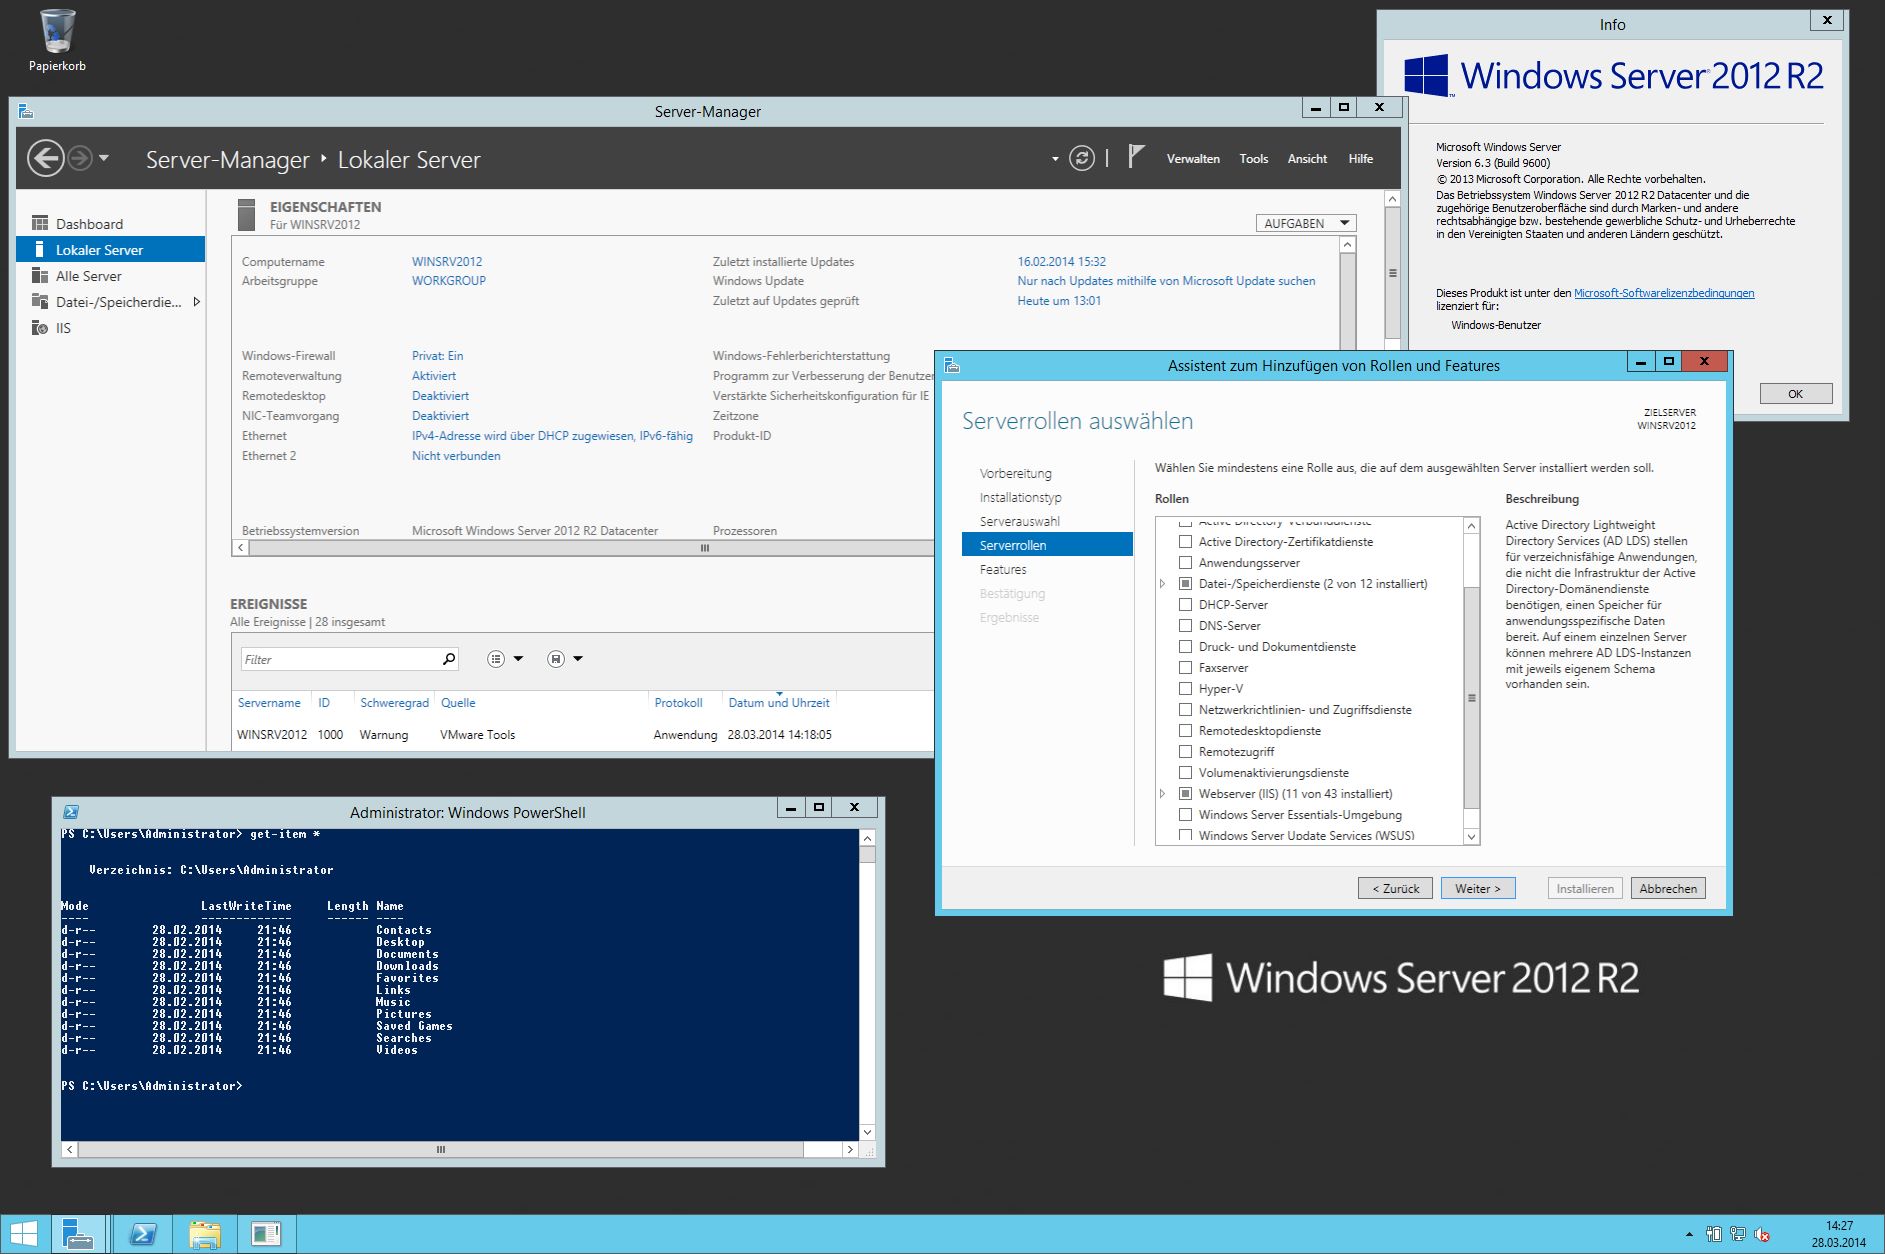
Configuring Virtual Machine Settings
After creating a virtual machine (VM) in Virtual Machine Manager (VMM), it’s important to configure its settings to ensure optimal performance and functionality. VMM provides a range of options to customize various aspects of a VM, allowing you to tailor it to your specific requirements. Here’s a step-by-step guide on how to configure virtual machine settings:
- Select the VM you want to configure from the Virtual Machines folder in VMM.
- Click on the “Settings” button in the toolbar or right-click on the VM and choose “Settings” from the context menu.
- In the “Settings” window, you’ll find different categories of settings for the VM. Let’s explore a few key settings:
- Hardware: This category allows you to modify hardware-related settings, such as memory allocation, CPU count, and virtual network adapters. Adjust these settings based on the desired workload and system requirements of the VM.
- Storage: Here, you can manage the virtual hard disks and DVD drives associated with the VM. You can add or remove virtual hard disks, resize them, and attach ISO images for software installation or data retrieval.
- Network Adapter: Configure the networking settings for the VM, including the virtual switch to connect to and the MAC address assignment. You can choose between dynamic MAC address assignment or specify a static address.
- Integration Services: Enable or disable various integration services, which enhance the performance and functionality of the VM. These include time synchronization, heartbeat, data exchange, and guest services.
- Checkpoints: Adjust the checkpoint settings to control the behavior of checkpoints (also known as snapshots) for the VM. You can enable or disable automatic checkpoints and specify the frequency of checkpoint creation.
- Advanced: This category provides advanced configuration options for the VM, such as processor compatibility mode, security settings, and resource metering.
- Once you have made the desired changes, click “Apply” or “OK” to save the settings and apply them to the VM.
Configuring virtual machine settings allows you to fine-tune the behavior and performance of your VMs. By modifying hardware allocations, adjusting networking settings, and enabling integration services, you can create a virtual environment that meets your specific needs.
In the next section, we will discuss the process of installing an operating system on a virtual machine in Virtual Machine Manager.
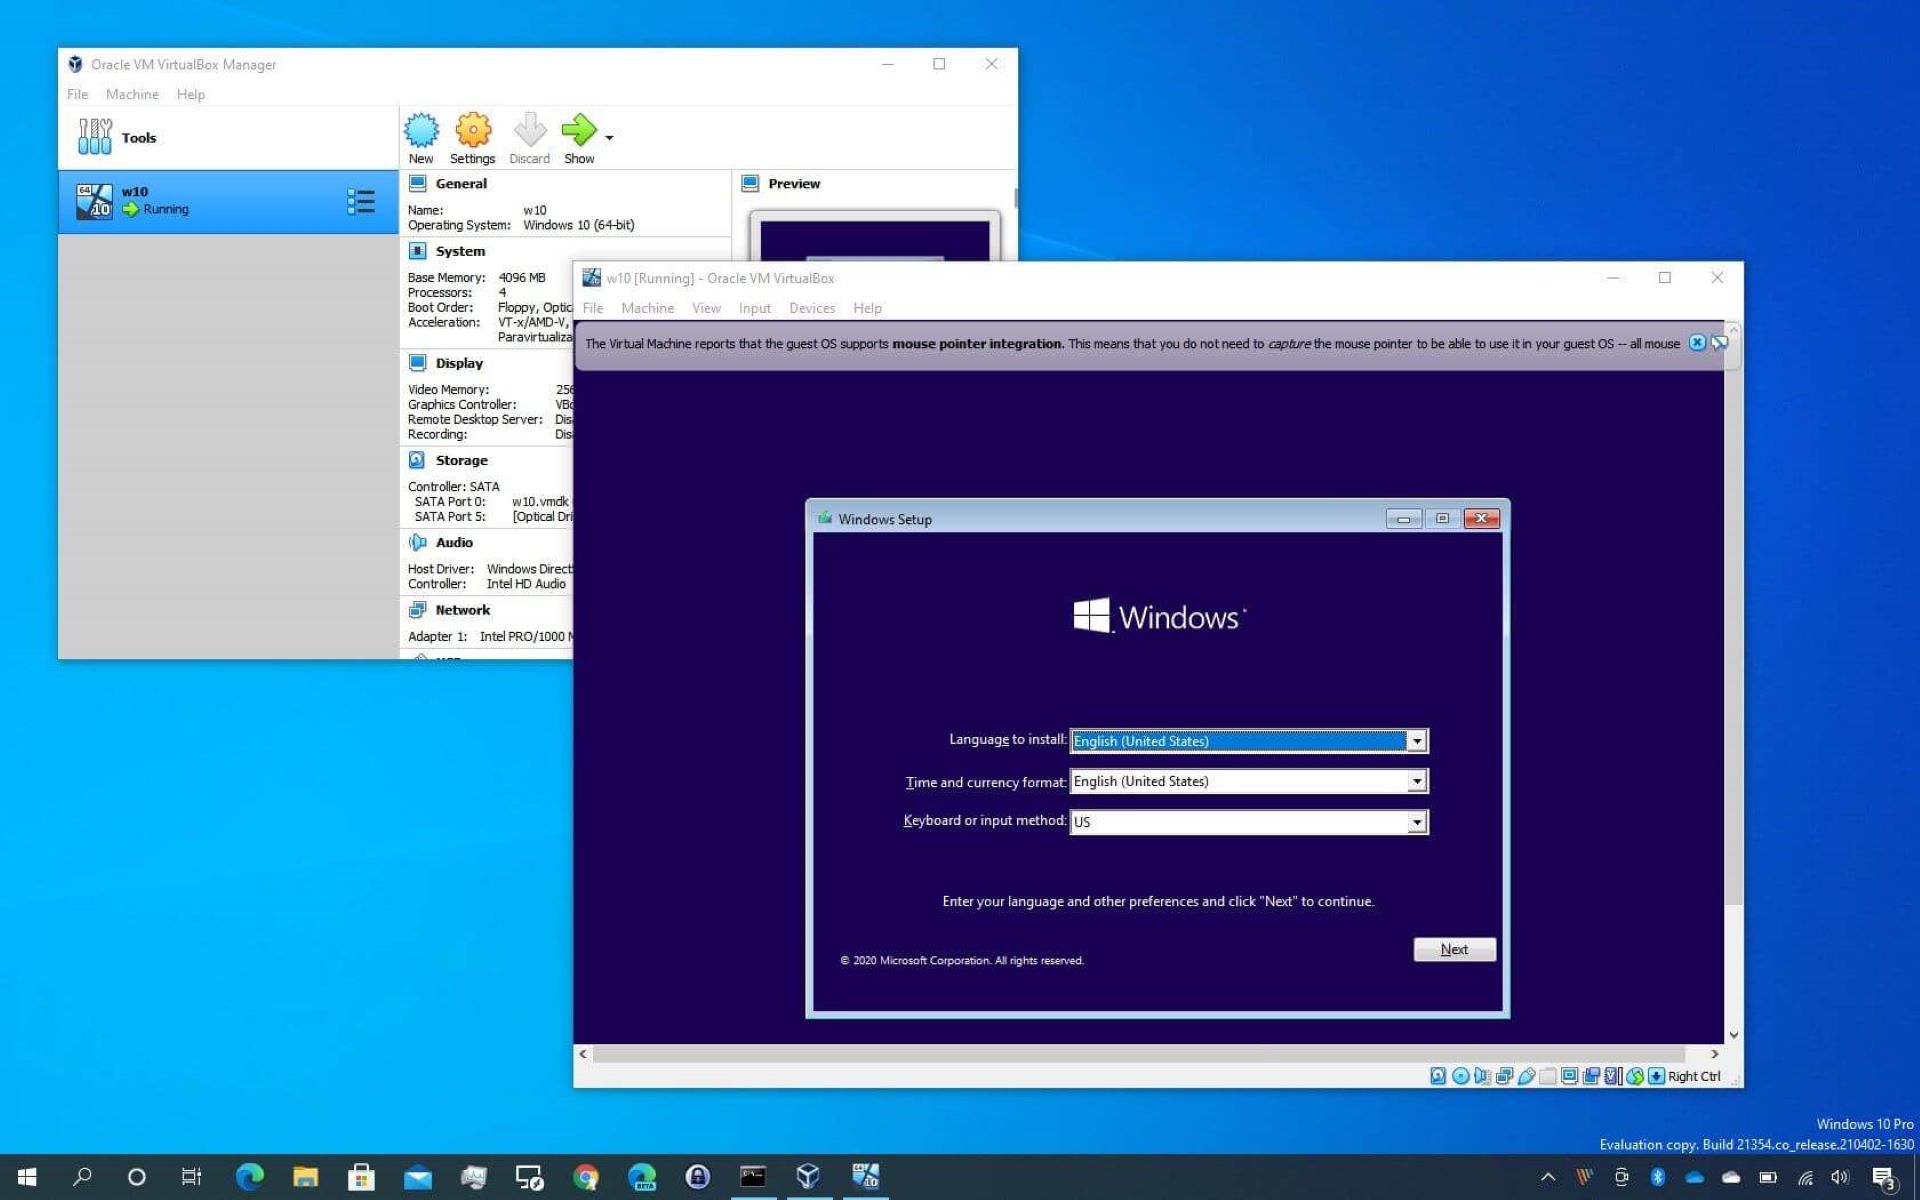
Installing an Operating System on a Virtual Machine
Once you have created a virtual machine (VM) in Virtual Machine Manager (VMM) and configured its settings, the next step is to install an operating system (OS) on the VM. Just like installing an OS on a physical computer, the process involves booting the VM from an installation media and following the on-screen prompts. Here’s a step-by-step guide on how to install an operating system on a virtual machine:
- Select the VM on which you want to install the OS from the Virtual Machines folder in VMM.
- Ensure that the VM has a virtual DVD drive attached, and insert the installation media (e.g., an ISO image or physical DVD) containing the OS into the drive.
- Start the VM by clicking on the “Start” button in VMM.
- The VM will boot up and start the installation process from the inserted media.
- Follow the on-screen prompts to choose the language, keyboard layout, and other regional settings.
- When prompted, select the installation type (e.g., clean installation or upgrade) and specify the installation location.
- Proceed with the installation by accepting the license terms, configuring additional settings (if applicable), and creating user accounts.
- Wait for the installation process to complete. The VM may restart multiple times during the installation.
- After the installation finishes, the VM will boot into the installed operating system.
Once the operating system is installed, you can now access and use the virtual machine with the OS running on it. You can interact with the VM by opening a console window or connecting to it remotely.
Installing an operating system on a virtual machine is a straightforward process, similar to installing it on a physical computer. With Virtual Machine Manager, you can easily deploy multiple virtual machines with different operating systems to meet your specific needs.
In the next section, we will explore how to manage virtual machine resources in VMM, allowing you to optimize performance and efficiently utilize your computing resources.
Managing Virtual Machine Resources
Virtual Machine Manager (VMM) provides powerful capabilities for managing virtual machine (VM) resources, allowing you to optimize performance and efficiently utilize your computing resources. With VMM, you can control CPU allocation, memory usage, storage configurations, and more. Let’s explore the various ways to manage VM resources:
- CPU Allocation: VMM allows you to adjust CPU settings for each VM, including the number of virtual processors and CPU reserves, limits, and weights. By allocating CPU resources appropriately, you can ensure that each VM receives the necessary processing power, preventing resource contention and performance degradation.
- Memory Management: With VMM, you can allocate memory to VMs based on their usage requirements. You can configure dynamic memory settings to allow VMs to consume additional memory when needed and release it when idle. This elastic memory allocation helps optimize memory usage and ensures efficient utilization across multiple VMs.
- Storage Configuration: VMM enables you to manage virtual hard disks and storage settings for VMs. You can resize, add, or remove virtual hard disks to meet changing storage needs. Additionally, you can leverage VMM’s storage optimization features, such as deduplication and thin provisioning, to minimize storage footprint and improve performance.
- Networking: Managing networking resources is crucial for optimal VM performance and connectivity. With VMM, you can create and manage virtual switches, allocate bandwidth, and configure network load balancing. This ensures that VMs have reliable and efficient network connectivity while preventing network resource bottlenecks.
- Resource Metering: VMM provides built-in resource metering capabilities that allow you to monitor resource usage by VMs. You can track metrics such as CPU usage, memory consumption, and storage utilization to identify bottlenecks, forecast resource needs, and optimize resource allocations.
By effectively managing VM resources in VMM, you can maximize the efficiency of your virtual environment. Optimal resource allocation enables you to achieve better performance, improve scalability, and make the most out of your infrastructure investments.
In the next section, we will explore how to import and export virtual machines in Virtual Machine Manager, facilitating easy migration and deployment of virtual machines.
Importing and Exporting Virtual Machines
Virtual Machine Manager (VMM) provides convenient options for importing and exporting virtual machines (VMs), making it easier to migrate and deploy VMs across different environments. Whether you want to transfer VMs to a new host, share them with others, or create backups, VMM offers a seamless process for managing VM import and export. Here’s a step-by-step guide on how to import and export virtual machines:
- Importing Virtual Machines:
- Click on the “Import Virtual Machine” button in the VMM toolbar.
- Choose the import method based on the source of the VM:
- Import from Virtual Machine Manager library: Select this option if the VM is already stored in the VMM library.
- Import from another host or a file: Choose this option if you want to import a VM from another VMM host or from an external file, such as an exported VM.
- Follow the prompts to select the source VM and provide the necessary details to import it.
- Review the import summary and click “Finish” to start the import process.
- Exporting Virtual Machines:
- Select the VM you want to export from the Virtual Machines folder in VMM.
- Click on the “Export” button in the toolbar.
- Choose the export location and provide a name for the exported VM.
- Select the options you want to include in the export, such as virtual hard disks and snapshots.
- Review the export summary and click “Finish” to start the export process.
By leveraging the importing and exporting capabilities in VMM, you can easily transfer VMs between hosts, share them with colleagues, or create backups for disaster recovery. This flexibility enables seamless VM management and enhances the overall efficiency of your virtual infrastructure.
In the next section, we will explore how to take snapshots of virtual machines in VMM, providing a reliable backup mechanism and enabling easy recovery of VM states.
Taking Snapshots of Virtual Machines
Virtual Machine Manager (VMM) offers a handy feature called snapshots that allows you to capture the state of a virtual machine (VM) at a specific point in time. Snapshots serve as a reliable backup mechanism and provide an easy way to roll back to a previous state if needed. With VMM, taking snapshots of VMs is a straightforward process. Here’s a step-by-step guide on how to take snapshots:
- Select the VM for which you want to create a snapshot from the Virtual Machines folder in VMM.
- Click on the “Snapshots” tab in the right panel.
- Click on the “New” button to create a new snapshot.
- Provide a name and optional description for the snapshot to help identify it.
- Choose whether to include the memory state in the snapshot (creating a checkpoint) or only capture the VM’s configuration.
- Click “OK” to initiate the snapshot creation process.
- Wait for the snapshot creation to complete. This may take some time, depending on the size and complexity of the VM.
Once the snapshot is created, it appears in the Snapshots tab, allowing you to easily manage and restore to a previous state if needed. You can take multiple snapshots of a VM to capture different milestones or configurations.
When you need to revert to a previous state, simply select the desired snapshot and click on the “Apply” or “Restore” button. VMM will restore the VM to the specified snapshot, including the VM’s memory state if a checkpoint was included.
Taking and managing snapshots provides a flexible and convenient way to create reliable backups of VMs and facilitates easy recovery from system configurations or software modifications. Snapshots are especially useful when performing software updates, testing different configurations, or troubleshooting issues in a safe environment.
In the next section, we will explore how to clone virtual machines in VMM, allowing you to quickly and effortlessly duplicate VMs for various purposes.
Cloning Virtual Machines
Virtual Machine Manager (VMM) provides a convenient feature called cloning that allows you to create exact copies of virtual machines (VMs) with all their configurations and settings. Cloning VMs in VMM is a quick and efficient way to duplicate VMs for various purposes, such as creating test environments, deploying multiple instances of the same VM, or provisioning new VMs based on existing ones. Here’s a step-by-step guide on how to clone virtual machines:
- Select the VM you want to clone from the Virtual Machines folder in VMM.
- Click on the “Clone” button in the toolbar or right-click on the VM and choose “Clone” from the context menu.
- Provide a name and optional description for the cloned VM.
- Select the destination host where you want to deploy the cloned VM. You can choose the same host or a different one.
- Specify the destination path for the VM files, including virtual hard disks and configuration files.
- Choose whether to generate new MAC addresses for the network adapters or keep the same MAC addresses as the source VM.
- Review the cloning summary and click “Finish” to start the cloning process.
- Wait for the cloning process to complete. This may take some time, depending on the size and complexity of the VM.
Once the cloning process finishes, the cloned VM appears in the Virtual Machines folder in VMM. It is an exact replica of the source VM, including all the configurations and settings. You can power on the cloned VM and make any necessary modifications or customizations specific to its use case.
Cloning virtual machines in VMM streamlines the process of duplicating VMs and eliminates the need for manual configuration. It is particularly useful when you need to deploy multiple instances of the same VM or quickly set up test environments.
In the next section, we will explore how to create virtual machine templates in VMM, enabling you to easily provision standardized VMs with preconfigured settings and configurations.
Creating Virtual Machine Templates
Virtual Machine Manager (VMM) allows you to create virtual machine templates, which are preconfigured and standardized virtual machine (VM) images that can be easily deployed. Templates serve as a convenient way to provision VMs with predetermined settings, configurations, and software installed. By creating VM templates in VMM, you can reduce the effort and time required to deploy new VMs while ensuring consistency across your virtual infrastructure. Here’s a step-by-step guide on how to create virtual machine templates:
- In the Virtual Machines folder in VMM, select the VM that you want to use as the base for the template.
- Click on the “Convert to Template” button in the toolbar or right-click on the VM and choose “Convert to Template” from the context menu.
- Provide a name and optional description for the template.
- Configure the template properties, such as the number of virtual processors, memory allocation, and disk size. You can also set options for guest OS customization and virtual machine hardware compatibility.
- Click “OK” to convert the VM to a template.
Once the VM is converted to a template, it will appear in the Templates folder in VMM. You can now use the template to deploy new VMs with preconfigured settings by following these steps:
- In the Templates folder, select the template you want to deploy.
- Click on the “Deploy” button in the toolbar or right-click on the template and choose “Deploy” from the context menu.
- Provide a name and optional description for the deployed VM.
- Specify the destination host where you want to deploy the VM.
- Configure any additional settings specific to the deployment, such as networking and storage options.
- Review the deployment summary and click “Finish” to start the deployment process.
- Wait for the deployment process to complete. The new VM will be created based on the template with the preconfigured settings.
Creating virtual machine templates in VMM simplifies the process of provisioning new VMs with predefined configurations. It ensures consistency, saves time, and eliminates manual configuration tasks. Templates are particularly useful when deploying VMs for specific purposes, such as standard application servers, development environments, or testing environments.
In the next section, we will explore how to configure networking for virtual machines in VMM, enabling seamless connectivity and network integration for your VMs.
Configuring Networking for Virtual Machines
Virtual Machine Manager (VMM) provides robust networking capabilities that allow you to configure and manage networking for your virtual machines (VMs). Whether you need to establish connectivity between VMs, connect VMs to external networks, or implement network isolation, VMM offers a range of options to meet your requirements. Here’s a step-by-step guide on how to configure networking for virtual machines:
- Select the VM for which you want to configure networking from the Virtual Machines folder in VMM.
- Click on the “Network Adapters” tab in the right panel.
- Click on the “Add Hardware” button.
- Select the type of network adapter you want to add to the VM, such as a synthetic or legacy network adapter.
- Choose the virtual switch to connect the network adapter to. You can select an existing virtual switch or create a new one.
- Specify additional settings for the network adapter, such as bandwidth assignment, VLAN ID, and MAC address configuration.
- Click “OK” to apply the changes and add the network adapter to the VM.
- Repeat the process for any additional network adapters you want to configure for the VM.
By configuring networking for your VMs in VMM, you can enable seamless connectivity and integration with your network infrastructure. VMs can communicate with each other and with external networks, allowing for efficient data transfer and collaboration.
In addition to virtual switches and network adapters, VMM also provides advanced networking features such as network load balancing, network isolation, and network virtualization to further enhance your VM networking capabilities.
Proper networking configuration is essential to ensure the performance, security, and connectivity of your virtual machines. With Virtual Machine Manager, you can easily configure and manage the networking settings for your VMs, enabling them to seamlessly integrate into your network environment.
In the next section, we will explore how to monitor and troubleshoot virtual machines in VMM, facilitating effective management of your VMs and ensuring optimal performance.
Monitoring and Troubleshooting Virtual Machines
Monitoring and troubleshooting virtual machines (VMs) is crucial for ensuring optimal performance, identifying issues, and maintaining the health of your virtual infrastructure. With Virtual Machine Manager (VMM), you have access to a range of tools and features that enable effective monitoring and troubleshooting of your VMs. Here’s a guide on how to monitor and troubleshoot virtual machines in VMM:
Monitoring:
- Select the VM you want to monitor from the Virtual Machines folder in VMM.
- Click on the “Monitoring” tab in the right panel to view real-time performance metrics for the selected VM.
- Explore different performance views, such as CPU usage, memory utilization, disk I/O, and network traffic, to identify any bottlenecks or anomalies.
- Set up alerts and notifications in VMM to proactively monitor VMs and receive notifications when specific performance thresholds are met or exceeded.
By regularly monitoring your VMs, you can identify performance issues and take appropriate actions to optimize resource allocation, troubleshoot bottlenecks, or tune VM configurations for better efficiency.
Troubleshooting:
- If you encounter issues with a VM, select the VM from the Virtual Machines folder in VMM.
- Check the Status column to identify any error or warning messages associated with the VM.
- Review the Events tab to gain insights into recent events or actions performed on the VM, which might provide clues about the cause of the issue.
- Use the console access feature in VMM to connect to the VM and troubleshoot issues directly within the guest operating system.
- Utilize the VMM library to store and access virtual machine templates, ISO images, and other resources that can aid in troubleshooting and resolving VM issues.
Effective troubleshooting of VMs involves a combination of proactive monitoring, timely identification of issues, and utilization of the available tools and resources. By addressing issues promptly, you can minimize downtime, maintain service continuity, and ensure optimal performance of your VMs.
Monitoring and troubleshooting virtual machines is an ongoing process that allows you to maintain the health and performance of your virtual infrastructure. By leveraging the monitoring and troubleshooting capabilities in VMM, you can proactively address issues, optimize resource utilization, and ensure a smooth and efficient operation of your VMs.
In the next section, we will conclude our guide on using Virtual Machine Manager and recap the key concepts discussed throughout the article.
Conclusion
Congratulations! You have now reached the end of our guide on using Virtual Machine Manager (VMM) to create, manage, and optimize virtual machines (VMs) in your computing environment. Throughout this article, we have covered various aspects of VMM, including setting up the software, creating and configuring VMs, installing operating systems, managing resources, importing and exporting VMs, taking snapshots, cloning VMs, creating templates, configuring networking, and monitoring and troubleshooting VMs. By mastering these capabilities, you can effectively harness the power of virtualization to enhance your workflows and maximize resource utilization.
Virtual Machine Manager provides a user-friendly interface and a comprehensive set of features that simplify VM management. From the initial setup to fine-tuning VM configurations, VMM empowers you to create and manage VMs with ease. You can take advantage of features such as snapshots and cloning to ensure data protection and enable quick replication of VMs for different purposes. Creating virtual machine templates streamlines the deployment process, while networking configurations facilitate seamless connectivity and integration with your network infrastructure.
Monitoring and troubleshooting VMs are essential for maintaining performance and addressing any issues that may arise. With VMM’s monitoring capabilities, you can track resource utilization and proactively address any performance bottlenecks. When troubleshooting, you can rely on the various tools and features available within VMM to quickly identify and resolve VM issues, ensuring the smooth operation of your virtual infrastructure.
Remember to regularly update Virtual Machine Manager to access the latest features, bug fixes, and security enhancements. Additionally, keep your VMs up to date with the latest operating system patches and security updates to protect against vulnerabilities.
Virtual Machine Manager is an invaluable tool for managing virtualized environments, enabling efficient utilization of resources, scalability, and flexibility. By leveraging its capabilities, you can create, configure, and manage VMs to meet your organizational requirements and improve overall productivity.
We hope this guide has provided you with a solid foundation for working with Virtual Machine Manager. As you continue your journey in virtualization, remember to explore the ever-evolving features and functionalities of VMM to get the most out of your virtual infrastructure.