Introduction
Welcome to the world of Asana, where you can streamline your tasks and manage your projects with ease. Asana is a powerful project management tool that helps individuals and teams stay organized, collaborate efficiently, and achieve their goals. With its user-friendly interface and extensive features, Asana has become one of the go-to platforms for professionals across industries.
However, we all make mistakes, and sometimes we need to undo certain actions in Asana. Whether you accidentally deleted a task, changed a due date, or mistakenly marked a task as complete, fear not! Asana offers several ways to undo these actions and restore your tasks to their previous state.
In this article, we will explore different methods to undo actions in Asana, allowing you to regain control and maintain the integrity of your projects. From keyboard shortcuts to task history and the handy undo button, we’ve got you covered. So, let’s dive in and learn how to effectively undo actions in Asana.
Understanding Asana’s Undo Feature
Before we begin discussing the methods to undo actions in Asana, it’s crucial to understand how the platform’s undo feature works. Asana provides multiple options to reverse an action, ensuring that you can easily rectify any mistakes or unintended changes.
One key aspect of Asana’s undo feature is its ability to track your actions and maintain a detailed history of task modifications. This means that you have a comprehensive log of every change made, which greatly facilitates the undo process. However, it’s important to note that the extent of undo capabilities varies depending on the action and the specific plan you’re using within Asana.
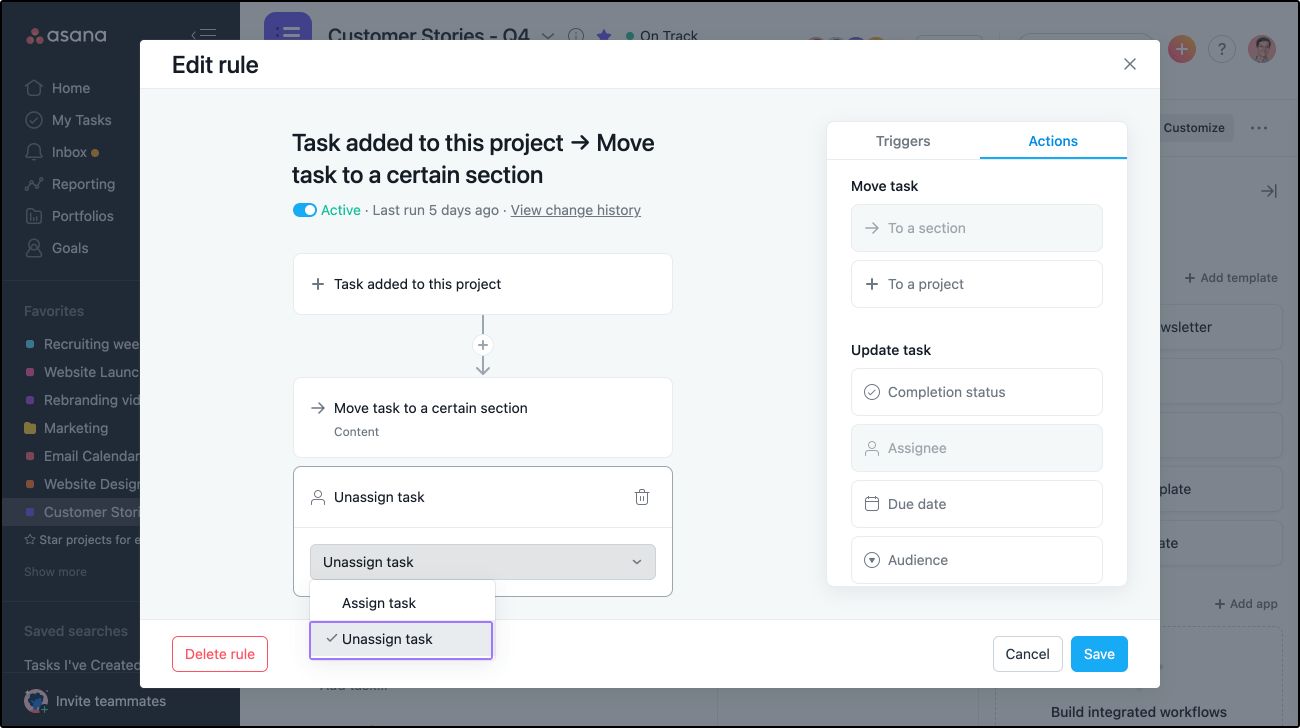
Asana’s undo feature covers a wide range of actions, including deleting tasks, modifying due dates, changing assignees, updating task descriptions, and much more. This versatility allows you to undo changes that may have negatively impacted your project management flow and restore tasks to their previous state.
Another important factor to consider is the timeframe for undoing actions in Asana. While some changes can be quickly reversed, others might have a limited undo window. Therefore, it is advisable to take immediate action if you realize a mistake in order to maximize the chances of successfully undoing it.
Now that we have a better understanding of Asana’s undo feature and its capabilities, let’s explore the different methods you can use to undo actions in Asana. By familiarizing yourself with these methods, you’ll be able to easily revert any unintended changes and maintain the integrity of your project management process.
Method 1: Using Keyboard Shortcuts
Asana provides a range of useful keyboard shortcuts that can save you time and make your workflow more efficient. In addition to their productivity benefits, some of these shortcuts also offer the ability to undo actions in a snap. Here’s how:
Step 1: Identify the action you want to undo. For example, let’s say you accidentally marked a task as complete.
Step 2: Press the “Z” key on your keyboard. This will instantly undo the last action you performed in Asana. In our example, it will change the completed status of the task back to its previous state.
Step 3: Repeat the “Z” keystroke if you need to undo multiple actions in succession. Asana remembers the sequence of actions, allowing you to undo them one by one.
Keyboard shortcuts provide a quick and efficient way to undo actions in Asana without interrupting your workflow. By familiarizing yourself with the available shortcuts and incorporating them into your daily tasks, you can easily rectify any mistakes and maintain a smooth project management process.
It’s important to note that keyboard shortcuts might differ based on the operating system you’re using. Make sure to check Asana’s official documentation for a complete list of keyboard shortcuts specific to your setup.
Now that you know how to use keyboard shortcuts to undo actions in Asana, let’s explore another method: using the Edit menu.
Method 2: Using the Edit Menu
If you prefer a more visual approach to undo actions in Asana, you can utilize the Edit menu. This method allows you to easily access a list of recent actions and revert them as needed. Follow these steps:
Step 1: Identify the action you want to undo. For example, let’s say you accidentally deleted a task.
Step 2: In the top navigation menu, click on the “Edit” option. A dropdown menu will appear.
Step 3: From the Edit menu, select “Undo” to reverse the most recent action. In our example, it will restore the deleted task back to its original state.
If you need to undo multiple actions, you can select “Undo” multiple times to revert them in reverse chronological order.
Using the Edit menu provides a visual representation of recent actions, making it easier to identify and undo specific changes. This method is especially useful when you’re unsure of the exact sequence of actions and need a comprehensive overview of recent modifications.
It’s worth noting that the Edit menu not only allows you to undo actions but also provides other useful options, such as redoing actions, cutting, copying, and pasting. Exploring the various features of the Edit menu can further enhance your workflow in Asana.
Now that you’re familiar with using the Edit menu to undo actions in Asana, let’s move on to another method: using the Task History.
Method 3: Using the Task History
Asana’s Task History feature allows you to view a detailed log of all the changes made to a task. This comprehensive history log includes information about modifications, such as task edits, comments, due date changes, and more. By leveraging the Task History, you can easily pinpoint the specific action you want to undo. Here’s how:
Step 1: Open the task for which you want to undo an action. You can do this by clicking on the task in your project or searching for it using the search bar.
Step 2: In the right-hand panel, scroll down to the “Activity” section and click on “See Full History.” This will open the Task History view.
Step 3: In the Task History view, review the list of actions that have been performed on the task. Each action includes a timestamp and the name of the user who made the change.
Step 4: Locate the action you want to undo and click on the “Revert” button next to it. Asana will automatically revert the task to its previous state, undoing the selected action.
Using the Task History feature is particularly useful when you need to undo older actions or if you’re unsure about the exact sequence of changes. By having a complete log of actions, you can easily track and reverse any modifications that may have been made to a task.
It’s important to note that the Task History feature may be restricted based on your Asana plan. Make sure to check your plan’s limitations to ensure access to this valuable feature.
Now that you know how to use the Task History to undo actions in Asana, let’s explore another method: using Asana’s Undo button.
Method 4: Using Asana’s Undo Button
Asana provides a convenient and intuitive way to undo actions through its dedicated Undo button. This feature allows you to quickly revert the most recent action performed on a task or a project. Follow these steps to utilize the Undo button:
Step 1: Identify the action you want to undo. For example, if you accidentally changed the due date of a task, this will be the action you need to reverse.
Step 2: Look for the Undo button located at the top-right corner of the Asana interface. It resembles a curved arrow pointing to the left.
Step 3: Click on the Undo button to instantly reverse the most recent action. In our example, it will revert the due date of the task back to its previous state.
The Undo button provides a simple and straightforward way to undo actions without the need for complex steps or navigating through menus. It allows you to quickly rectify mistakes or accidental changes, keeping your project management process on track.
It’s important to note that the Undo button is only available for the most recent action performed. If you need to undo multiple actions in succession, you may need to utilize other methods, such as keyboard shortcuts or the Task History feature.
Now that you know how to use Asana’s Undo button to reverse actions, let’s move on to some tips and best practices to further enhance your experience with undoing actions in Asana.
Tips and Best Practices
When it comes to undoing actions in Asana, taking a proactive approach can save you time and prevent unnecessary mistakes. Here are some tips and best practices to keep in mind:
1. Act quickly: If you notice a mistake or unintended change, try to undo it as soon as possible. The longer you wait, the more challenging it may become to reverse the action effectively.
2. Familiarize yourself with shortcuts: Keyboard shortcuts are a valuable tool to streamline your workflow and undo actions efficiently. Take the time to learn and utilize the available shortcuts to save time and improve productivity.
3. Use the right method: Depending on the nature of the action you want to undo, choose the most appropriate method. Whether it’s using shortcuts, accessing the Edit menu, reviewing Task History, or clicking the Undo button, select the method that suits your needs best.
4. Double-check before making changes: Before modifying a task or making any updates, it’s essential to review the information and ensure its accuracy. This can help minimize the need to undo actions in the first place.
5. Take advantage of Task History: Task History provides a comprehensive log of actions performed on tasks. Explore this feature to have a better understanding of the modifications made and easily undo specific changes.
6. Backup important tasks: If you’re working on critical projects, consider periodically exporting or creating backups of your tasks. This provides an extra layer of protection in case you need to recover previous versions or undo extensive changes.
7. Experiment in a test environment: If you’re unsure about the consequences of a specific action, consider conducting test scenarios in a separate Asana workspace or project. This allows you to familiarize yourself with the effects before making changes in your live projects.
By following these tips and best practices, you can effectively leverage Asana’s undo feature and maintain control over your tasks and projects.
Now that we’ve explored various methods to undo actions in Asana and discussed some helpful tips, it’s time to wrap up this guide. Remember to apply these techniques as you navigate Asana, ensuring a seamless project management experience.
Conclusion
Managing tasks and projects in Asana is made easier with the ability to undo actions. Whether you accidentally delete a task, make an incorrect edit, or change a due date erroneously, Asana provides several methods to revert these actions and restore your tasks to their previous state.
In this guide, we explored four different methods to undo actions in Asana. We learned about using keyboard shortcuts, accessing the Edit menu, utilizing the Task History feature, and clicking on Asana’s dedicated Undo button. Each method offers its own advantages and can be chosen based on your preference and the specific situation.
Additionally, we discussed some helpful tips and best practices to enhance your experience with undoing actions in Asana. These tips emphasized the importance of acting quickly, familiarizing yourself with shortcuts, choosing the right method for each situation, double-checking before making changes, and utilizing the Task History feature, among others.
By applying these methods and following the recommended practices, you can effectively undo actions in Asana, rectify mistakes, and maintain the integrity of your task management process.
Remember, mistakes happen to all of us, but with Asana’s undo feature at your disposal, you can easily and confidently navigate your projects without worrying about irreversible errors. So, go ahead and make the most of Asana’s undo capabilities while staying organized and in control.
Thank you for reading this guide, and we hope you found it valuable in your journey with Asana!