How to Turn WiFi on Dell Laptop
Having the ability to connect to WiFi is essential for most laptop users, as it provides convenient access to the internet and various online services. However, if you’re having trouble turning on the WiFi on your Dell laptop, don’t worry, as there are several solutions you can try.
1. Check the physical WiFi switch or function key: Many Dell laptops have a physical switch or function key combination to turn on or off the WiFi. Look for a switch on the side or front of your laptop, or check the function keys (F1-F12) for a WiFi icon. Press the corresponding key or toggle the switch to activate the WiFi.
2. Enable WiFi in Windows settings: If the physical switch or function key doesn’t work, you can enable the WiFi through the Windows settings. Go to the Start menu, open the Settings app, and click on “Network & Internet.” From there, select “WiFi” on the left-hand side and toggle the switch to turn it on.
3. Use the Dell QuickSet tool: Dell laptops often come with a pre-installed tool called QuickSet, which allows you to control various settings, including WiFi. Open the QuickSet application, locate the WiFi option, and make sure it is enabled.
4. Update WiFi drivers: Outdated or corrupt WiFi drivers can cause connectivity issues. Visit the Dell support website, enter your laptop’s model number, and download the latest WiFi drivers for your specific model. Install the drivers and restart your laptop to see if the WiFi functionality is restored.
5. Reset network stack: Sometimes, resetting the network stack can help resolve WiFi problems. Open the Command Prompt as an administrator and run the following commands one by one: “netsh winsock reset” and “netsh int ip reset.” After executing the commands, restart your laptop and check if the WiFi is working.
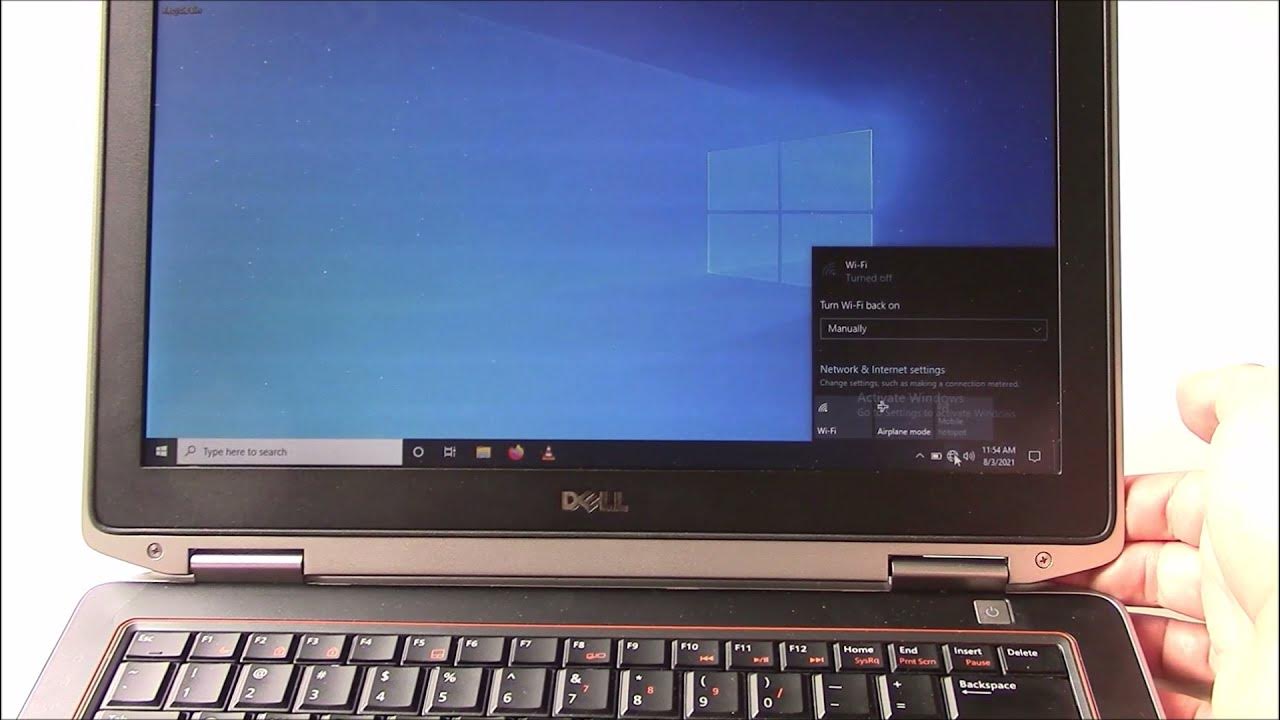
6. Disable Airplane mode: Airplane mode can disable all wireless connections, including WiFi. To ensure WiFi is turned on, open the Action Center by clicking on the notification icon in the system tray and make sure Airplane mode is disabled.
7. Reset Dell BIOS: Resetting the BIOS to default settings can help resolve hardware-related issues. Restart your Dell laptop and repeatedly press the F2 or Del key (depending on your model) to access the BIOS. Look for the option to reset the BIOS settings to default and save the changes before exiting.
If you’ve tried all these methods and are still unable to turn on the WiFi on your Dell laptop, it’s recommended to contact Dell support for further assistance. They will be able to provide specific troubleshooting steps based on your laptop’s model and configuration.
By following these steps, you should be able to successfully turn on the WiFi on your Dell laptop and enjoy seamless wireless connectivity. Stay connected and enjoy using your laptop to its fullest potential!
Troubleshooting WiFi Issues on Dell Laptops
Experiencing WiFi issues on your Dell laptop can be frustrating, but with some troubleshooting techniques, you can resolve the problem and restore your wireless connectivity. Here are some steps to help you troubleshoot WiFi issues on Dell laptops.
1. Restart your laptop: Sometimes, a simple restart can resolve minor software glitches. Restart your Dell laptop and check if the WiFi connection is restored.
2. Check WiFi signal strength: Poor WiFi signal strength can cause connection issues. Make sure you’re within range of the WiFi router and try moving closer to it. If possible, connect to a different WiFi network to check if the issue persists.
3. Verify WiFi network settings: Check if the WiFi network settings on your Dell laptop are correct. Go to the Network & Internet settings and confirm that the SSID (WiFi network name) and password are accurate. If necessary, re-enter the network credentials to ensure proper connection.
4. Update wireless drivers: Outdated or incompatible wireless drivers can lead to connectivity problems. Visit the Dell support website, enter your laptop’s model number, and download the latest wireless drivers. Install the drivers and restart your laptop to see if it resolves the WiFi issues.
5. Disable antivirus or firewall: Sometimes, antivirus or firewall software can interfere with WiFi connectivity. Temporarily disable any third-party security software and check if the WiFi connection improves. If it does, adjust the settings to allow WiFi access while maintaining security.
6. Reset network settings: Resetting the network settings can help resolve network-related issues. Open the Command Prompt as an administrator and run the command “ipconfig /flushdns” to clear the DNS cache. Additionally, restart your router and modem to ensure they are functioning properly.
7. Disable power-saving mode for WiFi adapter: Windows power-saving settings can sometimes disable the WiFi adapter to save power. Go to the Device Manager, expand the Network Adapters section, and right-click on your WiFi adapter. In the properties, navigate to the Power Management tab and uncheck the option to “Allow the computer to turn off this device to save power.”
8. Check for physical damage: Inspect the physical components of your Dell laptop, including the WiFi antenna and any visible damage. If you suspect a hardware issue, contact Dell support for further assistance.
9. Perform a system restore: If the WiFi issues started recently, you can try performing a system restore to a point when the WiFi was working correctly. This will revert your laptop’s settings to a previous state and may resolve any software conflicts causing the connectivity problem.
If these troubleshooting steps do not resolve the WiFi issues on your Dell laptop, it’s recommended to contact Dell support or consult a professional for further assistance. They can provide more specific troubleshooting steps and diagnose any underlying hardware or software problems.
By following these troubleshooting techniques, you can overcome WiFi issues and regain a stable and reliable internet connection on your Dell laptop. Stay connected and enjoy uninterrupted browsing and online activities!
Updating WiFi Drivers on Dell Laptop
Updating the WiFi drivers on your Dell laptop is an important step in resolving connectivity issues and ensuring a stable and optimal wireless connection. Here’s how you can update the WiFi drivers on your Dell laptop:
1. Identify the WiFi adapter model: Before updating the drivers, you need to identify the model of your WiFi adapter. Open the Device Manager by right-clicking on the Start menu and selecting “Device Manager.” Expand the Network Adapters section and find the WiFi adapter. Take note of the model name or number.
2. Visit the Dell Support website: Go to the official Dell Support website (www.dell.com/support) and navigate to the “Drivers and Downloads” section. Enter your laptop’s model number or use the auto-detect feature to find the correct drivers for your specific Dell laptop.
3. Locate the WiFi drivers: Once you’ve reached the drivers and downloads page, locate the WiFi drivers section. It may be listed as “Wireless LAN,” “WiFi,” or something similar. Click on the category to expand it.
4. Choose the latest driver: Look for the latest version of the WiFi driver available. This will usually be indicated by the highest number or the most recent release date. Click on the driver to view more details.
5. Download and install the drivers: Click on the “Download” button to download the WiFi driver to your computer. Once the download is complete, run the driver installer file and follow the on-screen instructions to install the drivers. Restart your Dell laptop after the installation is finished.
6. Verify the driver installation: After restarting your laptop, open the Device Manager again and navigate to the Network Adapters section. Find the WiFi adapter and make sure the driver version matches the one you downloaded and installed. This confirms that the driver update was successful.
7. Test the WiFi connection: Once the driver update is complete, test your WiFi connection to see if the connectivity issues have been resolved. Connect to your preferred WiFi network and check if the connection is stable and reliable.
8. Set up automatic driver updates: To ensure your WiFi drivers stay up to date in the future, you can set up automatic driver updates. Visit the Dell Support website and download the Dell Update application, which will automatically detect and install the latest drivers for your Dell laptop.
Updating the WiFi drivers on your Dell laptop can significantly improve the stability and performance of your wireless connection. By keeping your drivers up to date, you can enjoy seamless internet access and avoid common connectivity problems.
If you continue to experience WiFi issues after updating the drivers, it’s recommended to contact Dell support for further assistance. They can provide additional troubleshooting steps or diagnose any hardware-related problems that may be affecting your WiFi connection.
Enabling WiFi through Dell QuickSet Tool
Dell laptops often come equipped with the Dell QuickSet tool, which allows users to easily manage various settings, including WiFi, power options, and display settings. If you’re having trouble enabling WiFi on your Dell laptop, the Dell QuickSet tool can be a handy solution. Here’s how you can enable WiFi through the Dell QuickSet tool:
1. Locate the Dell QuickSet application: The Dell QuickSet tool should already be installed on your Dell laptop. You can find it by searching for “Dell QuickSet” in the Start menu or by checking the “Dell” folder in your list of installed programs.
2. Open the Dell QuickSet tool: Once you’ve located the Dell QuickSet tool, open it by double-clicking on the icon or selecting it from the Start menu or list of installed programs.
3. Navigate to the WiFi settings: In the Dell QuickSet tool, look for the WiFi section or icon. It is usually represented by a wireless signal or the word “WiFi.” Click on it to access the WiFi settings.
4. Enable WiFi: Within the WiFi settings of the Dell QuickSet tool, you should see an option to enable or disable the WiFi connection. Make sure the toggle switch or checkbox is set to “On” or “Enabled” to enable the WiFi functionality.
5. Apply the changes: After enabling the WiFi through the Dell QuickSet tool, click on the “Apply” or “OK” button to save the changes. The Dell QuickSet tool will apply the settings, and the WiFi should be enabled on your Dell laptop.
6. Verify the WiFi connection: Once you’ve enabled the WiFi through the Dell QuickSet tool, check if the WiFi connection is working properly. Connect to a WiFi network of your choice and ensure that the connection is stable and reliable.
7. Customization options: The Dell QuickSet tool may also provide additional customization options for WiFi settings. Explore the tool to see if you can adjust power-saving settings, signal strength, or other WiFi-related parameters according to your preferences.
If you cannot find or access the Dell QuickSet tool on your Dell laptop, it’s possible that it may not be installed or may have been removed. In such cases, you can try downloading the latest version of the Dell QuickSet utility from the official Dell Support website and install it on your laptop.
By utilizing the Dell QuickSet tool to enable WiFi on your Dell laptop, you can easily manage and optimize your wireless connection. Enjoy the convenience of seamless internet browsing and connectivity on your Dell laptop!
Checking WiFi Adapter Settings on Dell Laptop
When you’re experiencing WiFi issues on your Dell laptop, checking the WiFi adapter settings can help diagnose and resolve connectivity problems. Here’s how you can check the WiFi adapter settings on your Dell laptop:
1. Open the Control Panel: Go to the Start menu and search for “Control Panel.” Open the Control Panel application from the search results.
2. Navigate to Network and Internet settings: In the Control Panel, click on “Network and Internet” to access the network-related settings.
3. Select Network and Sharing Center: Within the Network and Internet settings, locate and click on “Network and Sharing Center.” This will open a window with various network-related options.
4. View adapter settings: In the Network and Sharing Center, look for the “Change adapter settings” option on the left-hand side. Click on it to view the available network adapters on your Dell laptop.
5. Identify the WiFi adapter: In the “Change adapter settings” window, locate the WiFi adapter. It is usually labeled as “Wireless Network Connection” or “WiFi.” Right-click on the WiFi adapter and select “Properties.”
6. Check the adapter settings: In the properties window of the WiFi adapter, you can view and modify various settings. Make sure that the checkbox for “Internet Protocol Version 4 (TCP/IPv4)” is checked. This ensures that the WiFi adapter is using the correct IP configuration for network communication.
7. Verify advanced settings: In the properties window, look for the “Configure” button or tab. This will open the advanced settings for the WiFi adapter. Check if the settings are configured appropriately, such as the Wireless Mode, Power Management, and Security settings. Ensure they are set according to your preferences and requirements.
8. Update driver and firmware: In the properties window of the WiFi adapter, you can also check if there are any available driver or firmware updates. Click on the “Driver” or “Driver Details” button to get information about the current driver version. If there is an update available, follow the prompts to download and install the latest driver or firmware for your WiFi adapter.
9. Restart the WiFi adapter: If you’re still experiencing WiFi issues, you can try restarting the WiFi adapter. Right-click on the WiFi adapter in the “Change adapter settings” window and select “Disable.” After a few seconds, right-click on it again and select “Enable.” This will reset the WiFi adapter and may help resolve connectivity problems.
By checking the WiFi adapter settings on your Dell laptop, you can ensure that the necessary configurations are in place for a stable and reliable WiFi connection. If you continue to experience WiFi issues after checking the settings, it’s recommended to contact Dell support for further assistance. They can provide specific troubleshooting steps and help resolve any hardware or driver-related problems.
Resetting Network Stack on Dell Laptop
If you’re experiencing persistent WiFi issues on your Dell laptop, resetting the network stack can help resolve connectivity problems caused by network configuration conflicts or corrupted settings. Here’s how you can reset the network stack on your Dell laptop:
1. Open the Command Prompt as an administrator: Go to the Start menu, type “Command Prompt” in the search bar, right-click on “Command Prompt,” and select “Run as administrator.” This will open the Command Prompt with administrative privileges.
2. Run the netsh winsock reset command: In the Command Prompt window, type the following command and press Enter: netsh winsock reset. The command will reset the Winsock Catalog to its default settings, which can help resolve network-related issues.
3. Run the netsh int ip reset command: After the previous command is executed, type the following command and press Enter: netsh int ip reset. This command will reset the TCP/IP stack to its default settings, which can fix network-related problems.
4. Restart your Dell laptop: After running both commands, restart your Dell laptop to apply the changes. This will refresh the network settings and start with a clean network configuration.
5. Test the WiFi connection: Once your Dell laptop restarts, try connecting to your WiFi network to check if the connectivity issues have been resolved. Verify that the WiFi connection is stable and reliable.
Note: Resetting the network stack will remove any custom network configurations or settings you have made, such as VPN settings or static IP addresses. Make sure to reconfigure any necessary network settings after performing the reset.
If resetting the network stack on your Dell laptop doesn’t fix the WiFi issues, consider updating the WiFi drivers, checking for hardware or software conflicts, or contacting Dell support for further assistance. They can provide additional troubleshooting steps specific to your Dell laptop model and help diagnose any underlying issues.
By resetting the network stack on your Dell laptop, you can eliminate network configuration conflicts and restore a stable WiFi connection. Enjoy uninterrupted internet access and seamless browsing on your Dell laptop!
Disabling Airplane Mode on Dell Laptop
Airplane mode is a useful feature on laptops that allows you to quickly disable all wireless connections, including WiFi, Bluetooth, and cellular data. However, if your Dell laptop is stuck in Airplane mode and you’re unable to connect to WiFi, disabling Airplane mode can resolve the issue. Here’s how you can disable Airplane mode on your Dell laptop:
1. Open the Action Center: To access the Airplane mode settings, click on the notification icon located in the system tray at the bottom-right corner of your screen. The Action Center will open, displaying various system settings.
2. Check Airplane mode status: In the Action Center, look for the Airplane mode icon. It typically looks like an airplane or a radio tower. If the icon appears in blue or highlighted, it means Airplane mode is enabled.
3. Disable Airplane mode: To disable Airplane mode, click on the Airplane mode icon in the Action Center. This will toggle Airplane mode off, and the icon should no longer be highlighted.
4. Verify WiFi connectivity: After disabling Airplane mode, check if the WiFi connectivity is restored. Connect to your preferred WiFi network and ensure that the connection is stable and reliable.
Alternate method: If the Airplane mode icon is not available in the Action Center, you can try disabling Airplane mode through the Windows Settings:
– Go to the Start menu and click on the Settings (gear) icon.
– In the Settings app, click on “Network & Internet”.
– On the left-hand side, select “Airplane mode”.
– Toggle the switch under “Airplane mode” to turn it off.
If you continue to experience WiFi issues or the Airplane mode re-enables itself automatically, consider updating the WiFi drivers, checking for hardware or software conflicts, or contacting Dell support for further assistance. They can provide additional troubleshooting steps specific to your Dell laptop model and help diagnose any underlying issues.
By disabling Airplane mode on your Dell laptop, you can regain WiFi connectivity and enjoy uninterrupted internet access. Stay connected and make the most of your Dell laptop’s wireless capabilities!
Resetting Dell BIOS to Default Settings
The Basic Input/Output System (BIOS) is essential for the proper functioning of your Dell laptop’s hardware and system configuration. If you’re experiencing persistent WiFi issues or other hardware-related problems, resetting the Dell BIOS to its default settings can help resolve the issue. Here’s how you can reset the Dell BIOS to default settings:
1. Restart your Dell laptop: Make sure your laptop is powered on and click on the Start menu. Select the “Restart” option to initiate a restart.
2. Access the BIOS setup: As your Dell laptop restarts, press the F2 or Del key repeatedly to access the BIOS setup. The exact key may vary depending on your Dell laptop model, so refer to your laptop’s documentation or look for the prompt on the screen during startup.
3. Navigate to the BIOS setup: Once inside the BIOS setup, you will see a list of options and settings. Use the arrow keys on your keyboard to navigate through the menu and select the “Reset to Default” or “Load Defaults” option. On some Dell laptops, you may find this option under the “Exit” or “Save & Exit” menu.
4. Confirm the reset: After selecting the “Reset to Default” or similar option, a prompt will appear asking for confirmation. Read the prompt carefully and press the appropriate key to confirm the reset, which is usually F9 or Enter. This will reset the BIOS settings to their default values.
5. Save and exit the BIOS setup: After confirming the reset, navigate to the “Save & Exit” or “Exit” menu within the BIOS setup. Select the option to save the changes and exit the BIOS setup. Your Dell laptop will then reboot.
6. Test the WiFi connection: Once your Dell laptop restarts, check if the WiFi issues have been resolved. Connect to your preferred WiFi network and ensure that the connection is stable and reliable.
Note: Resetting the Dell BIOS to default settings will erase any custom configurations you have made, such as boot order preferences or overclocking settings. Make sure to reconfigure any necessary settings after performing the reset.
If resetting the Dell BIOS to default settings doesn’t resolve the WiFi or hardware issues, consider updating the BIOS firmware or contacting Dell support for further assistance. They can provide specific troubleshooting steps and help diagnose any underlying issues.
By resetting the Dell BIOS to default settings, you can eliminate potential hardware conflicts and restore your Dell laptop to a stable state. Enjoy smooth WiFi connectivity and optimal performance on your Dell laptop!
Contacting Dell Support for Further Assistance
If you’ve tried the troubleshooting steps mentioned earlier and are still experiencing WiFi issues on your Dell laptop, it may be necessary to seek further assistance from Dell support. Dell’s knowledgeable support team can provide specialized guidance and solutions tailored to your specific laptop model and configuration. Here’s how you can contact Dell support for further assistance:
1. Visit the Dell Support website: Go to the Dell Support website at www.dell.com/support. This is the official support portal where you can access resources, documentation, and contact options.
2. Enter your laptop’s information: On the Dell Support website, you will need to enter your laptop’s model number or service tag. The model number is usually located on a label on the bottom of your Dell laptop. The service tag is a unique identifier that can also be found on the label or in the BIOS settings.
3. Explore self-help resources: The Dell Support website provides a wealth of self-help resources such as knowledge base articles, FAQs, tutorials, and troubleshooting guides. Browse through the relevant categories to find information that can help you resolve your WiFi issues.
4. Contact Dell support: If the self-help resources don’t resolve your issue, you can reach out to Dell support directly for personalized assistance. The Dell Support website offers various contact options, including phone support, email support, and live chat. Select the option that best suits your preference and availability.
5. Provide detailed information: When contacting Dell support, be prepared to provide detailed information about your WiFi issues. Describe the problem, any error messages you encounter, and the troubleshooting steps you have already tried. This will help the support team understand your situation and provide more accurate assistance.
6. Follow the guidance provided: Dell support will guide you through additional troubleshooting steps or provide instructions for further actions based on your specific issue. Follow their guidance carefully and provide any requested information or updates promptly.
7. Note your case reference: During your interaction with Dell support, make sure to note down the case reference or any other identification provided. This will help in tracking the progress of your support request and referencing it in future communications.
Dell support is dedicated to assisting customers with their technical issues and providing solutions tailored to Dell laptops. Their expertise can help diagnose and resolve complex WiFi problems and ensure your Dell laptop is running smoothly.
Reach out to Dell support for further assistance so you can get back to enjoying a seamless WiFi experience on your Dell laptop. Being proactive in seeking expert assistance will ultimately save you time and frustration in resolving any lingering WiFi issues.