Introduction
Grammarly is a widely popular tool used by many writers to enhance their writing by checking for grammar, spelling, punctuation, and style errors. While Grammarly can be a valuable tool, there may be times when you need to turn it off, especially when using Google Docs.
There are various reasons why you might want to disable Grammarly in Google Docs. Perhaps you prefer using the built-in spell checker or want to avoid any conflicts or interference between Grammarly and other extensions or add-ons you may be using. Whatever the reason, disabling Grammarly in Google Docs is a straightforward process that can be done in a few simple steps.
In this article, we will explore the different methods to turn off Grammarly in Google Docs and regain control over your writing experience. Whether you want to temporarily disable Grammarly or permanently remove it from your document, we have you covered with step-by-step instructions.
So, if you’re ready to take control of your writing and learn how to disable Grammarly in Google Docs, let’s dive into the various methods available to accomplish this.
Method 1: Disabling Grammarly through the Grammarly extension
The first method to turn off Grammarly in Google Docs is by using the Grammarly extension itself. Follow these steps:
- Open your Google Docs document.
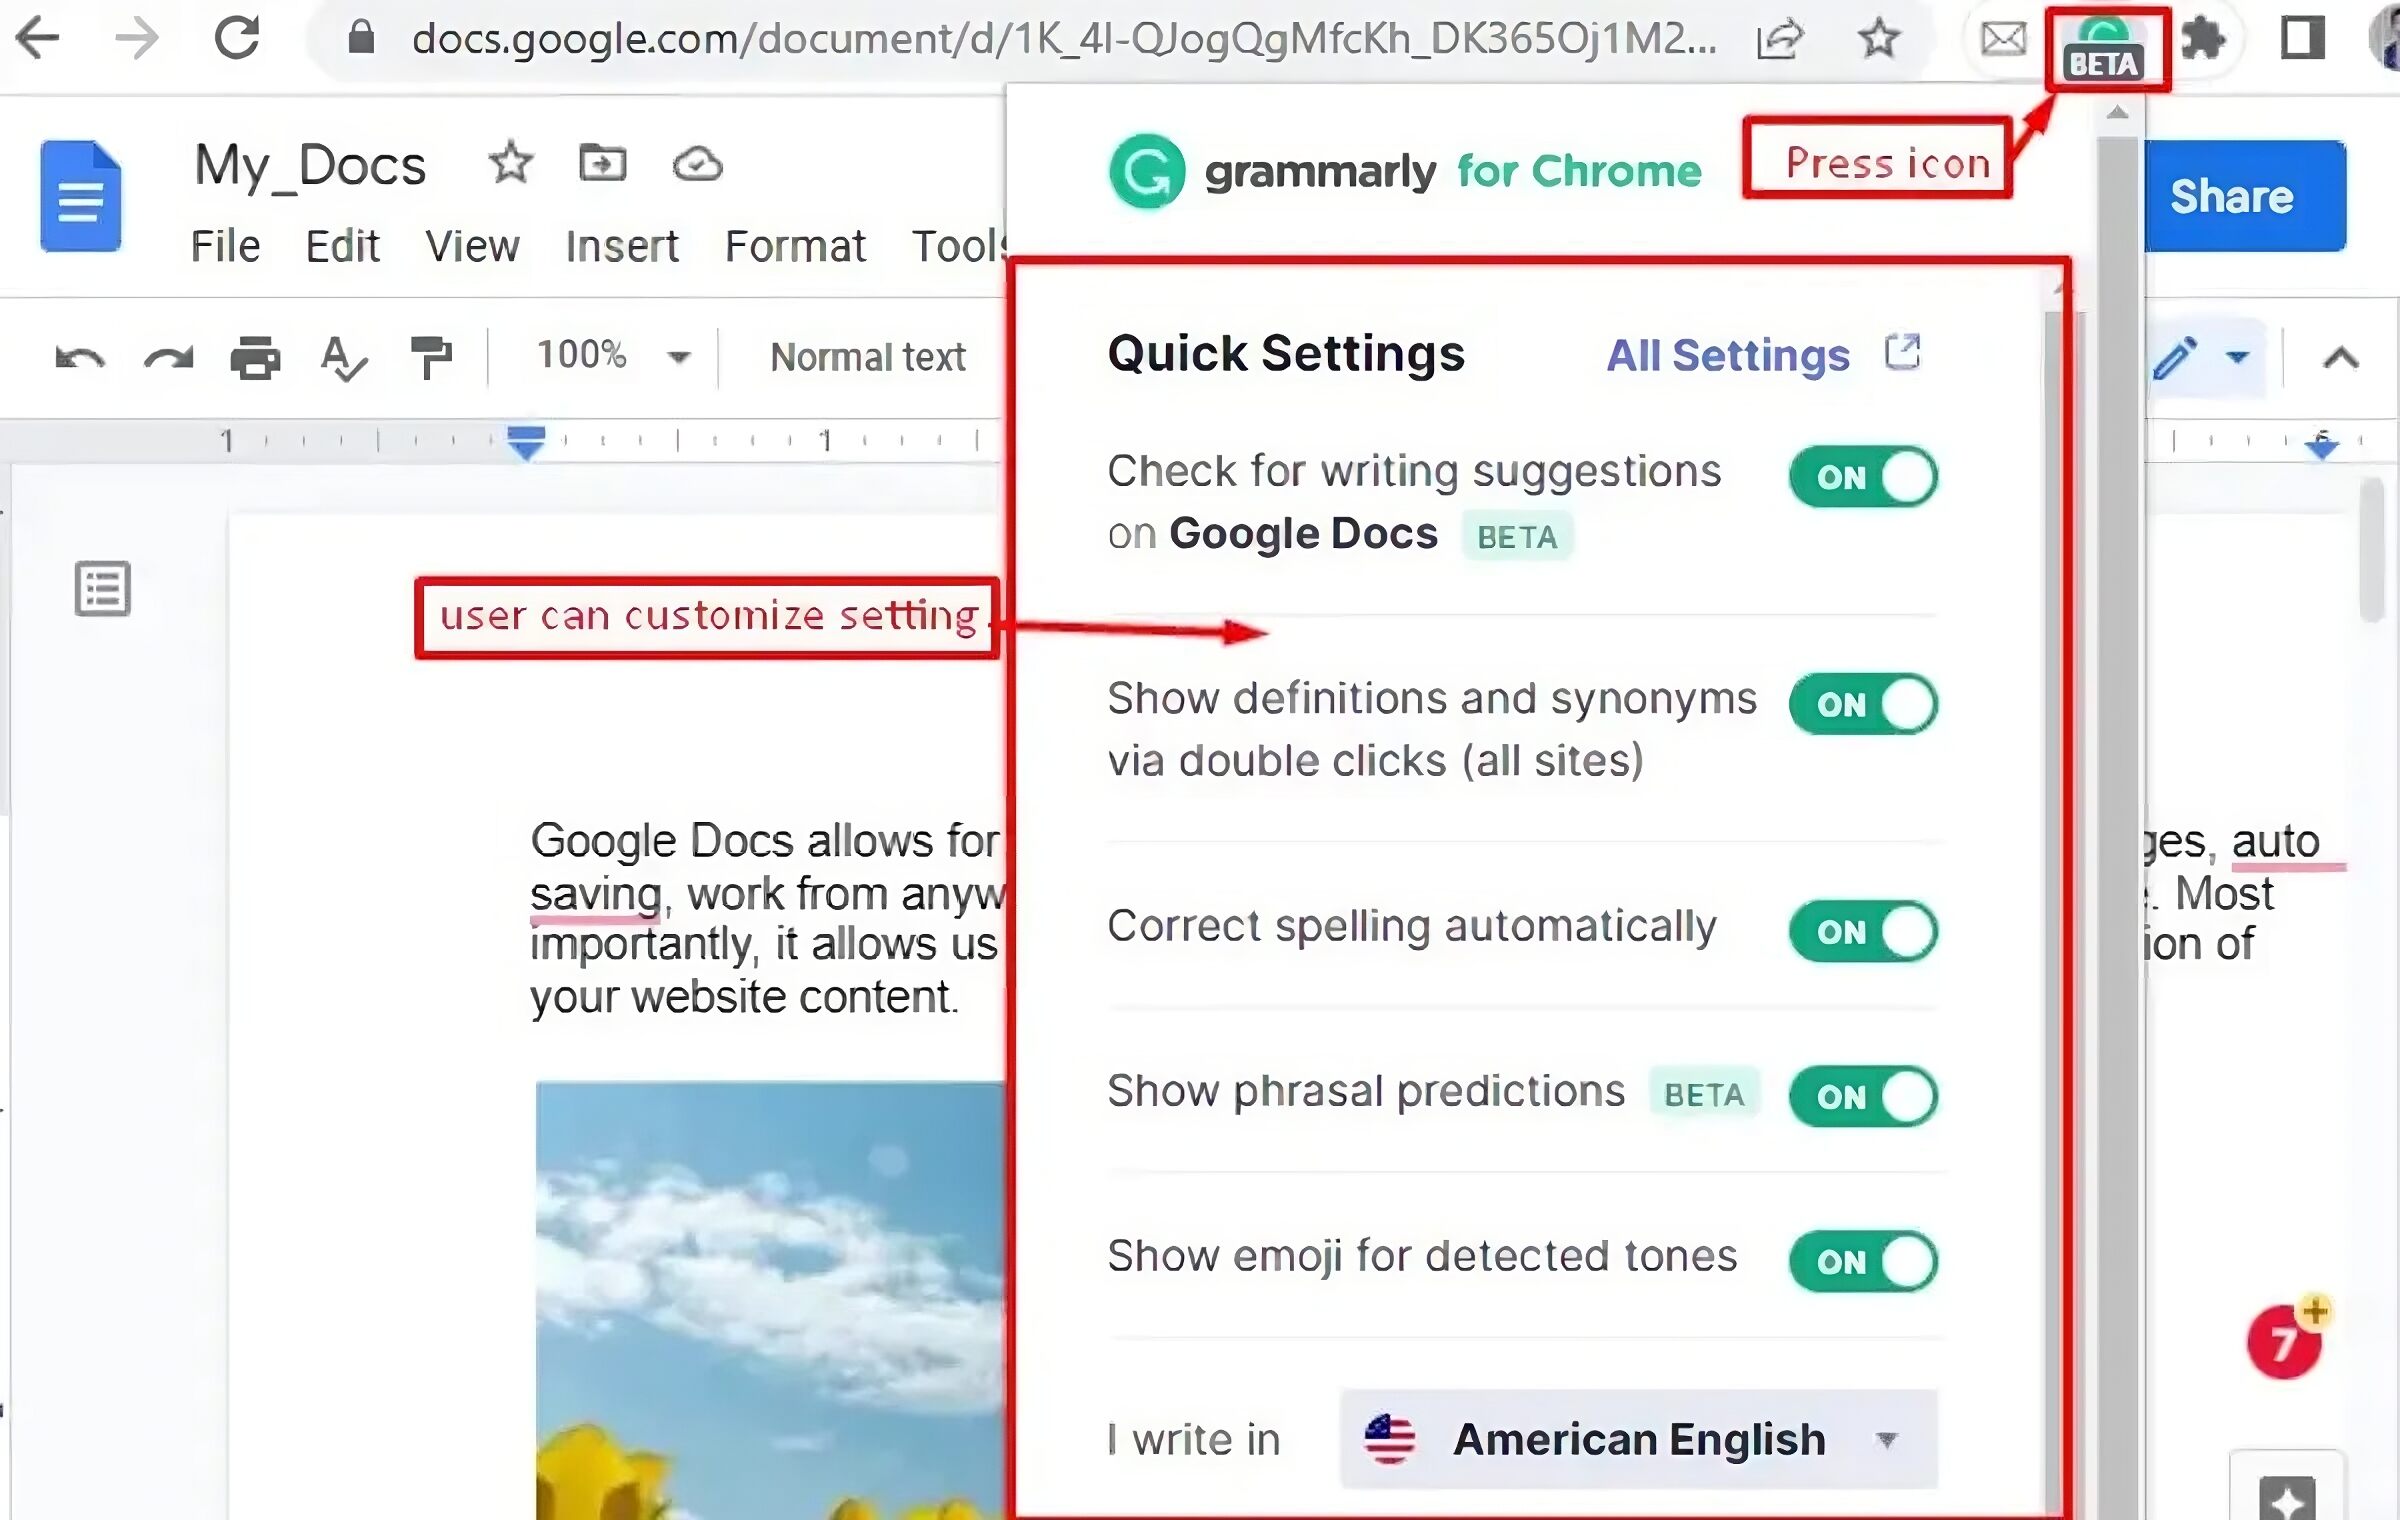
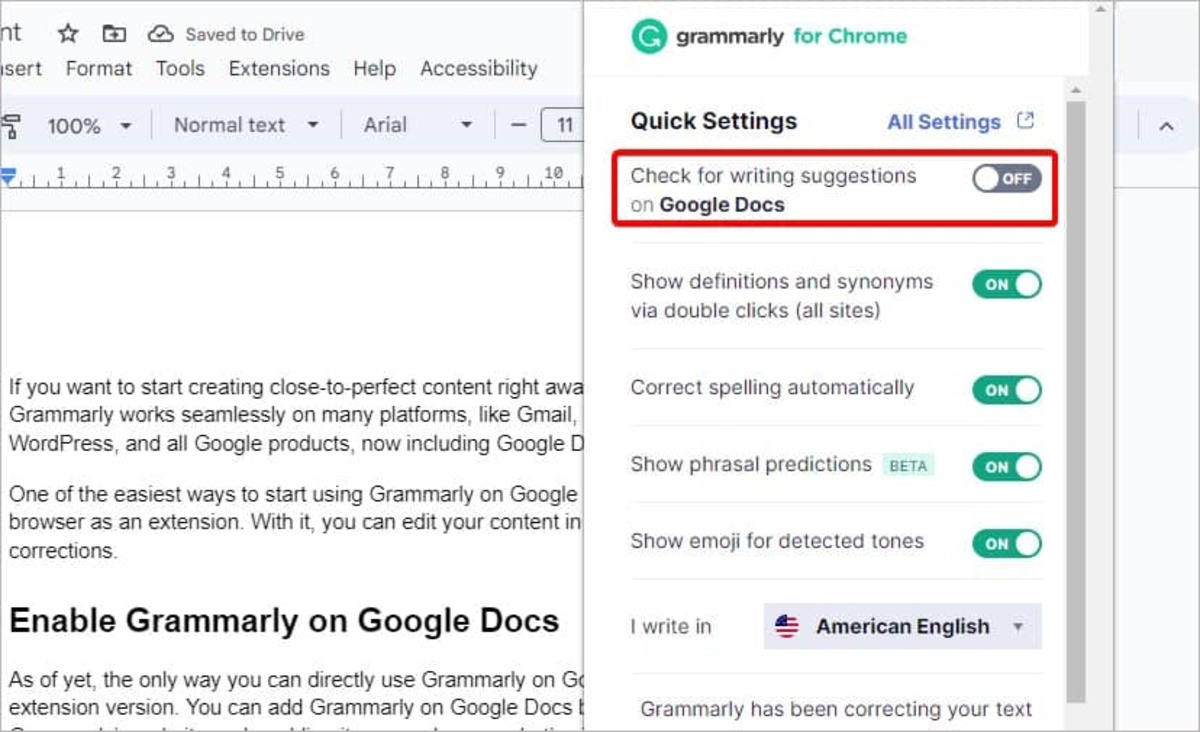
- Locate the Grammarly extension icon in the right corner of your browser toolbar. It appears as a green “G” logo.
- Click on the Grammarly icon and a pop-up menu will appear.
- In the menu, click on “Disable Grammarly for this site.” This action will temporarily disable Grammarly for the current Google Docs document.
- If you want to re-enable Grammarly, click on the Grammarly icon again and select “Enable Grammarly for this site.”
Disabling Grammarly through the Grammarly extension is a quick and straightforward method. However, if you want to completely remove Grammarly from Google Docs or disable it permanently, you can explore other methods discussed in this article.
Now that you know how to disable Grammarly through the Grammarly extension, let’s move on to the next method.
Method 2: Disabling Grammarly through the Add-ons menu in Google Docs
If you prefer a more integrated approach, you can disable Grammarly through the Add-ons menu in Google Docs. Here’s how:
- Open your Google Docs document.
- Navigate to the “Add-ons” tab in the menu bar.
- Click on “Grammarly” in the Add-ons menu.
- In the drop-down menu, select “Show Sidebar.”
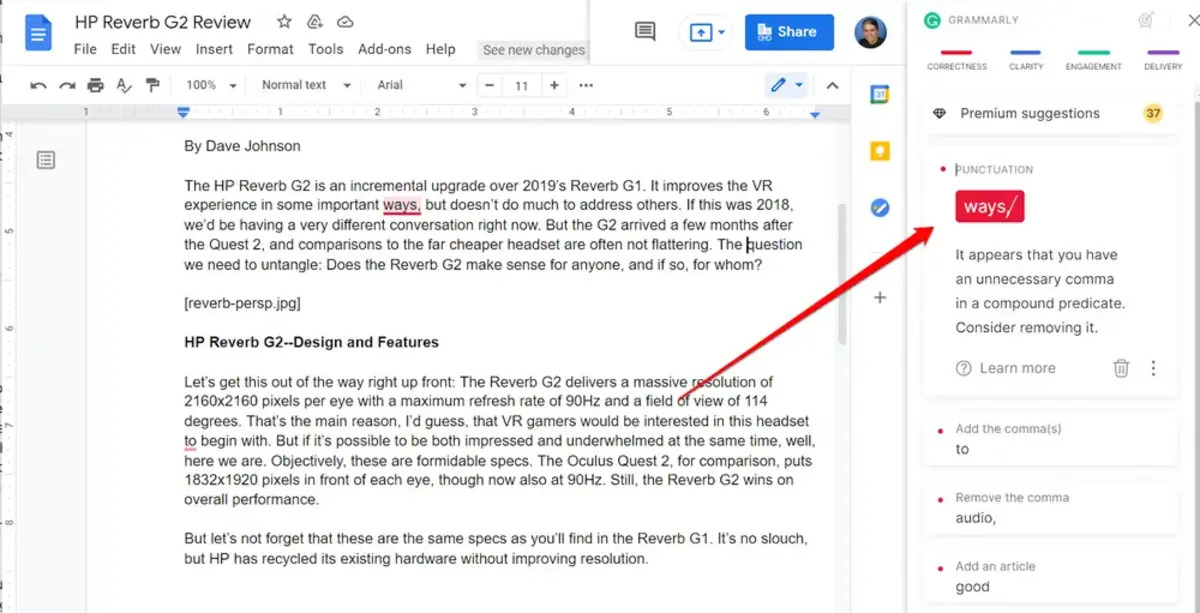
- The Grammarly sidebar will appear on the right-hand side of your document.
- In the Grammarly sidebar, click on the three dots (ellipsis) icon at the top.
- A pop-up menu will appear. Click on “Turn off Grammarly.”
By following these steps, you can disable Grammarly through the Add-ons menu in Google Docs. This method allows you to temporarily turn off the Grammarly functionality for the specific document you’re working on.
Remember that if you want to re-enable Grammarly, you can follow the same steps and click on “Turn on Grammarly” in the pop-up menu.
Now that you know how to disable Grammarly through the Add-ons menu, let’s move on to the next method.
Method 3: Temporarily disabling Grammarly through the Grammarly Editor
If you prefer to make use of the Grammarly Editor while writing your Google Docs document but want to temporarily disable Grammarly’s suggestions, you can do so through the Grammarly Editor itself. Follow these steps:
- Open your web browser and navigate to the Grammarly website.
- Log in to your Grammarly account.
- In the Grammarly Editor, click on the “Apps” option in the left-hand sidebar.
- Scroll down to find the “Other” section and click on “Google Docs.”
- A pop-up window will appear, prompting you to select the Google account you want to connect with Grammarly.
- After selecting your account, click on “Allow” to grant permission for Grammarly to access your Google Docs.
- Once connected, you can start using Grammarly within the Google Docs interface.
- If you want to temporarily disable Grammarly’s suggestions, you can click on the Grammarly icon in the bottom right corner of the Google Docs document.
- In the pop-up menu, toggle the switch next to “Checking” to turn off the suggestions temporarily.
- If you want to enable Grammarly again, simply toggle the switch back to the on position.
Using the Grammarly Editor to temporarily disable Grammarly’s suggestions gives you the flexibility to choose when you want to receive feedback on your writing. It allows you to have control over the editing process without permanently turning off Grammarly in Google Docs.
Now that you know how to temporarily disable Grammarly through the Grammarly Editor, let’s move on to the next method.
Method 4: Permanently disabling Grammarly through Grammarly settings
If you’ve decided that you no longer want to use Grammarly in Google Docs and want to permanently disable it, you can do so by adjusting your Grammarly settings. Here’s how:
- Open your web browser and go to the Grammarly website.
- Log in to your Grammarly account.
- In the Grammarly dashboard, click on the profile picture in the top right corner and select “My Grammarly” from the drop-down menu.
- In the left-hand sidebar, click on “Apps” to navigate to the Apps settings.
- Scroll down to find the “Other” section and locate “Google Docs” in the list of connected apps.
- Click on the three dots (ellipsis) icon next to Google Docs and select “Disconnect” from the options.
- A confirmation message will appear asking if you want to disconnect Grammarly from Google Docs. Click on “Disconnect” to proceed.
By following these steps, Grammarly will be permanently disabled in Google Docs, and the integration between the two will be removed.
It’s important to note that if you choose to permanently disable Grammarly, you won’t be able to use its features and suggestions in Google Docs anymore. However, you can still use Grammarly as a standalone tool by copying and pasting your text into the Grammarly Editor on the Grammarly website.
Now that you know how to permanently disable Grammarly through Grammarly settings, let’s wrap up the different methods we discussed.
Conclusion
Disabling Grammarly in Google Docs can provide you with more flexibility and control over your writing experience. Whether you want to temporarily turn off Grammarly or permanently remove it from your document, there are several methods available to achieve your desired outcome.
In this article, we explored four different methods for disabling Grammarly in Google Docs. You can disable Grammarly through the Grammarly extension, the Add-ons menu in Google Docs, the Grammarly Editor, or permanently through Grammarly settings.
By disabling the Grammarly extension or the Grammarly Add-on, you can temporarily turn off Grammarly’s suggestions for a specific document. This allows you to utilize other proofreading tools or work without any interference from Grammarly.
If you prefer to make use of the Grammarly Editor while writing in Google Docs but want to temporarily disable suggestions, you can do so within the Grammarly Editor itself. This gives you the flexibility to choose when you want to receive feedback on your writing.
On the other hand, if you have decided that you no longer want to use Grammarly in Google Docs, you can permanently disable it through Grammarly settings. This will disconnect Grammarly from Google Docs and remove its integration.
Remember, each method serves a different purpose, and you can choose the one that suits your needs the best. Whether you want to disable Grammarly temporarily or permanently, these methods provide you with the control you need over your writing process.
Now that you are familiar with these different methods, you can confidently turn off Grammarly in Google Docs whenever necessary, enabling you to customize your writing experience and use the tools that work best for you.